
:max_bytes(150000):strip_icc():format(webp)/Nightbooks-93aa15da6f37406fa34e8c155b1067b3.jpg)
"2024 Approved Inside TikTok's Dynamic World (Filters & Animation)"
Inside TikTok’s Dynamic World (Filters & Animation)
Since its augmentation in 2016, TikTok has become an unstoppable form of entertainment. Memes and videos are tempting to watch, yet better ones are uploaded almost daily for inspiration.
In 2020, many artists featured as they gain popularity. Their songs and hits entertained viewers, and songs like “WAP” by Cardi B gained recognition. Most people got followers through trending videos that frequently appeared on the subscribers’ lists.
So, let’s look at the most trending TikTok anime dances, TikTok anime memes, TikTok anime wallpapers, and TikTok anime filters list below without any further ado!
In this article
01 Top Anime Dances and Songs on TikTokof 2021
02 Funny TikTokAnime Memes and Wallpapers in 2022
03 How to Apply TikTok Anime Filters
04 How to Edit TikTok Anime Dance Videos?
Part 1: Top Anime Dances and Songs on TikTok of 2021
In the past, radios and television stations had the power to decide the content released to the public. However, everything has changed with the evolution of social media platforms like TikTok**. TikTok anime songs** seem to have dominated the entertainment sector due to the freedom of posting dynamic content.
5 Popular Anime dances on TikTok
1. Attack on Character
As the name suggests, this dance involves some “fight movements” of the famous Chinese movies. Dancing that consists of moving hands upwards make it more exciting.
2. Tokyo Ghoul
An excellent dancing style highly emulated is Tokyo Ghoul. Involving a few gymnastics, you can include some moves in your dance videos. Your waist gets swayed towards the right and left, hence making it fantastic.
3. Naruto Shippuden
Sliding on your feet while skipping is the way to go. Jumping a bit while moving hands around is what Naruto Shippuden is all about. It is a famous dance that is easy but mainly used by hip-hop artists.
4. Haikyuu
Haikyuu is a dance that lets you boast your modeled body parts by shaking your hands, head and swinging your legs around. It is simple yet exciting for dance groups. The best part of it is maintaining balance on your feet while moving.
5. Banana fish
Imitating a banana’s shape and the motion of fish, you move your hands forward with hands folded downwards. It is a good dance based on natural themes. Therefore, it is all enjoyable and fascinating when practiced for fun.
5 Popular TikTok dances that You Can Emulate
1.Buss it- Erica Banks.
This TikTok anime dance has views of over 6 million times. You can emulate the dance style here, especially when you feel like showing off. The only difference with other dancing styles is that you will have to squat.
2.Drivers license- Olivia Rodrigo
With almost 2 million videos of the song going viral on the internet, it is worth trying. To make it better, you can have it included in your “For You” page by listening to it frequently. Using it in lyrics as a severe form gives your performance a unique look.
3.Sugar crash! –Ely Otto
You might require some excellent skills to know the beats of this song. However, it is not difficult to master because many have done it. It will give you some ideas on what to present, mainly a comedian.
4.Oh No – Kreepa
So many TikTokers have used the song to promote their videos, and so should you. With more than 13.1 million videos produced to imitate the actions and words of this song, it is fantastic. It also becomes better when you produce a video on a theme that involves dealing with a difficult situation in life.
5.Aesthetic – Xilo
Do you feel like you want to demonstrate something? Aesthetic is another song with more than 12.1 trending videos on TikTok. It will be a perfect match for you to include it in a video about life in general. It will also come in handy for a how-to situation.
Part 2: Funny TikTokAnime Memes and Wallpapers in 2022
Memes are the most prevalent on most social media platforms, and TikTok is not an exception. There are many memes, and they keep increasing without showing declining signs. Every good content liked, and viral will always have TikTok anime memes.
During the COVID-19 pandemic, we stayed indoors for almost a year. That has given people a chance to utilize social media differently, with memes being the most common. So far, we cannot manage to control what people will write about in their memes. Therefore, we have to dance according to the moves as well.
Here’s a list of the craziest and funniest memes trending on TikTok in 2021. Check them out:
1. Da Vicky
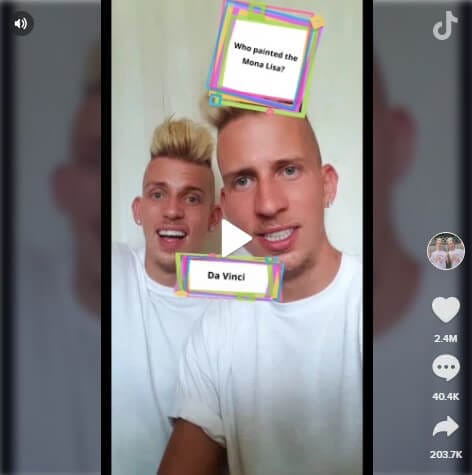
In September, a set of Hungarian-Canadian twins were busy watching a movie. As expected, they responded in unison to a proverb about the one who painted the Mona Lisa that popped up on the screen. Instead of saying Da Vinci, the guys yelled loudly, “Da Vicky?” The video went viral, with the views skyrocketing to 2.4 million on TikTok alone.
2. It’s corona time

The pandemic was transformed into a meme by featuring someone in 1985. The guy goes on to inform people that it is time for the pandemic. He keeps repeating the words as if others are not aware of the situation around him. The video was so funny and liked by many people.
3. But I’m shy

You can’t stop laughing when you come across this video of an overwhelmed character with timidity. The actor keeps turning the index fingers and brushes cosplayers. And, you might consider using this TikTok anime meme in your captions.
4. Hand gesturing TikTok meme
The video has been viewed for a long time but became more prevalent towards the end of 2019 and 2021. The beginning of the video seems boring but has a captivating ending. A character is punching himself, which adds humor to the video. Three-hand signals are used as timers, making it more interesting because it is impossible to have three hands.
5. Point–of–views
These are videos that target the audience to be the main character. The producers of the video give their opinions from a personal perspective. They mainly encourage, earn and teach new behavior in people. That allows TikTok to grow as the characters in the videos also rise to prominence. Usually, they stress various issues in life like relationships, education, marriage, entertainment, and any other niche that requires people’s opinions.
Top Wallpapers on TikTok 2021
1. TikTok cartoon wallpaper

This wallpaper with different colors and a toy at the center of the frames makes it appealing to the eye. A mixture of red, white, and light blue with a dark background makes this wallpaper irresistible!
2. TikTok anime wallpaper

An avatar sort of wallpaper with a young, energetic man’s centered image will motivate you. Besides their beautiful appearance, these TikTok anime wallpapers have an inspiring background.
3. TikTok girl wallpaper
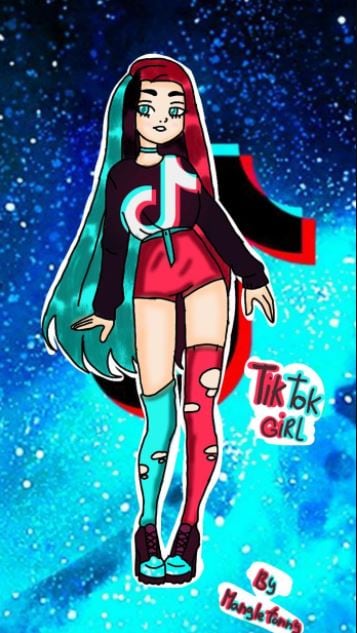
This amazing wallpaper utilizes an atmospheric theme featuring a girl in space. The bright and shining stars also give an impression of beauty, captivating.
4. TikTok boy wallpaper

The feeling of relaxation and satisfaction from the image is impressive. The bending boy in the image also embraces the male gender, making it better for you, especially if you are a young man.
5. Aesthetic TikTok Wallpaper

What an awesome wallpaper that stresses leadership. You cannot restrain yourself from staring at the young man positioned in front of others with a necktie. Moreover, it comes with some written memes that you can spend time reading in a relaxed mood.
Part 3: How to Apply TikTok Anime Filters
The anime filter is a Snapchat filter that went viral when people began uploading their Snapchat videos on TikTok. This filter transforms you into an anime character. However, you are first required to download the Snapchat to access the filter if you haven’t done it yet.
This filter, named Anime Style, has gone viral on Snapchat, Instagram, and TikTok, right after its introduction on Snapchat. This filter cleverly uses your skin tone, hair color, and unique features and turns you into an uncanny anime personality.

How to apply the anime filter in TikTok
Step 1: Firstly, download TikTok. Then, look for “Anime Style“ in the search bar and choose it.
Step 2: It will promptly open your camera. Next, you’re required to save the filter to your Snapchat filter collection by tapping “Unlock for 48 hours“.
Step 3: Take your video or photo using this Snapchat filter, or select a photo from your camera roll. Please save it to your camera roll when you finish editing.
Step 4: Upload this content to TikTok. This will also work on Instagram, Snapchat, or any other platform you would like to share the video.
Part 4: How to Edit TikTok Anime Dance Videos?
Wondershare Filmora has been one of the best video editors used by all video editing enthusiasts around the globe. It has many features that help you create a video and stand better among the competitors. In addition, it supports the editing of all videos regardless of the digital device used in recording them. The tool is quick to use and does not require any special skills. Even a novice can do it. Therefore, let’s look at some of its features:
Wondershare Filmora
Get started easily with Filmora’s powerful performance, intuitive interface, and countless effects!
Try It Free Try It Free Try It Free Learn More >

Key Features
• Edits up to 4,000 videos
• Supports the use of audio, visual effects, and transitions
• Edits both videos and audio
• Supports noise reduction, text editing, and color tuning
• Video features - Slow-motion backward motions
How to increase creativity in TikTok videos with Filmora’s overlays and filters
You can make numerous adjustments to your TikTok videos using Wondershare Filmora’s editing features. You can have your video presented smartly within a few minutes with the following editing features:
- Addition of filters
- Removal of filters/overlays
- Locating filters/overlays
- Customizing filters, Including favorite filters
1. How to include filters/Overlays
Wondershare Filmora has three ways of including filters in your videos.
Open Wondershare Filmora and go to the Effects tab, where you will choose your desired filter and include it in your project.
The second way is by hovering your mouse over the filter you want. You will see a “+” sign and click on it as the filter becomes automatically applied.
The third way seems to be the easiest. You have to drag the filter and drop it in the timeline. The filters will get applied to the entire video clip.
If you edit a portrait video in landscape orientation, you can include some background filters to substitute black bars.

2. How to remove filters
You can use one of these ways to remove filters.
Select the filter within the timeline section and press the delete key on your keyboard.
Alternatively, you can right-click on the desired filter and select “delete” from the menu that appears.
3. How to locate filters/overlays
Filters sorted into different categories like Bokeh, Faux Film, etc., makes it easy to locate them based on the category you want. Head to the effects menu, where you will find types to select.
4. How to Customize Filters/Overlays
With Wondershare Filmora, you are at liberty to change the time taken for each effect applied to the filter.
By default, the length of each filter applied is 5 seconds. However, you can drag the applied effect in the timeline section to increase or reduce the duration.
Changing the alpha opacity of the TikTok anime filter
Alpha opacity determines the transparency of the video, and it has a range of 0 to 100. Usually, a lower value means that your video is too transparent. Double click on the filter to alter its transparency, then confirm from the preview window. Chang it until you find a better video opacity.
5. How to use your favorite filters?
In the effects menu, right-click on the filter effect and select “Add to Favorite“ from the menu that appears. Once you finish, go to your favorite section, where you will quickly locate it.

Conclusion
So, here we come to the end of the list of TikTok anime dance, TikTok anime memes, TikTok anime wallpapers, and TikTok anime filters.
Although various social media platforms exist, TikTok is among the best. Thus, if you aspire to become an influencer by watching your videos, gaining more subscribers and likes, then use pro editing tools like WondershareFilmora. Besides some unique features, Filmora is easy to use and guarantees success much more than other apps available in the market.
02 Funny TikTokAnime Memes and Wallpapers in 2022
03 How to Apply TikTok Anime Filters
04 How to Edit TikTok Anime Dance Videos?
Part 1: Top Anime Dances and Songs on TikTok of 2021
In the past, radios and television stations had the power to decide the content released to the public. However, everything has changed with the evolution of social media platforms like TikTok**. TikTok anime songs** seem to have dominated the entertainment sector due to the freedom of posting dynamic content.
5 Popular Anime dances on TikTok
1. Attack on Character
As the name suggests, this dance involves some “fight movements” of the famous Chinese movies. Dancing that consists of moving hands upwards make it more exciting.
2. Tokyo Ghoul
An excellent dancing style highly emulated is Tokyo Ghoul. Involving a few gymnastics, you can include some moves in your dance videos. Your waist gets swayed towards the right and left, hence making it fantastic.
3. Naruto Shippuden
Sliding on your feet while skipping is the way to go. Jumping a bit while moving hands around is what Naruto Shippuden is all about. It is a famous dance that is easy but mainly used by hip-hop artists.
4. Haikyuu
Haikyuu is a dance that lets you boast your modeled body parts by shaking your hands, head and swinging your legs around. It is simple yet exciting for dance groups. The best part of it is maintaining balance on your feet while moving.
5. Banana fish
Imitating a banana’s shape and the motion of fish, you move your hands forward with hands folded downwards. It is a good dance based on natural themes. Therefore, it is all enjoyable and fascinating when practiced for fun.
5 Popular TikTok dances that You Can Emulate
1.Buss it- Erica Banks.
This TikTok anime dance has views of over 6 million times. You can emulate the dance style here, especially when you feel like showing off. The only difference with other dancing styles is that you will have to squat.
2.Drivers license- Olivia Rodrigo
With almost 2 million videos of the song going viral on the internet, it is worth trying. To make it better, you can have it included in your “For You” page by listening to it frequently. Using it in lyrics as a severe form gives your performance a unique look.
3.Sugar crash! –Ely Otto
You might require some excellent skills to know the beats of this song. However, it is not difficult to master because many have done it. It will give you some ideas on what to present, mainly a comedian.
4.Oh No – Kreepa
So many TikTokers have used the song to promote their videos, and so should you. With more than 13.1 million videos produced to imitate the actions and words of this song, it is fantastic. It also becomes better when you produce a video on a theme that involves dealing with a difficult situation in life.
5.Aesthetic – Xilo
Do you feel like you want to demonstrate something? Aesthetic is another song with more than 12.1 trending videos on TikTok. It will be a perfect match for you to include it in a video about life in general. It will also come in handy for a how-to situation.
Part 2: Funny TikTokAnime Memes and Wallpapers in 2022
Memes are the most prevalent on most social media platforms, and TikTok is not an exception. There are many memes, and they keep increasing without showing declining signs. Every good content liked, and viral will always have TikTok anime memes.
During the COVID-19 pandemic, we stayed indoors for almost a year. That has given people a chance to utilize social media differently, with memes being the most common. So far, we cannot manage to control what people will write about in their memes. Therefore, we have to dance according to the moves as well.
Here’s a list of the craziest and funniest memes trending on TikTok in 2021. Check them out:
1. Da Vicky
In September, a set of Hungarian-Canadian twins were busy watching a movie. As expected, they responded in unison to a proverb about the one who painted the Mona Lisa that popped up on the screen. Instead of saying Da Vinci, the guys yelled loudly, “Da Vicky?” The video went viral, with the views skyrocketing to 2.4 million on TikTok alone.
2. It’s corona time
The pandemic was transformed into a meme by featuring someone in 1985. The guy goes on to inform people that it is time for the pandemic. He keeps repeating the words as if others are not aware of the situation around him. The video was so funny and liked by many people.
3. But I’m shy
You can’t stop laughing when you come across this video of an overwhelmed character with timidity. The actor keeps turning the index fingers and brushes cosplayers. And, you might consider using this TikTok anime meme in your captions.
4. Hand gesturing TikTok meme
The video has been viewed for a long time but became more prevalent towards the end of 2019 and 2021. The beginning of the video seems boring but has a captivating ending. A character is punching himself, which adds humor to the video. Three-hand signals are used as timers, making it more interesting because it is impossible to have three hands.
5. Point–of–views
These are videos that target the audience to be the main character. The producers of the video give their opinions from a personal perspective. They mainly encourage, earn and teach new behavior in people. That allows TikTok to grow as the characters in the videos also rise to prominence. Usually, they stress various issues in life like relationships, education, marriage, entertainment, and any other niche that requires people’s opinions.
Top Wallpapers on TikTok 2021
1. TikTok cartoon wallpaper
This wallpaper with different colors and a toy at the center of the frames makes it appealing to the eye. A mixture of red, white, and light blue with a dark background makes this wallpaper irresistible!
2. TikTok anime wallpaper
An avatar sort of wallpaper with a young, energetic man’s centered image will motivate you. Besides their beautiful appearance, these TikTok anime wallpapers have an inspiring background.
3. TikTok girl wallpaper
This amazing wallpaper utilizes an atmospheric theme featuring a girl in space. The bright and shining stars also give an impression of beauty, captivating.
4. TikTok boy wallpaper
The feeling of relaxation and satisfaction from the image is impressive. The bending boy in the image also embraces the male gender, making it better for you, especially if you are a young man.
5. Aesthetic TikTok Wallpaper
What an awesome wallpaper that stresses leadership. You cannot restrain yourself from staring at the young man positioned in front of others with a necktie. Moreover, it comes with some written memes that you can spend time reading in a relaxed mood.
Part 3: How to Apply TikTok Anime Filters
The anime filter is a Snapchat filter that went viral when people began uploading their Snapchat videos on TikTok. This filter transforms you into an anime character. However, you are first required to download the Snapchat to access the filter if you haven’t done it yet.
This filter, named Anime Style, has gone viral on Snapchat, Instagram, and TikTok, right after its introduction on Snapchat. This filter cleverly uses your skin tone, hair color, and unique features and turns you into an uncanny anime personality.
How to apply the anime filter in TikTok
Step 1: Firstly, download TikTok. Then, look for “Anime Style“ in the search bar and choose it.
Step 2: It will promptly open your camera. Next, you’re required to save the filter to your Snapchat filter collection by tapping “Unlock for 48 hours“.
Step 3: Take your video or photo using this Snapchat filter, or select a photo from your camera roll. Please save it to your camera roll when you finish editing.
Step 4: Upload this content to TikTok. This will also work on Instagram, Snapchat, or any other platform you would like to share the video.
Part 4: How to Edit TikTok Anime Dance Videos?
Wondershare Filmora has been one of the best video editors used by all video editing enthusiasts around the globe. It has many features that help you create a video and stand better among the competitors. In addition, it supports the editing of all videos regardless of the digital device used in recording them. The tool is quick to use and does not require any special skills. Even a novice can do it. Therefore, let’s look at some of its features:
Wondershare Filmora
Get started easily with Filmora’s powerful performance, intuitive interface, and countless effects!
Try It Free Try It Free Try It Free Learn More >
Key Features
• Edits up to 4,000 videos
• Supports the use of audio, visual effects, and transitions
• Edits both videos and audio
• Supports noise reduction, text editing, and color tuning
• Video features - Slow-motion backward motions
How to increase creativity in TikTok videos with Filmora’s overlays and filters
You can make numerous adjustments to your TikTok videos using Wondershare Filmora’s editing features. You can have your video presented smartly within a few minutes with the following editing features:
- Addition of filters
- Removal of filters/overlays
- Locating filters/overlays
- Customizing filters, Including favorite filters
1. How to include filters/Overlays
Wondershare Filmora has three ways of including filters in your videos.
Open Wondershare Filmora and go to the Effects tab, where you will choose your desired filter and include it in your project.
The second way is by hovering your mouse over the filter you want. You will see a “+” sign and click on it as the filter becomes automatically applied.
The third way seems to be the easiest. You have to drag the filter and drop it in the timeline. The filters will get applied to the entire video clip.
If you edit a portrait video in landscape orientation, you can include some background filters to substitute black bars.
2. How to remove filters
You can use one of these ways to remove filters.
Select the filter within the timeline section and press the delete key on your keyboard.
Alternatively, you can right-click on the desired filter and select “delete” from the menu that appears.
3. How to locate filters/overlays
Filters sorted into different categories like Bokeh, Faux Film, etc., makes it easy to locate them based on the category you want. Head to the effects menu, where you will find types to select.
4. How to Customize Filters/Overlays
With Wondershare Filmora, you are at liberty to change the time taken for each effect applied to the filter.
By default, the length of each filter applied is 5 seconds. However, you can drag the applied effect in the timeline section to increase or reduce the duration.
Changing the alpha opacity of the TikTok anime filter
Alpha opacity determines the transparency of the video, and it has a range of 0 to 100. Usually, a lower value means that your video is too transparent. Double click on the filter to alter its transparency, then confirm from the preview window. Chang it until you find a better video opacity.
5. How to use your favorite filters?
In the effects menu, right-click on the filter effect and select “Add to Favorite“ from the menu that appears. Once you finish, go to your favorite section, where you will quickly locate it.
Conclusion
So, here we come to the end of the list of TikTok anime dance, TikTok anime memes, TikTok anime wallpapers, and TikTok anime filters.
Although various social media platforms exist, TikTok is among the best. Thus, if you aspire to become an influencer by watching your videos, gaining more subscribers and likes, then use pro editing tools like WondershareFilmora. Besides some unique features, Filmora is easy to use and guarantees success much more than other apps available in the market.
Sonic Sieve: Extracting Pure Audio in Audacity
The most frequent request you’ll get from video makers is to eliminate irritating noises like rumbling or humming from an original clip. Almost all of the time, capturing high-quality audio during filming is challenging since the conversation is often hard to hear or is made unclear due to surrounding noises, such as the dreadful air conditioners or fans.
To get rid of all these awful noises, this Audacity Noise Reduction feature will serve you a significant purpose in removing unwanted background noise for your future videos. Without further ado, let’s get started!
In this article
01 Things You Need to Prepare for Background Noise Reduction
02 How to Remove Background Noise in Audacity?
03 Why is Audacity Noise Reduction Not Working?
04 How to Prevent Background Noise in Audio Recording?
05 How to Remove Background Noise in Filmora?
Part 1: Things You Need to Prepare for Background Noise Reduction
Here are few things that you need to consider before you apply the noise reduction to your clips:
1. Noise Sample
A decent sample of the noise you wish to eliminate is perhaps the most crucial aspect of the Audacity remove noise procedure.
This will be used by Audacity to understand the noise and build a noise profile. The noise recording should last for a fair amount of time and be devoid of any other noises.
2. Avoid Copy Pasting Tiny Noise Section in Your Spoken Phrases
When you have a tiny part of noise between your stated words on your audio, please don’t copy/paste it to make a more significant piece of sound for Audacity to examine.
You would not be supplying Audacity with any more information that will help it generate a decent noise profile. The noise profile is what enables Audacity to tell the difference between speech and noise.
3. Minimum 2048 Data Samples Required
To build a noise profile, the Noise Reduction function requires a minimum of 2048 sample data. An audio file with a sampling frequency of 44.1kHz is roughly five hundredths of a second.
Note that this is the minor sound level that Audacity needs to generate a noise profile; however, should you supply a larger sample of the noise, Audacity can typically perform a great job of producing a suitable noise profile. As a result, attempt to capture a few seconds of background noises wherever possible.
4. Establish Recording Level and Record “Silence”
Setting your audio volume and capturing some “quiet” prior to speaking is the best way to achieve this. Instead, when you’ve finished talking, keep your camera/recorder going for a few moments.
Don’t move or create any sounds while capturing the background noises, and keep an ear open for any other noises. You only need to capture the ambient noise for a few moments; two to five seconds will suffice.
Part 2: How to Remove Background Noise in Audacity on Windows and Mac?
Whether you are using Windows or macOS, we will show you a step-by-step process to achieve your results using both software in this part of Audacity remove background music guide.
Remove background noise in Audacity on Windows
Step 1: On your recording, select a few moments of sound. Any segment of noise that incorporates other noises should be avoided.

Step 2: From the Effect menu, select Noise Reduction.

Step 3: Select the Get Noise Profile option whenever the Noise Reduction effect screen appears.

Note: Choose whether to implement the noise removal to the entire waveforms or only a portion of it.
Step 4: To access the Noise Reduction effects window, go to Effects > Noise Reduction. Raise the level of noise reduction progressively while previewing the result.

Step 5: Head over to the File section to Export and Save the result. Audacity does not save sound clips when you select Save Project; instead, you must choose Export. Select the file type you want to store and the place wherever you can save it. Select Save after giving the File Name.

Remove background noise in Audacity on Mac
Step 1: Create a room tone-containing audio file. When you don’t have a separate track for room tone, use a recording with a few moments of quiet in it. Click-and-drag to select a segment with a few minutes of silence using the Selection Tool.

Step 2: Select Noise Reduction from the Effects tab. Select the Get Noise Profile tab in the new tab under Step 1. The screen will shut, and Audacity will take noise profile samples of the indicated area.

Step 3: Click-and-drag to select the whole file, which requires noise reduction with the Selection Tool. To re-open the function, go to the Effect tab and pick Noise Reduction. Make modifications to the following parameters under Step 2:
- Reduce and Residue
- Frequency Smoothing (bands)
- Sensitivity
- Noise Reduction

Step 4: To listen to how the chosen file will look with the selected parameters, select Preview. Re-adjust until you have a sound noise reduction with no interference. When you’re finished, select Reduce and click OK.
Part 3: Why is Audacity Noise Reduction Not Working?
It’s possible that the Noise Reduction function isn’t letting you mop up your recording since your audio isn’t appropriate for it. The disturbance must be continuous, not random or fluctuating, to work for Audacity’s Noise Reduction function.
For example, the Noise Reduction function will not assist if your audio was made in a busy environment with unique noises such as background chatter, random traffic noises, or in an exhibition space or museum. The Noise Reduction feature in Audacity isn’t meant to cope with that kind of distortion. You’ll need to alter your recording approach if you’re capturing voice in either of those situations.
Under the following situations, the Audacity Noise Reduction function might underperform.
- Particular noise in the background, including traffic or people.
- When the harmonics of the sound and voice are comparable.
- There is sound variance where there is fluctuation in the noise.
- The volume of the voice is comparable to or lower than that of the background noise.
- When the noise is irregular or changeable rather than continuous.
- The loudness is deafening.
- The sound is a single click or pop.
Part 4: How to Prevent Background Noise in Audio Recording?
Although Audacity allows eliminating noise very simply, it is still an additional level that takes time to refine your podcast production. These pointers can help you avoid the necessity for noise reduction and cut down on the amount of time you spend processing.
1. Reduce the Computer Fan Noise
Whenever computers become too heated, they can produce a lot of noise. You may limit the amount of software that runs and position your mic away from the keyboard to help lessen this impact and avoid the fan from coming on.
However, even if you observe all of these guidelines, undesired recording sounds may still appear in your program. Fortunately, contemporary software makes this problem quite simple to resolve.
2. Reduce the Gain and Get Close to the Mic
Reduce the gain (sensitivity of the microphone) and go nearer to it. Talking straight into the microphone won’t distort your audio if you reduce the gain, and that would assist your microphone in concentrating on scooping up your voice’s tone.
Bonus Tip: Set your recorder’s (or DAW’s) sensitivity such that your speech peaks between -12 and -10db.
3. Utilize a Versatile Microphone
Condenser and dynamic microphones are the two most common types of podcast microphones. Condenser microphones are significantly more sensitive instruments meant to take up average atmospheric noise, whereas dynamic microphones have a narrower frequency range, picking up fewer ambient noises.
4. Optimize Your Recording Environment
The most significant and most crucial aspect of your podcasts’ sound quality is where you capture it. To optimize your personal podcasting space, we recommend choosing a peaceful, compact area away from HVAC systems, vehicles, external hard drives, background sound, motors, and other distractions. You may also increase the tone of your room by using natural sound absorbents such as curtains, rugs, carpets, and sofas.
Part 5: How to Remove Background Noise in Filmora?
Although there is a lot of software available to eliminate ambient noise, we highly suggest Wondershare Filmora Video Editor to edit audio and video in one place.
In addition to the standard audio editing capabilities, the recently redesigned Filmora currently includes enhanced waveforms, volume Keyframing , peak metering, and audio transitions, giving you a better audio editing interface.
For Win 7 or later (64-bit)
For macOS 10.12 or later
Filmora Video Editor will quickly remove ambient sound from both sound/video. You may also remove the sound from the video with this simple video editor, use the Audio Equalizer or Audio Mixer functions to modify the audio further, and then Export and save the audio in an Mp3 file. Here are the detailed steps:
Step 1: In the Wondershare Filmora Timeline menu, Import your footage. Trim the footage after previewing it and deleting the sections you don’t want to retain.

Step 2: To eliminate the ambient noise immediately, double-click on the video file, and go to the Audio panel to select the Remove Background Noise option. You will find that the background noise is removed automatically.

Step 3: After checking the results, select Export to download the noise-reduced clip to your desktop or upload it immediately to YouTube or Vimeo.

Conclusion
Well, there you have it. In this Audacity Remove Background Noise guide, we have reviewed every possible method you can adopt to get rid of the unnecessary background noise in the Audacity. And if the desired results are still not achieved, we highly recommend using the Wondershare Filmora editing software. Not only will it help you remove the unwanted ambient noise, but it will also allow you to customize your audio or video file further.
02 How to Remove Background Noise in Audacity?
03 Why is Audacity Noise Reduction Not Working?
04 How to Prevent Background Noise in Audio Recording?
05 How to Remove Background Noise in Filmora?
Part 1: Things You Need to Prepare for Background Noise Reduction
Here are few things that you need to consider before you apply the noise reduction to your clips:
1. Noise Sample
A decent sample of the noise you wish to eliminate is perhaps the most crucial aspect of the Audacity remove noise procedure.
This will be used by Audacity to understand the noise and build a noise profile. The noise recording should last for a fair amount of time and be devoid of any other noises.
2. Avoid Copy Pasting Tiny Noise Section in Your Spoken Phrases
When you have a tiny part of noise between your stated words on your audio, please don’t copy/paste it to make a more significant piece of sound for Audacity to examine.
You would not be supplying Audacity with any more information that will help it generate a decent noise profile. The noise profile is what enables Audacity to tell the difference between speech and noise.
3. Minimum 2048 Data Samples Required
To build a noise profile, the Noise Reduction function requires a minimum of 2048 sample data. An audio file with a sampling frequency of 44.1kHz is roughly five hundredths of a second.
Note that this is the minor sound level that Audacity needs to generate a noise profile; however, should you supply a larger sample of the noise, Audacity can typically perform a great job of producing a suitable noise profile. As a result, attempt to capture a few seconds of background noises wherever possible.
4. Establish Recording Level and Record “Silence”
Setting your audio volume and capturing some “quiet” prior to speaking is the best way to achieve this. Instead, when you’ve finished talking, keep your camera/recorder going for a few moments.
Don’t move or create any sounds while capturing the background noises, and keep an ear open for any other noises. You only need to capture the ambient noise for a few moments; two to five seconds will suffice.
Part 2: How to Remove Background Noise in Audacity on Windows and Mac?
Whether you are using Windows or macOS, we will show you a step-by-step process to achieve your results using both software in this part of Audacity remove background music guide.
Remove background noise in Audacity on Windows
Step 1: On your recording, select a few moments of sound. Any segment of noise that incorporates other noises should be avoided.
Step 2: From the Effect menu, select Noise Reduction.
Step 3: Select the Get Noise Profile option whenever the Noise Reduction effect screen appears.
Note: Choose whether to implement the noise removal to the entire waveforms or only a portion of it.
Step 4: To access the Noise Reduction effects window, go to Effects > Noise Reduction. Raise the level of noise reduction progressively while previewing the result.
Step 5: Head over to the File section to Export and Save the result. Audacity does not save sound clips when you select Save Project; instead, you must choose Export. Select the file type you want to store and the place wherever you can save it. Select Save after giving the File Name.
Remove background noise in Audacity on Mac
Step 1: Create a room tone-containing audio file. When you don’t have a separate track for room tone, use a recording with a few moments of quiet in it. Click-and-drag to select a segment with a few minutes of silence using the Selection Tool.
Step 2: Select Noise Reduction from the Effects tab. Select the Get Noise Profile tab in the new tab under Step 1. The screen will shut, and Audacity will take noise profile samples of the indicated area.
Step 3: Click-and-drag to select the whole file, which requires noise reduction with the Selection Tool. To re-open the function, go to the Effect tab and pick Noise Reduction. Make modifications to the following parameters under Step 2:
- Reduce and Residue
- Frequency Smoothing (bands)
- Sensitivity
- Noise Reduction
Step 4: To listen to how the chosen file will look with the selected parameters, select Preview. Re-adjust until you have a sound noise reduction with no interference. When you’re finished, select Reduce and click OK.
Part 3: Why is Audacity Noise Reduction Not Working?
It’s possible that the Noise Reduction function isn’t letting you mop up your recording since your audio isn’t appropriate for it. The disturbance must be continuous, not random or fluctuating, to work for Audacity’s Noise Reduction function.
For example, the Noise Reduction function will not assist if your audio was made in a busy environment with unique noises such as background chatter, random traffic noises, or in an exhibition space or museum. The Noise Reduction feature in Audacity isn’t meant to cope with that kind of distortion. You’ll need to alter your recording approach if you’re capturing voice in either of those situations.
Under the following situations, the Audacity Noise Reduction function might underperform.
- Particular noise in the background, including traffic or people.
- When the harmonics of the sound and voice are comparable.
- There is sound variance where there is fluctuation in the noise.
- The volume of the voice is comparable to or lower than that of the background noise.
- When the noise is irregular or changeable rather than continuous.
- The loudness is deafening.
- The sound is a single click or pop.
Part 4: How to Prevent Background Noise in Audio Recording?
Although Audacity allows eliminating noise very simply, it is still an additional level that takes time to refine your podcast production. These pointers can help you avoid the necessity for noise reduction and cut down on the amount of time you spend processing.
1. Reduce the Computer Fan Noise
Whenever computers become too heated, they can produce a lot of noise. You may limit the amount of software that runs and position your mic away from the keyboard to help lessen this impact and avoid the fan from coming on.
However, even if you observe all of these guidelines, undesired recording sounds may still appear in your program. Fortunately, contemporary software makes this problem quite simple to resolve.
2. Reduce the Gain and Get Close to the Mic
Reduce the gain (sensitivity of the microphone) and go nearer to it. Talking straight into the microphone won’t distort your audio if you reduce the gain, and that would assist your microphone in concentrating on scooping up your voice’s tone.
Bonus Tip: Set your recorder’s (or DAW’s) sensitivity such that your speech peaks between -12 and -10db.
3. Utilize a Versatile Microphone
Condenser and dynamic microphones are the two most common types of podcast microphones. Condenser microphones are significantly more sensitive instruments meant to take up average atmospheric noise, whereas dynamic microphones have a narrower frequency range, picking up fewer ambient noises.
4. Optimize Your Recording Environment
The most significant and most crucial aspect of your podcasts’ sound quality is where you capture it. To optimize your personal podcasting space, we recommend choosing a peaceful, compact area away from HVAC systems, vehicles, external hard drives, background sound, motors, and other distractions. You may also increase the tone of your room by using natural sound absorbents such as curtains, rugs, carpets, and sofas.
Part 5: How to Remove Background Noise in Filmora?
Although there is a lot of software available to eliminate ambient noise, we highly suggest Wondershare Filmora Video Editor to edit audio and video in one place.
In addition to the standard audio editing capabilities, the recently redesigned Filmora currently includes enhanced waveforms, volume Keyframing , peak metering, and audio transitions, giving you a better audio editing interface.
For Win 7 or later (64-bit)
For macOS 10.12 or later
Filmora Video Editor will quickly remove ambient sound from both sound/video. You may also remove the sound from the video with this simple video editor, use the Audio Equalizer or Audio Mixer functions to modify the audio further, and then Export and save the audio in an Mp3 file. Here are the detailed steps:
Step 1: In the Wondershare Filmora Timeline menu, Import your footage. Trim the footage after previewing it and deleting the sections you don’t want to retain.
Step 2: To eliminate the ambient noise immediately, double-click on the video file, and go to the Audio panel to select the Remove Background Noise option. You will find that the background noise is removed automatically.
Step 3: After checking the results, select Export to download the noise-reduced clip to your desktop or upload it immediately to YouTube or Vimeo.
Conclusion
Well, there you have it. In this Audacity Remove Background Noise guide, we have reviewed every possible method you can adopt to get rid of the unnecessary background noise in the Audacity. And if the desired results are still not achieved, we highly recommend using the Wondershare Filmora editing software. Not only will it help you remove the unwanted ambient noise, but it will also allow you to customize your audio or video file further.
Also read:
- [Updated] 2024 Approved Hottest 10 TikTok Filter Trends to Captivate Viewers
- [Updated] 2024 Approved How to Save TikTok Video in Gallery-3 Proven Ways [Android&iPhone]
- [Updated] Secure Your TikTok Memories Gallery Transfer for Phones for 2024
- Cutting Edge TikTok Content Mastering Video Edits on Mac for 2024
- Create Viral TikTok Content Step-by-Step Templates Guide for 2024
- [Updated] Regain Control How to Stop a Glitching TikTok App
- [Updated] Mastery of Content Validation Avoiding Copyright Issues on TikTok for 2024
- 2024 Approved Step Into 2023 A Comprehensive Guide to TikTok Elements
- Strategic Hashtag Usage for Enhanced Visibility on TikTok for 2024
- [New] In 2024, Tips to Inject Oversized Characters Into TikToks
- [New] Expert Downloader for TikTok Videos in Watermark-Free MP4
- Skyrocket Your Earnings on TikTok Discover the Top 8 Ways
- [New] Dinner Dramas The Most Entertaining Food Moments on TikTok
- [Updated] Eye-Catching TikTok Profiles with Innovative PFP Concepts
- [New] 2024 Approved Funniest TikTok Videos Latest Trends & Stars
- [Updated] In 2024, From Disparate Pieces to a Cohesive TikTok Story
- [Updated] In 2024, Navigating the New Age of Content Creation TikTok's Money Potential
- [Updated] In 2024, Chortling Chronicles New Comedy Sensations on TikTok
- [New] In 2024, Avoid Breaches The Pre-Upload Guide to Copyright on TikTok
- [Updated] Eye Candy Edition Top 10 TikTok Filters That Shine Bright
- [Updated] Foodie Fads The #Tiktok Treat that Took Over
- [New] Enhance TikTok Authenticity Changing Your Digital Vocal Trail
- Troubled TikToks? Learn How to Reactivate Them for 2024
- [New] In 2024, Your Portal to Pristine TikTok Downloads - Free & Simple
- Easily Alter TikTok Audio The No-Frills Guide to Vocal Changes
- [New] Essential Tips for Keeping Up with TikTok’s New Wave
- Epic Eats Escapades #TopTiktokFoodies
- [Updated] Social Media Strategy The Most Effective TikTok Hashtags
- [Updated] Timeless Tunes From the TikTok Stage Top 10 Hits of 2024 (Folk & Pop Fusion)
- Enhancing Collaboration with Snap Camera Techniques
- In 2024, Jujutsu Kaisen Characters in the World of TikTok Creatives
- [New] In 2024, Epic TikTok Gamers Top 10 Influencers
- [New] How to Record a TikTok All About TikTok Camera | Filmora for 2024
- [Updated] 2024 Approved Ultimate Guide The Top 6 No-Cost, Web Accessible MP3 From TikTok Apps (6)
- In 2024, Unlocking TikTok Perfecting Siri Voice Interaction
- [New] 2024 Approved Unveiling the Top 15 TikTok-Endorsed Literary Gems
- How to Speed Up TikTok Videos? [Simple Guide] for 2024
- [New] In 2024, Vibrant Visibility 30+ Biographical Concepts for Increased Viewers on the Filmora TikTok Platform
- [New] 2024 Approved Mouthwatering Moments The Hottest TikTok Food Videos for the Modern Kitchen Aficionado
- [Updated] In 2024, Discovering the Newest TikTok Songs that Excite Us
- Humor Highlights Top 20 Hilarious TikTok Jokes and Riddles
- [Updated] Explore 20 Most Shared Rap Tracks on Social Media for 2024
- How to recover old music from your Tecno
- In 2024, How to Transfer Data After Switching From Oppo Reno 8T 5G to Latest Samsung | Dr.fone
- How to Unlock Realme Narzo N55 Phone with Broken Screen
- Recover iPhone 8 Data From iOS iTunes Backup | Dr.fone
- How To Fix OEM Unlock Missing on OnePlus 11 5G?
- Updated 2024 Approved OBS Animated Alternatives
- In 2024, 3 Methods to Mirror Tecno Spark Go (2023) to Roku | Dr.fone
- In 2024, How to use Pokemon Go Joystick on Apple iPhone XR? | Dr.fone
- In 2024, 3 Ways to Unlock Your Apple iPhone XR for Free
- Updated Unlock Pro-Level Text Animation on Your Phone with These Apps
- [New] Integrating Visual Cues A Guide to Videography Annotations for 2024
- New Get Filmora Without Spending a Dime 100 Legal Methods for 2024
- [Updated] In 2024, Streamline Your Seminars Economical Tech Tips
- Play Store Not Working On Xiaomi 14 Ultra? 8 Solutions Inside | Dr.fone
- New Add Emoji to Linkedin Post – 5 Tips You Need to Know for 2024
- In 2024, A Working Guide For Pachirisu Pokemon Go Map On Vivo S17 | Dr.fone
- Looking For A Location Changer On Xiaomi Mix Fold 3? Look No Further | Dr.fone
- [New] 2024 Approved Amazon's Favorite Originals - Twitter Top Picks
- Pixel Chronicles Mastering the Art of Recording Your Minecraft World
- Updated Make Your Pictures Speak Online With the Best Tools Recommended for 2024
- How to Downgrade iPhone 15 Plus without Losing Any Content? | Dr.fone
- Title: "2024 Approved Inside TikTok's Dynamic World (Filters & Animation)"
- Author: Brian
- Created at : 2024-05-23 13:52:52
- Updated at : 2024-05-24 13:52:52
- Link: https://tiktok-videos.techidaily.com/2024-approved-inside-tiktoks-dynamic-world-filters-and-animation/
- License: This work is licensed under CC BY-NC-SA 4.0.
