
:max_bytes(150000):strip_icc()/CherieKloss1-c0ada8b85c6a4e1d819a441e25dbfeb1.jpeg)
"2024 Approved The Art of Transformation in TikTok Videos via Background Shifts"
The Art of Transformation in TikTok Videos via Background Shifts
TikTok has dramatically changed the world for digital content creators. It has provided millions of content creators a platform to design and deliver content to influence their followers. TikTok offers state-of-the-art features, such as filters, overlays, and effects to its worldwide customer base. One such feature is the green screen filter that allows changing the background of the TikTok video. Do you want to know more about the green screen in-built feature? If yes, we have got you professionally covered in the guide that will tell you everything about how to change the TikTok video background. Let’s get started.
In this article
01 Change Video Background with Green Screen Effect in TikTok
02 Get a Green Screen Background from Someone’s TikTok
03 Change TikTok Video Background in Filmora [No Green Screen]
Part 1: How to Change TikTok Video Background with Green Screen Effect?
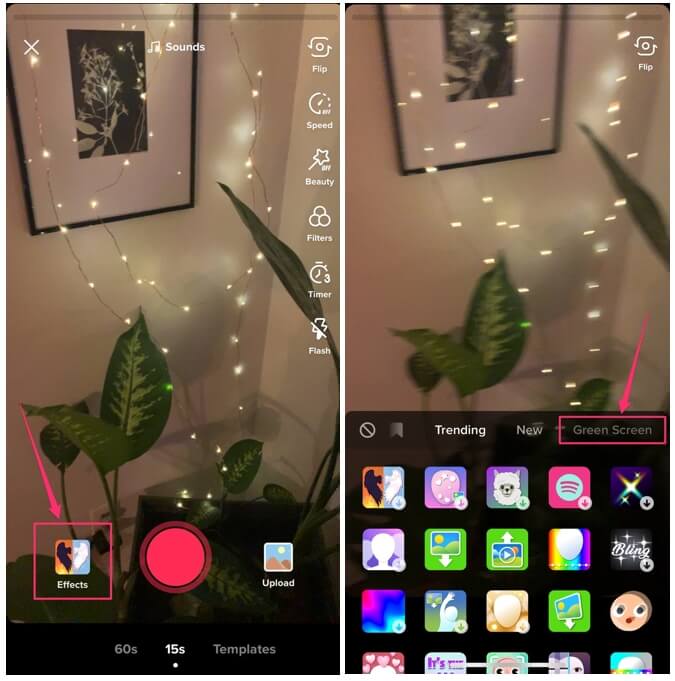
TikTok has a lot to fascinate its users. You will find loads of features that can help you make your video content engaging. Plus, it also facilitates users to polish their content. Hiding or replacing is one of the techniques to enhance the content’s quality. TikTok comes with an in-built filter that lets you change the video background. This is likely to make your video more compelling. Here’s how you can do it by following the simple steps below.
Step 1: Create a new TikTok video
Launch the TikTok application, log in to your account and tap the + button to capture a new video.
Step 2: Open effects and choose the Green Screen option
Select rear or front camera when directed to video recording window. Choose effects at the bottom-right of the screen. From the available options, look for the green screen option and select it.
Step 3:: Select the Image to change video background
You can choose any image from your phone’s gallery to utilize it as your background. Once done, hit the Record button to capture video with your customized background.
Note: Apart from selecting your own picture, you can choose from different effects available, including the titled background or AR (augmented reality) features.
Part 2: How to Get a Green Screen Background from Someone’s TikTok?
TikTok recently introduced a fantastic feature to customize or alter your video’s background without even looking for the green screen filter on your own. The “Green Screen Duet Feature.” This feature also lets users apply another person’s video as the background.
Green screens were once only available to those who had access to, well, a green screen. Now the case is different. You can utilize this “Green Screen” feature from the various applications now, allowing you to add a customizable background to your video, and TikTok is one of them. s Various content creators customize their background with effects, a still image, or even a video from their camera roll using the TikTok app.
Imagine scrolling down the TikTok app and finding an eye-catching customized background. Yes! You can utilize it to spice up your videos as well. We have already demonstrated how you can add a green screen effect in TikTok in your videos. But did you also know you can add green screen background from someone else’s video to your TikTok? Even if you didn’t, we have compiled a step-by-step guide that will give you a perfect depiction of how you can pull it off.
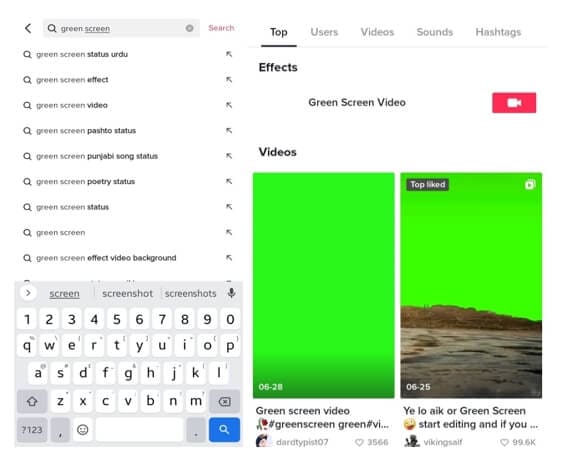
Step 1: Search the Video with Green Screen Effects on TikTok
First and foremost, launch the TikTok app on your phone. Either navigate the video with a green screen effect or type Green Screen in the Search Box to find a video. Open the video and click on the Green Screen Effect in the bottom left of the screen.
Step 2: Make Your Video with the Green Screen Effect
Now, you can record your TikTok video with the green-screen effect used.
Part 3: How to Change TikTok Video Background without Green Screen in Filmora?
For Win 7 or later (64-bit)
For macOS 10.12 or later
Wondershare Filmora is one of the most popular video editing software among YouTubers. With the latest Auto-Reframe feature, you can create social media videos easier and faster. With Filmora, you can change backgrounds in your videos in various ways, with or without a green screen.
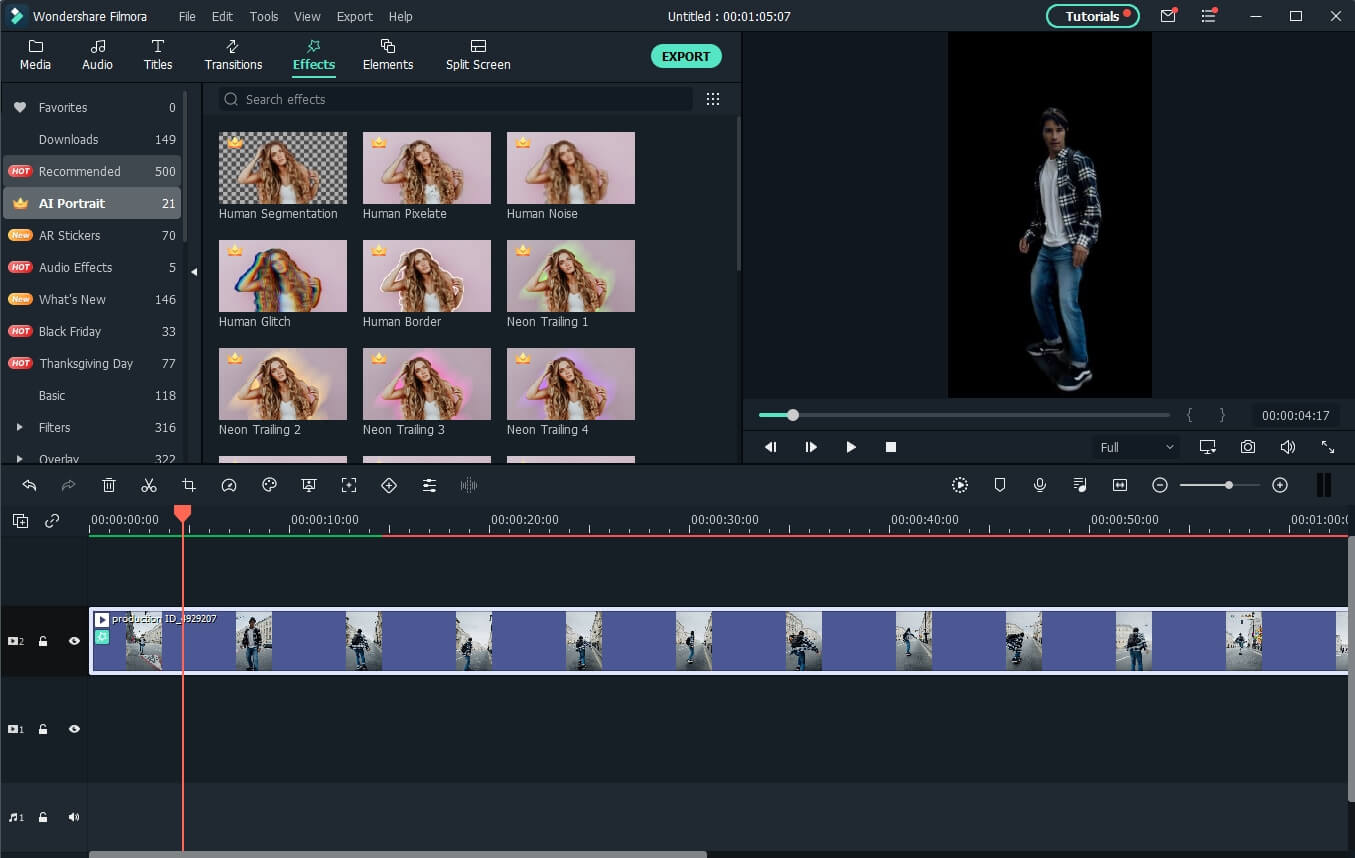
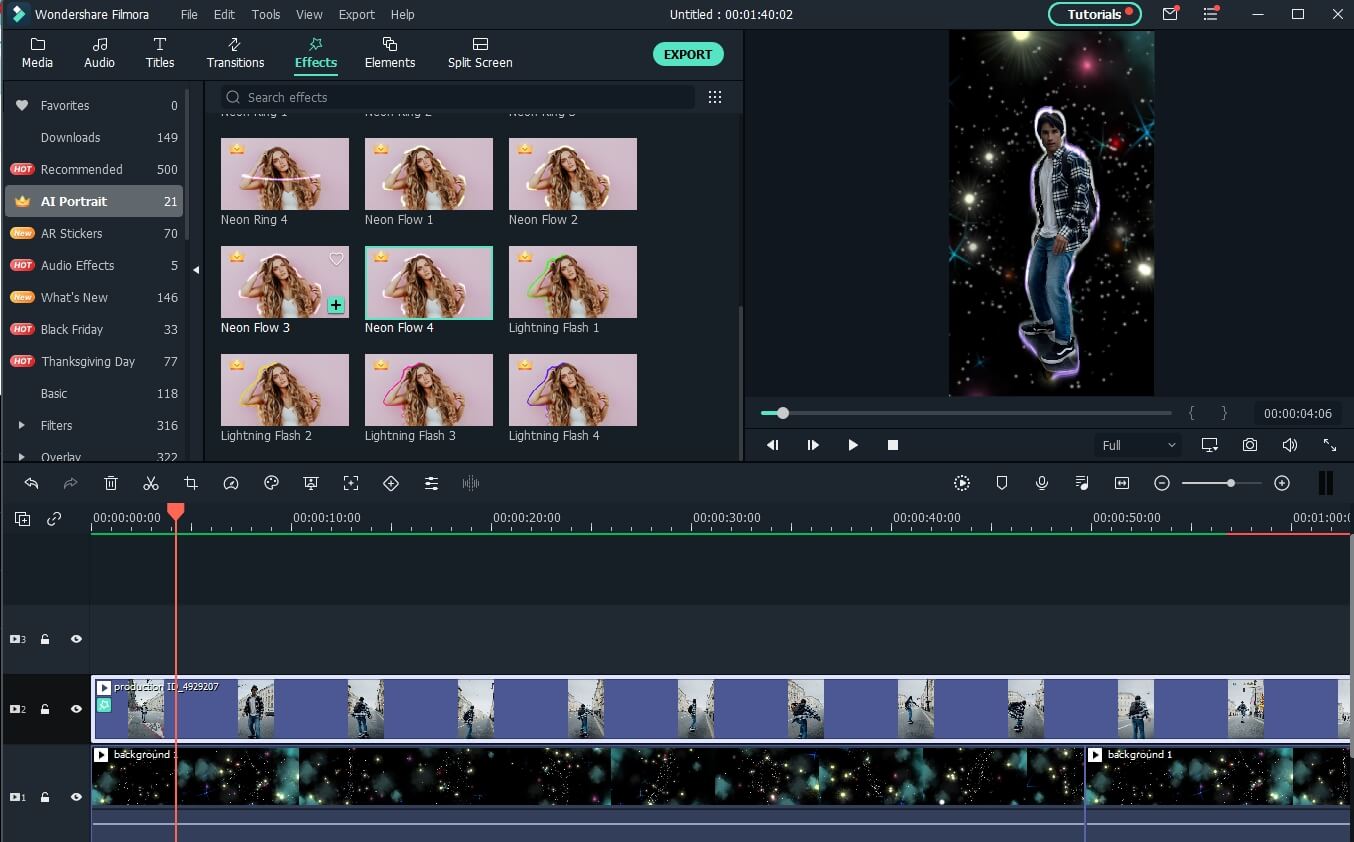
The Human Segmentation effect in Filmora’s AI Portrait lets you eliminate people from a movie’s background instead of using a green screen. It needs a very few mouse clicks, and it works the best when there are people next to the camera.
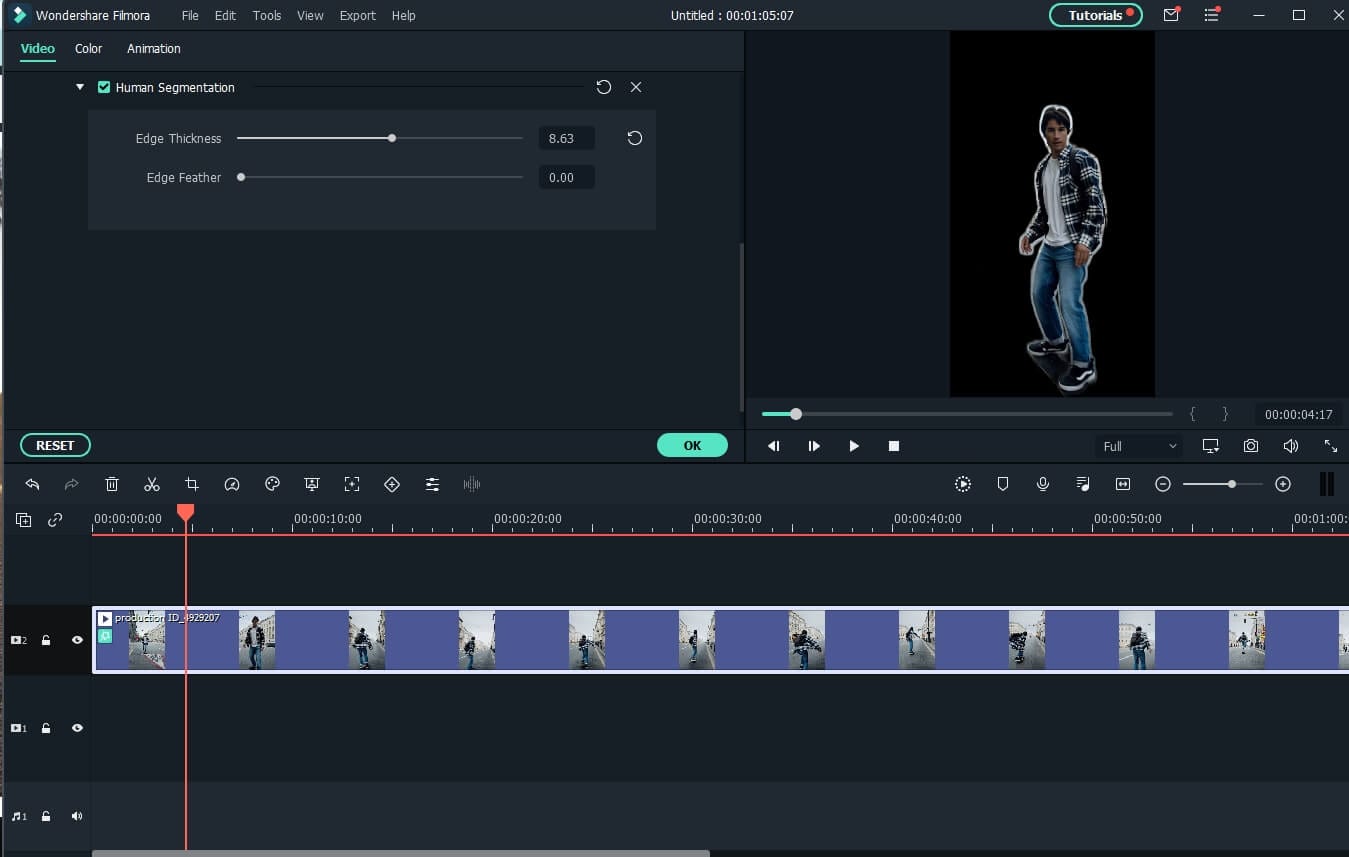
After you’ve eliminated the background, you’ll be able to see the primary foreground of your video in live time. You can then supplement your actual video with a picture or a background. You can also use the video without the background as an intermediate layer on top of another video. Follow the below steps to change the video background using this feature:
Step 1: Import Video to Timeline
Launch Filmora on your Windows PC or Mac, and then import the video to the timeline by clicking on the File and then Import Media.
Step 2: Apply Human Segmentation
Go to Effects and then select the AI Portrait to see all of the AI Portrait effects. Move the human segmentation effect to the video timeline.
Step 3: Adjust the Effect Setting (Optional)
In the preview window, you’ll notice that the subject has been separated from the video background. If necessary, double-click the video in the timeline and find the video effect field to modify the edge, thickness, and feather. You can also try the neon borders and glowing flow effects under the AI Portrait category to have some fun.
Step 4: Change the Background
Now, drop the background video to the track below the video clip to change the video background.
Step 5: Export the video with new background
Preview the final result and then click the Export button to save the video on your computer.
Note: Check this guide to find out how to upload TikTok videos on your desktop
Conclusion
To lure the viewer’s attention, there is always a necessity to create visual and audio effects in a TikTok video. A TikTok video maker may not always have the privilege of the ideal location and surroundings to make a video stand out in the vast online market. A simple way out is to use software-based simulation, which means replacing the video background with the required one rather than the original. After reading the article, we hope that you don’t have any concerns about how to change the TikTok video background.
02 Get a Green Screen Background from Someone’s TikTok
03 Change TikTok Video Background in Filmora [No Green Screen]
Part 1: How to Change TikTok Video Background with Green Screen Effect?
TikTok has a lot to fascinate its users. You will find loads of features that can help you make your video content engaging. Plus, it also facilitates users to polish their content. Hiding or replacing is one of the techniques to enhance the content’s quality. TikTok comes with an in-built filter that lets you change the video background. This is likely to make your video more compelling. Here’s how you can do it by following the simple steps below.
Step 1: Create a new TikTok video
Launch the TikTok application, log in to your account and tap the + button to capture a new video.
Step 2: Open effects and choose the Green Screen option
Select rear or front camera when directed to video recording window. Choose effects at the bottom-right of the screen. From the available options, look for the green screen option and select it.
Step 3:: Select the Image to change video background
You can choose any image from your phone’s gallery to utilize it as your background. Once done, hit the Record button to capture video with your customized background.
Note: Apart from selecting your own picture, you can choose from different effects available, including the titled background or AR (augmented reality) features.
Part 2: How to Get a Green Screen Background from Someone’s TikTok?
TikTok recently introduced a fantastic feature to customize or alter your video’s background without even looking for the green screen filter on your own. The “Green Screen Duet Feature.” This feature also lets users apply another person’s video as the background.
Green screens were once only available to those who had access to, well, a green screen. Now the case is different. You can utilize this “Green Screen” feature from the various applications now, allowing you to add a customizable background to your video, and TikTok is one of them. s Various content creators customize their background with effects, a still image, or even a video from their camera roll using the TikTok app.
Imagine scrolling down the TikTok app and finding an eye-catching customized background. Yes! You can utilize it to spice up your videos as well. We have already demonstrated how you can add a green screen effect in TikTok in your videos. But did you also know you can add green screen background from someone else’s video to your TikTok? Even if you didn’t, we have compiled a step-by-step guide that will give you a perfect depiction of how you can pull it off.
Step 1: Search the Video with Green Screen Effects on TikTok
First and foremost, launch the TikTok app on your phone. Either navigate the video with a green screen effect or type Green Screen in the Search Box to find a video. Open the video and click on the Green Screen Effect in the bottom left of the screen.
Step 2: Make Your Video with the Green Screen Effect
Now, you can record your TikTok video with the green-screen effect used.
Part 3: How to Change TikTok Video Background without Green Screen in Filmora?
For Win 7 or later (64-bit)
For macOS 10.12 or later
Wondershare Filmora is one of the most popular video editing software among YouTubers. With the latest Auto-Reframe feature, you can create social media videos easier and faster. With Filmora, you can change backgrounds in your videos in various ways, with or without a green screen.
The Human Segmentation effect in Filmora’s AI Portrait lets you eliminate people from a movie’s background instead of using a green screen. It needs a very few mouse clicks, and it works the best when there are people next to the camera.
After you’ve eliminated the background, you’ll be able to see the primary foreground of your video in live time. You can then supplement your actual video with a picture or a background. You can also use the video without the background as an intermediate layer on top of another video. Follow the below steps to change the video background using this feature:
Step 1: Import Video to Timeline
Launch Filmora on your Windows PC or Mac, and then import the video to the timeline by clicking on the File and then Import Media.
Step 2: Apply Human Segmentation
Go to Effects and then select the AI Portrait to see all of the AI Portrait effects. Move the human segmentation effect to the video timeline.
Step 3: Adjust the Effect Setting (Optional)
In the preview window, you’ll notice that the subject has been separated from the video background. If necessary, double-click the video in the timeline and find the video effect field to modify the edge, thickness, and feather. You can also try the neon borders and glowing flow effects under the AI Portrait category to have some fun.
Step 4: Change the Background
Now, drop the background video to the track below the video clip to change the video background.
Step 5: Export the video with new background
Preview the final result and then click the Export button to save the video on your computer.
Note: Check this guide to find out how to upload TikTok videos on your desktop
Conclusion
To lure the viewer’s attention, there is always a necessity to create visual and audio effects in a TikTok video. A TikTok video maker may not always have the privilege of the ideal location and surroundings to make a video stand out in the vast online market. A simple way out is to use software-based simulation, which means replacing the video background with the required one rather than the original. After reading the article, we hope that you don’t have any concerns about how to change the TikTok video background.
Mastering the Stitch for Immersive TikTok Experienines
Best Video Editor for Beginners on Windows and Mac
Wondershare Filmora is one of the most popular video editing software among TikTokers , download and have a try.
TikTok’s collaborative nature is one of its most appealing features. Your video is not finished the moment you publish it. They can be responded to, remixed, and re-shared by anybody. TikTok is meant to allow users to construct on other’s films shared on the network, whether you’re utilizing audio from some other video or making a duet.
Thanks to the stitch tool, creators may remix, remake, and reply to videos with a couple of taps. This article will tell you what you need to know about stitching videos on TikTok. Continue reading to learn more about Stitching and how to stitch on TikTok. Let’s get started!
In this article
02 How to Turn Stitch On or Off?
04 How to Stitch Any TikTok Video withFilmora Video Editor ?
05 FAQs About TikTok Video Stitch
Part 1: What is Stitch on TikTok?
TikTok’s latest video editing tool ‘Stitch,’ lets people incorporate video snippets from other people into their own. Creators may use Stitch to provide a five-second snippet from a TikTok video out of their own. Unlike duets that play videos together, stitched videos play in the sequence they were stitched. Videos containing open-ended questions have gained in popularity with the advent of the stitch.
Whenever you Stitch a clip-on TikTok, you are essentially inserting your video after yet another video that has already been submitted. People frequently utilize this to remark on or reply to other videos. And, when done well, it can add a lot more context to your movies.
The one limitation of the Stitch tool is that you may only publish up to five seconds from some other video. So, if you’re focusing on a Stitch, you must select the five seconds which are most critical to highlight your message.
Part 2: How to Turn Stitch On or Off?
By enabling the Stitch feature, you make your material available to millions of prospective collaborators. Consider the possibilities – it might be a fantastic approach to enhance reach and virility.
If you aren’t comfortable exposing your films to the whole TikTok community, users can opt out of allowing others to Stitch their work. You may modify them under the Privacy Controls. Here’s how to do a Stitch on TikTok:
Step 1: Launch the TikTok app and then head to your profile by clicking on the Profile option at the bottom right. After that, select the three dots to open the settings.
Step 2: After entering the settings, select Privacy to proceed, and then tap on the Stitch option to open the Stitch settings.
Step 3: Now, you will see three options that are No-one, Everyone, and Friends. If you want to allow the Stitching, select either Everyone or Friends. However, to restrict the people from stitching your videos, choose No-one. After you are done selecting, click on the back arrow to save the applied changes.
Part 3: How to Stitch on TikTok?
TikTok keeps giving creators more reasons to continue producing, and fans like us are more committed to continuing to open it. Stitch, a new app functionality from the famous social networking platform, makes things more straightforward than ever for artists to interact with each other.
But, you might be wondering, how to do a stitch on TikTok? Don’t worry; you’ve come to the right place. Here’s how:
Step 1: Launch TikTok and then go to the video that you want to stitch. Select the Share icon, which resembles an arrow. Select the Stitch symbol from the menu that displays, and then wait a few seconds for the video to complete. The lengthier the video is, the more the loading time.

Step 2: When it’s finished, you’ll be sent to a screen where you may take five seconds of the film and use it on your own. To navigate through the movie, use the sliders and the red bars to choose the portion you want. When you’re finished, tap Next.

Step 3: You’ll be sent to TikTok’s normal recording screen. Record the remainder of your TikTok video with all of the features you’re accustomed to utilizing. You may use whatever effects, stickers, texts, voiceovers, or captions you desire. After that, press the Next button.

Step 4: Make a title and hashtags for your TikTok video. You could also choose whether or not these users may Stitch your movie here – hit the toggle switch beside Allow Stitch to turn it off. Following that, hit the Post option, and your stitched video will be uploaded.

Part 4: How to Stitch Any TikTok Video with Filmora Video Editor ?
Before getting started, understand why people opt for Filmora video editor for stitching videos on TikTok when this can be done through the official TikTok application. TikTok app only allows you to stitch a video for up to five seconds which is quite frustrating if you wish to stitch an entire video.
One more reason is that, with TikTok, you cannot stitch the already existing video from the camera roll, which restricts creators from adding the already edited content to the existing video. So, to avoid the above problems, Filmora is used for stitching TikTok videos.
For Win 7 or later (64-bit)
For macOS 10.12 or later
To begin, download the video that you wish to stitch with from TikTok. After, follow the below stepwise guide:
Step 1: Launch the Filmora software on your PC and import the video files by clicking on the File and then Import/Export Media. You can simply drag and drop the videos as well.
Step 2: Drag the clips from the media library to the Timeline’s video track. All video files will be stitched into a single video with no transitions.

Note: To add a transition to the video , go to the Transition tab and drop the desired transition to the junction of two clips.

Step 3: Now, preview the stitched video and, when finished, click the Export option to save numerous video segments to a single file. Choose any format from the Format tab’s list.
Part 5: FAQs About TikTok Video Stitch
1. Can you do a Stitch on TikTok with a video from your Camera Roll?
Unfortunately, you cannot utilize a video from your Camera Roll in a Stitch at the time of this writing. So, whatever your reaction to a Stitch is, you must record 100% unique footage shot with the TikTok camera. However, you may download the video first and then stitch it with some third-party software such as Filmora.
2. Can you stitch longer than 5 seconds?
No, it is not possible to stitch a video for longer than five seconds using the built-in Stitching feature of the TikTok app. But this can be done by stitching the videos using third-party applications and software.
3. How do I see TikTok stitches?
Users who want to view as many stitches as possible can do it by browsing for them on the app. You must first browse to Discover, and from there to the search box. Then type #Stitch @username, where the username is the name of the account from which you wish to view stitches.
4. TikTok Stitch option not showing. How to fix it?
Users may choose whether or not someone else can Stitch their work in their settings. The option may be found under the Settings and Privacy tab, where users can activate or uncheck Stitch for all videos. So, if the Stitch option is not showing, the user may have disabled the Stitch option.
Conclusion
The Stitch feature is an excellent way to continue the discussion with your videos. You may leave comments on popular content on the site. Most importantly, it may be a fun method to generate material different from what you usually publish. And since you know How to Stitch on TikTok after reading this article, stitch the videos today and create unique content!
TikTok’s collaborative nature is one of its most appealing features. Your video is not finished the moment you publish it. They can be responded to, remixed, and re-shared by anybody. TikTok is meant to allow users to construct on other’s films shared on the network, whether you’re utilizing audio from some other video or making a duet.
Thanks to the stitch tool, creators may remix, remake, and reply to videos with a couple of taps. This article will tell you what you need to know about stitching videos on TikTok. Continue reading to learn more about Stitching and how to stitch on TikTok. Let’s get started!
In this article
02 How to Turn Stitch On or Off?
04 How to Stitch Any TikTok Video withFilmora Video Editor ?
05 FAQs About TikTok Video Stitch
Part 1: What is Stitch on TikTok?
TikTok’s latest video editing tool ‘Stitch,’ lets people incorporate video snippets from other people into their own. Creators may use Stitch to provide a five-second snippet from a TikTok video out of their own. Unlike duets that play videos together, stitched videos play in the sequence they were stitched. Videos containing open-ended questions have gained in popularity with the advent of the stitch.
Whenever you Stitch a clip-on TikTok, you are essentially inserting your video after yet another video that has already been submitted. People frequently utilize this to remark on or reply to other videos. And, when done well, it can add a lot more context to your movies.
The one limitation of the Stitch tool is that you may only publish up to five seconds from some other video. So, if you’re focusing on a Stitch, you must select the five seconds which are most critical to highlight your message.
Part 2: How to Turn Stitch On or Off?
By enabling the Stitch feature, you make your material available to millions of prospective collaborators. Consider the possibilities – it might be a fantastic approach to enhance reach and virility.
If you aren’t comfortable exposing your films to the whole TikTok community, users can opt out of allowing others to Stitch their work. You may modify them under the Privacy Controls. Here’s how to do a Stitch on TikTok:
Step 1: Launch the TikTok app and then head to your profile by clicking on the Profile option at the bottom right. After that, select the three dots to open the settings.
Step 2: After entering the settings, select Privacy to proceed, and then tap on the Stitch option to open the Stitch settings.
Step 3: Now, you will see three options that are No-one, Everyone, and Friends. If you want to allow the Stitching, select either Everyone or Friends. However, to restrict the people from stitching your videos, choose No-one. After you are done selecting, click on the back arrow to save the applied changes.
Part 3: How to Stitch on TikTok?
TikTok keeps giving creators more reasons to continue producing, and fans like us are more committed to continuing to open it. Stitch, a new app functionality from the famous social networking platform, makes things more straightforward than ever for artists to interact with each other.
But, you might be wondering, how to do a stitch on TikTok? Don’t worry; you’ve come to the right place. Here’s how:
Step 1: Launch TikTok and then go to the video that you want to stitch. Select the Share icon, which resembles an arrow. Select the Stitch symbol from the menu that displays, and then wait a few seconds for the video to complete. The lengthier the video is, the more the loading time.
Step 2: When it’s finished, you’ll be sent to a screen where you may take five seconds of the film and use it on your own. To navigate through the movie, use the sliders and the red bars to choose the portion you want. When you’re finished, tap Next.
Step 3: You’ll be sent to TikTok’s normal recording screen. Record the remainder of your TikTok video with all of the features you’re accustomed to utilizing. You may use whatever effects, stickers, texts, voiceovers, or captions you desire. After that, press the Next button.
Step 4: Make a title and hashtags for your TikTok video. You could also choose whether or not these users may Stitch your movie here – hit the toggle switch beside Allow Stitch to turn it off. Following that, hit the Post option, and your stitched video will be uploaded.
Part 4: How to Stitch Any TikTok Video with Filmora Video Editor ?
Before getting started, understand why people opt for Filmora video editor for stitching videos on TikTok when this can be done through the official TikTok application. TikTok app only allows you to stitch a video for up to five seconds which is quite frustrating if you wish to stitch an entire video.
One more reason is that, with TikTok, you cannot stitch the already existing video from the camera roll, which restricts creators from adding the already edited content to the existing video. So, to avoid the above problems, Filmora is used for stitching TikTok videos.
For Win 7 or later (64-bit)
For macOS 10.12 or later
To begin, download the video that you wish to stitch with from TikTok. After, follow the below stepwise guide:
Step 1: Launch the Filmora software on your PC and import the video files by clicking on the File and then Import/Export Media. You can simply drag and drop the videos as well.
Step 2: Drag the clips from the media library to the Timeline’s video track. All video files will be stitched into a single video with no transitions.
Note: To add a transition to the video , go to the Transition tab and drop the desired transition to the junction of two clips.
Step 3: Now, preview the stitched video and, when finished, click the Export option to save numerous video segments to a single file. Choose any format from the Format tab’s list.
Part 5: FAQs About TikTok Video Stitch
1. Can you do a Stitch on TikTok with a video from your Camera Roll?
Unfortunately, you cannot utilize a video from your Camera Roll in a Stitch at the time of this writing. So, whatever your reaction to a Stitch is, you must record 100% unique footage shot with the TikTok camera. However, you may download the video first and then stitch it with some third-party software such as Filmora.
2. Can you stitch longer than 5 seconds?
No, it is not possible to stitch a video for longer than five seconds using the built-in Stitching feature of the TikTok app. But this can be done by stitching the videos using third-party applications and software.
3. How do I see TikTok stitches?
Users who want to view as many stitches as possible can do it by browsing for them on the app. You must first browse to Discover, and from there to the search box. Then type #Stitch @username, where the username is the name of the account from which you wish to view stitches.
4. TikTok Stitch option not showing. How to fix it?
Users may choose whether or not someone else can Stitch their work in their settings. The option may be found under the Settings and Privacy tab, where users can activate or uncheck Stitch for all videos. So, if the Stitch option is not showing, the user may have disabled the Stitch option.
Conclusion
The Stitch feature is an excellent way to continue the discussion with your videos. You may leave comments on popular content on the site. Most importantly, it may be a fun method to generate material different from what you usually publish. And since you know How to Stitch on TikTok after reading this article, stitch the videos today and create unique content!
Also read:
- Navigating Non-Working TikTok Videos with Ease for 2024
- Gain More Traction on TikTok A Compendium of Unique Username Concepts
- [Updated] In 2024, Premium Choices Best TikTok Downloader Tools No Watermarks
- [New] Unveiling Preeminent Android and iPhone Marks Removers
- Top 5 Must-Know Aspects of Using TikTok (macOS) for 2024
- From Novice to Pro A Compreenhensive Guide to Gifs in Snapchat
- [New] In 2024, Update Your TikTok Statement and Visuals Effortlessly
- 2024 Approved Commanding Attention Best-in-Class TikTok Caption Ideas for Audiene Engagement
- [Updated] 2024 Approved Who Are the Kings of TikTok Gameplay?
- [New] Beat the Scene Top 20 Chill-Out TikTok Dancing Beats for 2024
- Propel Your Passion Profits Joining the Elite of TikTok Creators for 2024
- [Updated] Revolutionize Your TikTok Experience - 50+ Impressive Name Ideas for 2024
- [Updated] 2024 Approved 8 Must-Have TikTok Tools to Boost Your Growth
- [New] 2024 Approved TikTok Trends Navigating Copyright Laws for Your Videos
- [New] 2024 Approved The Authoritative TikTok Symbol Compendium
- 2024 Approved Elevate Your TikTok Game Expert Mac Video Editing Guide
- [Updated] Lightning-Fast Method to Claim TikTok Treasures
- [Updated] 2024 Approved Enhancing TikToks with Customizable Video Subtitles
- [New] 2024 Approved Strategies to Bypass Invisible Restrictions on TikTok
- Ensuring Every Snapchatter-Friendly Footage via Mac
- [New] 2024 Approved Elevating Your Edits – A Step-by-Step Guide to Captivating TikTok React Videos in Filmora
- [Updated] 2024 Approved Top 5 Factors to Master When Using TikTok Web (Mac)
- In 2024, Exclusive Apps to Remove Logos From Android/iOS Videos
- [Updated] No Watermarks, Just Joy - Download TikTok Videos
- 10 Trending TikTok Treats to Try
- [New] How to Fast Forward on TikTok, In 2024
- [New] 2024 Approved Watermark-Free TikTok Video Streams Available Here
- [New] In 2024, Expanding Visual Presence TikTok's Head Dilation Methods
- [Updated] Unlock Viewer Interest with These 5 Effective TikTok Captions
- [New] How to Make a Difference on TikTok The Best Practices & Exemplary Case Studies for 2024
- [New] In 2024, From One to a Hundred A Guide to Creating Multiple TikToks of Youself
- [Updated] Boosting Video Impact with Expert Slow Motion Filming on TikTok
- [New] Unlock Potential Discover These 30 Compelling Nicknames for TikTok for 2024
- [Updated] Sonic Sieve Extracting Pure Audio in Audacity for 2024
- [New] From Buzz to Sales Transforming Social Media Into Traffic for 2024
- [Updated] Amplify Views on TikTok with These Standout Username Concepts
- Captivating Content Conqueror’s Manual for Stellar TikTok Reactions with Filmora for 2024
- Embrace the Thrill How to Engage in TikTok Livestreams for 2024
- [New] The Critical 7 TikTok Apps to Amplify Your Influence for 2024
- Mirthful Monitors Top Comedians on the Rise in TikTok
- [Updated] In 2024, The Most Sharing Videos TikTok Reactions
- [New] Innovative Editing Mastery in TikTok Seamless Transition of Video Borders for 2024
- [New] A Step-by-Step Approach to Dominating TikTok with Ads for 2024
- In 2024, How To Activate and Use Life360 Ghost Mode On Vivo X Flip | Dr.fone
- In 2024, Is Fake GPS Location Spoofer a Good Choice On Motorola G24 Power? | Dr.fone
- [Updated] Driving Engagement on Instagram A Step-by-Step Guide for 2024
- In 2024, How to Unlock SIM Card on Nokia 150 (2023) online without jailbreak
- Enhance Interaction Mobile Screenshotting on Android
- In 2024, Step-by-Step Tutorial How To Bypass Samsung Galaxy F54 5G FRP
- Updated Mastering Audio Normalization with DaVinci Resolve An In-Depth Tutorial
- [New] In 2024, Navigating the Art of Facebook Video Distribution
- [Updated] In 2024, Flourishing in Virtual Dialogue Top Strategies to Master ZOOM Chats
- [New] 2024 Approved Essential Tips for Efficiently Using EZ Grabber
- In 2024, Bypassing Errors in Facebook Story Postings & Viewing
- 2024 Approved Divided Footage Delight Top Cam Discussion?
- [New] Educational Excellence Through Effective Lecture Audio Documentation (Mac)
- New 2024 Approved Elevate Your Videos Inception with These Top 8 Sound Effects (Updated )
- In 2024, How to Transfer Data After Switching From Tecno Spark 10 5G to Latest Samsung | Dr.fone
- [New] 2024 Approved Maximizing Visibility with Smart Hashtag Use in FB Advertising
- In 2024, Enhancing Minecraft Through Optimal RAM Assignment
- Tagging Towards Triumph The Best Instagram Hashtags
- [Updated] Discovering the #1 Songs of Facebook Video Insights
- How to Reset a Poco F5 5G Phone That Is Locked | Dr.fone
- In 2024, Forgot Pattern Lock? Heres How You Can Unlock Vivo V27 Pro Pattern Lock Screen
- From Followers to Brand Ambassadors The Five Pillars of Influencer Success for 2024
- New Google Translate Video A Complete Guide To Translate Video With Google
- How to Insert a GIF Into Powerpoint for 2024
- [Updated] In-Depth Look at Frozen Delight Recording Software
- Updated Some Top Methods to Create AI Slow Motion Videos
- [New] In 2024, The Screen Recorder Showdown Experts' Take on Popular Tools
- How to Track a Lost Realme Narzo 60 5G for Free? | Dr.fone
- iSpoofer is not working On Infinix Zero 30 5G? Fixed | Dr.fone
- New 2024 Approved The Art of Image Resizing Finding the Perfect Ratio
- [Updated] Revealing MyCam’s True Recording Potential
- Updated In 2024, How to Use LUTs in Adobe Premiere Pro
- [Updated] Ultimate Guide Testing MyCam Recording Capabilities
- How to Track Samsung Galaxy S23 by Phone Number | Dr.fone
- In 2024, Captivating Cycles on IG Perfecting the Boomerang Effect
- Title: "2024 Approved The Art of Transformation in TikTok Videos via Background Shifts"
- Author: Brian
- Created at : 2024-05-23 14:11:49
- Updated at : 2024-05-24 14:11:49
- Link: https://tiktok-videos.techidaily.com/2024-approved-the-art-of-transformation-in-tiktok-videos-via-background-shifts/
- License: This work is licensed under CC BY-NC-SA 4.0.
