
:max_bytes(150000):strip_icc()/GettyImages-457316526-57deda085f9b58651650818c-5c62f2e346e0fb0001f2552f.jpg)
"2024 Approved TikTok Video Sync Chrome, Android & iOS Integration Techniques"
TikTok Video Sync: Chrome, Android & iOS Integration Techniques
Tiktok started out as a popular video-sharing platform for smartphones, but due to the massive response it got from people all around the world, it also launched a desktop version in 2021.
While creating, editing, and uploading videos on Tiktok via smartphones is as easy as pie, many people find it confusing, especially those new to this platform.
Therefore, in this article, we have compiled a step-by-step guide on how to upload Tiktok videos on Chrome, Android, and iPhone.
So, let’s get into it asap!
Upload Tiktok Videos on Chrome
Uploading Tiktok videos via Chrome is quite an easy and straightforward process. Just follow these steps, and you’re done!
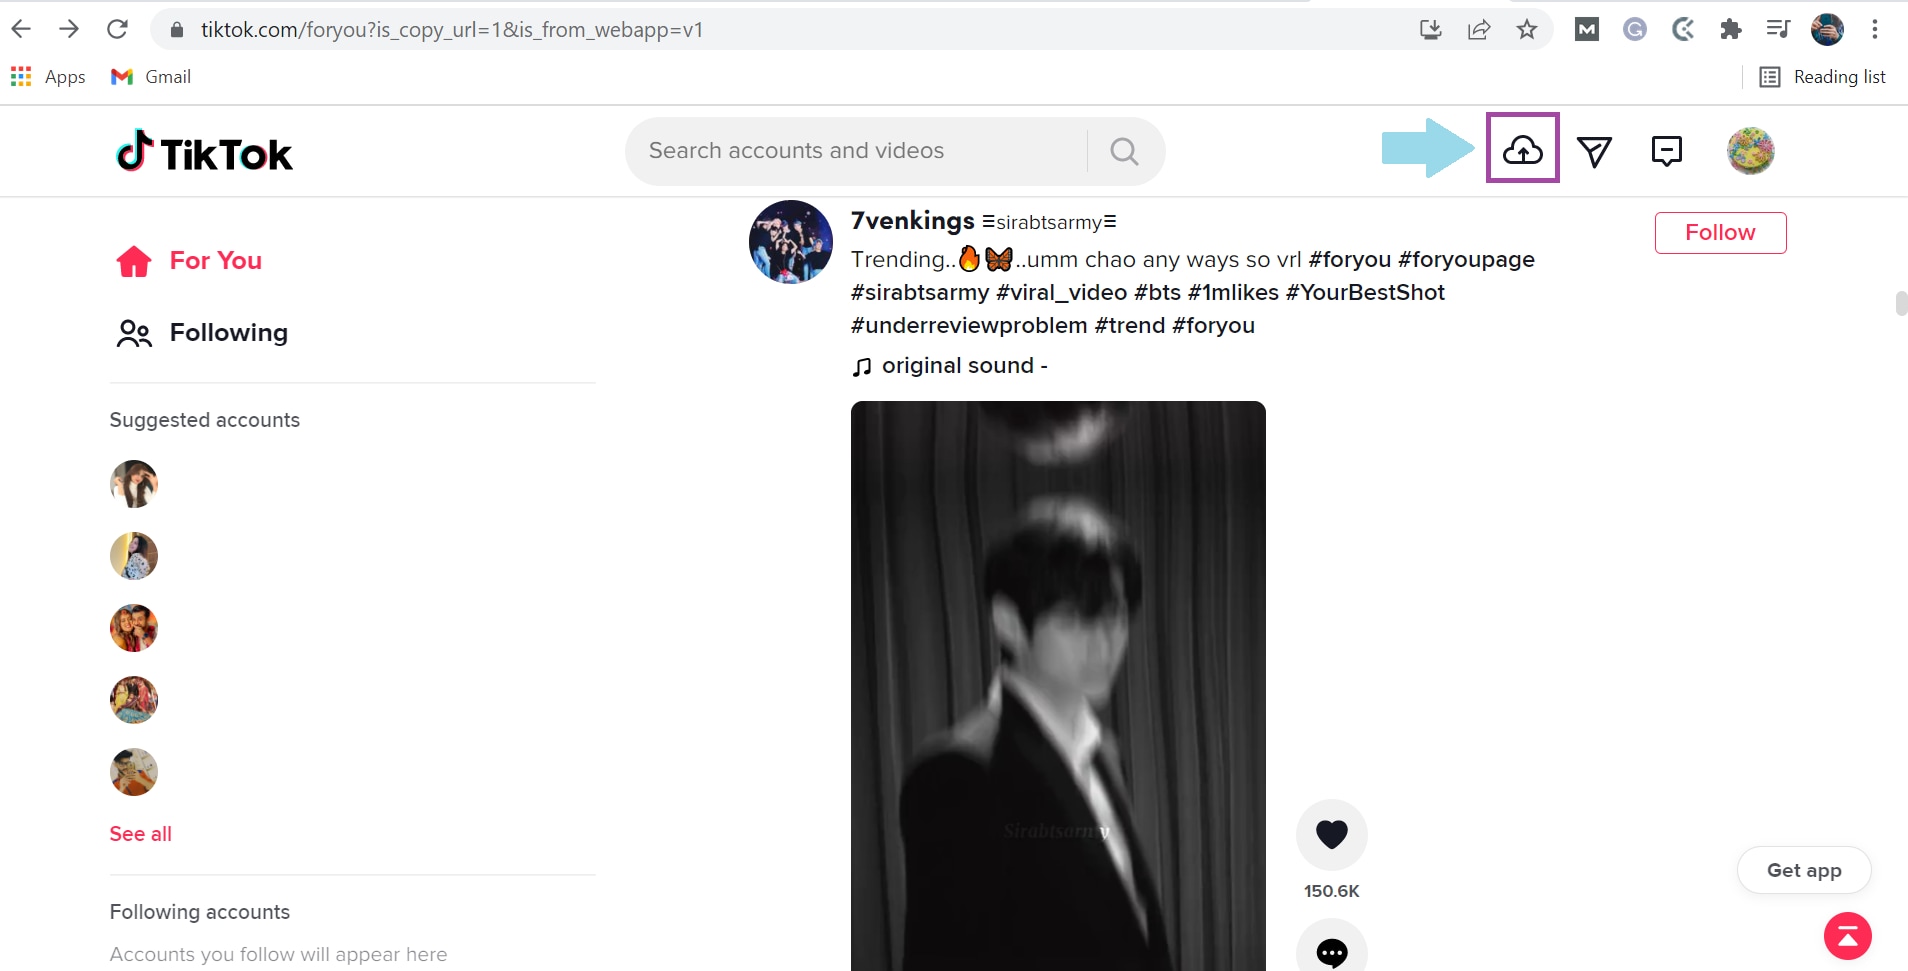
Step 1
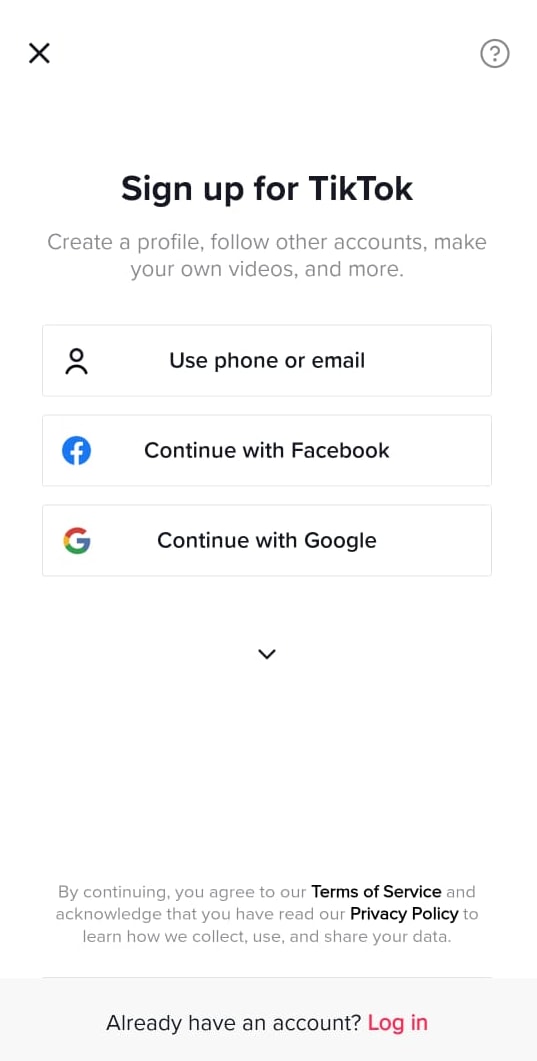
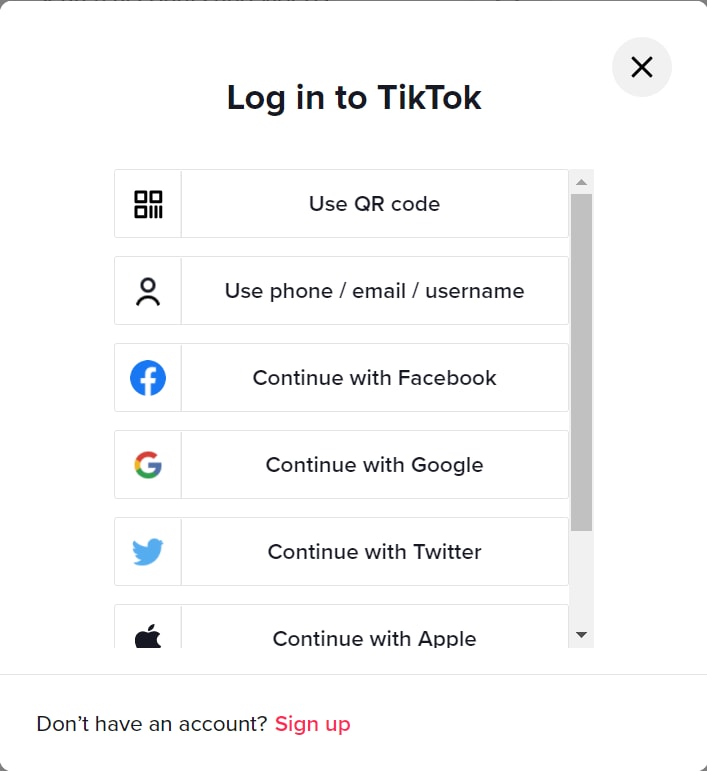
Go to the website version of Tiktok from Chrome, and click on “Log In” at the top-right corner of the page. You can also click on “Log In” under the “Following” option on the left.

Step 2
You will get a popup asking you to either sign up to Tiktok or log in using your email, Facebook, Twitter, Google, Apple, or Instagram. You can choose whichever option you find convenient.
Step 3
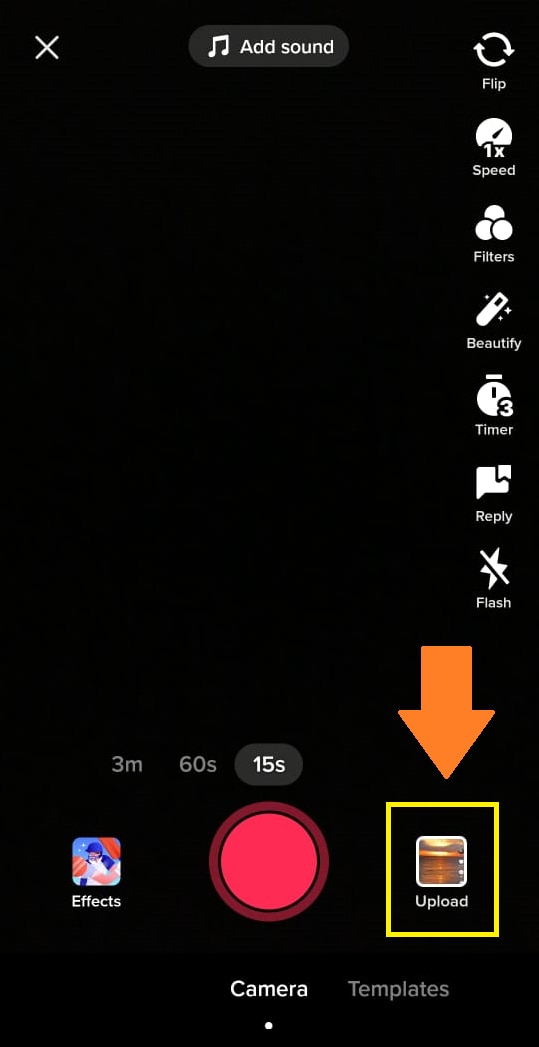
Click on the “Upload” option indicated by a cloud with an arrow.
Step 4
Click on “Select Video to Upload” and choose a video from your PC’s storage.
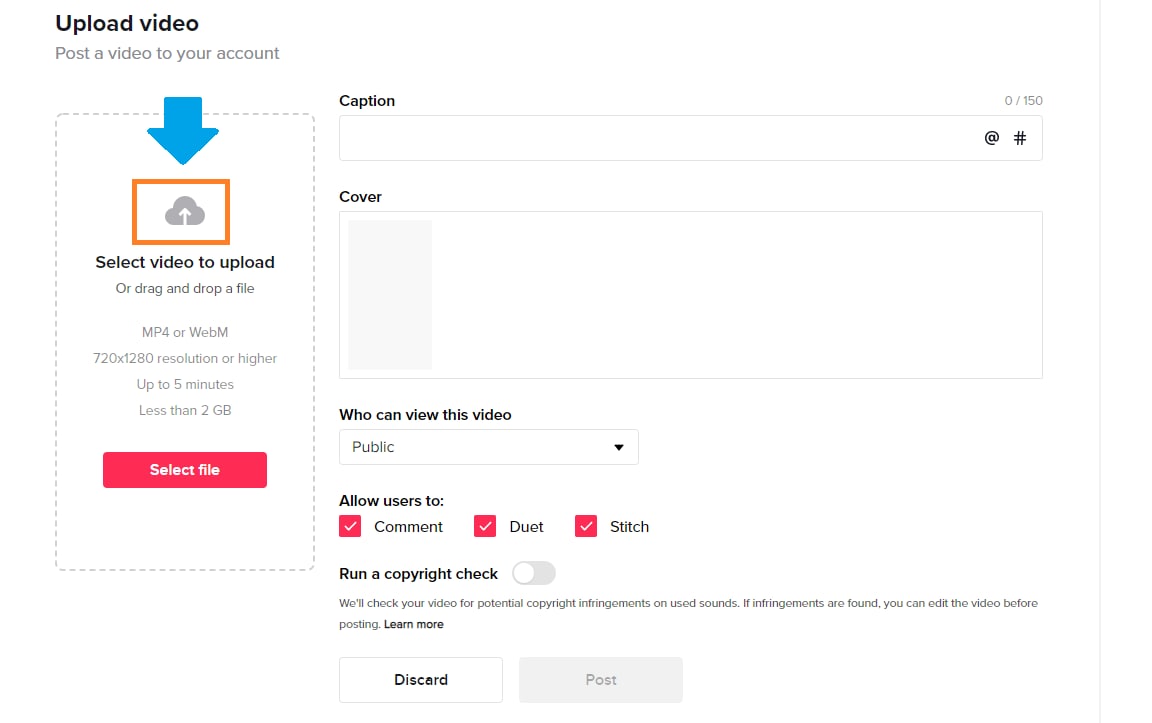
Step 5
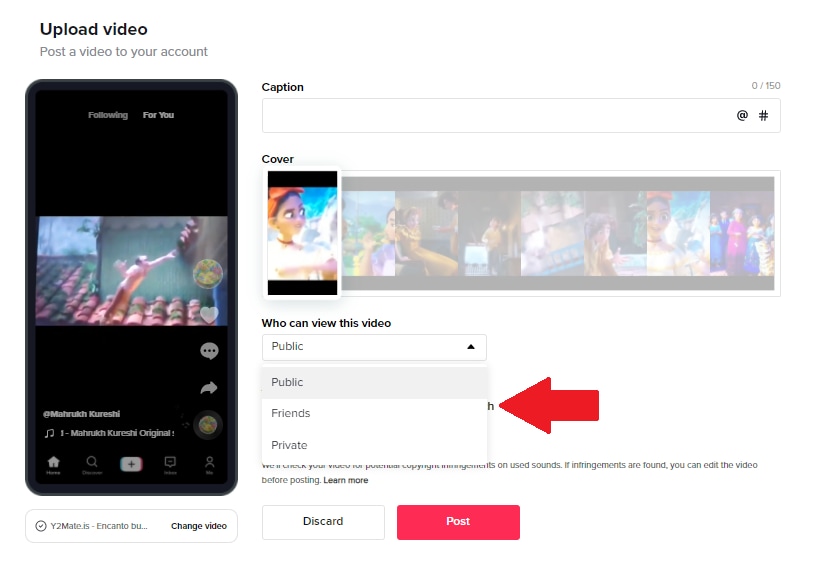
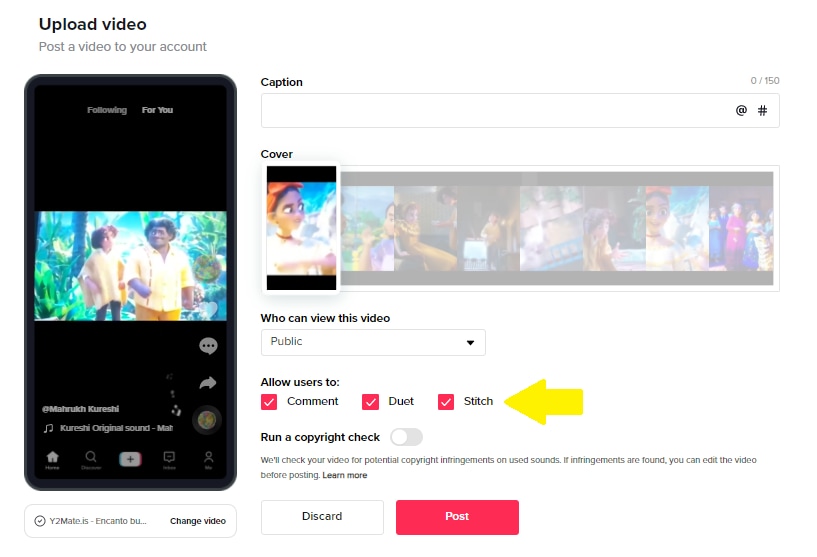
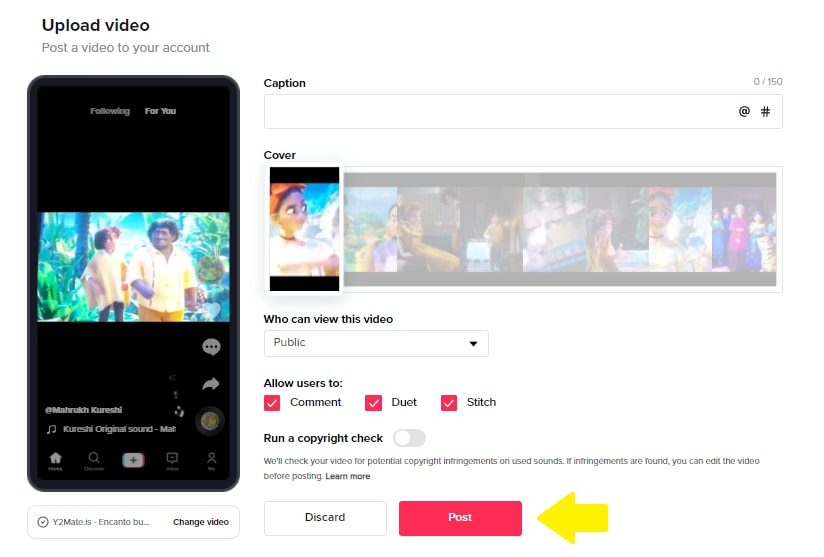
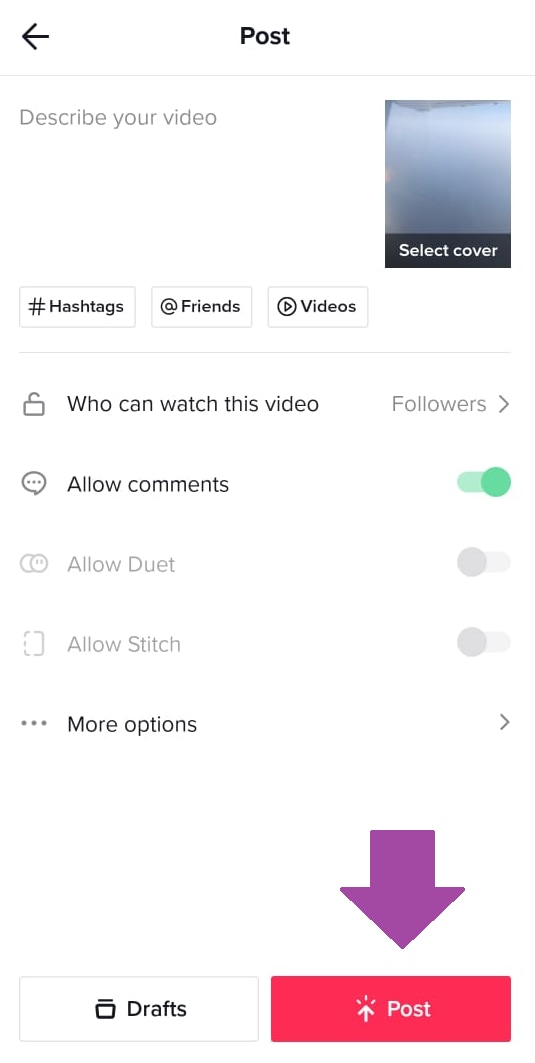
Once the video is uploaded, add a caption with hashtags and select the cover for your video.

Step 6
The next step is to choose whether your video can be viewed by the public or your friends or whether you want to keep it private from everyone.
Step 7
You can also allow or restrict users to comment on your video, make duets, or stitch your video.
Step 8
Once you have adjusted all the settings, click on “Post” to upload the video to Tiktok.
Your video will be uploaded on Tiktok and ready to receive comments and likes!
Wasn’t that easy?
Now, if you want to upload a Tiktok video on Android or iPhone, we have a tutorial for that too!
Upload Tiktok Videos on Android/iPhone
Here are the steps to upload Tiktok videos on Android or iPhone.
Step 1
Launch the Tiktok app on your Android or iOS device, and sign up using any of the given methods or log in if you already have an account.
Step 2
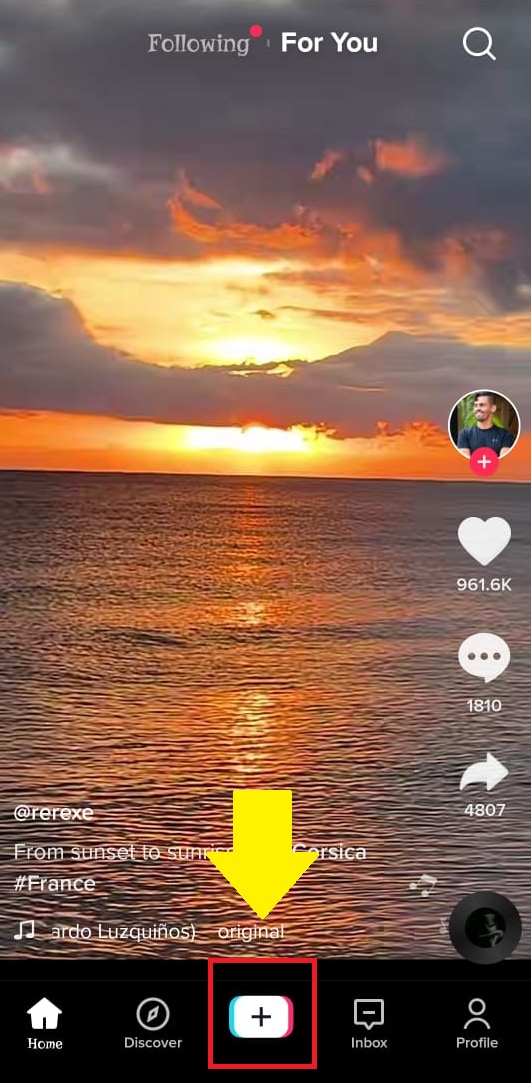
Click on the “+” sign to go to the video recording page.
Step 3
Click on the “Upload” option at the bottom right of the screen. This will take you to your device’s gallery/photos.
Step 4
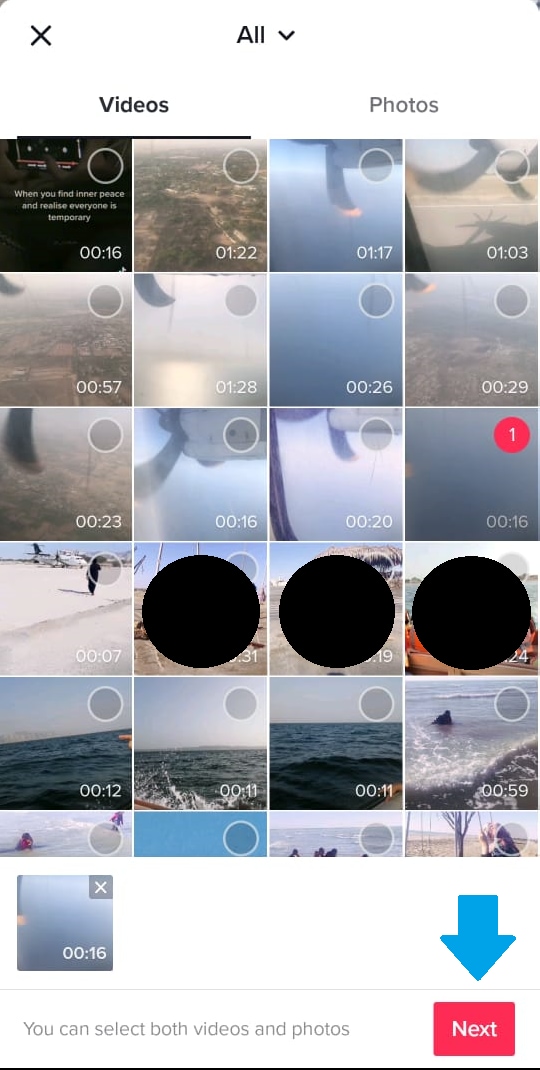
Tap on the video you want to upload to Tiktok and click “Next.”
Step 5
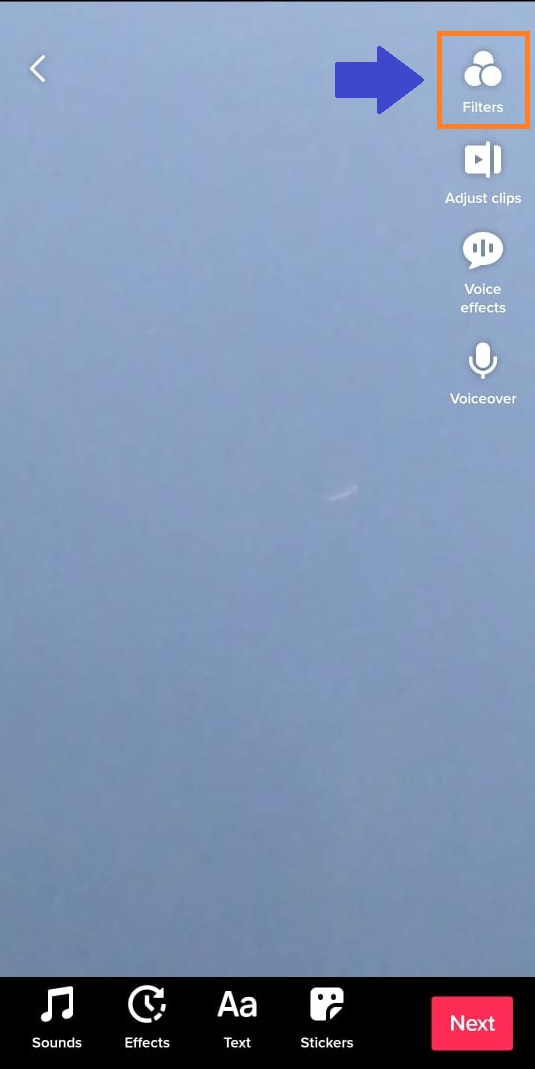
On the next page, you will see several different options to edit your video.
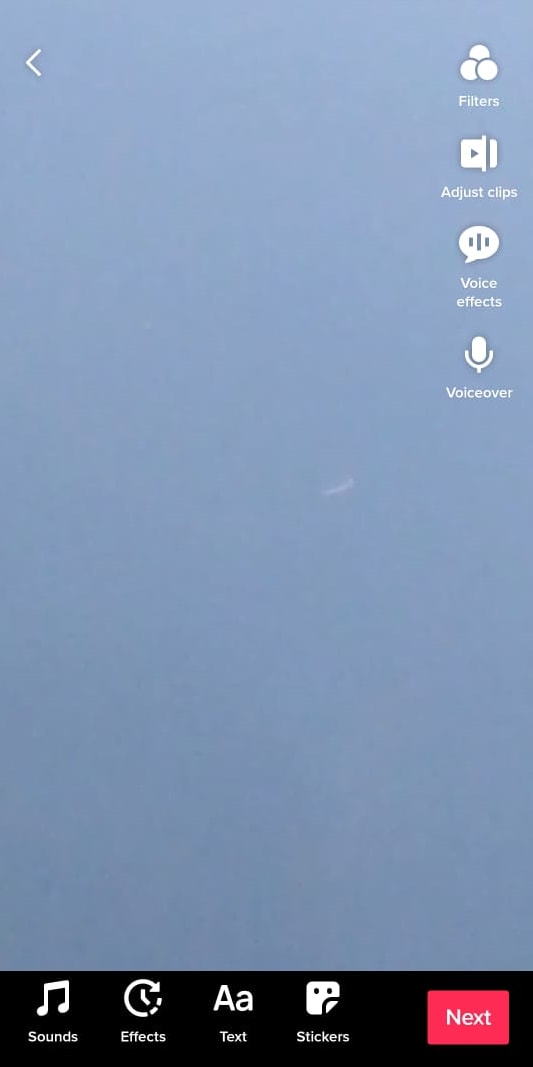
- You can add filters to your video by tapping on the “Filter” option at the top.
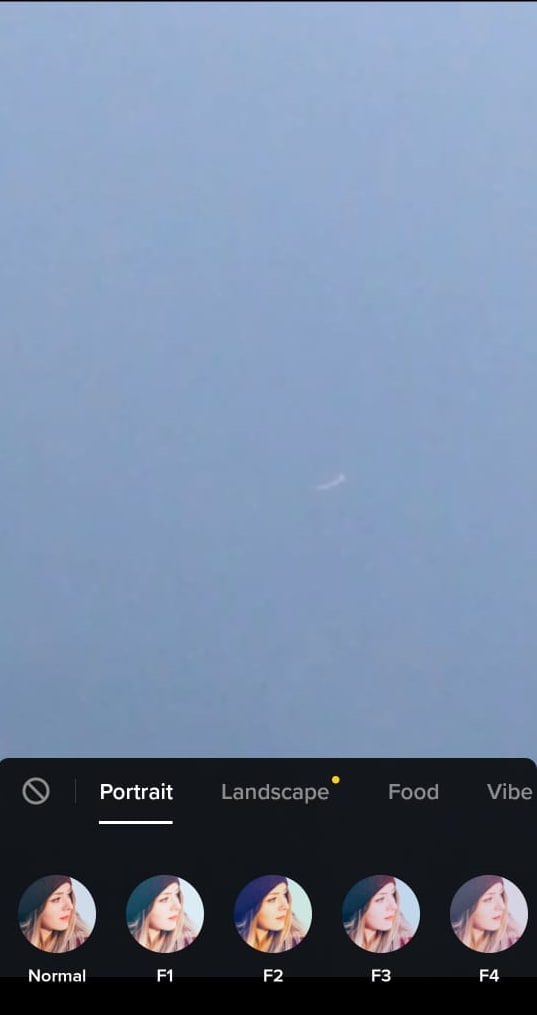
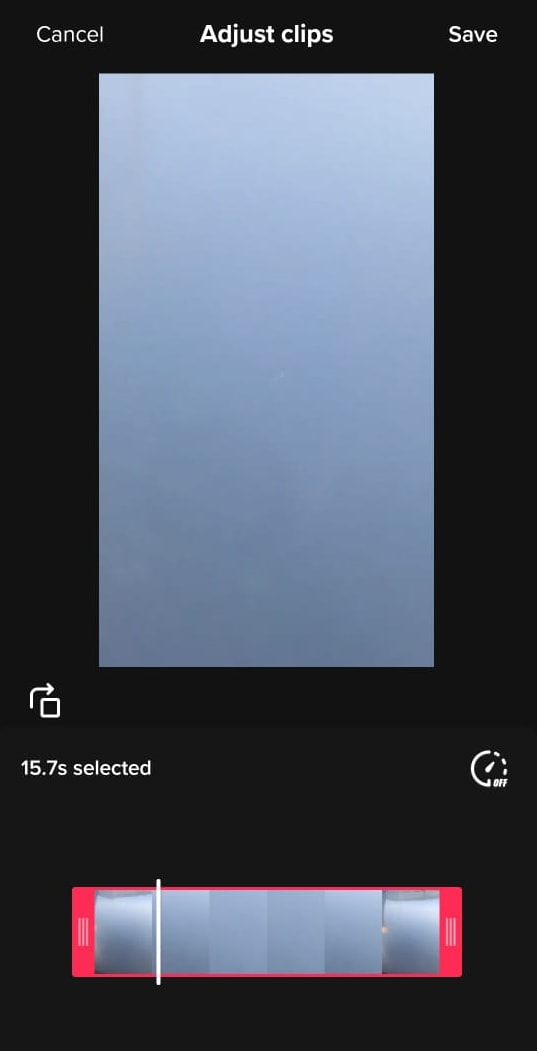
- To trim, rotate, and set the playback speed of your video, tap on “Adjust Clips.”
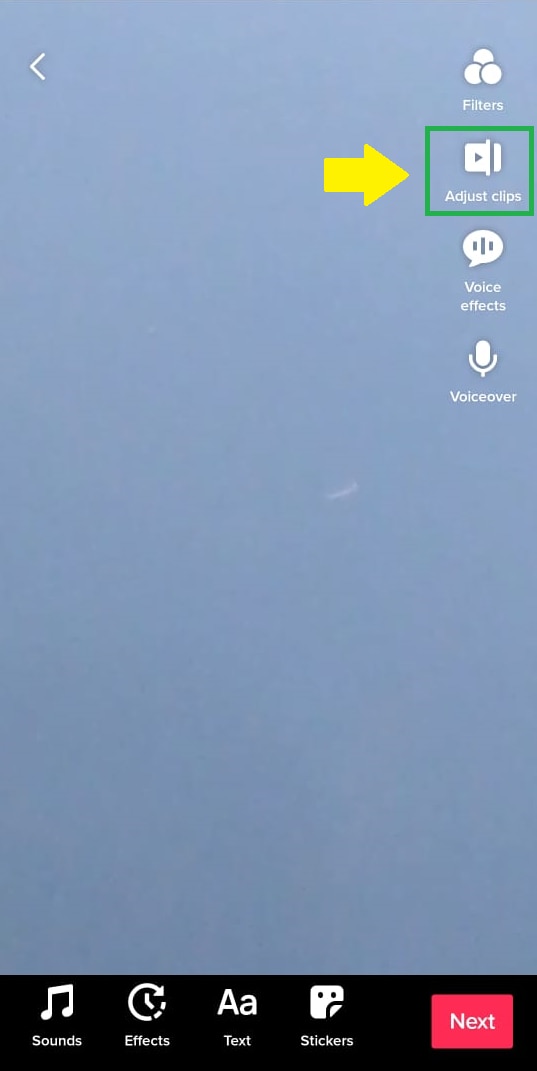
- You can also add voice effects to your videos by tapping on the “Voice Effects” button.
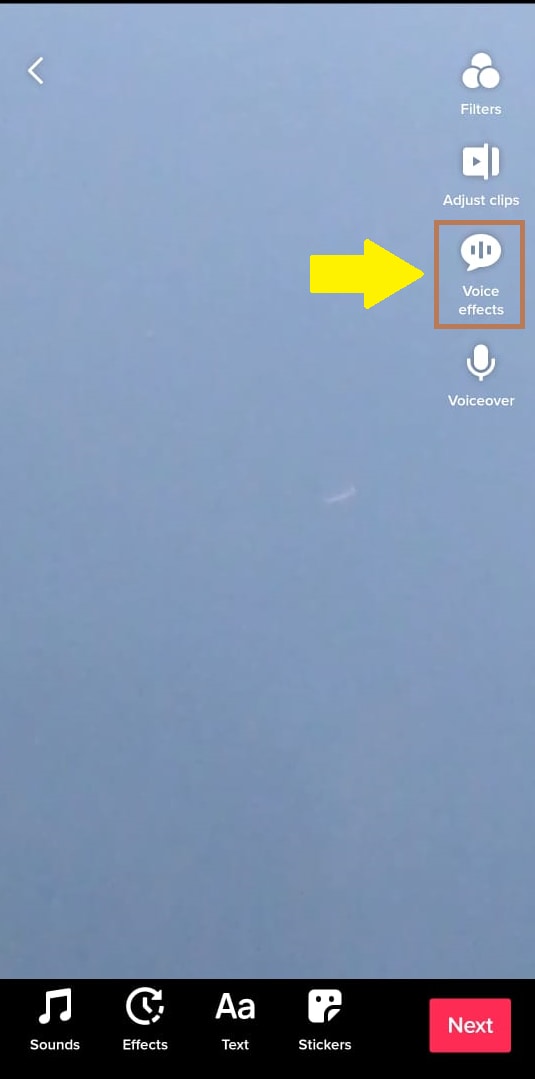
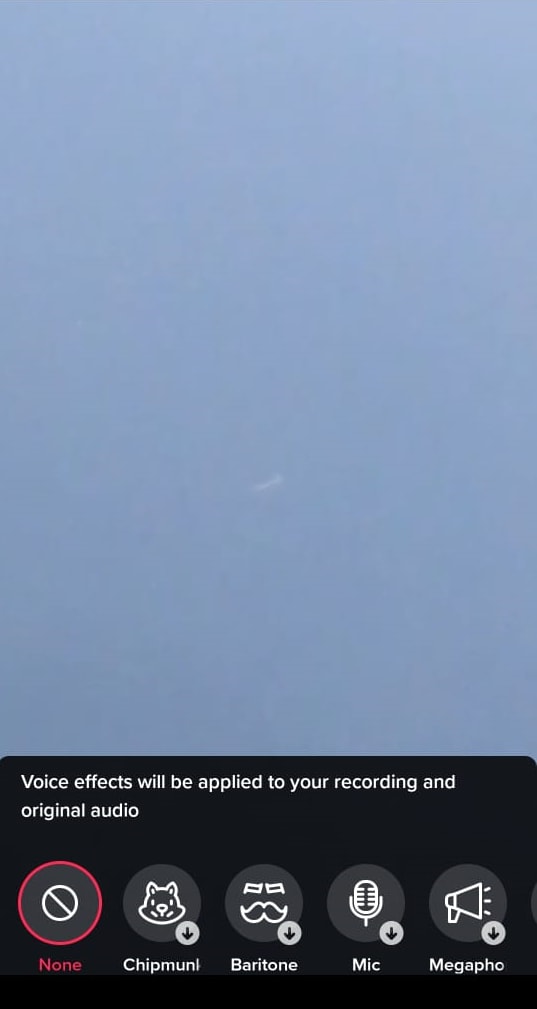
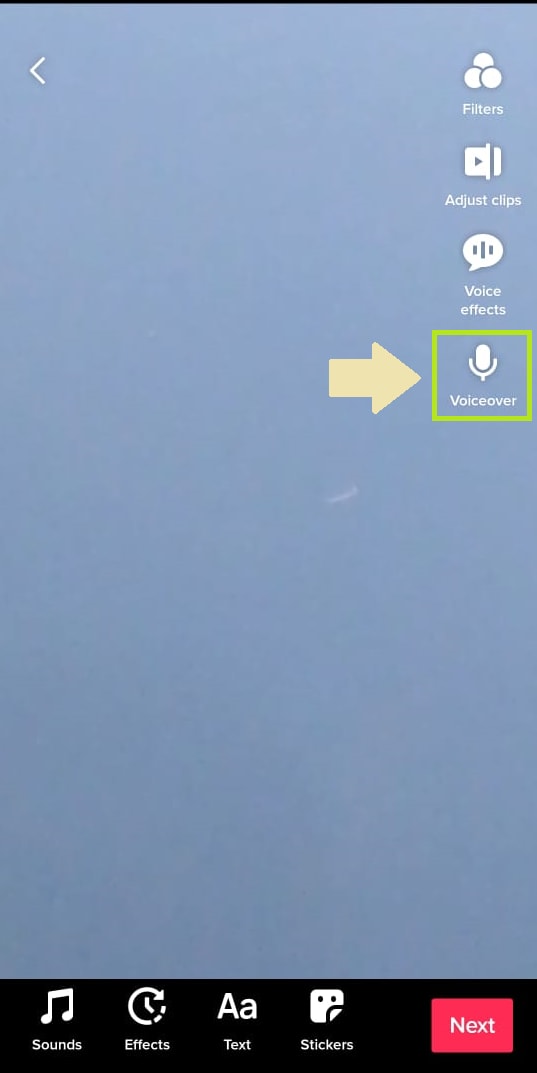
- If you want to explain something during the video, you can do so by adding a voiceover.
- To add effects to your video from Tiktok’s built-in effects library, tap on “Effects.”
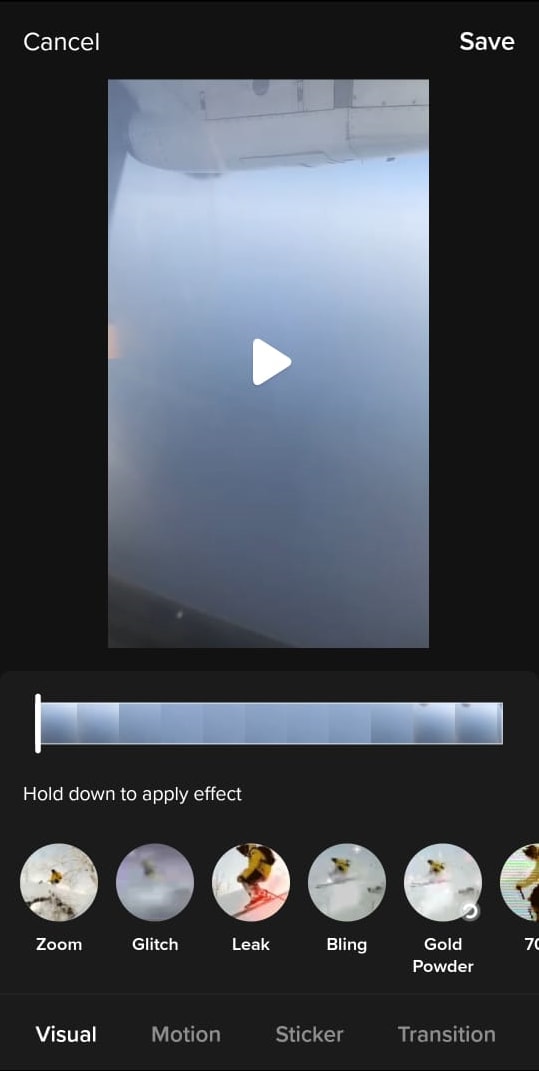
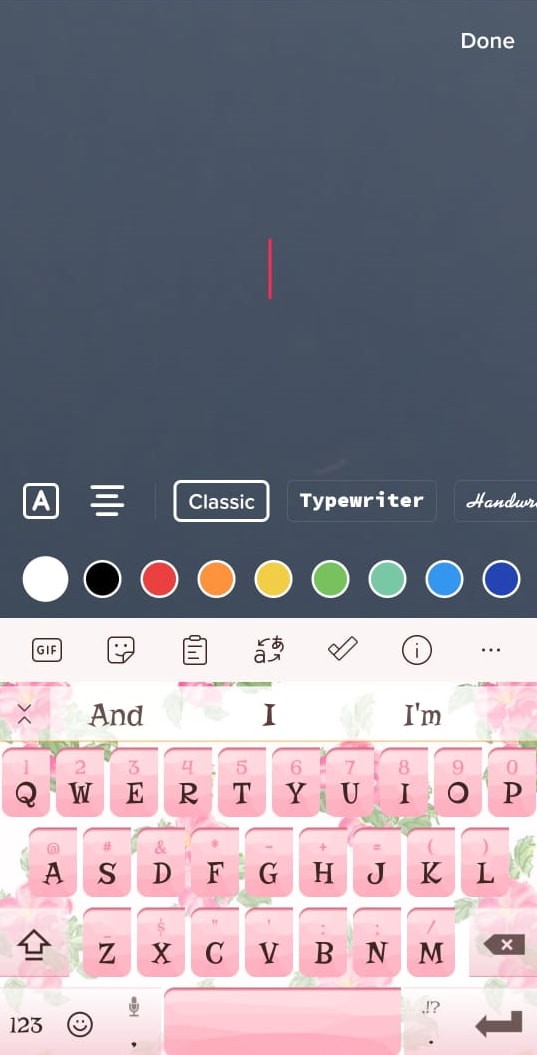
- To add text to your video, click on the “Text” button.
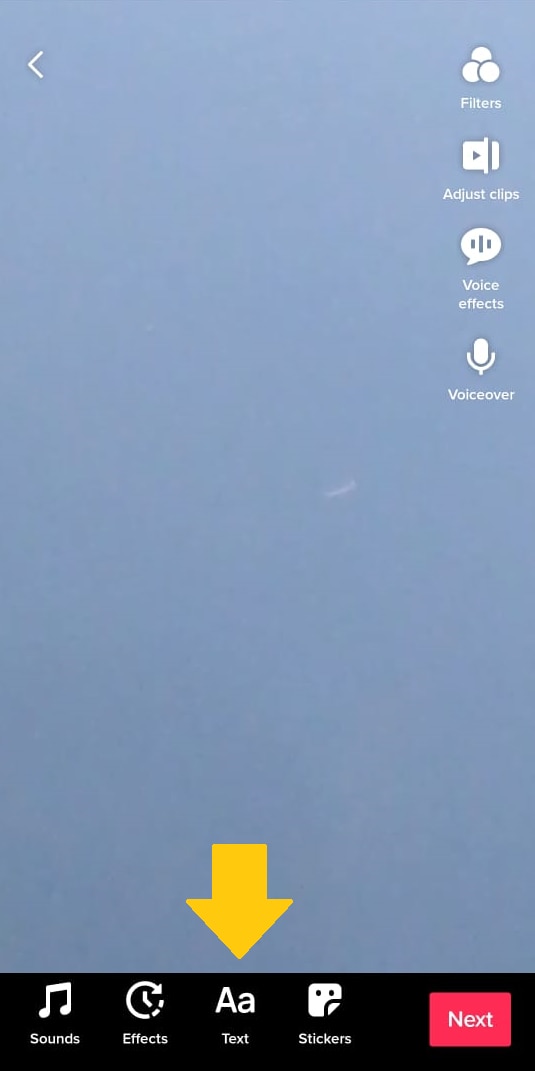
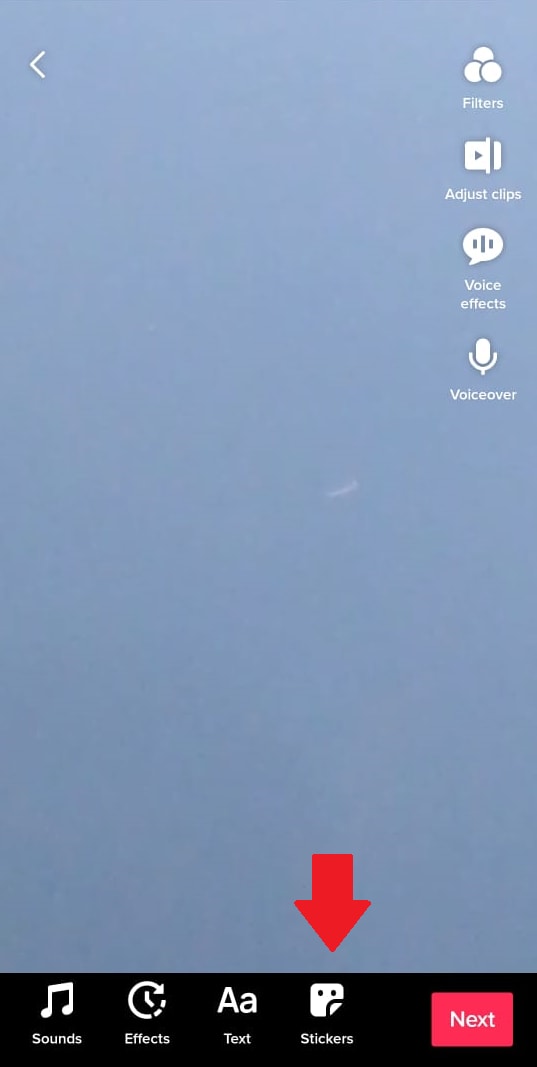
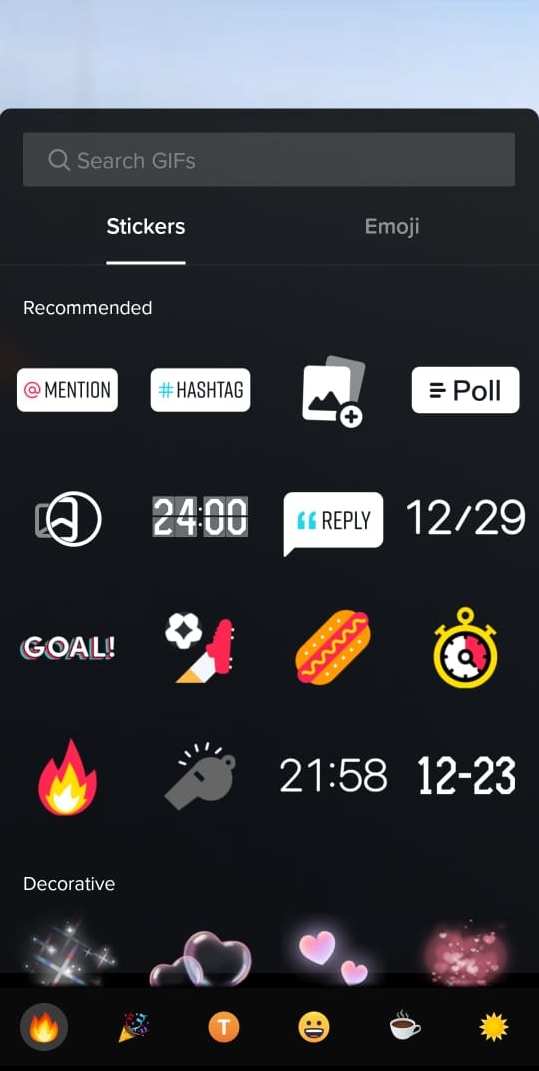
- Lastly, you can also add stickers to your videos by tapping on the “Stickers” icon.
Step 6
Once you’ve edited the video, tap “Next” and adjust the settings for posting the video. You can add a description, hashtags, tag friends, etc. You can also customize the viewers, and allow or restrict comments and duets.
Click “Post” to upload your video to Tiktok!
You have now successfully uploaded your video on Tiktok via Android or iPhone.
Conclusion
Gone are the days when there were only a handful of social media options. Now, there are many platforms that you need, to have a distinct online presence. And, some of them are too famous to ignore, like Tiktok!
In this article we have gone over several ways on how to upload Tiktok videos on Chrome, Android, and iPhone. We hope it will help you learn the basics of refining your videos before you put them out there for the world to see!
Step 2
You will get a popup asking you to either sign up to Tiktok or log in using your email, Facebook, Twitter, Google, Apple, or Instagram. You can choose whichever option you find convenient.
Step 3
Click on the “Upload” option indicated by a cloud with an arrow.
Step 4
Click on “Select Video to Upload” and choose a video from your PC’s storage.
Step 5
Once the video is uploaded, add a caption with hashtags and select the cover for your video.
Step 6
The next step is to choose whether your video can be viewed by the public or your friends or whether you want to keep it private from everyone.
Step 7
You can also allow or restrict users to comment on your video, make duets, or stitch your video.
Step 8
Once you have adjusted all the settings, click on “Post” to upload the video to Tiktok.
Your video will be uploaded on Tiktok and ready to receive comments and likes!
Wasn’t that easy?
Now, if you want to upload a Tiktok video on Android or iPhone, we have a tutorial for that too!
Upload Tiktok Videos on Android/iPhone
Here are the steps to upload Tiktok videos on Android or iPhone.
Step 1
Launch the Tiktok app on your Android or iOS device, and sign up using any of the given methods or log in if you already have an account.
Step 2
Click on the “+” sign to go to the video recording page.
Step 3
Click on the “Upload” option at the bottom right of the screen. This will take you to your device’s gallery/photos.
Step 4
Tap on the video you want to upload to Tiktok and click “Next.”
Step 5
On the next page, you will see several different options to edit your video.
- You can add filters to your video by tapping on the “Filter” option at the top.
- To trim, rotate, and set the playback speed of your video, tap on “Adjust Clips.”
- You can also add voice effects to your videos by tapping on the “Voice Effects” button.
- If you want to explain something during the video, you can do so by adding a voiceover.
- To add effects to your video from Tiktok’s built-in effects library, tap on “Effects.”
- To add text to your video, click on the “Text” button.
- Lastly, you can also add stickers to your videos by tapping on the “Stickers” icon.
Step 6
Once you’ve edited the video, tap “Next” and adjust the settings for posting the video. You can add a description, hashtags, tag friends, etc. You can also customize the viewers, and allow or restrict comments and duets.
Click “Post” to upload your video to Tiktok!
You have now successfully uploaded your video on Tiktok via Android or iPhone.
Conclusion
Gone are the days when there were only a handful of social media options. Now, there are many platforms that you need, to have a distinct online presence. And, some of them are too famous to ignore, like Tiktok!
In this article we have gone over several ways on how to upload Tiktok videos on Chrome, Android, and iPhone. We hope it will help you learn the basics of refining your videos before you put them out there for the world to see!
Capture Your Best Selfie on TikTok: Essential Recording Techniques Explained
Whether sardonic, informative, or both, voiceovers can improve a TikTok video for humor and clarity.
What do sewing how-to videos, cooking tutorials, and daily vlogs have in common? They all probably are dependent on TikTok’s voiceover feature, which can be helpful in the inbuilt editing suite of the TikTok app.
Ever wished to record a TikTok and save it for later without letting the publisher know? Then, it is always the best idea to learn how to screen record on TikTok. This article will help you learn multiple ways of screen recording on TikTok without you having to worry about the other person knowing.
And, we’ll also look at how to do a voiceover on TikTok using the step-by-step guide mentioned below.
In this article
01 How to Screen Record on TikTok?
02 How to Add Voiceover to the TikTok Video?
03 Add Voiceover to TikTok Video with Extra Fusion: Wondershare Filmora
Part 1: How to Screen Record on TikTok?
Have you ever accidentally taken a screenshot of someone’s Instagram story or screen recorded it for future reference and got scared that the person may have got notified?
While Instagram had the feature of notifying users if their story or picture has been screen recorded, it has recently changed to restrict this notification to images and videos sent via private DMs.
However, TikTokers can rest assured as TikTok has never had a similar notification feature, and you can safely screen record TikTok without mentioning the publisher.
How to Record Computer Screens on Windows
PCs allow software products useful for various purposes. For example, if you would like to record your PC screen while using Windows-based software, you’ll be required a powerful screen recorder that lets you set up a new screencasting session in just a few simple steps.
Here are some of the steps you need to consider!
Step 1: Download Wondershare Filmora
Download Wondershare Filmora onto your computer and then launch the software.
Wondershare Filmora
Get started easily with Filmora’s powerful performance, intuitive interface, and countless effects!
Try It Free Try It Free Try It Free Learn More >

Just visit the browser and type the URL ‘tiktok.com’ in the search bar. Then, look for the TikTok video you would like to record.
Besides providing functions that activate you to control the screen recording procedure entirely, Wondershare Filmora is also a video editor program that lets you manipulate your videos in any way you want.
You must double-click on its desktop icon and open the Full Feature mode right after launching the software. Now, hit the Record tab and choose the Record PC screen option.
The Wondershare Screen Recorder window will appear on the screen so you can modify the settings for your upcoming screencasting session.

You’ll see the Settings icon in the window’s lower right corner and then click it. For example, you can select the computer’s hard drive destination where the recording will be saved, modify the frame rate or set the quality of the recording from the Quality drop-down menu.

Hit the Microphone icon to choose the mic you’ll be using to record narration, and you can select the Speakers icon if you want to disable or enable the computer’s speakers during the session of screen recording.
You’ll see the Settings icon in the window’s lower right corner and then click it. For example, you can select the computer’s hard drive destination where the recording will be saved, modify the frame rate or set the quality of the recording from the Quality drop-down menu.

Mark the Mouse checkbox if you wish the mouse clicks to display in the recording, and you can easily place the maximum duration of a recording session. It is done by inserting the preferred default screen recording duration into the Record Timer box.

Hit the Rec button to begin a new screencasting session, and the software will start recording after a three-second countdown.
Tap the F9 button on the keyboard to stop recording. It will automatically open the file in Filmora’s video editor so you can edit it before publishing online.
Part 2: How to Add Voiceover to the TikTok Video?
Steps to add a voiceover to your TikTok video.
Upload or record a new video by hitting the + at the menu’s center at the screen’s bottom area.
Hit the microphone icon on the screen’s upper right corner once you’re over with the recording and trimming clips to your desired edit. Beneath, the microphone icon must mention “Voiceover.”

Source: mashable.com
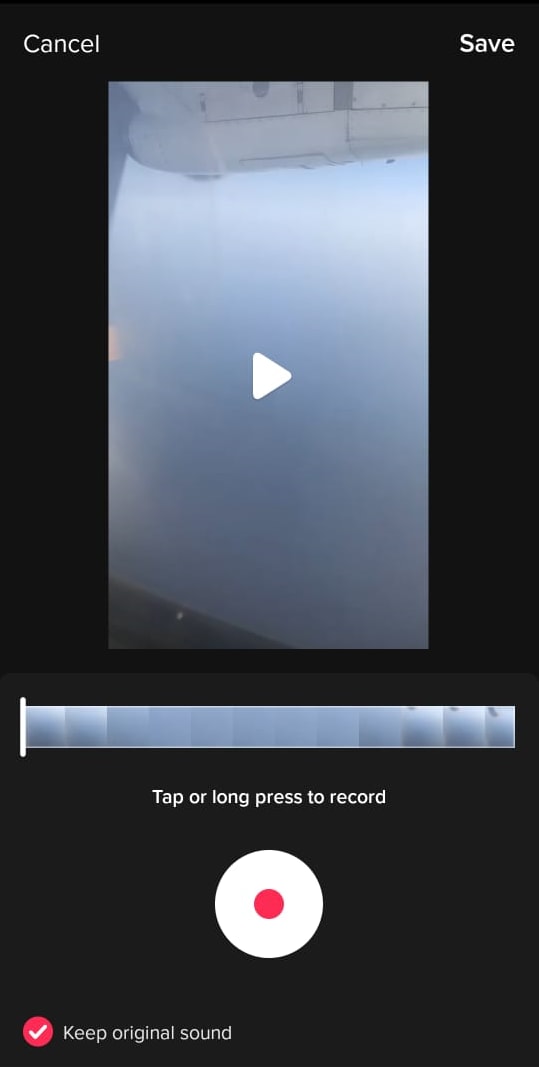
Now, you can record a voiceover timed to Video’s every frame here.
Hit the “Save“ button once you’re satisfied with the voiceover

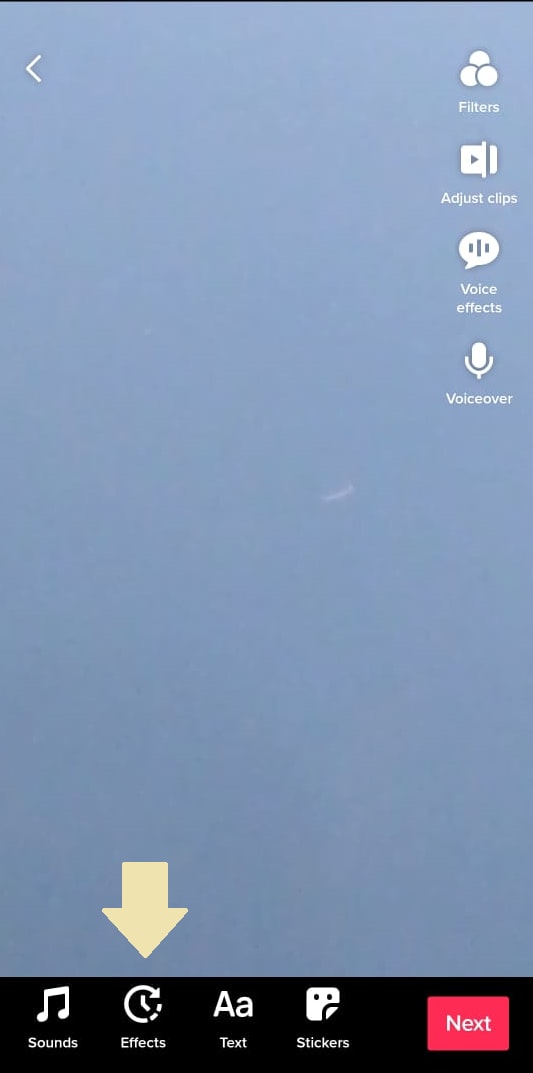
Hitting the “Save“ button will offer you back to the video’s preview, where you can add filters, text, stickers, and various sounds.
It is needed to add effects to your voiceover by hitting the “voice effects”. Here, you can control the narrator’s volume as well.
Also, make sure to enable automatic captions to make sure your video is more accessible!
Tap the Next button once you’re over with your Video. Then, you can edit the Video’s privacy settings, add a caption, and select a cover.
Part 3: Add Voiceover to TikTok Video with Extra Fusion: Wondershare Filmora
Do you want to include your voice in a video, create a voiceover demo for sharing and uploading on social networking platforms, or frame a documentary for important content?
All you need is an ideal video editing program similar to the Wondershare Filmora Video Editor.
The Filmora’s voiceover feature allows you to record your voice or add voice-over files to Video easily. In addition, you can customize the pitch, speed, and volume of the recorded voiceover and apply fade-in and fade-out effects. I’ll share how to register and add voiceover to a video with Filmora on your computer in this post.
Firstly, you can edit your Video in Filmora and then record the voiceover afterward. Or, you can first record the voiceover and then edit the Video around.
Check the steps below on how to make TikTok videos with voiceover via Wondershare Filmora.
Wondershare Filmora
Get started easily with Filmora’s powerful performance, intuitive interface, and countless effects!
Try It Free Try It Free Try It Free Learn More >
Record Voiceover and Add it to Video
We suggest you record the voiceover first in most cases so the sound will become pretty natural.
Step 1: Connect Microphone to PC or laptop
Connect the microphone to your laptop/PC when you’re ready to begin. It’s advisable to use some professional external microphones to capture high-quality sound.
Step 2: Record voiceover
Tap the Wondershare Filmora icon to launch this software. Then, select the New Project option in the beginning interface to create a new one.
Enter the Record tab and choose the “Record a Voiceover” option to arouse the Record Audio windows.
Or hit the microphone icon, and you only need 3 seconds of countdown to begin speaking.
Click the microphone icon again after you finish the above. Then, a new Record file option will be automatically present on the audio track.
Step 3: Edit Recorded Voiceover to Video
To edit the recorded voiceover, you can adjust audio settings, such as changing the Speed, Pitch, Volume, etc.

You can cut and trim out unnecessary sound sections from the recorded voiceover or apply the fade effects to the voiceover for a smoother transition.
Step 4: Sync Voiceover to Video
Now, it’s time to synchronize the recorded voiceover to video to create a compelling video.
The Wondershare Filmora allows up to 100 audio tracks; you can also add some background music to the voiceover.
Then import and drag-n-drop the video content to the video track, drag and drop the soundtrack to the video’s right-side position. Keep the voice and video track in the exact video duration if required.
Here’s how to sync voiceover to video!
Now, sync the recorded voiceover to Video to create a video. Since Filmora is compatible with 100 plus audio tracks, you can add different background music to the voiceover.
Then import and drag-n-drop the video content to the video track, drag and drop the soundtrack to the Video’s right side position. You can keep the Video and audio track in the same video duration.

Note: If you’ve recorded the iPhone voiceover or other device already, you can import it in the Project Library if you wish to add it to the Video and then sync it to Video.
Here is the ultimate step-by-step guide about adding titles to videos after knowing how to do a voiceover on TikTok.
Step 5: Export and save the new file
Click the “Export“ tab to export your new video file after you complete the project. You can either save the Video to different formats or directly share it on other social media platforms.
Additionally, you can even burn a DVD in minutes to watch it on TV.
How to Record and Add Voice over File during Filmora’s Video Editing Process
If you’ve recorded the voice over on your iPhone or another device already, even via the Wondershare Filmora, and wish to add it to the Video, visit the steps mentioned below:
1. Upload the video to Filmora
After logging in to Filmora’s main editing interface, click “Import” or drag-drop your video and voiceover file to the project library.
Filmora video editing software is compatible with a vast range of formats, so there will be no need to convert the files before import.
Drag and drop the files or video content to the Video Timeline when all the files get imported.
2. Record Voiceover in Video Editing
3. Edit voiceover and Export
You can then edit the recorded voiceover for TikTok to perfectly fit the Video and export it to your laptop/PC or directly upload it to YouTube.
For improving the sound, Filmora features more audio editing tools.
Conclusion
This article offered you a step-by-step guide on how to record a TikTok. It also displays four different screen recording methods, along with how to do a voiceover on TikTok.
Now, don’t ever worry about losing out on your favorite TikTok without the original publisher knowing via screen record TikTok via Wondershare Filmora.
02 How to Add Voiceover to the TikTok Video?
03 Add Voiceover to TikTok Video with Extra Fusion: Wondershare Filmora
Part 1: How to Screen Record on TikTok?
Have you ever accidentally taken a screenshot of someone’s Instagram story or screen recorded it for future reference and got scared that the person may have got notified?
While Instagram had the feature of notifying users if their story or picture has been screen recorded, it has recently changed to restrict this notification to images and videos sent via private DMs.
However, TikTokers can rest assured as TikTok has never had a similar notification feature, and you can safely screen record TikTok without mentioning the publisher.
How to Record Computer Screens on Windows
PCs allow software products useful for various purposes. For example, if you would like to record your PC screen while using Windows-based software, you’ll be required a powerful screen recorder that lets you set up a new screencasting session in just a few simple steps.
Here are some of the steps you need to consider!
Step 1: Download Wondershare Filmora
Download Wondershare Filmora onto your computer and then launch the software.
Wondershare Filmora
Get started easily with Filmora’s powerful performance, intuitive interface, and countless effects!
Try It Free Try It Free Try It Free Learn More >
Just visit the browser and type the URL ‘tiktok.com’ in the search bar. Then, look for the TikTok video you would like to record.
Besides providing functions that activate you to control the screen recording procedure entirely, Wondershare Filmora is also a video editor program that lets you manipulate your videos in any way you want.
You must double-click on its desktop icon and open the Full Feature mode right after launching the software. Now, hit the Record tab and choose the Record PC screen option.
The Wondershare Screen Recorder window will appear on the screen so you can modify the settings for your upcoming screencasting session.
You’ll see the Settings icon in the window’s lower right corner and then click it. For example, you can select the computer’s hard drive destination where the recording will be saved, modify the frame rate or set the quality of the recording from the Quality drop-down menu.
Hit the Microphone icon to choose the mic you’ll be using to record narration, and you can select the Speakers icon if you want to disable or enable the computer’s speakers during the session of screen recording.
You’ll see the Settings icon in the window’s lower right corner and then click it. For example, you can select the computer’s hard drive destination where the recording will be saved, modify the frame rate or set the quality of the recording from the Quality drop-down menu.
Mark the Mouse checkbox if you wish the mouse clicks to display in the recording, and you can easily place the maximum duration of a recording session. It is done by inserting the preferred default screen recording duration into the Record Timer box.
Hit the Rec button to begin a new screencasting session, and the software will start recording after a three-second countdown.
Tap the F9 button on the keyboard to stop recording. It will automatically open the file in Filmora’s video editor so you can edit it before publishing online.
Part 2: How to Add Voiceover to the TikTok Video?
Steps to add a voiceover to your TikTok video.
Upload or record a new video by hitting the + at the menu’s center at the screen’s bottom area.
Hit the microphone icon on the screen’s upper right corner once you’re over with the recording and trimming clips to your desired edit. Beneath, the microphone icon must mention “Voiceover.”
Source: mashable.com
Now, you can record a voiceover timed to Video’s every frame here.
Hit the “Save“ button once you’re satisfied with the voiceover
Hitting the “Save“ button will offer you back to the video’s preview, where you can add filters, text, stickers, and various sounds.
It is needed to add effects to your voiceover by hitting the “voice effects”. Here, you can control the narrator’s volume as well.
Also, make sure to enable automatic captions to make sure your video is more accessible!
Tap the Next button once you’re over with your Video. Then, you can edit the Video’s privacy settings, add a caption, and select a cover.
Part 3: Add Voiceover to TikTok Video with Extra Fusion: Wondershare Filmora
Do you want to include your voice in a video, create a voiceover demo for sharing and uploading on social networking platforms, or frame a documentary for important content?
All you need is an ideal video editing program similar to the Wondershare Filmora Video Editor.
The Filmora’s voiceover feature allows you to record your voice or add voice-over files to Video easily. In addition, you can customize the pitch, speed, and volume of the recorded voiceover and apply fade-in and fade-out effects. I’ll share how to register and add voiceover to a video with Filmora on your computer in this post.
Firstly, you can edit your Video in Filmora and then record the voiceover afterward. Or, you can first record the voiceover and then edit the Video around.
Check the steps below on how to make TikTok videos with voiceover via Wondershare Filmora.
Wondershare Filmora
Get started easily with Filmora’s powerful performance, intuitive interface, and countless effects!
Try It Free Try It Free Try It Free Learn More >
Record Voiceover and Add it to Video
We suggest you record the voiceover first in most cases so the sound will become pretty natural.
Step 1: Connect Microphone to PC or laptop
Connect the microphone to your laptop/PC when you’re ready to begin. It’s advisable to use some professional external microphones to capture high-quality sound.
Step 2: Record voiceover
Tap the Wondershare Filmora icon to launch this software. Then, select the New Project option in the beginning interface to create a new one.
Enter the Record tab and choose the “Record a Voiceover” option to arouse the Record Audio windows.
Or hit the microphone icon, and you only need 3 seconds of countdown to begin speaking.
Click the microphone icon again after you finish the above. Then, a new Record file option will be automatically present on the audio track.
Step 3: Edit Recorded Voiceover to Video
To edit the recorded voiceover, you can adjust audio settings, such as changing the Speed, Pitch, Volume, etc.
You can cut and trim out unnecessary sound sections from the recorded voiceover or apply the fade effects to the voiceover for a smoother transition.
Step 4: Sync Voiceover to Video
Now, it’s time to synchronize the recorded voiceover to video to create a compelling video.
The Wondershare Filmora allows up to 100 audio tracks; you can also add some background music to the voiceover.
Then import and drag-n-drop the video content to the video track, drag and drop the soundtrack to the video’s right-side position. Keep the voice and video track in the exact video duration if required.
Here’s how to sync voiceover to video!
Now, sync the recorded voiceover to Video to create a video. Since Filmora is compatible with 100 plus audio tracks, you can add different background music to the voiceover.
Then import and drag-n-drop the video content to the video track, drag and drop the soundtrack to the Video’s right side position. You can keep the Video and audio track in the same video duration.
Note: If you’ve recorded the iPhone voiceover or other device already, you can import it in the Project Library if you wish to add it to the Video and then sync it to Video.
Here is the ultimate step-by-step guide about adding titles to videos after knowing how to do a voiceover on TikTok.
Step 5: Export and save the new file
Click the “Export“ tab to export your new video file after you complete the project. You can either save the Video to different formats or directly share it on other social media platforms.
Additionally, you can even burn a DVD in minutes to watch it on TV.
How to Record and Add Voice over File during Filmora’s Video Editing Process
If you’ve recorded the voice over on your iPhone or another device already, even via the Wondershare Filmora, and wish to add it to the Video, visit the steps mentioned below:
1. Upload the video to Filmora
After logging in to Filmora’s main editing interface, click “Import” or drag-drop your video and voiceover file to the project library.
Filmora video editing software is compatible with a vast range of formats, so there will be no need to convert the files before import.
Drag and drop the files or video content to the Video Timeline when all the files get imported.
2. Record Voiceover in Video Editing
3. Edit voiceover and Export
You can then edit the recorded voiceover for TikTok to perfectly fit the Video and export it to your laptop/PC or directly upload it to YouTube.
For improving the sound, Filmora features more audio editing tools.
Conclusion
This article offered you a step-by-step guide on how to record a TikTok. It also displays four different screen recording methods, along with how to do a voiceover on TikTok.
Now, don’t ever worry about losing out on your favorite TikTok without the original publisher knowing via screen record TikTok via Wondershare Filmora.
Also read:
- [Updated] 2024 Approved A Deep Dive Into TikTok's PFP Significance
- 2024 Approved Keep Your Content Safe Guidelines for Clearance of TikTok Videos
- In 2024, Step-by-Step Guide to Adding Descriptive Text in TikTok Videos
- Fuel Your Film Rate with These Easy TikTok Tricks
- Best 10 Customizable Filters for Personalized Videos
- Trusted Sources for Authentic TikTok Fans
- [New] Dinner Dramas The Most Entertaining Food Moments on TikTok
- [New] 2024 Approved Transforming TikTok Videos with Effortless Text Enhancement Techniques
- [Updated] In 2024, Baffling Battles A Collection of Intense TikTok Games
- [New] Filmmaker’s Finesse for Fabulous TikTok Reactions with Filmora Pro Tools for 2024
- [Updated] 2024 Approved Overcoming TikTok's Covert Ban A Guide to Re-Emerge
- [Updated] On-Demand Rhythm Sharing on Xigua Video
- [Updated] In 2024, Gripping Gurus on TikTok Top 15 for Aspiring Influencers
- [New] Sync Your Creativity Across Chrome, Android & iOS for TikTok for 2024
- [Updated] Transforming Ideas Into Visuals The Template Method for Impressive TikToks for 2024
- Access to High-Quality TikTok Videos Without Watermarks Online for 2024
- [New] 2024 Approved Crafting Engaging TikTok Content on Computers
- Decoding Slow Motion Magic A Step-by-Step Guide for TikTok Filmmakers for 2024
- [Updated] 2024 Approved Unique 30 Names That Skyrocket Your TikTok Popularity
- Top 10 Hits When TikTok Goes Wild for 2024
- [Updated] In 2024, Establishing a Unique Code for Your TikTok Presence
- [New] In 2024, Hip-Hop Frenzy Top TikTok Rap Videos of Today
- [Updated] In 2024, Epic Explorers & Creators TikTok's Fascinating 15
- [New] 2024 Approved Watermark-Free TikTok Get Content Directly
- [New] Strategies for Expanding Your TikTok Influence via Hashtags
- [New] Expertly Curated Facebook's #1-#10 Plays for 2024
- Time Trackers in Action Using OBS for Timed Events
- Updated 2024 Approved What Is the Top MP3 Converter Mac Software?
- 11 Proven Solutions to Fix Google Play Store Not Working Issue on Oppo Reno 10 5G | Dr.fone
- How to Stop My Spouse from Spying on My Vivo S18 Pro | Dr.fone
- A Guide Nokia XR21 Wireless and Wired Screen Mirroring | Dr.fone
- [Updated] 2024 Approved 10 Best Webcams | A Buyer’s Guide
- In 2024, Zoom-In on Zuck's Users Rapidly Pinpoint Profiles
- Top 7 Skype Hacker to Hack Any Skype Account On your Poco X5 Pro | Dr.fone
- 2024 Approved Adjust and Shine Best Video Brightness Apps
- 4 Easy Ways for Your Xiaomi Redmi Note 13 Pro+ 5G Hard Reset | Dr.fone
- [New] Free Screen Recording Techniques for PC Enthusiasts for 2024
- In 2024, How To Unlock a Infinix Note 30 VIP Racing Edition Easily?
- Best 10 Spotify Recorders
- New 2024 Approved No Cost, All Vibes Download Spotifys Free Playlist
- Updated Exploring Depth of Field for Giant Audio Waves for 2024
- [Updated] 2024 Approved Tall Screen Editing Made Easy Using FCPX on Instagram
- [Updated] Exclusive Guide to the Best Chrome Extensions for FB Videos for 2024
- [Updated] Collecting Conquerors 8 Tools Every Business Leader Can’t Overlook for 2024
- Updated In 2024, Best 22 Video Editing Tips to Know
- New How to Adjust Aspect Ratio on Amazon Prime Video for 2024
- [New] In 2024, Essential Free Cam Tech Guide Quality and Selection
- [Updated] In 2024, Bust a Smile, Well Up in Tears with Top 10 Instagram Meme Groups
- [Updated] Screen Recording Showdown Go with OBS Studio or Bandicam
- Bypassing Google Account With vnROM Bypass For Poco C50
- Title: "2024 Approved TikTok Video Sync Chrome, Android & iOS Integration Techniques"
- Author: Brian
- Created at : 2024-05-23 14:17:49
- Updated at : 2024-05-24 14:17:49
- Link: https://tiktok-videos.techidaily.com/2024-approved-tiktok-video-sync-chrome-android-and-ios-integration-techniques/
- License: This work is licensed under CC BY-NC-SA 4.0.
