
:max_bytes(150000):strip_icc()/IsAmazonDown-2c0665c6b0db42e2ba578b9fe11bad92.jpg)
Blended Vocalists, One Platform at a Time
Blended Vocalists, One Platform at a Time
How to Make Duet On TikToK?

Shanoon Cox
Mar 27, 2024• Proven solutions
You might have heard about the TikTok app that people are using popularly these days to make short duet videos online. These custom videos can be posted online, and they play automatically on the left side of the screen along with another video.
There is no doubt to say that TikTok duet is one of the most popular platforms for gaining more followers and fans online. In this article, we are going to discuss a few tips and tricks to make the best out of duet videos. Hope it will help you get started quickly with the TikTok app.

- Part 1: Why Should I Create Duet Videos?
- Part 2: How to Make a Duet Video in TikTok?
- Part 3: Tips for Making Duet video in TikTok
- Part 4: FAQs about Making Duet on TikTok
Why Should I Create Duet Videos?
If you want to be an influencer on TikTok, the quickest way to become famous is to try and shape a duet challenge, and so does a brand. As a dispensable part of TikTok culture, duet challenges remain special due to its abundant user-generated content, which really encourages you to attend social events.
Do you want to spread the influence of your brand? Let’s see the tutorial below about making a duet video without hassle.
How to Make a Duet Video in TikTok?
Before creating your duet video, let’s see how other people do the popcorn duet.
Those who are eager to learn how to duet in Tik Tok app are advised to go through the steps below:
Creating Duet Video Via TikTok App
Step 1: Get the TikTok app installed on your gadget.
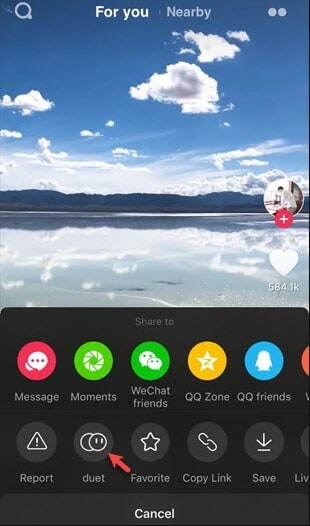
Step 2: Open the app and look for the video that you want to duet. Hit the share button and choose the duet option from the bottom of the screen. Now start recording your own video while the selected video is automatically playing on another side of the screen.
Step 3: Now you can modify your video by adding interesting stickers and special effects available in the TikTok app. Choose a cover for your recorded video and hit the next button. Finally hit post button to share your split-screen video.
Tips for Making Duet Video in TikTok
- Never forget to add tags to your duet video to make it go viral soon.
- The bolt button can be used to see all the notifications about how followed your profile and likes your videos.
- Set alerts to get notified when a particular person publishes a new musical.ly video online.
- Never forget to share your videos on Instagram to enjoy more popularity.
- Prefer to comment and like other videos; it will help you develop healthy relations online, and they will pay for promotions in the long run.
FAQs about Making Duet on TikTok
Quick Fix: Why can’t I make a duet video or how to prevent people from creating duet videos with me?
There are chances that you will not be able to create duet videos with some people. It happens just because those people have prevented others from creating duet videos with them. Although there is no method to delete the duet videos that others have created with you, yes, you can prevent it in the future by using app settings. By doing this, you are keeping your profile publicly visible, but you are not allowing other people to create a duet with you. If you want to do such settings; go through the steps below.
How to prevent people from creating duet videos with you?
Step 1: First of all, open the app and then go to privacy settings.
Step 2: Now move to the Safety option.
Step 3: Click on the option “Who Can Duet With Me.” Now you can choose the suitable option out of “Everyone,” “Friends” or simply “Off.” The last option doesn’t allow anyone to make duet videos with you; however, the second one allows only mutual followers to create videos with you.
Edit Your Duet Video with Versatile Video Editing Software


Conclusion
So, you must be now ready to create interesting duet videos on the TikTok platform. Get ready to choose your duet partner online and use some eye-catching effects to make your video more popular. Prefer to share your videos on a few other social media platforms to enjoy more engagement online. This is the simplest trick to entertain the public on the internet.
Shanoon Cox
Shanoon Cox is a writer and a lover of all things video.
Follow @Shanoon Cox
Shanoon Cox
Mar 27, 2024• Proven solutions
You might have heard about the TikTok app that people are using popularly these days to make short duet videos online. These custom videos can be posted online, and they play automatically on the left side of the screen along with another video.
There is no doubt to say that TikTok duet is one of the most popular platforms for gaining more followers and fans online. In this article, we are going to discuss a few tips and tricks to make the best out of duet videos. Hope it will help you get started quickly with the TikTok app.
- Part 1: Why Should I Create Duet Videos?
- Part 2: How to Make a Duet Video in TikTok?
- Part 3: Tips for Making Duet video in TikTok
- Part 4: FAQs about Making Duet on TikTok
Why Should I Create Duet Videos?
If you want to be an influencer on TikTok, the quickest way to become famous is to try and shape a duet challenge, and so does a brand. As a dispensable part of TikTok culture, duet challenges remain special due to its abundant user-generated content, which really encourages you to attend social events.
Do you want to spread the influence of your brand? Let’s see the tutorial below about making a duet video without hassle.
How to Make a Duet Video in TikTok?
Before creating your duet video, let’s see how other people do the popcorn duet.
Those who are eager to learn how to duet in Tik Tok app are advised to go through the steps below:
Creating Duet Video Via TikTok App
Step 1: Get the TikTok app installed on your gadget.
Step 2: Open the app and look for the video that you want to duet. Hit the share button and choose the duet option from the bottom of the screen. Now start recording your own video while the selected video is automatically playing on another side of the screen.
Step 3: Now you can modify your video by adding interesting stickers and special effects available in the TikTok app. Choose a cover for your recorded video and hit the next button. Finally hit post button to share your split-screen video.
Tips for Making Duet Video in TikTok
- Never forget to add tags to your duet video to make it go viral soon.
- The bolt button can be used to see all the notifications about how followed your profile and likes your videos.
- Set alerts to get notified when a particular person publishes a new musical.ly video online.
- Never forget to share your videos on Instagram to enjoy more popularity.
- Prefer to comment and like other videos; it will help you develop healthy relations online, and they will pay for promotions in the long run.
FAQs about Making Duet on TikTok
Quick Fix: Why can’t I make a duet video or how to prevent people from creating duet videos with me?
There are chances that you will not be able to create duet videos with some people. It happens just because those people have prevented others from creating duet videos with them. Although there is no method to delete the duet videos that others have created with you, yes, you can prevent it in the future by using app settings. By doing this, you are keeping your profile publicly visible, but you are not allowing other people to create a duet with you. If you want to do such settings; go through the steps below.
How to prevent people from creating duet videos with you?
Step 1: First of all, open the app and then go to privacy settings.
Step 2: Now move to the Safety option.
Step 3: Click on the option “Who Can Duet With Me.” Now you can choose the suitable option out of “Everyone,” “Friends” or simply “Off.” The last option doesn’t allow anyone to make duet videos with you; however, the second one allows only mutual followers to create videos with you.
Edit Your Duet Video with Versatile Video Editing Software
Conclusion
So, you must be now ready to create interesting duet videos on the TikTok platform. Get ready to choose your duet partner online and use some eye-catching effects to make your video more popular. Prefer to share your videos on a few other social media platforms to enjoy more engagement online. This is the simplest trick to entertain the public on the internet.
Shanoon Cox
Shanoon Cox is a writer and a lover of all things video.
Follow @Shanoon Cox
Easy Steps for Exceptional TikTok Video Experience
Whether sardonic, informative, or both, voiceovers can improve a TikTok video for humor and clarity.
What do sewing how-to videos, cooking tutorials, and daily vlogs have in common? They all probably are dependent on TikTok’s voiceover feature, which can be helpful in the inbuilt editing suite of the TikTok app.
Ever wished to record a TikTok and save it for later without letting the publisher know? Then, it is always the best idea to learn how to screen record on TikTok. This article will help you learn multiple ways of screen recording on TikTok without you having to worry about the other person knowing.
And, we’ll also look at how to do a voiceover on TikTok using the step-by-step guide mentioned below.
In this article
01 How to Screen Record on TikTok?
02 How to Add Voiceover to the TikTok Video?
03 Add Voiceover to TikTok Video with Extra Fusion: Wondershare Filmora
Part 1: How to Screen Record on TikTok?
Have you ever accidentally taken a screenshot of someone’s Instagram story or screen recorded it for future reference and got scared that the person may have got notified?
While Instagram had the feature of notifying users if their story or picture has been screen recorded, it has recently changed to restrict this notification to images and videos sent via private DMs.
However, TikTokers can rest assured as TikTok has never had a similar notification feature, and you can safely screen record TikTok without mentioning the publisher.
How to Record Computer Screens on Windows
PCs allow software products useful for various purposes. For example, if you would like to record your PC screen while using Windows-based software, you’ll be required a powerful screen recorder that lets you set up a new screencasting session in just a few simple steps.
Here are some of the steps you need to consider!
Step 1: Download Wondershare Filmora
Download Wondershare Filmora onto your computer and then launch the software.
Wondershare Filmora
Get started easily with Filmora’s powerful performance, intuitive interface, and countless effects!
Try It Free Try It Free Try It Free Learn More >

Just visit the browser and type the URL ‘tiktok.com’ in the search bar. Then, look for the TikTok video you would like to record.
Besides providing functions that activate you to control the screen recording procedure entirely, Wondershare Filmora is also a video editor program that lets you manipulate your videos in any way you want.
You must double-click on its desktop icon and open the Full Feature mode right after launching the software. Now, hit the Record tab and choose the Record PC screen option.
The Wondershare Screen Recorder window will appear on the screen so you can modify the settings for your upcoming screencasting session.

You’ll see the Settings icon in the window’s lower right corner and then click it. For example, you can select the computer’s hard drive destination where the recording will be saved, modify the frame rate or set the quality of the recording from the Quality drop-down menu.

Hit the Microphone icon to choose the mic you’ll be using to record narration, and you can select the Speakers icon if you want to disable or enable the computer’s speakers during the session of screen recording.
You’ll see the Settings icon in the window’s lower right corner and then click it. For example, you can select the computer’s hard drive destination where the recording will be saved, modify the frame rate or set the quality of the recording from the Quality drop-down menu.

Mark the Mouse checkbox if you wish the mouse clicks to display in the recording, and you can easily place the maximum duration of a recording session. It is done by inserting the preferred default screen recording duration into the Record Timer box.

Hit the Rec button to begin a new screencasting session, and the software will start recording after a three-second countdown.
Tap the F9 button on the keyboard to stop recording. It will automatically open the file in Filmora’s video editor so you can edit it before publishing online.
Part 2: How to Add Voiceover to the TikTok Video?
Steps to add a voiceover to your TikTok video.
Upload or record a new video by hitting the + at the menu’s center at the screen’s bottom area.
Hit the microphone icon on the screen’s upper right corner once you’re over with the recording and trimming clips to your desired edit. Beneath, the microphone icon must mention “Voiceover.”

Source: mashable.com
Now, you can record a voiceover timed to Video’s every frame here.
Hit the “Save“ button once you’re satisfied with the voiceover

Hitting the “Save“ button will offer you back to the video’s preview, where you can add filters, text, stickers, and various sounds.
It is needed to add effects to your voiceover by hitting the “voice effects”. Here, you can control the narrator’s volume as well.
Also, make sure to enable automatic captions to make sure your video is more accessible!
Tap the Next button once you’re over with your Video. Then, you can edit the Video’s privacy settings, add a caption, and select a cover.
Part 3: Add Voiceover to TikTok Video with Extra Fusion: Wondershare Filmora
Do you want to include your voice in a video, create a voiceover demo for sharing and uploading on social networking platforms, or frame a documentary for important content?
All you need is an ideal video editing program similar to the Wondershare Filmora Video Editor.
The Filmora’s voiceover feature allows you to record your voice or add voice-over files to Video easily. In addition, you can customize the pitch, speed, and volume of the recorded voiceover and apply fade-in and fade-out effects. I’ll share how to register and add voiceover to a video with Filmora on your computer in this post.
Firstly, you can edit your Video in Filmora and then record the voiceover afterward. Or, you can first record the voiceover and then edit the Video around.
Check the steps below on how to make TikTok videos with voiceover via Wondershare Filmora.
Wondershare Filmora
Get started easily with Filmora’s powerful performance, intuitive interface, and countless effects!
Try It Free Try It Free Try It Free Learn More >
Record Voiceover and Add it to Video
We suggest you record the voiceover first in most cases so the sound will become pretty natural.
Step 1: Connect Microphone to PC or laptop
Connect the microphone to your laptop/PC when you’re ready to begin. It’s advisable to use some professional external microphones to capture high-quality sound.
Step 2: Record voiceover
Tap the Wondershare Filmora icon to launch this software. Then, select the New Project option in the beginning interface to create a new one.
Enter the Record tab and choose the “Record a Voiceover” option to arouse the Record Audio windows.
Or hit the microphone icon, and you only need 3 seconds of countdown to begin speaking.
Click the microphone icon again after you finish the above. Then, a new Record file option will be automatically present on the audio track.
Step 3: Edit Recorded Voiceover to Video
To edit the recorded voiceover, you can adjust audio settings, such as changing the Speed, Pitch, Volume, etc.

You can cut and trim out unnecessary sound sections from the recorded voiceover or apply the fade effects to the voiceover for a smoother transition.
Step 4: Sync Voiceover to Video
Now, it’s time to synchronize the recorded voiceover to video to create a compelling video.
The Wondershare Filmora allows up to 100 audio tracks; you can also add some background music to the voiceover.
Then import and drag-n-drop the video content to the video track, drag and drop the soundtrack to the video’s right-side position. Keep the voice and video track in the exact video duration if required.
Here’s how to sync voiceover to video!
Now, sync the recorded voiceover to Video to create a video. Since Filmora is compatible with 100 plus audio tracks, you can add different background music to the voiceover.
Then import and drag-n-drop the video content to the video track, drag and drop the soundtrack to the Video’s right side position. You can keep the Video and audio track in the same video duration.

Note: If you’ve recorded the iPhone voiceover or other device already, you can import it in the Project Library if you wish to add it to the Video and then sync it to Video.
Here is the ultimate step-by-step guide about adding titles to videos after knowing how to do a voiceover on TikTok.
Step 5: Export and save the new file
Click the “Export“ tab to export your new video file after you complete the project. You can either save the Video to different formats or directly share it on other social media platforms.
Additionally, you can even burn a DVD in minutes to watch it on TV.
How to Record and Add Voice over File during Filmora’s Video Editing Process
If you’ve recorded the voice over on your iPhone or another device already, even via the Wondershare Filmora, and wish to add it to the Video, visit the steps mentioned below:
1. Upload the video to Filmora
After logging in to Filmora’s main editing interface, click “Import” or drag-drop your video and voiceover file to the project library.
Filmora video editing software is compatible with a vast range of formats, so there will be no need to convert the files before import.
Drag and drop the files or video content to the Video Timeline when all the files get imported.
2. Record Voiceover in Video Editing
3. Edit voiceover and Export
You can then edit the recorded voiceover for TikTok to perfectly fit the Video and export it to your laptop/PC or directly upload it to YouTube.
For improving the sound, Filmora features more audio editing tools.
Conclusion
This article offered you a step-by-step guide on how to record a TikTok. It also displays four different screen recording methods, along with how to do a voiceover on TikTok.
Now, don’t ever worry about losing out on your favorite TikTok without the original publisher knowing via screen record TikTok via Wondershare Filmora.
02 How to Add Voiceover to the TikTok Video?
03 Add Voiceover to TikTok Video with Extra Fusion: Wondershare Filmora
Part 1: How to Screen Record on TikTok?
Have you ever accidentally taken a screenshot of someone’s Instagram story or screen recorded it for future reference and got scared that the person may have got notified?
While Instagram had the feature of notifying users if their story or picture has been screen recorded, it has recently changed to restrict this notification to images and videos sent via private DMs.
However, TikTokers can rest assured as TikTok has never had a similar notification feature, and you can safely screen record TikTok without mentioning the publisher.
How to Record Computer Screens on Windows
PCs allow software products useful for various purposes. For example, if you would like to record your PC screen while using Windows-based software, you’ll be required a powerful screen recorder that lets you set up a new screencasting session in just a few simple steps.
Here are some of the steps you need to consider!
Step 1: Download Wondershare Filmora
Download Wondershare Filmora onto your computer and then launch the software.
Wondershare Filmora
Get started easily with Filmora’s powerful performance, intuitive interface, and countless effects!
Try It Free Try It Free Try It Free Learn More >
Just visit the browser and type the URL ‘tiktok.com’ in the search bar. Then, look for the TikTok video you would like to record.
Besides providing functions that activate you to control the screen recording procedure entirely, Wondershare Filmora is also a video editor program that lets you manipulate your videos in any way you want.
You must double-click on its desktop icon and open the Full Feature mode right after launching the software. Now, hit the Record tab and choose the Record PC screen option.
The Wondershare Screen Recorder window will appear on the screen so you can modify the settings for your upcoming screencasting session.
You’ll see the Settings icon in the window’s lower right corner and then click it. For example, you can select the computer’s hard drive destination where the recording will be saved, modify the frame rate or set the quality of the recording from the Quality drop-down menu.
Hit the Microphone icon to choose the mic you’ll be using to record narration, and you can select the Speakers icon if you want to disable or enable the computer’s speakers during the session of screen recording.
You’ll see the Settings icon in the window’s lower right corner and then click it. For example, you can select the computer’s hard drive destination where the recording will be saved, modify the frame rate or set the quality of the recording from the Quality drop-down menu.
Mark the Mouse checkbox if you wish the mouse clicks to display in the recording, and you can easily place the maximum duration of a recording session. It is done by inserting the preferred default screen recording duration into the Record Timer box.
Hit the Rec button to begin a new screencasting session, and the software will start recording after a three-second countdown.
Tap the F9 button on the keyboard to stop recording. It will automatically open the file in Filmora’s video editor so you can edit it before publishing online.
Part 2: How to Add Voiceover to the TikTok Video?
Steps to add a voiceover to your TikTok video.
Upload or record a new video by hitting the + at the menu’s center at the screen’s bottom area.
Hit the microphone icon on the screen’s upper right corner once you’re over with the recording and trimming clips to your desired edit. Beneath, the microphone icon must mention “Voiceover.”
Source: mashable.com
Now, you can record a voiceover timed to Video’s every frame here.
Hit the “Save“ button once you’re satisfied with the voiceover
Hitting the “Save“ button will offer you back to the video’s preview, where you can add filters, text, stickers, and various sounds.
It is needed to add effects to your voiceover by hitting the “voice effects”. Here, you can control the narrator’s volume as well.
Also, make sure to enable automatic captions to make sure your video is more accessible!
Tap the Next button once you’re over with your Video. Then, you can edit the Video’s privacy settings, add a caption, and select a cover.
Part 3: Add Voiceover to TikTok Video with Extra Fusion: Wondershare Filmora
Do you want to include your voice in a video, create a voiceover demo for sharing and uploading on social networking platforms, or frame a documentary for important content?
All you need is an ideal video editing program similar to the Wondershare Filmora Video Editor.
The Filmora’s voiceover feature allows you to record your voice or add voice-over files to Video easily. In addition, you can customize the pitch, speed, and volume of the recorded voiceover and apply fade-in and fade-out effects. I’ll share how to register and add voiceover to a video with Filmora on your computer in this post.
Firstly, you can edit your Video in Filmora and then record the voiceover afterward. Or, you can first record the voiceover and then edit the Video around.
Check the steps below on how to make TikTok videos with voiceover via Wondershare Filmora.
Wondershare Filmora
Get started easily with Filmora’s powerful performance, intuitive interface, and countless effects!
Try It Free Try It Free Try It Free Learn More >
Record Voiceover and Add it to Video
We suggest you record the voiceover first in most cases so the sound will become pretty natural.
Step 1: Connect Microphone to PC or laptop
Connect the microphone to your laptop/PC when you’re ready to begin. It’s advisable to use some professional external microphones to capture high-quality sound.
Step 2: Record voiceover
Tap the Wondershare Filmora icon to launch this software. Then, select the New Project option in the beginning interface to create a new one.
Enter the Record tab and choose the “Record a Voiceover” option to arouse the Record Audio windows.
Or hit the microphone icon, and you only need 3 seconds of countdown to begin speaking.
Click the microphone icon again after you finish the above. Then, a new Record file option will be automatically present on the audio track.
Step 3: Edit Recorded Voiceover to Video
To edit the recorded voiceover, you can adjust audio settings, such as changing the Speed, Pitch, Volume, etc.
You can cut and trim out unnecessary sound sections from the recorded voiceover or apply the fade effects to the voiceover for a smoother transition.
Step 4: Sync Voiceover to Video
Now, it’s time to synchronize the recorded voiceover to video to create a compelling video.
The Wondershare Filmora allows up to 100 audio tracks; you can also add some background music to the voiceover.
Then import and drag-n-drop the video content to the video track, drag and drop the soundtrack to the video’s right-side position. Keep the voice and video track in the exact video duration if required.
Here’s how to sync voiceover to video!
Now, sync the recorded voiceover to Video to create a video. Since Filmora is compatible with 100 plus audio tracks, you can add different background music to the voiceover.
Then import and drag-n-drop the video content to the video track, drag and drop the soundtrack to the Video’s right side position. You can keep the Video and audio track in the same video duration.
Note: If you’ve recorded the iPhone voiceover or other device already, you can import it in the Project Library if you wish to add it to the Video and then sync it to Video.
Here is the ultimate step-by-step guide about adding titles to videos after knowing how to do a voiceover on TikTok.
Step 5: Export and save the new file
Click the “Export“ tab to export your new video file after you complete the project. You can either save the Video to different formats or directly share it on other social media platforms.
Additionally, you can even burn a DVD in minutes to watch it on TV.
How to Record and Add Voice over File during Filmora’s Video Editing Process
If you’ve recorded the voice over on your iPhone or another device already, even via the Wondershare Filmora, and wish to add it to the Video, visit the steps mentioned below:
1. Upload the video to Filmora
After logging in to Filmora’s main editing interface, click “Import” or drag-drop your video and voiceover file to the project library.
Filmora video editing software is compatible with a vast range of formats, so there will be no need to convert the files before import.
Drag and drop the files or video content to the Video Timeline when all the files get imported.
2. Record Voiceover in Video Editing
3. Edit voiceover and Export
You can then edit the recorded voiceover for TikTok to perfectly fit the Video and export it to your laptop/PC or directly upload it to YouTube.
For improving the sound, Filmora features more audio editing tools.
Conclusion
This article offered you a step-by-step guide on how to record a TikTok. It also displays four different screen recording methods, along with how to do a voiceover on TikTok.
Now, don’t ever worry about losing out on your favorite TikTok without the original publisher knowing via screen record TikTok via Wondershare Filmora.
Also read:
- [Updated] 2024 Approved Global Gastronomy Hits on TikTok
- 2024 Approved The Clone Game Amplifying Your Presence on TikTok
- [Updated] Stay Ahead of the Curve Hot TikTok Deals at Amazon for Now
- What If My TikTok Not Working on Android/iPhone/Chrome?
- 2024 Approved Top 7 Free Apps for TikTok Creations on MacOS Devices
- [New] Chuckling Chronicles The Best TikTok Joke & Prank Compilation for 2024
- Sizzling Stories From TikTok's Foodies
- Superior TikTok Video Conversion Guide
- 2024 Approved Enjoy Pure TikTok Videos - No Watermark Downloads
- [New] Foodie's Guide to Hot TikTok Recipes for 2024
- [Updated] Your Starting Guide to TikTok (macOS) Basics for 2024
- Mastering the Art of Screen Recording on Snapchat Devices
- In 2024, Fresh Filmmaking Innovative Biographical Ideas to Triple Your TikTok Following on Filmora
- [Updated] Noise Negation Crafting Clear Audio Artifacts
- Masterful Backup Techniques for iPhone to Snapchat Content
- [New] In 2024, 63 Chuckle Factory on TikTok
- [New] Getting Started with TikTok A Mac/PC Guide for 2024
- [Updated] Guide to Perfect Everyday TikTok Footage Expert Advice for 2024
- [Updated] In 2024, Amazon's Trendy Treasures - The Must-Have TikTok Finds of 2023
- [New] Meme Masters Celebrated Comedy on TikTok for 2024
- Navigating TikTok to Perfect Your Digital Twin
- [Updated] In 2024, A Friendly How-To Participating in TikTok Livestreams
- [New] 2024 Approved Focus Frequencies Zoning Out Ambient Noise on Audacity
- [Updated] Instant Success with PC and Mac Videos on TikTok for 2024
- 2024 Approved Mastering TikTok The Top 20 Best Caption Techniques
- Capture the Vibes - Fast Access to TikTok Content for 2024
- [Updated] Top-Rated TikTok Marker Erasers on Mobile Devices for 2024
- Relaxed Riffs 20 Country Songs That Make You Want to Dance and Chill on TikTok for 2024
- Breaking the Streak Code Proven Techniques
- [Updated] Mastering TikTok's Siri Speech Functionality for 2024
- In 2024, The Commerce Catalyst Strategic Growth on TikTok Platforms
- [New] The Insider's Guide to Using Siri on TikTok Applications
- [Updated] In 2024, Expert Downloader for TikTok Videos in Watermark-Free MP4
- [Updated] 2024 Approved International Eats Iconic Recipes for the Palate
- In 2024, Mystical Environments Transforming Spaces with Anime on TikTok
- In 2024, Wacky World of Webinars Top 10 Hilarious TikTok Challenges
- [Updated] The Ultimate Guide to Speedy Skipping in the World of TikTok
- [New] The Secrets to Swiftly Skipping TikTok Content
- [New] 2024 Approved Master the Art of Virality on TikTok with 50+ Powerful Lyrics
- [Updated] In 2024, Trusty TikTok Following Providers
- Step Up Your Snapchat Game with Three Simple Steps
- [New] TikTok's Anime Revolution Innovative Ideas Countdown for 2024
- Navigating Non-Working TikTok Videos with Ease for 2024
- [Updated] In 2024, Explore Next-Level TikTok Edits with Simple Background Swapping Techniques
- [Updated] The Ultimate List of TikTok's Most Popular & Secret Emojis
- Edit and Send Fake Location on Telegram For your Motorola Moto G13 in 3 Ways | Dr.fone
- Your Account Has Been Disabled in the App Store and iTunes From Apple iPhone SE?
- [New] 2024 Approved How to Securely Capture Web Series Every Time You Watch
- 5 Quick Methods to Bypass Infinix Smart 8 FRP
- How to share/fake gps on Uber for Apple iPhone 7 | Dr.fone
- In 2024, How to Unlock Vivo X Flip Phone without Google Account?
- [Updated] In 2024, Techniques to Elevate Your Facecam Video Quality
- Audiophiles Manual Advanced Methods for Rectifying Sound Distortion in Videos for 2024
- [New] 2024 Approved Gaming Chronicles Capturing Every Play in Overwatch
- What are Location Permissions Life360 On Google Pixel 8 Pro? | Dr.fone
- In 2024, How to Cast Realme C51 Screen to PC Using WiFi | Dr.fone
- How to Detect and Stop mSpy from Spying on Your Xiaomi Redmi K70E | Dr.fone
- Mac Techniques for Instagram Short-Form Videos
- Hard Resetting an OnePlus Nord CE 3 5G Device Made Easy | Dr.fone
- How to Transfer Text Messages from Honor X9b to New Phone | Dr.fone
- [New] In 2024, Guide to Saving Real-Time Screen Chats
- [Updated] Cut-to-the-Chase Newest Method for iDevice Screen Recordings, 2023 for 2024
- 5 Ways to Track Vivo Y55s 5G (2023) without App | Dr.fone
- Updated 2024 Approved Harmonizing Music and Imagery Best AE Lyric Video Blueprints
- New The Complete AIFF Converter Resource Reviews, Comparisons, and More for 2024
- Recommended Best Applications for Mirroring Your Sony Xperia 10 V Screen | Dr.fone
- [Updated] In 2024, Inhabit Your Island Minimalistic MC House Plans Explained
- [Updated] 2024 Approved Perfecting Profile Playlists on Facebook Through Mobile
- Effective Strategies for PPT Screen Recordings for 2024
- Will iSpoofer update On Vivo Y27 4G | Dr.fone
- Does Samsung Galaxy S23+ Have Find My Friends? | Dr.fone
- How can I get more stardust in pokemon go On Meizu 21 Pro? | Dr.fone
- 2024 Approved Enhancing Social Media Impact with High-Quality 360 Facebook Content
- New 2024 Approved The Ultimate Guide to MP4 to MP3 Conversion Apps for Mobile
- New In 2024, Top Pinnacle Studio Replacements for Mac
- [Updated] Boost Engagement by Personalizing Your Twitter Videos with New Thumbnails for 2024
- [Updated] In 2024, Engage Viewers with 3 Innovative Description Styles on Instagram Vids
- In 2024, How to Remove Find My iPhone without Apple ID On your Apple iPhone 8 Plus?
- [New] Learn to Keep Unwanted Suggestions Away From IG
- In 2024, Is it Possible to Use Miracast with Apple iPhone 14 Pro Max? | Dr.fone
- How to recover lost data from Tecno Phantom V Flip?
- [Updated] 2024 Approved Frame Grabber's Companion
- 2024 Approved Fight for Finesse The Best of Royale Battles
- [New] In 2024, Take Control of Your Webinars A Guide to Zoom Screensharing
- [Updated] Cutting the Chaff Skilled Techniques for Cropping Videos for Instagram
- In 2024, Convert FB Videos Directly to MP3 - 2023 Edition
- New In 2024, How to Make an Audio Book with Ease A Complete Guide
- Title: Blended Vocalists, One Platform at a Time
- Author: Brian
- Created at : 2024-05-23 13:13:39
- Updated at : 2024-05-24 13:13:39
- Link: https://tiktok-videos.techidaily.com/blended-vocalists-one-platform-at-a-time/
- License: This work is licensed under CC BY-NC-SA 4.0.
