
:max_bytes(150000):strip_icc()/chatgptlogin-d176b679eef94d49ab45a5b3ec340b5e.jpg)
Crafting Engaging Content with Discord Streaming Tools
Crafting Engaging Content with Discord Streaming Tools
How to Stream on Discord

Richard Bennett
Mar 27, 2024• Proven solutions
Discord has completely transformed online communication, becoming the preferred platform for gamers, streamers, and reviewers alike.
As of late, it has started integrating with other gaming and streaming services, giving us the streamer mode. With streaming’s growing popularity, it’s essential to know what the streamer mode is all about.
If you’re a gamer, Discord’s streamer mode allows you to stream your gaming session to viewers by broadcasting your game to your friends, fans, and even a closed community of enthusiasts.
Many e-gaming professionals have taken up streaming, offering original and valuable content for like-minded individuals. This mode helps them streamline all their communications in one place.
If you’re new to Discord’s streamer mode, you need to know what it is, how you can use it to engage with other community members, and the primary security concerns you need to be aware of.
- Part 1: How to Stream on Discord from Desktop Computers?
- Part 2: How to Stream on Discord from Chromebook?
- Part 3: How to Stream on Discord from iPhone And Android?
- Part 4: How to Watch Discord Streaming?
- Part 5: Discord Streaming Tips
We have compiled a list of steps to help you learn how to conduct Discord streaming from the most prominent platforms: Windows, Mac, Chromebook, iPhone, Android.
Part 1: How to Stream on Discord from Desktop Computers
How to Stream on Discord from Windows
Discord allows for streaming through its Windows desktop client. You can stream games, podcasts, and any other kind of content through it.
However, it is crucial to remember that you can only stream in 480p and 720p resolutions in the free version. If you want higher resolution streaming, subscribe to Discord Nitro, which costs $9.99 a month.
With that said, follow these steps to start Discord streaming:
- Start the game that you want to stream and then switch back to Discord
- You will find an icon at the bottom left of the window displaying the name of the game you started and a stream icon resembling a camera next to it. Click on this icon to begin streaming
- The Screen Share menu will pop-up displaying the game you have started, and from the ‘Select a voice channel’ drop-down, select the channel you want to stream with
- Adjust your screen resolution and frame rates according to your choice
- After you’ve made all the adjustments, you can hit the ‘Go Live’ button at the bottom right of the window to start streaming.
If you wish to stop streaming, click on the ‘Stop Streaming’ icon at the app’s bottom-left corner
Additionally, if you wish to stream voice and video calls on your Discord server, you can do so as well. To make a call to your friends through Discord:
- Open the Discord app on your Windows PC and then select the server you want to use
- Click the General Voice channel to place a voice connection with Discord
- On the bottom left of the window, you will see a Voice Connected entry. If you wish to video call, click on the ‘Video’ button; otherwise, click on the ‘Screen’ button for screen sharing
- When you click ‘Video,’ your screen’s center will switch to conversation mode, and you will be able to see your camera feed
- If you click on the screen, a pop-up window shows up, allowing you to select the application you want to share
- After setting this up, your friends can join your call by clicking on the General channel
When you want to end the call, click on the red Disconnect icon
How to Stream on Discord from Mac
To achieve the same result with Discord on a Mac:
- Open the Discord app on your Macintosh and then find and join a voice channel that allows you to stream (you can find out which channels will let you stream by joining the channel and checking if you can click on ‘Video’ or ‘Screen’ at the bottom of the window)
- Once you’ve made sure that the channel allows you to stream, you can choose whether you want to stream from your webcam or share your computer screen. Click on the option you want
- If you’ve selected the ‘Video’ option, this will turn on your webcam after a prompt, and it will start streaming immediately
- If you’ve selected the screen-sharing option, choose the window you’d like to share, and it will start broadcasting the specific window
- You can either share your entire screen or specific windows, depending on your choice
- Choose a resolution and frame rate for the stream, but remember that higher resolutions and frame rates take up more bandwidth
- If you’re streaming from your desktop, you can even stream in sound. Toggle the sound button to the right, and you will be able to access your microphone for the stream
- When you’ve decided all the parameters and feel you’re ready to stream, click on ‘Go Live’
Part 2: How to Stream on Discord from Chromebook
Chromebooks have a customized Android operating software that can fit the laptop, functioning seamlessly with its requirements.
However, because Chromebooks use a restrictive OS, the Discord app functions like it would on a smartphone or tablet.
Therefore, for Discord streaming on a Chromebook, you will have to:
- Select a voice channel and then join it
- Press the Video camera icon to share your screen
- Allow the program camera access
- Begin streaming
However, it is slightly challenging to join voice channels using the app. To do this, you will have to:
- Locate the voice channel and click on it
- Upon clicking, you will see a window appear at the bottom
- Scroll to the bottom of the menu, and click on the ‘Join Channel’ button
- To join with the camera, click on the camcorder icon
Part 3: How to Stream on Discord from iPhone And Android
Although Discord does not allow users to broadcast content from the Discord Mobile app, they can still share their screen to stream games and videos. To do so, they must:
- Select a voice channel and join it
- Press the Video camera icon for screen-sharing
- Then allow permission to third-party apps on the mobile to access your camera
- Press the Camera icon to allow the program access to your camera
- Once this is done, you are now streaming live
It is important to note that while sharing your screen on Discord, make sure you are not divulging any crucial details with other users in the form of notifications.
To avoid incoming notifications, put your mobile on airplane mode.
Part 4: How to Watch Discord Streaming
Aside from broadcasting streams, you can also watch other users streaming their content on Discord. To watch someone’s stream, you will need to:
- Go to the voice channel where someone is streaming and click on their name
- If you’ve decided you want to join their stream, click on ‘Join Stream’
- You can also click on ‘Watch Stream’ from the main chat screen on your Discord
When someone is streaming content on Discord, you can see a red ‘Live’ icon next to their name. Knowing this will make it easier to tell when your favorite users are streaming.
Part 5: Discord Streaming Tips
To help you get the max out of your Discord streaming experience, we’ve compiled a couple of tips:
Tip 1: How to Stream Without Lag On Discord
Do you experience lag while streaming games and videos on your Discord server? Don’t worry; streaming is often demanding for casual internet connections, and lags can happen!
Here are some quick fixes to get rid of it:
Close Unnecessary Programs
If you’re running multiple programs on your computer while using Discord, they can cause lag. To solve this, close all unnecessary programs.
Turn Off Hardware Acceleration
To do this:
- Go to the ‘Settings’ option in your Discord app,
- Click on ‘Appearance’ and toggle off the ‘Hardware Acceleration’ option
- Press ‘OK’ to confirm and restart the application
Clear Discord Cache Files
Too many accumulated caches files can cause lag in your Discord. To fix this, you will need to clear the Discord cache from the File Explorer:
- Open the ‘Run’ window
- Enter ‘%APPDATA%/Discord/Cache’ to open the cache folder
- Press ‘Ctrl+A’ to delete the files
Reset Discord Voice Settings
To do this:
- Go to the ‘Settings’ option on your Discord app
- Select the ‘Voice & Video’ option in the left pane
- Click on the ‘Reset Voice Settings’ in the right pane
- Press OK to confirm and restart the application
Reinstall Discord
If none of the above methods seem to fix lag, you might have to reinstall your Discord. To uninstall it: first
- Go to the Discord Panel,
- Select ‘View by: Category’
- Click ‘Uninstall a program’
- Right-click Discord
- Click Uninstall
- After it is uninstalled, reinstall it once again
Tip 2: How to Add A Game to Discord Go Live
If you can’t get access to the game you want to stream through the ‘Go Live’ icon, you can access it manually. All you have to do is:
- Click on the cog icon in the bottom left
- Open the Settings menu
- Click on the ‘Game Activity’ tab on the left
- Click ‘Add It’
- Choose your game
- Go back to your server
- Click the ‘Go Live’ button
Richard Bennett
Richard Bennett is a writer and a lover of all things video.
Follow @Richard Bennett
Richard Bennett
Mar 27, 2024• Proven solutions
Discord has completely transformed online communication, becoming the preferred platform for gamers, streamers, and reviewers alike.
As of late, it has started integrating with other gaming and streaming services, giving us the streamer mode. With streaming’s growing popularity, it’s essential to know what the streamer mode is all about.
If you’re a gamer, Discord’s streamer mode allows you to stream your gaming session to viewers by broadcasting your game to your friends, fans, and even a closed community of enthusiasts.
Many e-gaming professionals have taken up streaming, offering original and valuable content for like-minded individuals. This mode helps them streamline all their communications in one place.
If you’re new to Discord’s streamer mode, you need to know what it is, how you can use it to engage with other community members, and the primary security concerns you need to be aware of.
- Part 1: How to Stream on Discord from Desktop Computers?
- Part 2: How to Stream on Discord from Chromebook?
- Part 3: How to Stream on Discord from iPhone And Android?
- Part 4: How to Watch Discord Streaming?
- Part 5: Discord Streaming Tips
We have compiled a list of steps to help you learn how to conduct Discord streaming from the most prominent platforms: Windows, Mac, Chromebook, iPhone, Android.
Part 1: How to Stream on Discord from Desktop Computers
How to Stream on Discord from Windows
Discord allows for streaming through its Windows desktop client. You can stream games, podcasts, and any other kind of content through it.
However, it is crucial to remember that you can only stream in 480p and 720p resolutions in the free version. If you want higher resolution streaming, subscribe to Discord Nitro, which costs $9.99 a month.
With that said, follow these steps to start Discord streaming:
- Start the game that you want to stream and then switch back to Discord
- You will find an icon at the bottom left of the window displaying the name of the game you started and a stream icon resembling a camera next to it. Click on this icon to begin streaming
- The Screen Share menu will pop-up displaying the game you have started, and from the ‘Select a voice channel’ drop-down, select the channel you want to stream with
- Adjust your screen resolution and frame rates according to your choice
- After you’ve made all the adjustments, you can hit the ‘Go Live’ button at the bottom right of the window to start streaming.
If you wish to stop streaming, click on the ‘Stop Streaming’ icon at the app’s bottom-left corner
Additionally, if you wish to stream voice and video calls on your Discord server, you can do so as well. To make a call to your friends through Discord:
- Open the Discord app on your Windows PC and then select the server you want to use
- Click the General Voice channel to place a voice connection with Discord
- On the bottom left of the window, you will see a Voice Connected entry. If you wish to video call, click on the ‘Video’ button; otherwise, click on the ‘Screen’ button for screen sharing
- When you click ‘Video,’ your screen’s center will switch to conversation mode, and you will be able to see your camera feed
- If you click on the screen, a pop-up window shows up, allowing you to select the application you want to share
- After setting this up, your friends can join your call by clicking on the General channel
When you want to end the call, click on the red Disconnect icon
How to Stream on Discord from Mac
To achieve the same result with Discord on a Mac:
- Open the Discord app on your Macintosh and then find and join a voice channel that allows you to stream (you can find out which channels will let you stream by joining the channel and checking if you can click on ‘Video’ or ‘Screen’ at the bottom of the window)
- Once you’ve made sure that the channel allows you to stream, you can choose whether you want to stream from your webcam or share your computer screen. Click on the option you want
- If you’ve selected the ‘Video’ option, this will turn on your webcam after a prompt, and it will start streaming immediately
- If you’ve selected the screen-sharing option, choose the window you’d like to share, and it will start broadcasting the specific window
- You can either share your entire screen or specific windows, depending on your choice
- Choose a resolution and frame rate for the stream, but remember that higher resolutions and frame rates take up more bandwidth
- If you’re streaming from your desktop, you can even stream in sound. Toggle the sound button to the right, and you will be able to access your microphone for the stream
- When you’ve decided all the parameters and feel you’re ready to stream, click on ‘Go Live’
Part 2: How to Stream on Discord from Chromebook
Chromebooks have a customized Android operating software that can fit the laptop, functioning seamlessly with its requirements.
However, because Chromebooks use a restrictive OS, the Discord app functions like it would on a smartphone or tablet.
Therefore, for Discord streaming on a Chromebook, you will have to:
- Select a voice channel and then join it
- Press the Video camera icon to share your screen
- Allow the program camera access
- Begin streaming
However, it is slightly challenging to join voice channels using the app. To do this, you will have to:
- Locate the voice channel and click on it
- Upon clicking, you will see a window appear at the bottom
- Scroll to the bottom of the menu, and click on the ‘Join Channel’ button
- To join with the camera, click on the camcorder icon
Part 3: How to Stream on Discord from iPhone And Android
Although Discord does not allow users to broadcast content from the Discord Mobile app, they can still share their screen to stream games and videos. To do so, they must:
- Select a voice channel and join it
- Press the Video camera icon for screen-sharing
- Then allow permission to third-party apps on the mobile to access your camera
- Press the Camera icon to allow the program access to your camera
- Once this is done, you are now streaming live
It is important to note that while sharing your screen on Discord, make sure you are not divulging any crucial details with other users in the form of notifications.
To avoid incoming notifications, put your mobile on airplane mode.
Part 4: How to Watch Discord Streaming
Aside from broadcasting streams, you can also watch other users streaming their content on Discord. To watch someone’s stream, you will need to:
- Go to the voice channel where someone is streaming and click on their name
- If you’ve decided you want to join their stream, click on ‘Join Stream’
- You can also click on ‘Watch Stream’ from the main chat screen on your Discord
When someone is streaming content on Discord, you can see a red ‘Live’ icon next to their name. Knowing this will make it easier to tell when your favorite users are streaming.
Part 5: Discord Streaming Tips
To help you get the max out of your Discord streaming experience, we’ve compiled a couple of tips:
Tip 1: How to Stream Without Lag On Discord
Do you experience lag while streaming games and videos on your Discord server? Don’t worry; streaming is often demanding for casual internet connections, and lags can happen!
Here are some quick fixes to get rid of it:
Close Unnecessary Programs
If you’re running multiple programs on your computer while using Discord, they can cause lag. To solve this, close all unnecessary programs.
Turn Off Hardware Acceleration
To do this:
- Go to the ‘Settings’ option in your Discord app,
- Click on ‘Appearance’ and toggle off the ‘Hardware Acceleration’ option
- Press ‘OK’ to confirm and restart the application
Clear Discord Cache Files
Too many accumulated caches files can cause lag in your Discord. To fix this, you will need to clear the Discord cache from the File Explorer:
- Open the ‘Run’ window
- Enter ‘%APPDATA%/Discord/Cache’ to open the cache folder
- Press ‘Ctrl+A’ to delete the files
Reset Discord Voice Settings
To do this:
- Go to the ‘Settings’ option on your Discord app
- Select the ‘Voice & Video’ option in the left pane
- Click on the ‘Reset Voice Settings’ in the right pane
- Press OK to confirm and restart the application
Reinstall Discord
If none of the above methods seem to fix lag, you might have to reinstall your Discord. To uninstall it: first
- Go to the Discord Panel,
- Select ‘View by: Category’
- Click ‘Uninstall a program’
- Right-click Discord
- Click Uninstall
- After it is uninstalled, reinstall it once again
Tip 2: How to Add A Game to Discord Go Live
If you can’t get access to the game you want to stream through the ‘Go Live’ icon, you can access it manually. All you have to do is:
- Click on the cog icon in the bottom left
- Open the Settings menu
- Click on the ‘Game Activity’ tab on the left
- Click ‘Add It’
- Choose your game
- Go back to your server
- Click the ‘Go Live’ button
Richard Bennett
Richard Bennett is a writer and a lover of all things video.
Follow @Richard Bennett
Leading Choices: Discord’s Elite Emoji Generators
Best Discord Emoji Makers - Online & Mobile
Richard Bennett
Mar 27, 2024• Proven solutions
Emojis have been trending for quite some time now, especially on Discord . They’ve become an integral part of our communication because they can make our messages more expressive and less dull.
The popularity of emojis over Discord has grown so much that many users now want to make their own. Hundreds of online websites and mobile applications have surfaced for this purpose.
While making an emoji may seem daunting at first, this blog is here to guide you to the best tools to help you do it just the way you want it.
Best Free Online Discord Emoji Makers
Is there anything better than a free website that allows you to create an emoji to express your true feelings in your own style?
Here are three free Discord emoji maker online tools you might want to try out:
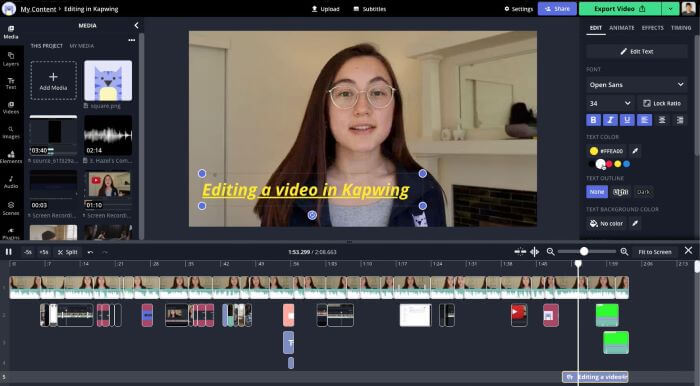
1. Kapwing
Kapwing is a custom Discord emote maker that provides you with all the necessary tools and features required to make an emoji.
Remember, Discord has a strict image size policy, so set your image to 128x128 pixels when building your emoji.
The layout allows you to edit your picture and turn it into a Discord emote easily, ensuring that it’s the right size and dimensions. The tool also provides you with various options to make your emoji just the way you want it.
Once you’ve made your emoji all that is left is to upload it to your Discord server. Here’s how to do that:
- Head up to your server where you want to upload the emoji,
- Select the down-arrow next to the server’s name in the Discord screen’s top-left corner.
- You’ll find an option of server settings; choosing would lead you to a list of other options.
- Select the Emojis options in the left sidebar
- Click on the “Upload Emoji” bar.
To know more about getting and adding emojis to your Discord server, read this .
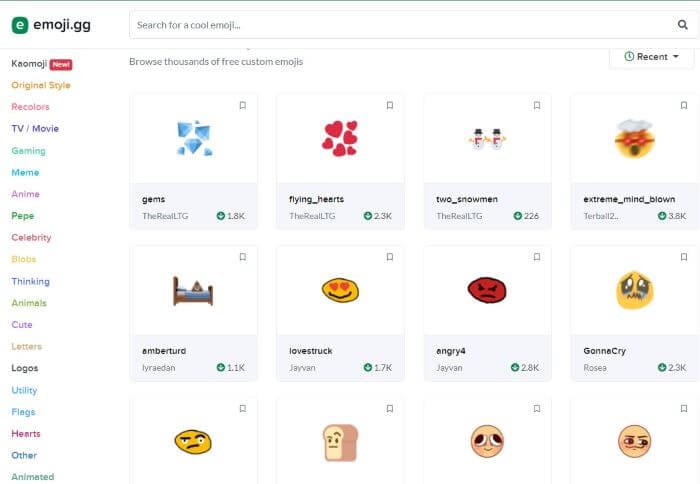
2. Emoji.gg
In case you’ve been searching for a way to create customized emojis, emoji.gg is the ideal Discord emote creator application for you.
It offers you full control over each aspect of the creation process, with many cool tools at your disposal, from different shapes to colors and much more.
Here you can create any emoji you wish with the toolbox available. The interface is quite user-friendly, and you will get the hang of it in minutes.
All that’s left now is to let your creativity run wild and make a genuinely expressive emote to entertain your Discord friends.
Once done, download the emoji from the tool with a single click, and upload it to your Discord server, as explained above.
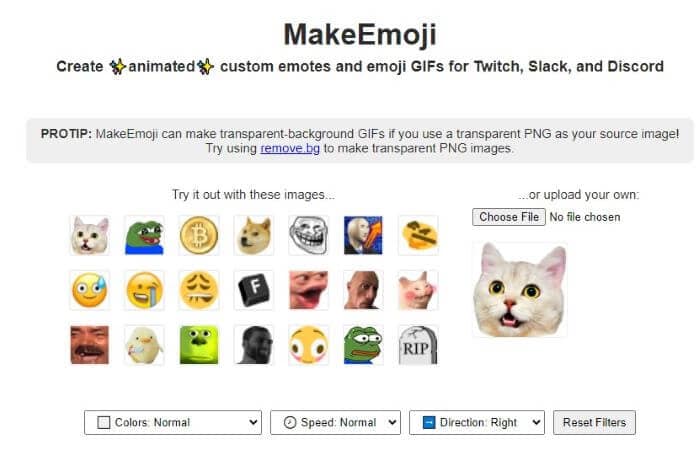
3. MakeEmoji
Another online Discord emote creator tool that lets you make your emojis is MakeEmoji .
It’s straightforward and easy to use, offering you various options to help you make your emoji.
The site’s simplicity stands out since you understand all the functions and tools available from the minute you visit it.
You have the option of downloading custom-built emojis or making an emoji that you would like to use on Discord.
Or you could animate them for all the more fun. All you have to do is upload an image. MakeEmoji will generate animated emojis that you can use in conversations on Discord to make them exciting and refreshing.
Best Discord Emoji Making Apps for iPhone and Android
The good thing about Discord is that it’s for everyone, regardless of the platform, device, or OS they may be using.
These Discord emoji maker applications are easy to use, intelligently designed, and, best of all, can be used on both iPhone and Android devices:
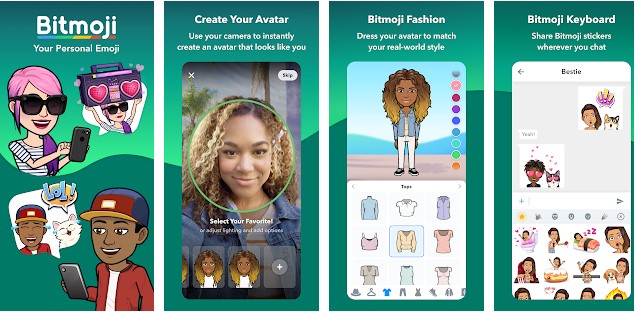
1. BITMOJI
With over 3 million downloads, Bitmoji is a top-rated application that’s also linked with Snapchat.
It is the go-to app for teenagers and is considered one of the best and most popular third-party applications over the last year.
The highly-customizable emojis created via this app could be your alter-egos because you can make them look just like you, making conversing highly interactive and fun.
Using Bitmoji is easy and straightforward. While the application earlier required you to create an avatar or an emoji from scratch, it now offers the option of selecting a picture and generating emojis and stickers.
You can make changes or adjustments to your emoji if it’s not what you imagined it to be. You may do this by directly customizing the appearance of your avatar. That includes changing hair, color, size or shape, and much more.
Furthermore, with Bitmoji you can:
- Create an expressive avatar
- Choose from a vast library of emojis
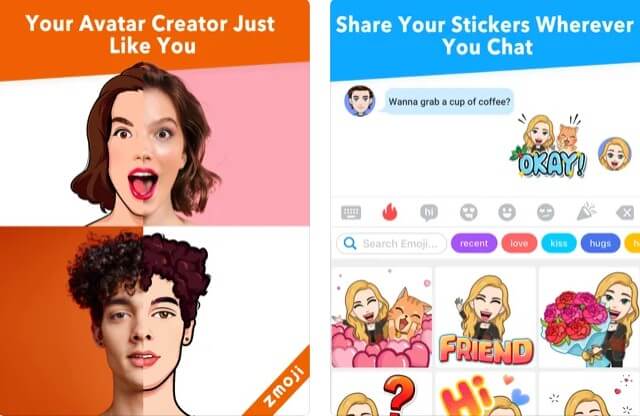
2. ZMOJI
This application is the perfect fit for you if you want to create and easily share customizable emojis with your friends. This is also used as a Discord emoji maker, but it may remind old users of the Bitmoji application, where you had no automated guidance.
You were left clear to experiment and use your creativity to start in and make emojis for yourself from scratch.
There is almost nothing in the application that you are not able to adjust.
This includes changing or adjusting the avatar features such as eyebrows and hairstyle to face type and clothing.
Once you’ve created ZMoji emojis for yourself, you can download them and send them over to your Discord server for upload.
ZMoji keyboard, an extension of the ZMoji application, is a must if you love animated emojis. It offers an extensive range of stickers, and you won’t run out of options anytime soon.
However, some users might find that the biggest drawback of ZMoji is the number of ads on the platform and that the cost of a premium subscription is a touch more expensive.
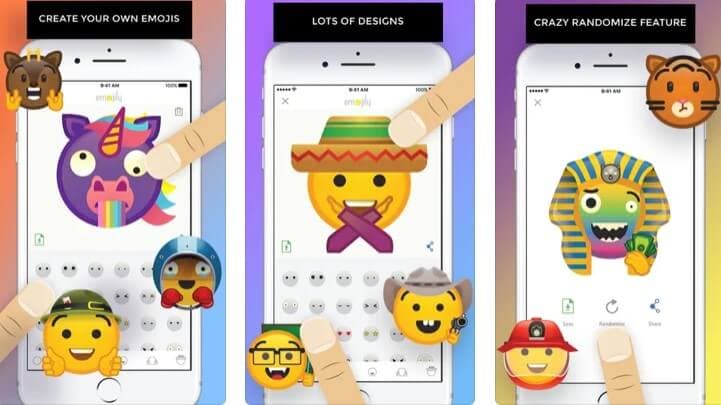
3. EMOJILY
Another exciting Discord emote maker application that works as an emoji maker is Emojily.
The application offers several different designs to make your unique emoji and emoticon. You can label your emojis in many categories and find the perfect features such as eyes, eyebrows, mouths, hands, clothes, and even hats.
Users also appreciate the ability to directly share it to other platforms like Facebook, Instagram, Snapchat, Kik, or upload it to your Discord server is appreciated by users.
The standout feature of Emojly is a feature that they term a super feature called the randomize feature. It is designed to act as an automated super crazy creator and maker! This feature generates random emojis based on the labels decided by you. Pretty cool, right?
With Emojily, you have all the tools available to run your creativity wild and make the best emoji present.
While The Create Emoji is a free, customized extension of Emojily, you can only access limited elements in the free version. You may wish to subscribe to the paid version to establish more control over the design. Doing this will allow you to enjoy the more extensive experience Emojily has to offer.
Conclusion
Making your emojis might sound like a difficult task, especially for Discord, but Discord emoji maker applications make the process fun and straightforward.
Popular apps like Bitmoji or MakeEmoji can create stickers or avatars. In contrast, Emojily and similar apps can be used to quickly make some detailed emotes.
All of these are incredibly well designed online tools and apps to make your experience of building your emoji a pleasant and worthwhile experience.
Richard Bennett
Richard Bennett is a writer and a lover of all things video.
Follow @Richard Bennett
Richard Bennett
Mar 27, 2024• Proven solutions
Emojis have been trending for quite some time now, especially on Discord . They’ve become an integral part of our communication because they can make our messages more expressive and less dull.
The popularity of emojis over Discord has grown so much that many users now want to make their own. Hundreds of online websites and mobile applications have surfaced for this purpose.
While making an emoji may seem daunting at first, this blog is here to guide you to the best tools to help you do it just the way you want it.
Best Free Online Discord Emoji Makers
Is there anything better than a free website that allows you to create an emoji to express your true feelings in your own style?
Here are three free Discord emoji maker online tools you might want to try out:
1. Kapwing
Kapwing is a custom Discord emote maker that provides you with all the necessary tools and features required to make an emoji.
Remember, Discord has a strict image size policy, so set your image to 128x128 pixels when building your emoji.
The layout allows you to edit your picture and turn it into a Discord emote easily, ensuring that it’s the right size and dimensions. The tool also provides you with various options to make your emoji just the way you want it.
Once you’ve made your emoji all that is left is to upload it to your Discord server. Here’s how to do that:
- Head up to your server where you want to upload the emoji,
- Select the down-arrow next to the server’s name in the Discord screen’s top-left corner.
- You’ll find an option of server settings; choosing would lead you to a list of other options.
- Select the Emojis options in the left sidebar
- Click on the “Upload Emoji” bar.
To know more about getting and adding emojis to your Discord server, read this .
2. Emoji.gg
In case you’ve been searching for a way to create customized emojis, emoji.gg is the ideal Discord emote creator application for you.
It offers you full control over each aspect of the creation process, with many cool tools at your disposal, from different shapes to colors and much more.
Here you can create any emoji you wish with the toolbox available. The interface is quite user-friendly, and you will get the hang of it in minutes.
All that’s left now is to let your creativity run wild and make a genuinely expressive emote to entertain your Discord friends.
Once done, download the emoji from the tool with a single click, and upload it to your Discord server, as explained above.
3. MakeEmoji
Another online Discord emote creator tool that lets you make your emojis is MakeEmoji .
It’s straightforward and easy to use, offering you various options to help you make your emoji.
The site’s simplicity stands out since you understand all the functions and tools available from the minute you visit it.
You have the option of downloading custom-built emojis or making an emoji that you would like to use on Discord.
Or you could animate them for all the more fun. All you have to do is upload an image. MakeEmoji will generate animated emojis that you can use in conversations on Discord to make them exciting and refreshing.
Best Discord Emoji Making Apps for iPhone and Android
The good thing about Discord is that it’s for everyone, regardless of the platform, device, or OS they may be using.
These Discord emoji maker applications are easy to use, intelligently designed, and, best of all, can be used on both iPhone and Android devices:
1. BITMOJI
With over 3 million downloads, Bitmoji is a top-rated application that’s also linked with Snapchat.
It is the go-to app for teenagers and is considered one of the best and most popular third-party applications over the last year.
The highly-customizable emojis created via this app could be your alter-egos because you can make them look just like you, making conversing highly interactive and fun.
Using Bitmoji is easy and straightforward. While the application earlier required you to create an avatar or an emoji from scratch, it now offers the option of selecting a picture and generating emojis and stickers.
You can make changes or adjustments to your emoji if it’s not what you imagined it to be. You may do this by directly customizing the appearance of your avatar. That includes changing hair, color, size or shape, and much more.
Furthermore, with Bitmoji you can:
- Create an expressive avatar
- Choose from a vast library of emojis
2. ZMOJI
This application is the perfect fit for you if you want to create and easily share customizable emojis with your friends. This is also used as a Discord emoji maker, but it may remind old users of the Bitmoji application, where you had no automated guidance.
You were left clear to experiment and use your creativity to start in and make emojis for yourself from scratch.
There is almost nothing in the application that you are not able to adjust.
This includes changing or adjusting the avatar features such as eyebrows and hairstyle to face type and clothing.
Once you’ve created ZMoji emojis for yourself, you can download them and send them over to your Discord server for upload.
ZMoji keyboard, an extension of the ZMoji application, is a must if you love animated emojis. It offers an extensive range of stickers, and you won’t run out of options anytime soon.
However, some users might find that the biggest drawback of ZMoji is the number of ads on the platform and that the cost of a premium subscription is a touch more expensive.
3. EMOJILY
Another exciting Discord emote maker application that works as an emoji maker is Emojily.
The application offers several different designs to make your unique emoji and emoticon. You can label your emojis in many categories and find the perfect features such as eyes, eyebrows, mouths, hands, clothes, and even hats.
Users also appreciate the ability to directly share it to other platforms like Facebook, Instagram, Snapchat, Kik, or upload it to your Discord server is appreciated by users.
The standout feature of Emojly is a feature that they term a super feature called the randomize feature. It is designed to act as an automated super crazy creator and maker! This feature generates random emojis based on the labels decided by you. Pretty cool, right?
With Emojily, you have all the tools available to run your creativity wild and make the best emoji present.
While The Create Emoji is a free, customized extension of Emojily, you can only access limited elements in the free version. You may wish to subscribe to the paid version to establish more control over the design. Doing this will allow you to enjoy the more extensive experience Emojily has to offer.
Conclusion
Making your emojis might sound like a difficult task, especially for Discord, but Discord emoji maker applications make the process fun and straightforward.
Popular apps like Bitmoji or MakeEmoji can create stickers or avatars. In contrast, Emojily and similar apps can be used to quickly make some detailed emotes.
All of these are incredibly well designed online tools and apps to make your experience of building your emoji a pleasant and worthwhile experience.
Richard Bennett
Richard Bennett is a writer and a lover of all things video.
Follow @Richard Bennett
Also read:
- [Updated] In 2024, Cooking Craze Alert These 15 Viral TikTok Creations You Can't Ignore
- [Updated] 2024 Approved Maximizing Views 50+ Most Popular TikTok Hashtags
- [New] In 2024, Free Online Convertors 6 Leading Applications Turning TikTop to MP3
- Step Into Trendiness with These Simple Moves
- [New] Navigating the Virtual Stage Your PC Guide to Engaging Live on TikTok for 2024
- [New] 2024 Approved Safe and Trusted TikTok Fan Buyers
- [New] 2024 Approved Unveiling the Secrets to TikTok Success Proven Marketing Techniques & Illustrated Cases
- Taste Odyssey Favorite Recipes From Every Land for 2024
- [Updated] Direct TikTok Video Downloader Flawless MP4 Outputs
- [Updated] Discover the Hottest TikTok Reading Trends
- [Updated] Top 30 Unique TikTok PFPs for Standout Profiles for 2024
- [Updated] Unleash the Power of Words on TikTok Videos
- [New] Installing TikTok Your Path to Joyful MacBook Experience for 2024
- [New] Absurd Adventures Your Guide to Wildest TikTok Gaming Escapades for 2024
- [New] 2024 Approved Resolving Recurring TikTok Problems Easily
- [Updated] Xbox Screen Sharing Setting Up for FB Livestreaming
- In 2024, How To Create an Apple Developer Account From Apple iPhone 12 Pro
- In 2024, Why does the pokemon go battle league not available On Vivo X100 Pro | Dr.fone
- In 2024, Life360 Learn How Everything Works On OnePlus Nord N30 SE | Dr.fone
- iSpoofer is not working On Nokia G22? Fixed | Dr.fone
- Leveraging Captivate for Professional Demos for 2024
- 5 Most Effective Methods to Unlock iPhone 14 Pro Max in Lost Mode
- What Actions Can I Take if My Content Is Swiftly Stripped by FB?
- Updated 2024 Approved Seeking Out Wolves Haunting Howls in Audio Form
- In 2024, How to Unlock Vivo Y36i Pattern Lock if Forgotten? 6 Ways
- 2024 Approved Beat Buffers Archive & Dissect Tunes
- Expert Tips on Navigating the Complex World of Instagram Hashtags for 2024
- Title: Crafting Engaging Content with Discord Streaming Tools
- Author: Brian
- Created at : 2024-05-23 15:48:26
- Updated at : 2024-05-24 15:48:26
- Link: https://tiktok-videos.techidaily.com/crafting-engaging-content-with-discord-streaming-tools/
- License: This work is licensed under CC BY-NC-SA 4.0.
