
:max_bytes(150000):strip_icc():format(webp)/edit-tweet-after-publish-3476767-34af9aa3b62b4bf4b11891460076916b.png)
Elevate Your Group Dynamics with Discord Roles
Elevate Your Group Dynamics with Discord Roles
How to Add Roles in Discord?

Richard Bennett
Mar 27, 2024• Proven solutions
Having a Discord server for you and your friends is a fun experience. And for gamers, Discord is a necessity. You can customize it with bots, connect real-time over voice channels, and even add rooms for chat forums.
Obviously, creating and managing a Discord server can get difficult. Especially when the server gets crammed with members, it is no longer a one-person show. You need help with monitoring and moderation. And let’s face it – you cannot watch your server round the clock.
So, let us learn the art of delegation on Discord! This guide will help you with – How to add roles in Discord and how to assign them to members. This includes creating roles, deleting them, and granting appropriate permissions.
- Part 1: Discord Server Permissions Introduction
- Part 2: How to Make and Add Roles in Discord on Computer
- Part 3: How to Manage Roles in Discord?
- Part 4: How to Delete Roles in Discord?
- Part 5: How to Add Roles on Discord Mobile?
- Part 6: Adding Roles to Discord FAQs
Part 1: Discord Server Permissions You Can Set Up
To give you a heads-up, there are around 29 permissions that you can adjust over a Discord server. More specifically, there are 7 voice permissions, 9 permissions related to texts, and about 13 permissions dealing with the server.
1. General server permission
Administrator – this is the highest permission that you can grant to a user. Think twice before giving this authority to anyone.
View Audit Log – with this permission, a user can read the server’s audits.
Manage Server – this permission enables a user to change the server’s name or shift it to another region.
Manage Roles – a user with this authority can make new roles or modify the roles without this permission.
Manage Channels – with this; a user can make, edit, or remove channels on a server.
Manage emojis – users with this authority can manage emotes.
Manage Webhooks – if you have this authority, you can add, modify, and remove webhooks.
Read Text Channels & See Voice Channels – a user with this permission can read text channels.
2. Membership permissions
Ban Members – a member with permission, can ban members from the server.
Create Instant Invite – users with this permission can invite people to the server.
Change Nickname – you can change your nickname anytime if this permission is enabled.
Manage Nicknames – if enabled, a user can change other’s nicknames.
Kick Members – a user with this authority can remove members from the server.
3. Text channel permissions
Send Messages – with this; users can send texts on chats.
Send TTS Messages – this enables users to send text-to-speech texts.
Manage Messages – with this; a user can remove or pin texts of other users.
Embed Links – enables users to embed hyperlinks in texts.
Attach Files – with this; users can attach files in the texts.
Read Message History – enables users to access earlier texts.
Mention Everyone – you can send push notifications on the channel if this permission is enabled.
Use External Emojis – if enabled, users can send emojis from other servers.
Add Reactions – with this; users can add new reactions to a text.
4. Voice channel permissions
Connect – enables users to connect themselves over the voice channel.
Speak – users can talk over the voice channel.
Mute Members – turn off other user’s speech.
Deafen Members – turn off hearing on the channel for a user.
Move Members – enables a user to shift members from one channel to a different channel.
Use Voice Activity – a member can talk without using Push-to-Talk, with this permission.
Priority Speaker – when this permission is turned on for a user, other’s
this permission allows the user to reduce the volume of other users when this user is speaking so that their words are louder on the channel.
5. Advanced permissions
Includes the ‘Administrator’ permission, which by default enables all the permissions to the assigned user.
Part 2: How to Make and Add Roles in Discord on Computer
The desktop app and Browser resemble the mobile apple a lot. The process of assigning roles and configuring members is more or less the same across devices. First, you need to create roles and define their authority before assigning these roles to some members.
How to create roles in Discord?
Before you can assign roles, you need a server. Once you have created your Discord server, start crafting the structure.
- Open your server and right-click on it.
- From the menu that appears, tap server settings.
- Name the role suitably. It should be descriptive of the authority.
- Tap on the plus sign that appears on the top right of the page.
- Here, you can change the title off the roll and even choose the color.
- Now comes the time to grant some permissions. These are basically the authority that you gave to every profile.
- When you are done, save the changes.
How to Assign Roles to Members in Discord?
To be able to assign roles, you should first create them
- Once again, hit that right button on your server and go to server settings.
- From the menu that appears to the left, ‘choose members’ under user management.
- Here, you will see the list of all the members on your server, tap the Plus sign that is right beside the username.
- From the drop-down menu that appears, select a role you want to assign to that member.
- You will notice that the color changes as per your settings. And this is how you assign roles to a server.
Part 3: How to Manage Roles in Discord?
After you learn how to make roles in Discord, you might want to manage them.
If you have got the hang of creating roles, then managing them is no different. Whenever the server gets crowded, you can create more roles or modify the existing ones. A smaller server can run smoothly with just an admin and an ‘everyone’ role.
The quickest and easiest way to manage your bloating server is to let all members be ‘everyone’ and adjust permissions accordingly. So, whenever members enter your server, they will automatically be assigned the common role.
Further, you can easily figure out what roles you have assigned to whom. Due to these colors, the other members can identify moderators, admins, or other roles.
Part 4: How to Delete Roles in Discord?
Honestly, removing Discord roles easier than setting them up. There are hardly a few steps that you need to follow for role removal.
- place the cursor on the server, and hit the right-click.
- From the list, choose server settings. Then click on roles.
- From the roles window, tap on the role that you wish to delete.
- Towards the bottom, you will see the option to delete the role.
- Press ok to confirm.
Part 5: How to Add Roles on Discord Mobile?
Like we mentioned earlier, the user interface of Discord is similar across devices. So, there is little difference between the process of creating and managing roles. But it can be baffling for beginners, so here’s a brief!
1. How to create roles in Discord mobile app?
Before you can assign roles, you have to create them.
- Open your server.
- Tap on the arrow beside the server’s title. A drop-down menu will appear. Select ‘server settings’ from that.
- Tap on ‘Roles.’ A common role, ‘everyone’ is assigned to all the members who have basic permissions enabled for everyone.
- Tap the plus sign and add a role.
- Give the role a color and describe it in a few words.
- Go through the permissions and enable the ones that fit the role.
- Save the changes.
You can repeat this multiple times to create more roles.
2. How to Assign Roles in Discord mobile app?
- Head over to settings and select ‘Members.’
- Select the members you want to assign roles to.
- Tick the boxes beside each member’s name for the roles you are assigning them.
Save the changes, and you are good to go! You can assign multiple roles to a member.
Part 6: FAQs about Discord Server Roles
Just some obvious things you might wonder about.
- How to make someone admin on Discord?
Making someone admin is the same as assigning other roles. Open your server and go to server settings.
- From there, select ‘roles’ from the left pane.
- Create a new role.
- Name the role ‘admin’ or an equivalent title.
- Adjust the setting related to sorting out role members with other members.
- Go to general permissions and tick the ‘Administrator’ option.
- Hit the ‘save changes’ button at the bottom.
- Now it’s time to assign the role to someone. Right-click on the user that you want to assign the role.
- Choose ‘roles’ from the drop-down list and select ‘Admin.’
And now your server has an admin!
- How can I assign roles to new users in Discord automatically?
By default, every member gets the role of ‘everyone’ on the server. However, you can customize this and add the MEE6 bot for automatic role allocation.
- Why can’t I manage the server even I am an admin on the server?
This is likely to happen if the server owner gave you the role of admin, but the permissions are disabled. You can ask the owner to enable the permissions for your user ID.
Richard Bennett
Richard Bennett is a writer and a lover of all things video.
Follow @Richard Bennett
Richard Bennett
Mar 27, 2024• Proven solutions
Having a Discord server for you and your friends is a fun experience. And for gamers, Discord is a necessity. You can customize it with bots, connect real-time over voice channels, and even add rooms for chat forums.
Obviously, creating and managing a Discord server can get difficult. Especially when the server gets crammed with members, it is no longer a one-person show. You need help with monitoring and moderation. And let’s face it – you cannot watch your server round the clock.
So, let us learn the art of delegation on Discord! This guide will help you with – How to add roles in Discord and how to assign them to members. This includes creating roles, deleting them, and granting appropriate permissions.
- Part 1: Discord Server Permissions Introduction
- Part 2: How to Make and Add Roles in Discord on Computer
- Part 3: How to Manage Roles in Discord?
- Part 4: How to Delete Roles in Discord?
- Part 5: How to Add Roles on Discord Mobile?
- Part 6: Adding Roles to Discord FAQs
Part 1: Discord Server Permissions You Can Set Up
To give you a heads-up, there are around 29 permissions that you can adjust over a Discord server. More specifically, there are 7 voice permissions, 9 permissions related to texts, and about 13 permissions dealing with the server.
1. General server permission
Administrator – this is the highest permission that you can grant to a user. Think twice before giving this authority to anyone.
View Audit Log – with this permission, a user can read the server’s audits.
Manage Server – this permission enables a user to change the server’s name or shift it to another region.
Manage Roles – a user with this authority can make new roles or modify the roles without this permission.
Manage Channels – with this; a user can make, edit, or remove channels on a server.
Manage emojis – users with this authority can manage emotes.
Manage Webhooks – if you have this authority, you can add, modify, and remove webhooks.
Read Text Channels & See Voice Channels – a user with this permission can read text channels.
2. Membership permissions
Ban Members – a member with permission, can ban members from the server.
Create Instant Invite – users with this permission can invite people to the server.
Change Nickname – you can change your nickname anytime if this permission is enabled.
Manage Nicknames – if enabled, a user can change other’s nicknames.
Kick Members – a user with this authority can remove members from the server.
3. Text channel permissions
Send Messages – with this; users can send texts on chats.
Send TTS Messages – this enables users to send text-to-speech texts.
Manage Messages – with this; a user can remove or pin texts of other users.
Embed Links – enables users to embed hyperlinks in texts.
Attach Files – with this; users can attach files in the texts.
Read Message History – enables users to access earlier texts.
Mention Everyone – you can send push notifications on the channel if this permission is enabled.
Use External Emojis – if enabled, users can send emojis from other servers.
Add Reactions – with this; users can add new reactions to a text.
4. Voice channel permissions
Connect – enables users to connect themselves over the voice channel.
Speak – users can talk over the voice channel.
Mute Members – turn off other user’s speech.
Deafen Members – turn off hearing on the channel for a user.
Move Members – enables a user to shift members from one channel to a different channel.
Use Voice Activity – a member can talk without using Push-to-Talk, with this permission.
Priority Speaker – when this permission is turned on for a user, other’s
this permission allows the user to reduce the volume of other users when this user is speaking so that their words are louder on the channel.
5. Advanced permissions
Includes the ‘Administrator’ permission, which by default enables all the permissions to the assigned user.
Part 2: How to Make and Add Roles in Discord on Computer
The desktop app and Browser resemble the mobile apple a lot. The process of assigning roles and configuring members is more or less the same across devices. First, you need to create roles and define their authority before assigning these roles to some members.
How to create roles in Discord?
Before you can assign roles, you need a server. Once you have created your Discord server, start crafting the structure.
- Open your server and right-click on it.
- From the menu that appears, tap server settings.
- Name the role suitably. It should be descriptive of the authority.
- Tap on the plus sign that appears on the top right of the page.
- Here, you can change the title off the roll and even choose the color.
- Now comes the time to grant some permissions. These are basically the authority that you gave to every profile.
- When you are done, save the changes.
How to Assign Roles to Members in Discord?
To be able to assign roles, you should first create them
- Once again, hit that right button on your server and go to server settings.
- From the menu that appears to the left, ‘choose members’ under user management.
- Here, you will see the list of all the members on your server, tap the Plus sign that is right beside the username.
- From the drop-down menu that appears, select a role you want to assign to that member.
- You will notice that the color changes as per your settings. And this is how you assign roles to a server.
Part 3: How to Manage Roles in Discord?
After you learn how to make roles in Discord, you might want to manage them.
If you have got the hang of creating roles, then managing them is no different. Whenever the server gets crowded, you can create more roles or modify the existing ones. A smaller server can run smoothly with just an admin and an ‘everyone’ role.
The quickest and easiest way to manage your bloating server is to let all members be ‘everyone’ and adjust permissions accordingly. So, whenever members enter your server, they will automatically be assigned the common role.
Further, you can easily figure out what roles you have assigned to whom. Due to these colors, the other members can identify moderators, admins, or other roles.
Part 4: How to Delete Roles in Discord?
Honestly, removing Discord roles easier than setting them up. There are hardly a few steps that you need to follow for role removal.
- place the cursor on the server, and hit the right-click.
- From the list, choose server settings. Then click on roles.
- From the roles window, tap on the role that you wish to delete.
- Towards the bottom, you will see the option to delete the role.
- Press ok to confirm.
Part 5: How to Add Roles on Discord Mobile?
Like we mentioned earlier, the user interface of Discord is similar across devices. So, there is little difference between the process of creating and managing roles. But it can be baffling for beginners, so here’s a brief!
1. How to create roles in Discord mobile app?
Before you can assign roles, you have to create them.
- Open your server.
- Tap on the arrow beside the server’s title. A drop-down menu will appear. Select ‘server settings’ from that.
- Tap on ‘Roles.’ A common role, ‘everyone’ is assigned to all the members who have basic permissions enabled for everyone.
- Tap the plus sign and add a role.
- Give the role a color and describe it in a few words.
- Go through the permissions and enable the ones that fit the role.
- Save the changes.
You can repeat this multiple times to create more roles.
2. How to Assign Roles in Discord mobile app?
- Head over to settings and select ‘Members.’
- Select the members you want to assign roles to.
- Tick the boxes beside each member’s name for the roles you are assigning them.
Save the changes, and you are good to go! You can assign multiple roles to a member.
Part 6: FAQs about Discord Server Roles
Just some obvious things you might wonder about.
- How to make someone admin on Discord?
Making someone admin is the same as assigning other roles. Open your server and go to server settings.
- From there, select ‘roles’ from the left pane.
- Create a new role.
- Name the role ‘admin’ or an equivalent title.
- Adjust the setting related to sorting out role members with other members.
- Go to general permissions and tick the ‘Administrator’ option.
- Hit the ‘save changes’ button at the bottom.
- Now it’s time to assign the role to someone. Right-click on the user that you want to assign the role.
- Choose ‘roles’ from the drop-down list and select ‘Admin.’
And now your server has an admin!
- How can I assign roles to new users in Discord automatically?
By default, every member gets the role of ‘everyone’ on the server. However, you can customize this and add the MEE6 bot for automatic role allocation.
- Why can’t I manage the server even I am an admin on the server?
This is likely to happen if the server owner gave you the role of admin, but the permissions are disabled. You can ask the owner to enable the permissions for your user ID.
Richard Bennett
Richard Bennett is a writer and a lover of all things video.
Follow @Richard Bennett
Delete and Disconnect Discord (PC/Mobile)
How to Delete Discord Account [Step-by-Step]
Richard Bennett
Mar 27, 2024• Proven solutions
Discord is a voice and text chat service to bring like-minded people together, especially e-sports professionals.
The goal was to provide users with an improved communications platform that could streamline the way people speak in real-time and over the internet.
Originally designed for gamers, the app allowed users to communicate with others who share interests on a given topic.
After a while, the Discord app expanded its reach and included non-gamers as well. Today, it is one of the most popular chatting apps out there.
However, if, for any reason, you want to delete or disable your account for good, you can. In the following articles, you will learn about how to delete your account step by step.
- Part 1: Deleting A Discord Account Permanently on Desktop Computer
- Part 2: Deleting Discord Account from Mobile Devices
- Part 3: How to Disable Discord Account On Desktop Computer
- Part 4: How To Disable Discord Account On Mobile?
Part 1: How To Delete A Discord Account Permanently?
Are you done with a game, scared about your data, or just bored with the app? No problem! If you want to learn how to delete your discord account, look no further.
But before doing so, you’ll have to do two quick things:
- Reassign ‘administrative rights’ of the servers
- Completely delete them
The only reason you will have to think about these things is if you assumed responsibility for any server.
Without further ado, here are some easy to follow steps to delete a Discord account permanently:
- Open the Discord app
- Sign in to your Discord account and open the user settings option (Cog icon)
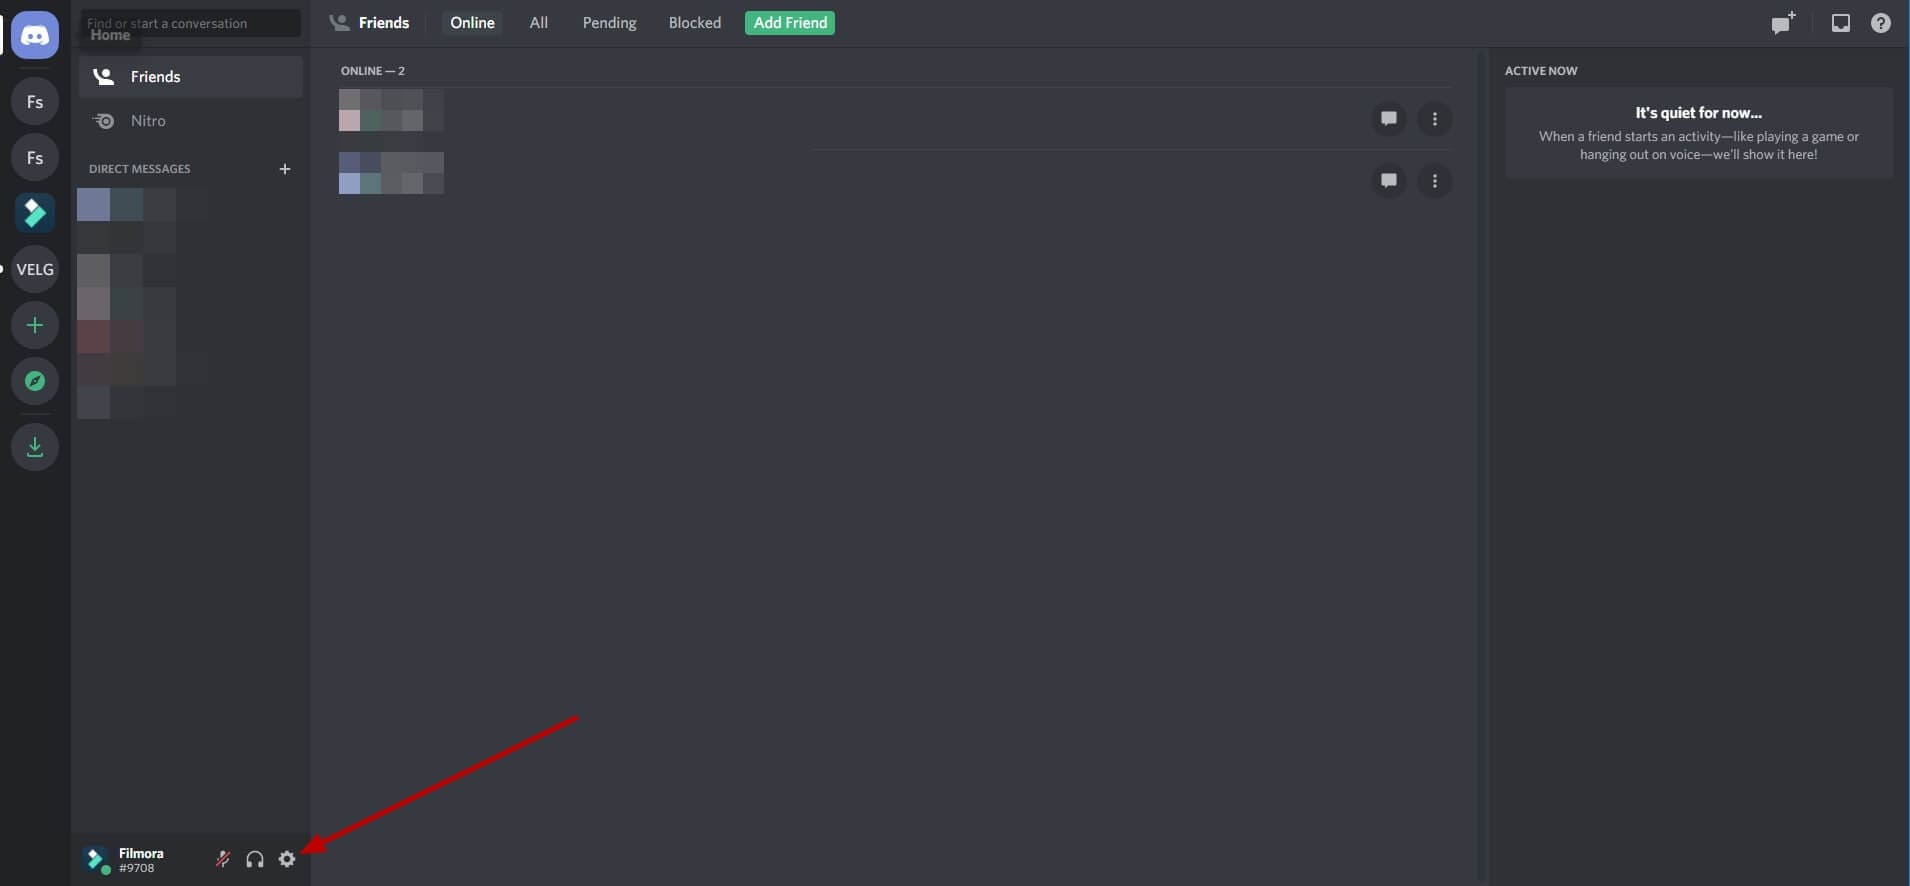
- Click the “My Account” option in the user setting menu. At the very bottom of the screen, you’ll see the “delete account” option
- Click the delete account button to make your Discord account disappear!
However, if you’ve activated 2FA, you may also be asked to put your password and 2FA code.
Also, if you want to delete your account permanently, there are some things you need to do before completing the process.
As mentioned before, if you’re the server’s owner, you’ll have to either delete your server or transfer its ownership to a trusted source.
For transferring ownership on Discord, follow these steps:
- Open the Discord app
- Click the “server name,” and a range of options will open; then click “server setting”
- At the bottom-left of the screen, click the ‘members’ option below “User Management”
- Here you’ll make the critical decision of who gets the keys to your kingdom. Once you decide who to transfer the ownership to, click the “3 vertical dots”
- As the “dialog menu” opens, click “Transfer Ownership”
Once it’s completed, you’ll become a regular server member. Your access to the server will be limited and as per the set position.
On the other hand, if you don’t want to transfer its ownership to someone else, you can also delete it.
Here’s how you can delete the server to complete the process of deleting your Discord account:
- Click the “Server Name” again
- Within the several options, click the “Server Settings.”
- At the bottom-left of your window, click the “Delete Server” option in the “User Management” section.

- Once clicked, the system will ask you to enter the account password to delete your server (or servers) from existence altogether
Like the primary Discord account deletion process, if you have enabled 2FA on this account, you’ll have to put in the code to get things completed.
After this, you’ll be asked one more time to click the “delete server” button before it is completely deleted. Keep in mind that you’ll have 14 days time to recover your Discord account. Once the two-week time passes, you won’t be able to retrieve or sign in to your account.
Once the account is deleted, the username will show up as “deleteduser 0000” or something similar to this. However, users you have texted via your account will still see your texts.
Part 2: How to Delete Discord Account From iPhone And Android?
Yes, you can delete the discord account from iPhone and Android. And if you’re wondering how to delete a Discord account, Here’s a quick way to do it:
- Open your updated discord app and tap the “hamburger” menu located at the top-left
- Tap the gear icon so you can go to the “user settings.”
- Select “My Account”
- Below the “Account Management” option, choose “Delete Account” and put your password and 2FA (if you have set it up)
Part 3: How To Disable Discord Account On Desktop Computer?
Deleting the account means you won’t be able to use it further, whereas disabling the account normally means you’re taking a little break.
So, if you don’t want to remove or delete your account entirely but only want it gone for some time, choose the disable option.
Here’s how you can disable a Discord account on a desktop computer:
- Open the app on your window PC/Mac and then log in to your Discord account
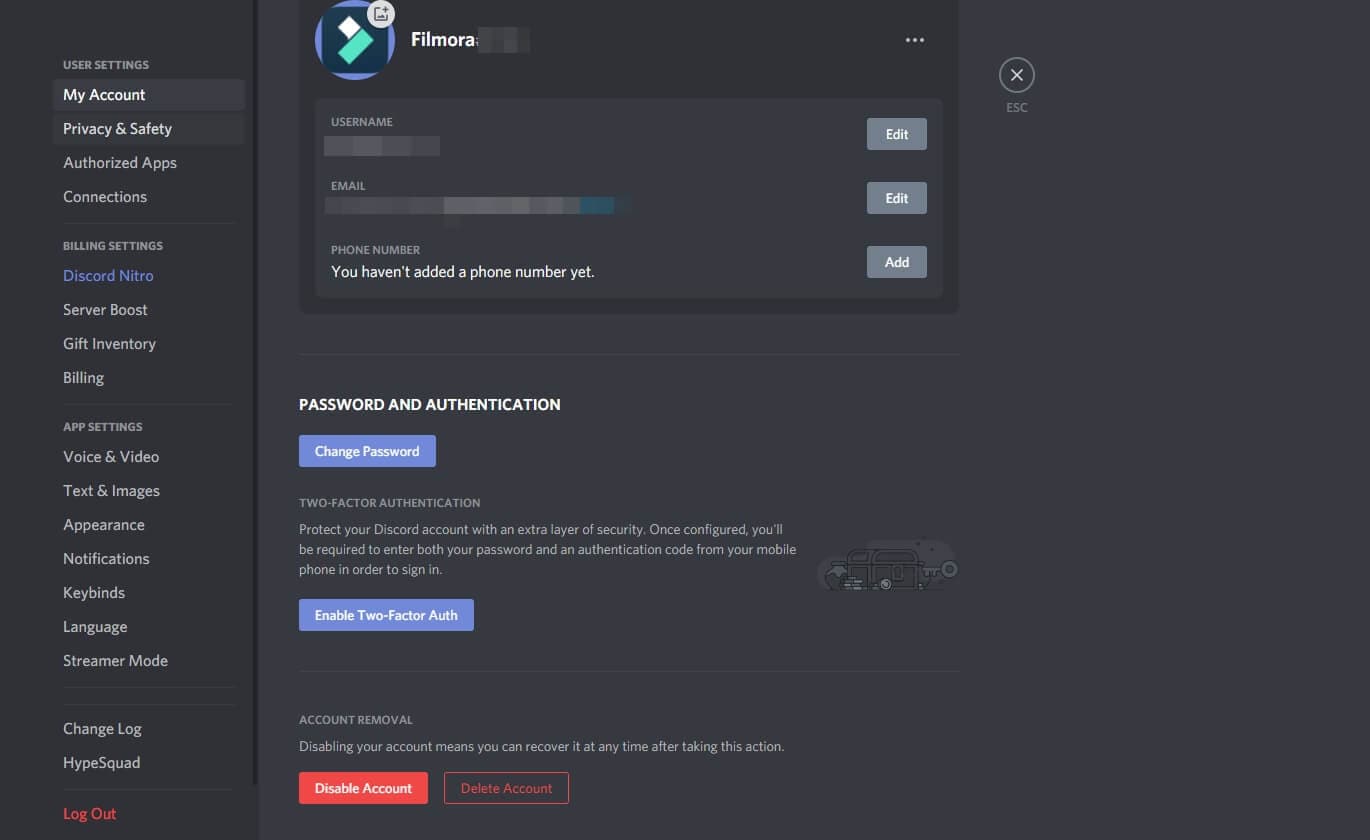
- Click the “User Settings” option and then go to the “My Account” option within the user settings
- In the lower corner of your Mac/PC screen, you’ll see the “Disable Account” button next to the “Delete Account” button
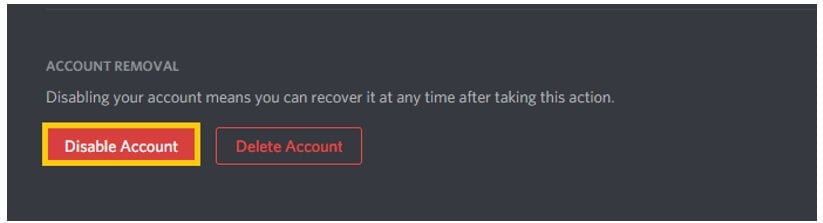
- Click the “Disable Account” option, and it will be disabled.
What’s The Difference Between Disabling And Deleting A Discord Account?
Disabling the account means you can recover it anytime you want, unlike deleting the account where you only have a 14-day restoration window. Additionally, when the account is disabled, you won’t receive notifications, but you will still get “friend requests.”
Part 4: How To Disable Discord Account On Mobile?
Disabling your Discord account for Android and iOS isn’t as simple as it is on a Desktop Windows/Mac PC.
Currently, there is no direct way to either delete or disable your Discord account through a mobile device.
Nevertheless, follow the steps below to disable your Discord account on mobile:
- Open the Discord application on your smartphone
- Tap the cog icon on the lower right corner of the phone
- Tap on the “My Account” option in the “User Settings” menu
- You’ll have the choice to either “Delete Account” or “Disable Account.” However, whatever you choose, you’ll be prompted to the support page explaining ways to disable or delete your account
- To complete disabling process from a mobile device, you’ll have to send a request to the support team, as it’s the only way to disable your account via your smartphone
FAQs About Deleting Discord Account
1. How Long Does Discord Take To Delete Account?
Typically, once you have completed the entire deletion process, Discord takes approximately 14 to 30 days to process it.
2. What Happens When You Delete Discord Account?
Deleting your discord account won’t delete the information you have on the account. It will delete your profile and rename the account to “deleteduser.” However, all your data and messages will remain on the server or servers.
3. Can I Re-Use The Deleted Discord Account?
You can re-use your deleted discord account only if the account is in a “pending deletion state,” which is 14 days. If the time is passed, you won’t be able to re-use it.
Richard Bennett
Richard Bennett is a writer and a lover of all things video.
Follow @Richard Bennett
Richard Bennett
Mar 27, 2024• Proven solutions
Discord is a voice and text chat service to bring like-minded people together, especially e-sports professionals.
The goal was to provide users with an improved communications platform that could streamline the way people speak in real-time and over the internet.
Originally designed for gamers, the app allowed users to communicate with others who share interests on a given topic.
After a while, the Discord app expanded its reach and included non-gamers as well. Today, it is one of the most popular chatting apps out there.
However, if, for any reason, you want to delete or disable your account for good, you can. In the following articles, you will learn about how to delete your account step by step.
- Part 1: Deleting A Discord Account Permanently on Desktop Computer
- Part 2: Deleting Discord Account from Mobile Devices
- Part 3: How to Disable Discord Account On Desktop Computer
- Part 4: How To Disable Discord Account On Mobile?
Part 1: How To Delete A Discord Account Permanently?
Are you done with a game, scared about your data, or just bored with the app? No problem! If you want to learn how to delete your discord account, look no further.
But before doing so, you’ll have to do two quick things:
- Reassign ‘administrative rights’ of the servers
- Completely delete them
The only reason you will have to think about these things is if you assumed responsibility for any server.
Without further ado, here are some easy to follow steps to delete a Discord account permanently:
- Open the Discord app
- Sign in to your Discord account and open the user settings option (Cog icon)
- Click the “My Account” option in the user setting menu. At the very bottom of the screen, you’ll see the “delete account” option
- Click the delete account button to make your Discord account disappear!
However, if you’ve activated 2FA, you may also be asked to put your password and 2FA code.
Also, if you want to delete your account permanently, there are some things you need to do before completing the process.
As mentioned before, if you’re the server’s owner, you’ll have to either delete your server or transfer its ownership to a trusted source.
For transferring ownership on Discord, follow these steps:
- Open the Discord app
- Click the “server name,” and a range of options will open; then click “server setting”
- At the bottom-left of the screen, click the ‘members’ option below “User Management”
- Here you’ll make the critical decision of who gets the keys to your kingdom. Once you decide who to transfer the ownership to, click the “3 vertical dots”
- As the “dialog menu” opens, click “Transfer Ownership”
Once it’s completed, you’ll become a regular server member. Your access to the server will be limited and as per the set position.
On the other hand, if you don’t want to transfer its ownership to someone else, you can also delete it.
Here’s how you can delete the server to complete the process of deleting your Discord account:
- Click the “Server Name” again
- Within the several options, click the “Server Settings.”
- At the bottom-left of your window, click the “Delete Server” option in the “User Management” section.
- Once clicked, the system will ask you to enter the account password to delete your server (or servers) from existence altogether
Like the primary Discord account deletion process, if you have enabled 2FA on this account, you’ll have to put in the code to get things completed.
After this, you’ll be asked one more time to click the “delete server” button before it is completely deleted. Keep in mind that you’ll have 14 days time to recover your Discord account. Once the two-week time passes, you won’t be able to retrieve or sign in to your account.
Once the account is deleted, the username will show up as “deleteduser 0000” or something similar to this. However, users you have texted via your account will still see your texts.
Part 2: How to Delete Discord Account From iPhone And Android?
Yes, you can delete the discord account from iPhone and Android. And if you’re wondering how to delete a Discord account, Here’s a quick way to do it:
- Open your updated discord app and tap the “hamburger” menu located at the top-left
- Tap the gear icon so you can go to the “user settings.”
- Select “My Account”
- Below the “Account Management” option, choose “Delete Account” and put your password and 2FA (if you have set it up)
Part 3: How To Disable Discord Account On Desktop Computer?
Deleting the account means you won’t be able to use it further, whereas disabling the account normally means you’re taking a little break.
So, if you don’t want to remove or delete your account entirely but only want it gone for some time, choose the disable option.
Here’s how you can disable a Discord account on a desktop computer:
- Open the app on your window PC/Mac and then log in to your Discord account
- Click the “User Settings” option and then go to the “My Account” option within the user settings
- In the lower corner of your Mac/PC screen, you’ll see the “Disable Account” button next to the “Delete Account” button
- Click the “Disable Account” option, and it will be disabled.
What’s The Difference Between Disabling And Deleting A Discord Account?
Disabling the account means you can recover it anytime you want, unlike deleting the account where you only have a 14-day restoration window. Additionally, when the account is disabled, you won’t receive notifications, but you will still get “friend requests.”
Part 4: How To Disable Discord Account On Mobile?
Disabling your Discord account for Android and iOS isn’t as simple as it is on a Desktop Windows/Mac PC.
Currently, there is no direct way to either delete or disable your Discord account through a mobile device.
Nevertheless, follow the steps below to disable your Discord account on mobile:
- Open the Discord application on your smartphone
- Tap the cog icon on the lower right corner of the phone
- Tap on the “My Account” option in the “User Settings” menu
- You’ll have the choice to either “Delete Account” or “Disable Account.” However, whatever you choose, you’ll be prompted to the support page explaining ways to disable or delete your account
- To complete disabling process from a mobile device, you’ll have to send a request to the support team, as it’s the only way to disable your account via your smartphone
FAQs About Deleting Discord Account
1. How Long Does Discord Take To Delete Account?
Typically, once you have completed the entire deletion process, Discord takes approximately 14 to 30 days to process it.
2. What Happens When You Delete Discord Account?
Deleting your discord account won’t delete the information you have on the account. It will delete your profile and rename the account to “deleteduser.” However, all your data and messages will remain on the server or servers.
3. Can I Re-Use The Deleted Discord Account?
You can re-use your deleted discord account only if the account is in a “pending deletion state,” which is 14 days. If the time is passed, you won’t be able to re-use it.
Richard Bennett
Richard Bennett is a writer and a lover of all things video.
Follow @Richard Bennett
Also read:
- [New] 24 Clever TikToks The Comedy Goldmine for 2024
- The Pathway to Professional PC Livestreams with TikTok for 2024
- [Updated] 2024 Approved Lift Yourself Up Strategies to Emerge Post-Shadowban
- How to Join Someone's Live on TikTok for 2024
- [New] In 2024, Dare to Be Different Elevating Your Profile Above TikTok's Elite
- In 2024, Comprehensive TikTok Video Upload Strategies for Chrome, Android, and iOS Users
- 2024 Approved Inadvertent TikTok Redownload – What's Next?
- [New] Crafting a New Digital Persona Comprehensible Steps for Changing TikTok Handle
- Revolutionize Your TikTok with These Top Analytic Instruments
- [Updated] Complete Guide to Adding Texts to TikTok
- [Updated] 2024 Approved The Top 8 Ways to Turn TikTok Into a Money Machine
- [New] 2024 Approved The Leading Analytics Solutions for a Thriving TikTok Presence
- [New] 2024 Approved How to Make TikTok Big Head Effect
- Hot TikTok Deals & Finds – Your Ultimate Amazon List
- [Updated] 2024 Approved Extreme Escape Top 10 Unpredictable TikTok Challenges
- TikTok Transformation Hacks Best Filter Strategies Uncovered
- [New] In 2024, Free Tool for TikTok to MP4 Conversion
- 2024 Approved Breakthrough Personalities on TikTok A Guide for Motivation
- Revolutionize Your TikTok Presence with Analytics Leaders for 2024
- [Updated] Live Dance Performances on Xigua Video for 2024
- [New] In 2024, Your Cheat Sheet for Auditing Friends’ Vibrant Livestrances
- [New] Top 10 Craziest TikTok Games Worth Playing for 2024
- [New] In 2024, Stepwise Introduction to Adding Texts on TikTok
- [Updated] From Buzz to Sales Transforming Social Media Into Traffic for 2024
- [New] In 2024, Soundscapes for Success The Art of Music on TikTok
- Download Free Animated Emojis Explore These 9 Hidden Websites
- 2024 Approved Crossing the Line Guesting in Friends' TikTok Shows
- [New] From Challenges to Characters Best GIF Converters for TikToks
- Navigating Through the Maze Choosing Top-Tier Audio Formats Explained for 2024
- How to Factory Reset Xiaomi Redmi Note 12 5G in 5 Easy Ways | Dr.fone
- In 2024, Recommended Best Applications for Mirroring Your Meizu 21 Screen | Dr.fone
- [Updated] QuickSnapper Simple Recording on Windows 10 for 2024
- [Updated] 2024 Approved The Ultimate Guide to Replacing Bandicam on Mac Systems
- [Updated] In 2024, Navigating Twitch Recording A User's Playbook
- In 2024, Why Does iTools Virtual Location Not Work For Apple iPhone 15 Pro/iPad? Solved | Dr.fone
- 3 Methods to Mirror Poco M6 5G to Roku | Dr.fone
- Updated In 2024, Expert Guide Top Linux Applications for High-Fidelity Sound Recording
- [Updated] In 2024, Effortless Solutions for Instagram Video Archiving
- Title: Elevate Your Group Dynamics with Discord Roles
- Author: Brian
- Created at : 2024-05-23 13:12:15
- Updated at : 2024-05-24 13:12:15
- Link: https://tiktok-videos.techidaily.com/elevate-your-group-dynamics-with-discord-roles/
- License: This work is licensed under CC BY-NC-SA 4.0.
