
:max_bytes(150000):strip_icc()/galaxy-s24-plus-23772c8fac4a47e0af1c0cae35011bff.jpg)
"Enhancing TikTok Content 5 Proven Caption Tactics Explored"
Enhancing TikTok Content: 5 Proven Caption Tactics Explored
TikTok is one of the most famous social media apps as it creates various trends frequently that engage users continuously. Every week, you can explore various TikTok trends, such as dance videos, pranks, challenges, or quick hacks. These trends are a great entertainment source for people and motivate them to create engaging content.
However, adding captions is mandatory if you want to make TikTok trend videos for a diverse audience. This article will guide you if you are unaware of how to add captions on TikTok. We will provide 5 different ways to create TikTok captions effectively.
- Way 1: Auto-Generate Captions with TikTok’s Built-in Feature
- Way 2: Use Auto Captions in CapCut
- Way 3: Add Captions to TikTok Videos Manually
- Way 4: Automatically Add Subtitles to TikTok Videos with Online Editor
Part 1: Why Should You Add Captions to TikTok Videos?
Adding captions on TikTok videos can bring you multiple advantages. To learn more about the benefits of adding captions on TikTok, read this section:
1. Increases Comprehension
It may be possible that viewers won’t be able to understand a particular dialogue in your TikTok video. To make your TikTok content more understandable, adding captions can prove to be a great option. Moreover, if some viewers can’t turn on the sound of TikTok videos, they can easily read the captions to understand the content.
2. Enhances Focus
Captions have the ability to grasp the attention of a viewer automatically. Adding captions to your TikTok video lets your viewers focus more properly. Thus, you can engage your audience throughout the TikTok video effortlessly.
3. Helps During Audio Problems
Audio problems may arise unexpectedly. In such situations, added captions on TikTok videos can offer great convenience. Moreover, people who have auditory disabilities can also enjoy your TikTok videos.
4. Attracts Diverse Audience
If some foreigners can’t understand or speak your native language, TikTok captions are necessary for them. By doing so, a broad and diverse audience can watch your TikTok videos easily.
Part 2: How to Add Captions on TikTok?
There are various ways through which you can generate TikTok captions effortlessly. Read this section to discover multiple and convenient ways to create TikTok captions easily.
Way 1: Auto-Generate Captions with TikTok’s Built-in Feature
If you don’t want to download video editing software, you can utilize the built-in feature of TikTok to create auto-captions. This will save you from the hassle of launching or accessing a professional subtitle editor. Moreover, it will also save you time and effort from creating subtitles manually. To use the built-in feature of TikTok automatic captions, check the following instructions:
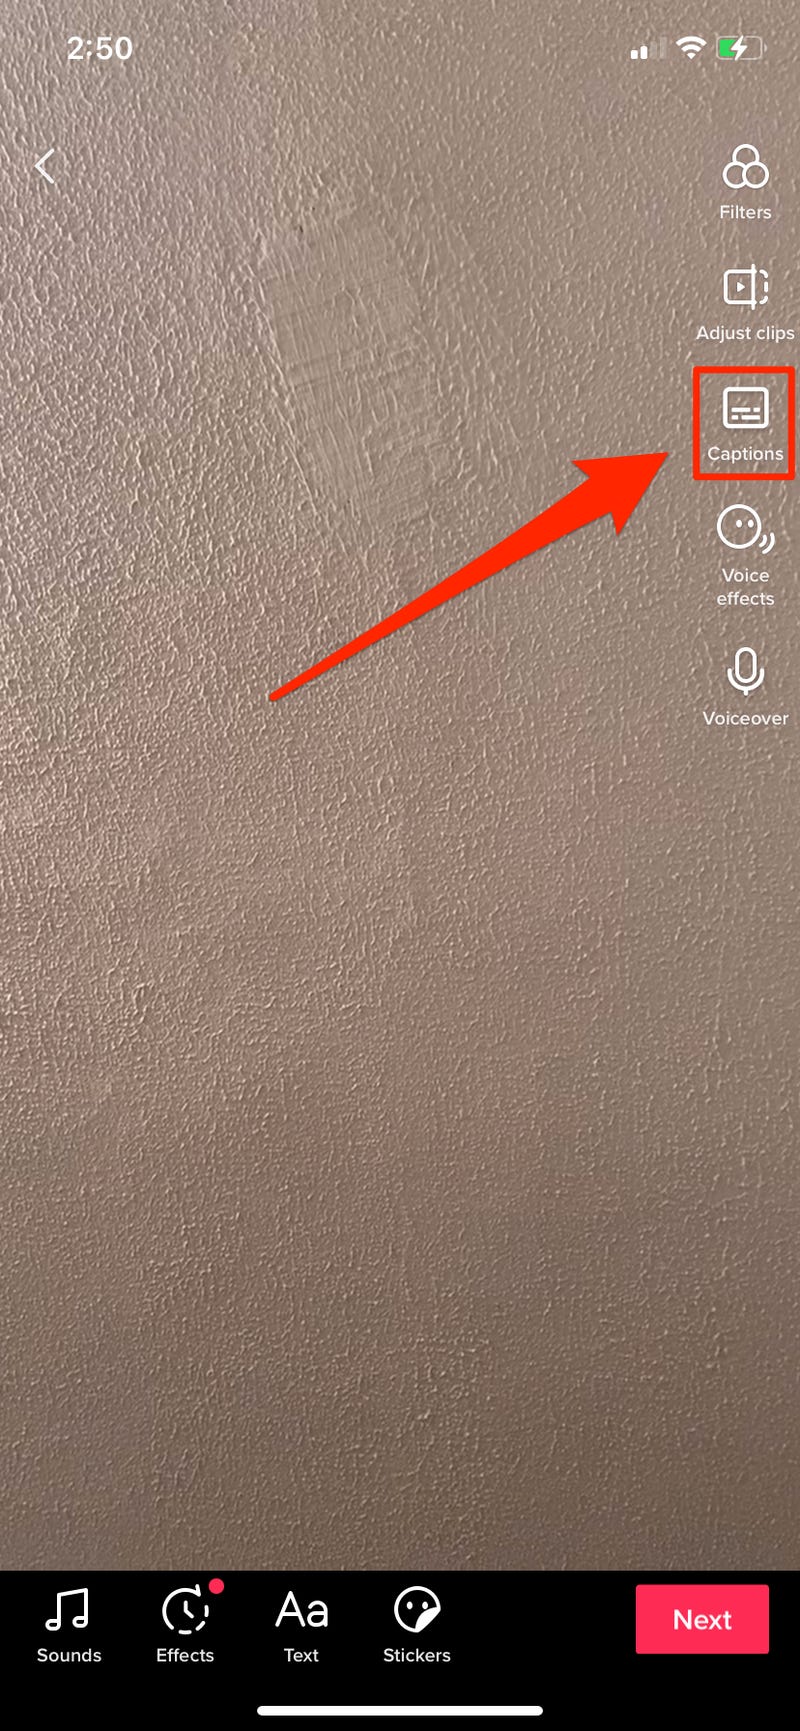
Step1 Once you have captured a video on TikTok, tap the “Tick” icon from the bottom right side. This will redirect you to the editing mode.
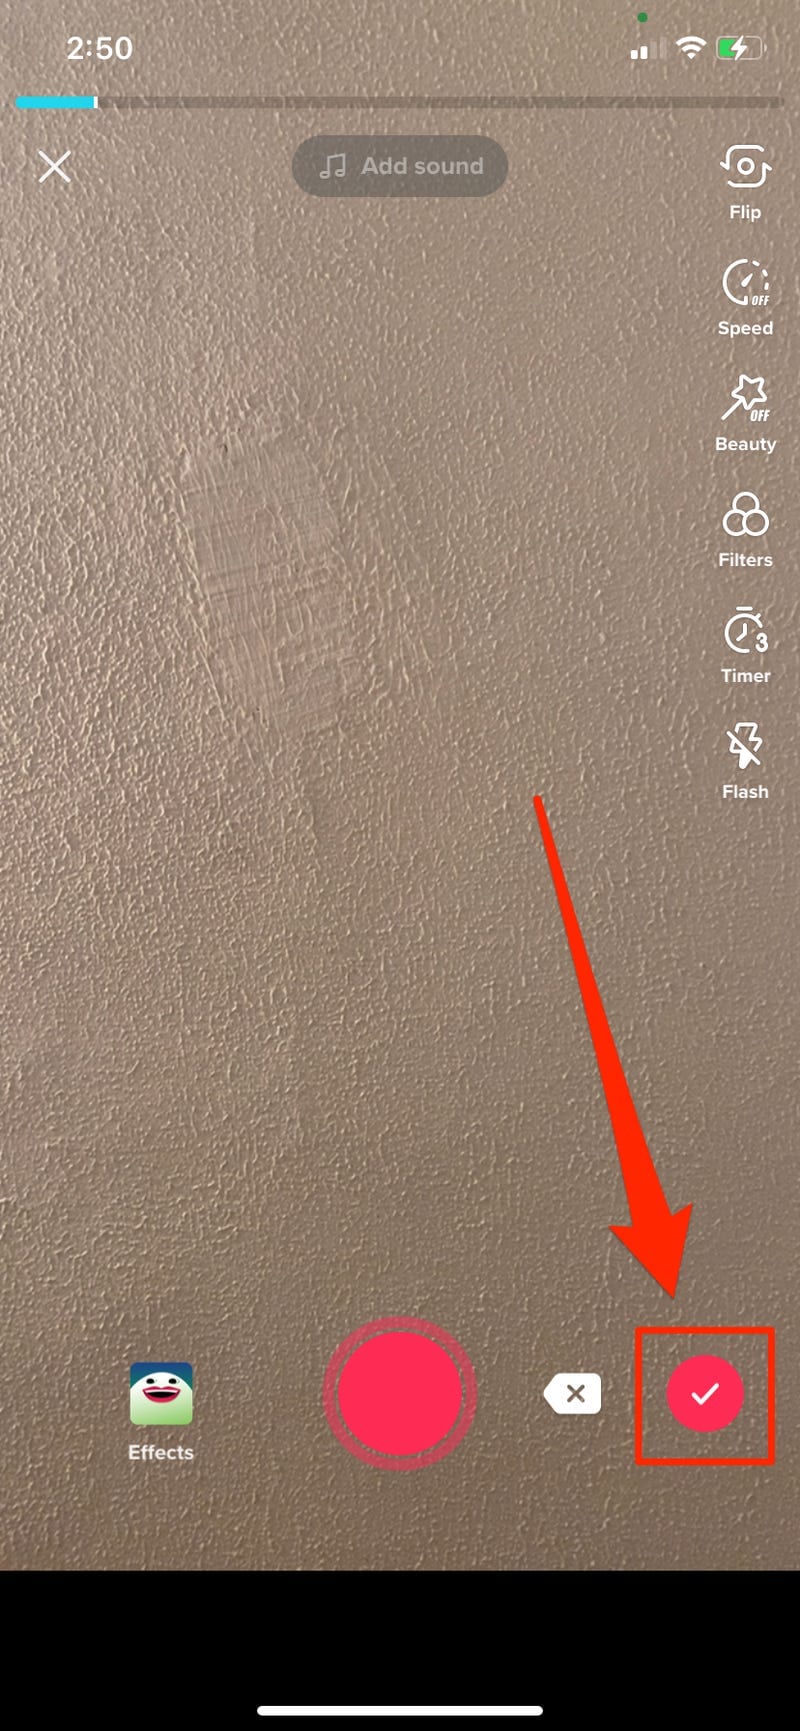
Step2 On the editing mode, locate the “Captions” option from the right side. After tapping on it, TikTok will instantly generate the subtitles automatically. Make sure that all the captions are correctly created. Once you are done, hit the “Save” button displayed at the top right side. Afterward, you can quickly post your TikTok video with captions.
Way 2: Use Auto Captions in CapCut
CapCut and TikTok are closely related to each other as they both have the same parent company called ByteDance. Thus, using CapCut to create captions for your TikTok videos can bring high-quality results. You can easily download CapCut on Android and iOS devices without any complications. The interface of this tool is clean that allows you to generate subtitles efficiently.
The auto caption feature in CapCut enables you to produce subtitles instantly. It uses advanced algorithms that ensure high accuracy while creating subtitles. To use this advanced feature of CapCut, read the below steps:
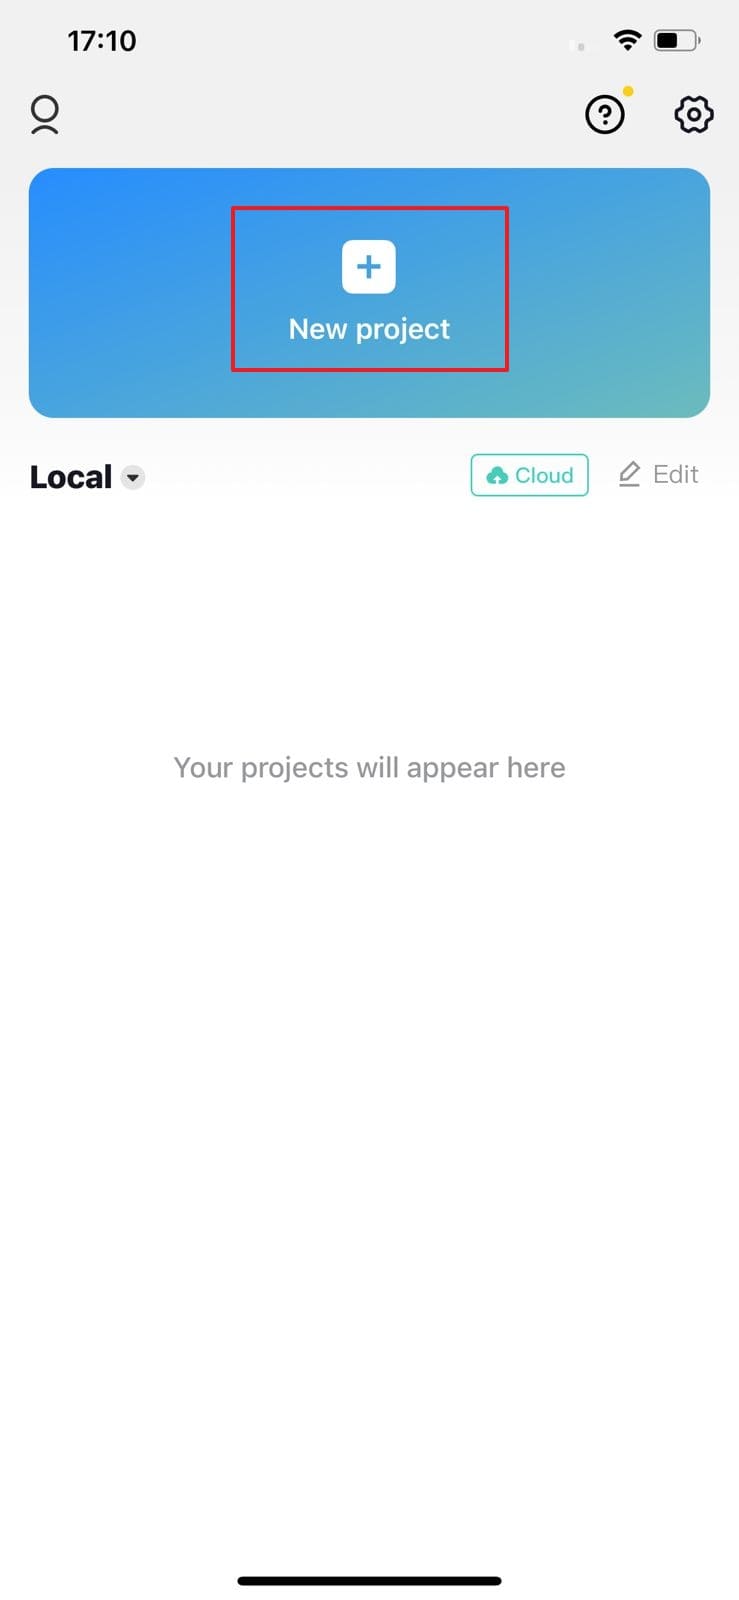
Step1 Download and launch CapCut on your phone. To import, tap on “New Project” and select the video from your phone’s gallery. Tap on “Add” to head to the editing mode of CapCut.
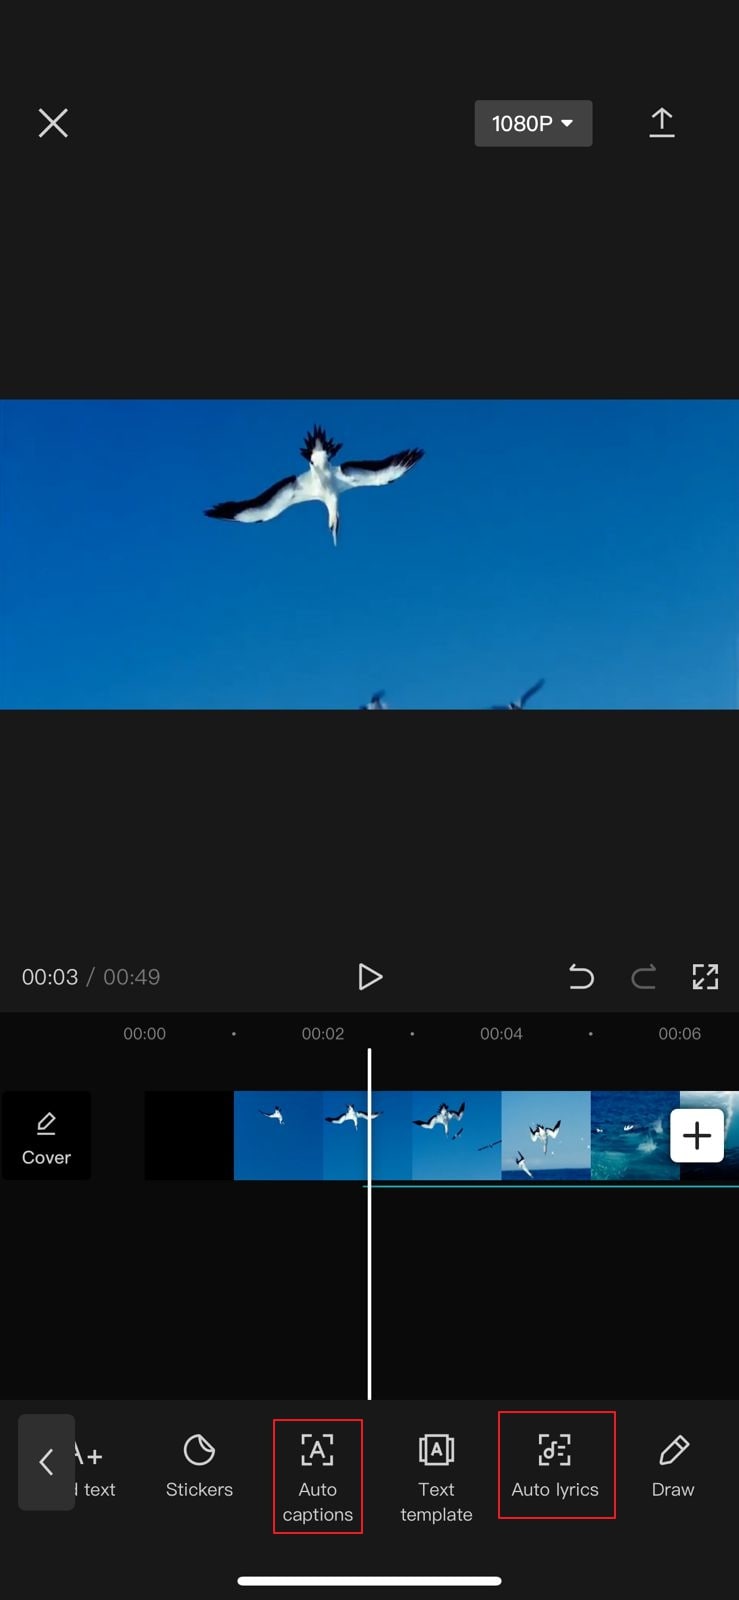
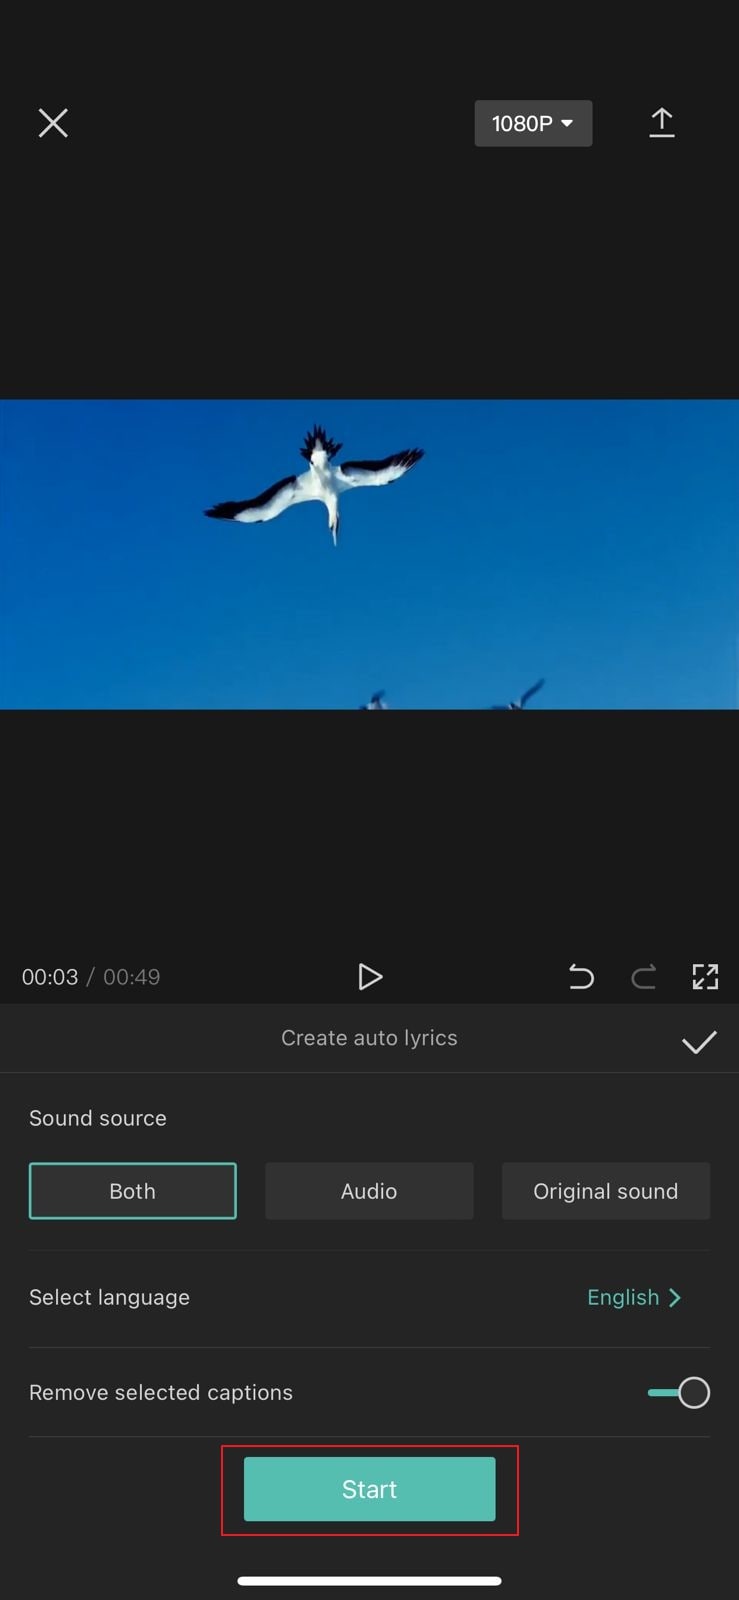
Step2 Afterward, select “Text” options from which you can either choose “Auto Lyrics” or “Auto Captions.” Using the Auto Lyrics option, you can generate captions for a song automatically. On the other hand, by using the Auto Captions option, you can transcribe the voice in your video to create subtitles. From the pop-up menus, choose the sound source and language to proceed.
Step3 Once you are done adjusting the settings, hit the “Start” button. After some seconds, CapCut will create captions for your TikTok video efficiently. Afterward, you can choose video resolution and hit the “Arrow” icon to export the video.
Way 3: Add Captions to TikTok Videos Manually
If you want to create captions for TikTok briefly, you can manually add them using the instructions given below. This method is extremely simple and helpful if you want to create small captions for your TikTok videos. Moreover, you can efficiently choose the font, color, and style of your captions in this manual method:
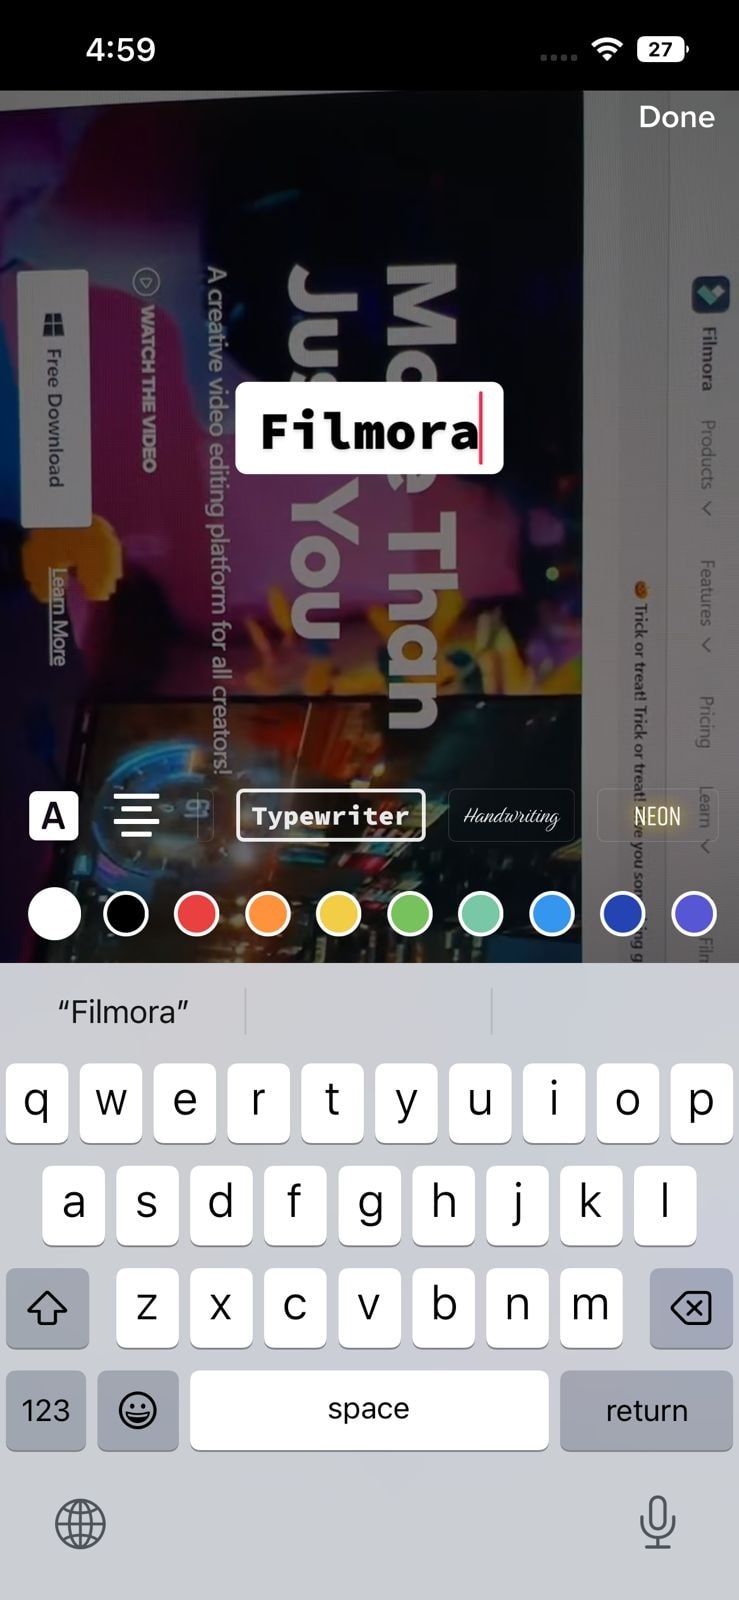
Step1 Open your TikTok app and create a video to begin. Tap on the “Tick” icon to enter the editing mode. Select “Text” given on the bottom toolbar of your screen.

Step2 Now, choose the style for your captions from the available options. Select the color and start writing your captions carefully. Once you are done, you can save and publish your created TikTok video.
Way 4: Automatically Add Subtitles to TikTok Videos with Online Editor
There are various online editors that can create captions for TikTok videos automatically. They use the Auto Transcription feature, through which the tool can create subtitles by recognizing the voice used in a TikTok video. One of the reliable online tools that can produce auto-subtitles is Veed.io.
Veed.io is an online tool that is capable of creating TikTok automatic captions efficiently. You can easily access this online tool from your web browsers. Moreover, it supports more than 100 languages and accents that you can choose to create auto-captions. Also, you can translate your captions into different languages using this tool. To use this tool flawlessly, check the below steps:
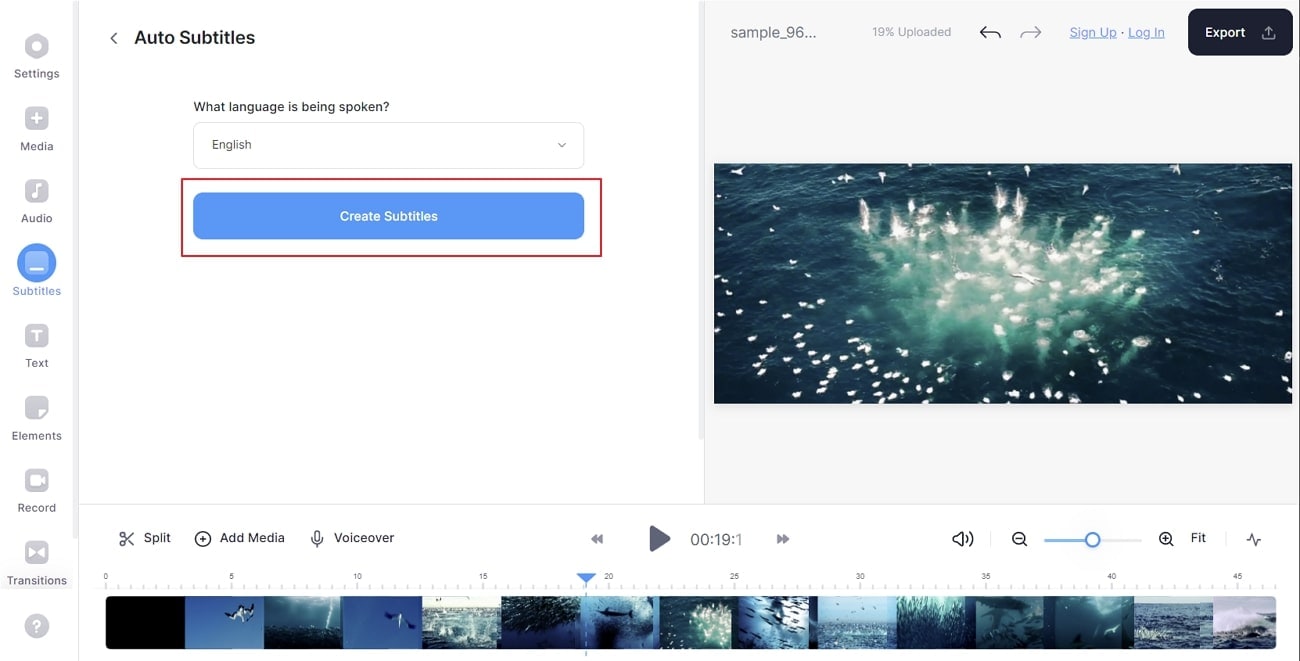
Step1 Begin by reaching the official website of Veed.io. Go to its Tools and locate the “Auto Subtitle Generator” option. It will redirect you to another page that consists of the tool information.

Step2 Click “Get Started” and upload a video from your system. Once you are done, tap on “Subtitles” and select “Auto Subtitle” from the given options. Choose your preferred language and tap on “Create Subtitles.”
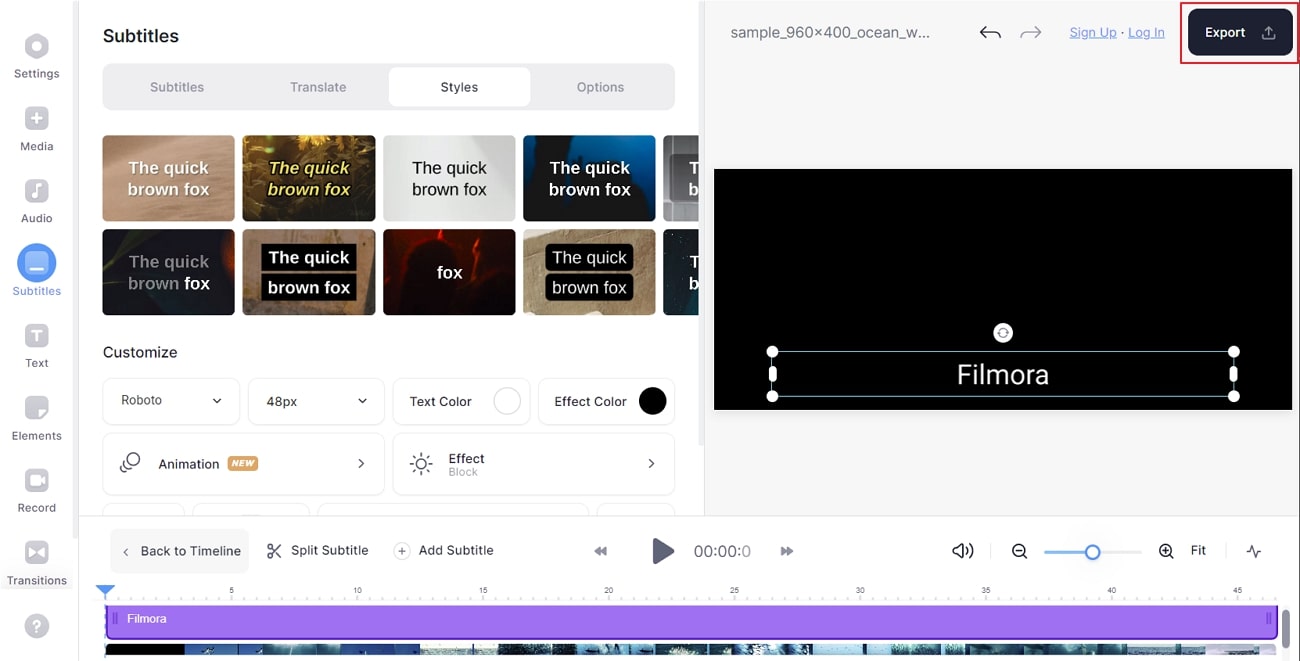
Step3 After waiting some time, you can see your auto-captions. You can choose the text color, effect, size, and alignment from the given options. Once you are satisfied with the TikTok captions, hit the “Export” button.
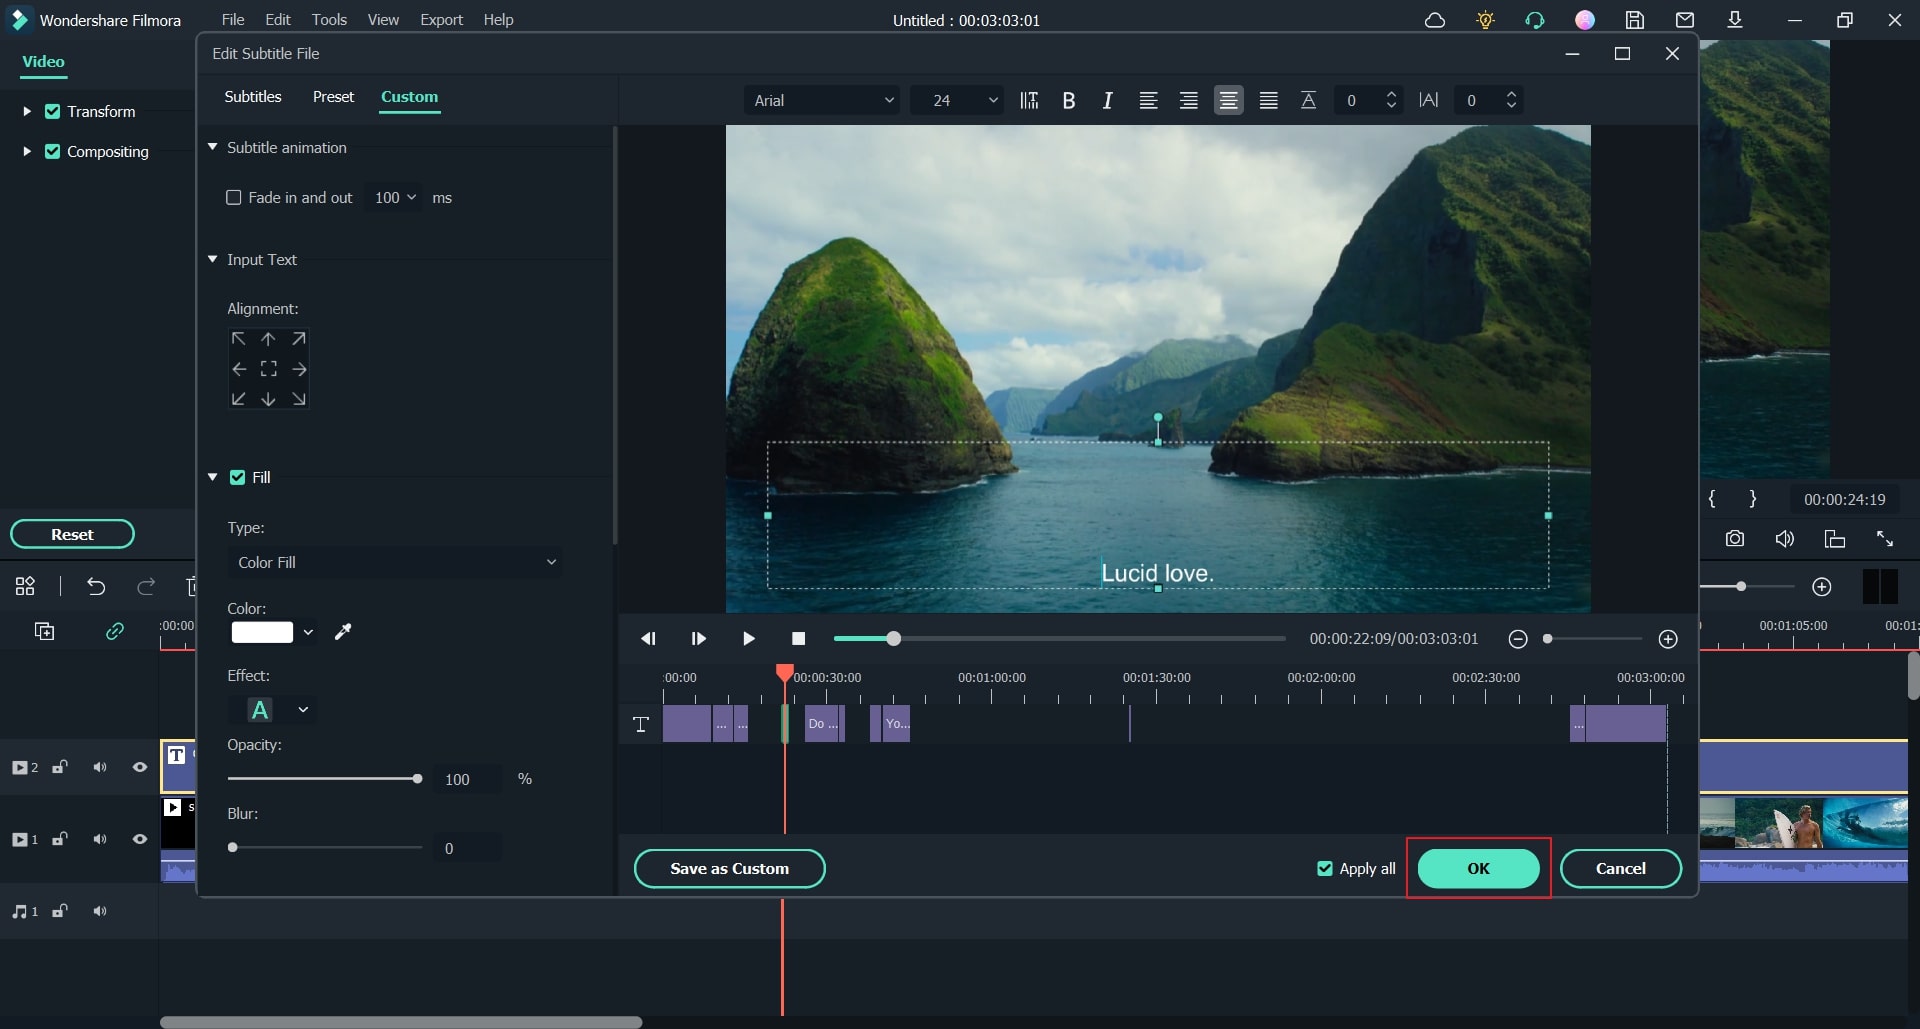
Part 3: How to Add Captions to Your TikTok Videos with Filmora
If you want to add further enhancements to your TikTok captions, you can use an offline tool like Wondershare Filmora . Using this platform, you can manually add captions by choosing the suitable style from the presets. Moreover, you can also add customizations to the captions through Filomora easily. You can also upload SRT files on this tool to produce TikTok captions.
Free Download For Win 7 or later(64-bit)
Free Download For macOS 10.14 or later
TikTok automatic captions can be easily generated from Filmora as it offers excellent results through its Speech-to-Text feature. Using this unique feature, you can transcribe the voice in your TikTok videos in up to 16 different languages. To use this feature conveniently, follow the below steps:
Step 1 Import the TikTok Video
Once done with launching and creating the Filmora project on your PC, hit the “Arrow” icon to import your video file on this tool. Now drag and drop the video file to the timeline in order to proceed.
Step 2 Initiate the Automatic Subtitle Feature
On your timeline, tap on the “Speech-to-Text” feature. Choose your language and video clip from the pop-up menu. Wait for some seconds, and the subtitles will be generated automatically. Double-click on the created TikTok automatic captions to open the editing settings. Here, you can select subtitles style and respective time duration. You can also add customizations efficiently.
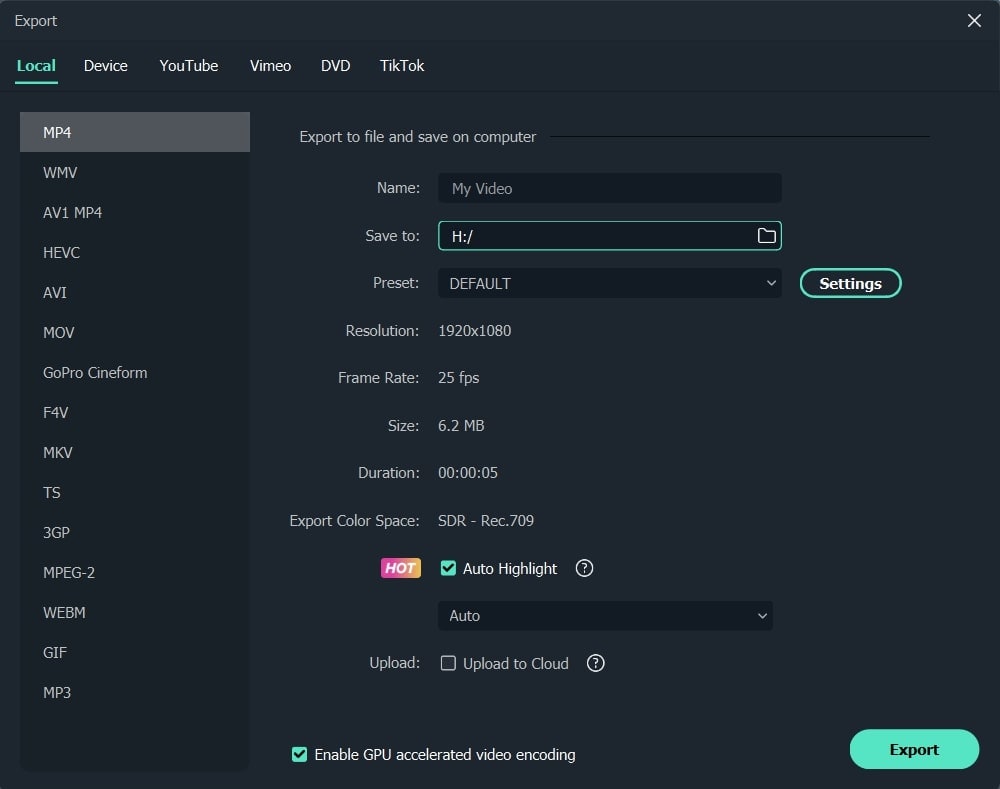
Step 3 Export the TikTok Video
After completing all the settings, you can click on the “Export” button. Before exporting, you can choose the video resolution and file formats easily. Also, this tool gives you the facility to export the video file directly to your TikTok account.
Part 4: People Also Want to Know
1. How to add captions to TikTok?
To add TikTok captions, you can choose the manual or automatic way. TikTok has a built-in auto-generator through which you can add captions automatically. Moreover, there are different offline and online tools, such as Filmora, CapCut, and Veed.io, through which you can add captions on TikTok flawlessly.
2. How to add captions to TikTok after posting?
If you want to add TikTok captions after posting, you have to download the video on your phone first. Afterward, hit the Plus icon to re-upload the video from your gallery. Choose that particular video again and tap on the Post button. Now you can write the captions on the given space easily. Afterward, tap on the “Post” button.
Last Words
This article has shed light on various ways how to add captions on TikTok efficiently. You can add TikTok captions manually or use the auto-generator for ease. Moreover, we have also highlighted an online tool to create subtitles that can be accessed from any web browser. However, if you want a professional caption editor for a longer run, Wondershare Filmora is the best choice among other tools. It has an easy-to-use interface and achieves accurate results comfortably.
Part 1: Why Should You Add Captions to TikTok Videos?
Adding captions on TikTok videos can bring you multiple advantages. To learn more about the benefits of adding captions on TikTok, read this section:
1. Increases Comprehension
It may be possible that viewers won’t be able to understand a particular dialogue in your TikTok video. To make your TikTok content more understandable, adding captions can prove to be a great option. Moreover, if some viewers can’t turn on the sound of TikTok videos, they can easily read the captions to understand the content.
2. Enhances Focus
Captions have the ability to grasp the attention of a viewer automatically. Adding captions to your TikTok video lets your viewers focus more properly. Thus, you can engage your audience throughout the TikTok video effortlessly.
3. Helps During Audio Problems
Audio problems may arise unexpectedly. In such situations, added captions on TikTok videos can offer great convenience. Moreover, people who have auditory disabilities can also enjoy your TikTok videos.
4. Attracts Diverse Audience
If some foreigners can’t understand or speak your native language, TikTok captions are necessary for them. By doing so, a broad and diverse audience can watch your TikTok videos easily.
Part 2: How to Add Captions on TikTok?
There are various ways through which you can generate TikTok captions effortlessly. Read this section to discover multiple and convenient ways to create TikTok captions easily.
Way 1: Auto-Generate Captions with TikTok’s Built-in Feature
If you don’t want to download video editing software, you can utilize the built-in feature of TikTok to create auto-captions. This will save you from the hassle of launching or accessing a professional subtitle editor. Moreover, it will also save you time and effort from creating subtitles manually. To use the built-in feature of TikTok automatic captions, check the following instructions:
Step1 Once you have captured a video on TikTok, tap the “Tick” icon from the bottom right side. This will redirect you to the editing mode.
Step2 On the editing mode, locate the “Captions” option from the right side. After tapping on it, TikTok will instantly generate the subtitles automatically. Make sure that all the captions are correctly created. Once you are done, hit the “Save” button displayed at the top right side. Afterward, you can quickly post your TikTok video with captions.
Way 2: Use Auto Captions in CapCut
CapCut and TikTok are closely related to each other as they both have the same parent company called ByteDance. Thus, using CapCut to create captions for your TikTok videos can bring high-quality results. You can easily download CapCut on Android and iOS devices without any complications. The interface of this tool is clean that allows you to generate subtitles efficiently.
The auto caption feature in CapCut enables you to produce subtitles instantly. It uses advanced algorithms that ensure high accuracy while creating subtitles. To use this advanced feature of CapCut, read the below steps:
Step1 Download and launch CapCut on your phone. To import, tap on “New Project” and select the video from your phone’s gallery. Tap on “Add” to head to the editing mode of CapCut.
Step2 Afterward, select “Text” options from which you can either choose “Auto Lyrics” or “Auto Captions.” Using the Auto Lyrics option, you can generate captions for a song automatically. On the other hand, by using the Auto Captions option, you can transcribe the voice in your video to create subtitles. From the pop-up menus, choose the sound source and language to proceed.
Step3 Once you are done adjusting the settings, hit the “Start” button. After some seconds, CapCut will create captions for your TikTok video efficiently. Afterward, you can choose video resolution and hit the “Arrow” icon to export the video.
Way 3: Add Captions to TikTok Videos Manually
If you want to create captions for TikTok briefly, you can manually add them using the instructions given below. This method is extremely simple and helpful if you want to create small captions for your TikTok videos. Moreover, you can efficiently choose the font, color, and style of your captions in this manual method:
Step1 Open your TikTok app and create a video to begin. Tap on the “Tick” icon to enter the editing mode. Select “Text” given on the bottom toolbar of your screen.
Step2 Now, choose the style for your captions from the available options. Select the color and start writing your captions carefully. Once you are done, you can save and publish your created TikTok video.
Way 4: Automatically Add Subtitles to TikTok Videos with Online Editor
There are various online editors that can create captions for TikTok videos automatically. They use the Auto Transcription feature, through which the tool can create subtitles by recognizing the voice used in a TikTok video. One of the reliable online tools that can produce auto-subtitles is Veed.io.
Veed.io is an online tool that is capable of creating TikTok automatic captions efficiently. You can easily access this online tool from your web browsers. Moreover, it supports more than 100 languages and accents that you can choose to create auto-captions. Also, you can translate your captions into different languages using this tool. To use this tool flawlessly, check the below steps:
Step1 Begin by reaching the official website of Veed.io. Go to its Tools and locate the “Auto Subtitle Generator” option. It will redirect you to another page that consists of the tool information.
Step2 Click “Get Started” and upload a video from your system. Once you are done, tap on “Subtitles” and select “Auto Subtitle” from the given options. Choose your preferred language and tap on “Create Subtitles.”
Step3 After waiting some time, you can see your auto-captions. You can choose the text color, effect, size, and alignment from the given options. Once you are satisfied with the TikTok captions, hit the “Export” button.
Part 3: How to Add Captions to Your TikTok Videos with Filmora
If you want to add further enhancements to your TikTok captions, you can use an offline tool like Wondershare Filmora . Using this platform, you can manually add captions by choosing the suitable style from the presets. Moreover, you can also add customizations to the captions through Filomora easily. You can also upload SRT files on this tool to produce TikTok captions.
Free Download For Win 7 or later(64-bit)
Free Download For macOS 10.14 or later
TikTok automatic captions can be easily generated from Filmora as it offers excellent results through its Speech-to-Text feature. Using this unique feature, you can transcribe the voice in your TikTok videos in up to 16 different languages. To use this feature conveniently, follow the below steps:
Step 1 Import the TikTok Video
Once done with launching and creating the Filmora project on your PC, hit the “Arrow” icon to import your video file on this tool. Now drag and drop the video file to the timeline in order to proceed.
Step 2 Initiate the Automatic Subtitle Feature
On your timeline, tap on the “Speech-to-Text” feature. Choose your language and video clip from the pop-up menu. Wait for some seconds, and the subtitles will be generated automatically. Double-click on the created TikTok automatic captions to open the editing settings. Here, you can select subtitles style and respective time duration. You can also add customizations efficiently.
Step 3 Export the TikTok Video
After completing all the settings, you can click on the “Export” button. Before exporting, you can choose the video resolution and file formats easily. Also, this tool gives you the facility to export the video file directly to your TikTok account.
Part 4: People Also Want to Know
1. How to add captions to TikTok?
To add TikTok captions, you can choose the manual or automatic way. TikTok has a built-in auto-generator through which you can add captions automatically. Moreover, there are different offline and online tools, such as Filmora, CapCut, and Veed.io, through which you can add captions on TikTok flawlessly.
2. How to add captions to TikTok after posting?
If you want to add TikTok captions after posting, you have to download the video on your phone first. Afterward, hit the Plus icon to re-upload the video from your gallery. Choose that particular video again and tap on the Post button. Now you can write the captions on the given space easily. Afterward, tap on the “Post” button.
Last Words
This article has shed light on various ways how to add captions on TikTok efficiently. You can add TikTok captions manually or use the auto-generator for ease. Moreover, we have also highlighted an online tool to create subtitles that can be accessed from any web browser. However, if you want a professional caption editor for a longer run, Wondershare Filmora is the best choice among other tools. It has an easy-to-use interface and achieves accurate results comfortably.
Techniques to Purify Your Recordings in Audacity
The most frequent request you’ll get from video makers is to eliminate irritating noises like rumbling or humming from an original clip. Almost all of the time, capturing high-quality audio during filming is challenging since the conversation is often hard to hear or is made unclear due to surrounding noises, such as the dreadful air conditioners or fans.
To get rid of all these awful noises, this Audacity Noise Reduction feature will serve you a significant purpose in removing unwanted background noise for your future videos. Without further ado, let’s get started!
In this article
01 Things You Need to Prepare for Background Noise Reduction
02 How to Remove Background Noise in Audacity?
03 Why is Audacity Noise Reduction Not Working?
04 How to Prevent Background Noise in Audio Recording?
05 How to Remove Background Noise in Filmora?
Part 1: Things You Need to Prepare for Background Noise Reduction
Here are few things that you need to consider before you apply the noise reduction to your clips:
1. Noise Sample
A decent sample of the noise you wish to eliminate is perhaps the most crucial aspect of the Audacity remove noise procedure.
This will be used by Audacity to understand the noise and build a noise profile. The noise recording should last for a fair amount of time and be devoid of any other noises.
2. Avoid Copy Pasting Tiny Noise Section in Your Spoken Phrases
When you have a tiny part of noise between your stated words on your audio, please don’t copy/paste it to make a more significant piece of sound for Audacity to examine.
You would not be supplying Audacity with any more information that will help it generate a decent noise profile. The noise profile is what enables Audacity to tell the difference between speech and noise.
3. Minimum 2048 Data Samples Required
To build a noise profile, the Noise Reduction function requires a minimum of 2048 sample data. An audio file with a sampling frequency of 44.1kHz is roughly five hundredths of a second.
Note that this is the minor sound level that Audacity needs to generate a noise profile; however, should you supply a larger sample of the noise, Audacity can typically perform a great job of producing a suitable noise profile. As a result, attempt to capture a few seconds of background noises wherever possible.
4. Establish Recording Level and Record “Silence”
Setting your audio volume and capturing some “quiet” prior to speaking is the best way to achieve this. Instead, when you’ve finished talking, keep your camera/recorder going for a few moments.
Don’t move or create any sounds while capturing the background noises, and keep an ear open for any other noises. You only need to capture the ambient noise for a few moments; two to five seconds will suffice.
Part 2: How to Remove Background Noise in Audacity on Windows and Mac?
Whether you are using Windows or macOS, we will show you a step-by-step process to achieve your results using both software in this part of Audacity remove background music guide.
Remove background noise in Audacity on Windows
Step 1: On your recording, select a few moments of sound. Any segment of noise that incorporates other noises should be avoided.

Step 2: From the Effect menu, select Noise Reduction.

Step 3: Select the Get Noise Profile option whenever the Noise Reduction effect screen appears.

Note: Choose whether to implement the noise removal to the entire waveforms or only a portion of it.
Step 4: To access the Noise Reduction effects window, go to Effects > Noise Reduction. Raise the level of noise reduction progressively while previewing the result.

Step 5: Head over to the File section to Export and Save the result. Audacity does not save sound clips when you select Save Project; instead, you must choose Export. Select the file type you want to store and the place wherever you can save it. Select Save after giving the File Name.

Remove background noise in Audacity on Mac
Step 1: Create a room tone-containing audio file. When you don’t have a separate track for room tone, use a recording with a few moments of quiet in it. Click-and-drag to select a segment with a few minutes of silence using the Selection Tool.

Step 2: Select Noise Reduction from the Effects tab. Select the Get Noise Profile tab in the new tab under Step 1. The screen will shut, and Audacity will take noise profile samples of the indicated area.

Step 3: Click-and-drag to select the whole file, which requires noise reduction with the Selection Tool. To re-open the function, go to the Effect tab and pick Noise Reduction. Make modifications to the following parameters under Step 2:
- Reduce and Residue
- Frequency Smoothing (bands)
- Sensitivity
- Noise Reduction

Step 4: To listen to how the chosen file will look with the selected parameters, select Preview. Re-adjust until you have a sound noise reduction with no interference. When you’re finished, select Reduce and click OK.
Part 3: Why is Audacity Noise Reduction Not Working?
It’s possible that the Noise Reduction function isn’t letting you mop up your recording since your audio isn’t appropriate for it. The disturbance must be continuous, not random or fluctuating, to work for Audacity’s Noise Reduction function.
For example, the Noise Reduction function will not assist if your audio was made in a busy environment with unique noises such as background chatter, random traffic noises, or in an exhibition space or museum. The Noise Reduction feature in Audacity isn’t meant to cope with that kind of distortion. You’ll need to alter your recording approach if you’re capturing voice in either of those situations.
Under the following situations, the Audacity Noise Reduction function might underperform.
- Particular noise in the background, including traffic or people.
- When the harmonics of the sound and voice are comparable.
- There is sound variance where there is fluctuation in the noise.
- The volume of the voice is comparable to or lower than that of the background noise.
- When the noise is irregular or changeable rather than continuous.
- The loudness is deafening.
- The sound is a single click or pop.
Part 4: How to Prevent Background Noise in Audio Recording?
Although Audacity allows eliminating noise very simply, it is still an additional level that takes time to refine your podcast production. These pointers can help you avoid the necessity for noise reduction and cut down on the amount of time you spend processing.
1. Reduce the Computer Fan Noise
Whenever computers become too heated, they can produce a lot of noise. You may limit the amount of software that runs and position your mic away from the keyboard to help lessen this impact and avoid the fan from coming on.
However, even if you observe all of these guidelines, undesired recording sounds may still appear in your program. Fortunately, contemporary software makes this problem quite simple to resolve.
2. Reduce the Gain and Get Close to the Mic
Reduce the gain (sensitivity of the microphone) and go nearer to it. Talking straight into the microphone won’t distort your audio if you reduce the gain, and that would assist your microphone in concentrating on scooping up your voice’s tone.
Bonus Tip: Set your recorder’s (or DAW’s) sensitivity such that your speech peaks between -12 and -10db.
3. Utilize a Versatile Microphone
Condenser and dynamic microphones are the two most common types of podcast microphones. Condenser microphones are significantly more sensitive instruments meant to take up average atmospheric noise, whereas dynamic microphones have a narrower frequency range, picking up fewer ambient noises.
4. Optimize Your Recording Environment
The most significant and most crucial aspect of your podcasts’ sound quality is where you capture it. To optimize your personal podcasting space, we recommend choosing a peaceful, compact area away from HVAC systems, vehicles, external hard drives, background sound, motors, and other distractions. You may also increase the tone of your room by using natural sound absorbents such as curtains, rugs, carpets, and sofas.
Part 5: How to Remove Background Noise in Filmora?
Although there is a lot of software available to eliminate ambient noise, we highly suggest Wondershare Filmora Video Editor to edit audio and video in one place.
In addition to the standard audio editing capabilities, the recently redesigned Filmora currently includes enhanced waveforms, volume Keyframing , peak metering, and audio transitions, giving you a better audio editing interface.
For Win 7 or later (64-bit)
For macOS 10.12 or later
Filmora Video Editor will quickly remove ambient sound from both sound/video. You may also remove the sound from the video with this simple video editor, use the Audio Equalizer or Audio Mixer functions to modify the audio further, and then Export and save the audio in an Mp3 file. Here are the detailed steps:
Step 1: In the Wondershare Filmora Timeline menu, Import your footage. Trim the footage after previewing it and deleting the sections you don’t want to retain.

Step 2: To eliminate the ambient noise immediately, double-click on the video file, and go to the Audio panel to select the Remove Background Noise option. You will find that the background noise is removed automatically.

Step 3: After checking the results, select Export to download the noise-reduced clip to your desktop or upload it immediately to YouTube or Vimeo.

Conclusion
Well, there you have it. In this Audacity Remove Background Noise guide, we have reviewed every possible method you can adopt to get rid of the unnecessary background noise in the Audacity. And if the desired results are still not achieved, we highly recommend using the Wondershare Filmora editing software. Not only will it help you remove the unwanted ambient noise, but it will also allow you to customize your audio or video file further.
02 How to Remove Background Noise in Audacity?
03 Why is Audacity Noise Reduction Not Working?
04 How to Prevent Background Noise in Audio Recording?
05 How to Remove Background Noise in Filmora?
Part 1: Things You Need to Prepare for Background Noise Reduction
Here are few things that you need to consider before you apply the noise reduction to your clips:
1. Noise Sample
A decent sample of the noise you wish to eliminate is perhaps the most crucial aspect of the Audacity remove noise procedure.
This will be used by Audacity to understand the noise and build a noise profile. The noise recording should last for a fair amount of time and be devoid of any other noises.
2. Avoid Copy Pasting Tiny Noise Section in Your Spoken Phrases
When you have a tiny part of noise between your stated words on your audio, please don’t copy/paste it to make a more significant piece of sound for Audacity to examine.
You would not be supplying Audacity with any more information that will help it generate a decent noise profile. The noise profile is what enables Audacity to tell the difference between speech and noise.
3. Minimum 2048 Data Samples Required
To build a noise profile, the Noise Reduction function requires a minimum of 2048 sample data. An audio file with a sampling frequency of 44.1kHz is roughly five hundredths of a second.
Note that this is the minor sound level that Audacity needs to generate a noise profile; however, should you supply a larger sample of the noise, Audacity can typically perform a great job of producing a suitable noise profile. As a result, attempt to capture a few seconds of background noises wherever possible.
4. Establish Recording Level and Record “Silence”
Setting your audio volume and capturing some “quiet” prior to speaking is the best way to achieve this. Instead, when you’ve finished talking, keep your camera/recorder going for a few moments.
Don’t move or create any sounds while capturing the background noises, and keep an ear open for any other noises. You only need to capture the ambient noise for a few moments; two to five seconds will suffice.
Part 2: How to Remove Background Noise in Audacity on Windows and Mac?
Whether you are using Windows or macOS, we will show you a step-by-step process to achieve your results using both software in this part of Audacity remove background music guide.
Remove background noise in Audacity on Windows
Step 1: On your recording, select a few moments of sound. Any segment of noise that incorporates other noises should be avoided.
Step 2: From the Effect menu, select Noise Reduction.
Step 3: Select the Get Noise Profile option whenever the Noise Reduction effect screen appears.
Note: Choose whether to implement the noise removal to the entire waveforms or only a portion of it.
Step 4: To access the Noise Reduction effects window, go to Effects > Noise Reduction. Raise the level of noise reduction progressively while previewing the result.
Step 5: Head over to the File section to Export and Save the result. Audacity does not save sound clips when you select Save Project; instead, you must choose Export. Select the file type you want to store and the place wherever you can save it. Select Save after giving the File Name.
Remove background noise in Audacity on Mac
Step 1: Create a room tone-containing audio file. When you don’t have a separate track for room tone, use a recording with a few moments of quiet in it. Click-and-drag to select a segment with a few minutes of silence using the Selection Tool.
Step 2: Select Noise Reduction from the Effects tab. Select the Get Noise Profile tab in the new tab under Step 1. The screen will shut, and Audacity will take noise profile samples of the indicated area.
Step 3: Click-and-drag to select the whole file, which requires noise reduction with the Selection Tool. To re-open the function, go to the Effect tab and pick Noise Reduction. Make modifications to the following parameters under Step 2:
- Reduce and Residue
- Frequency Smoothing (bands)
- Sensitivity
- Noise Reduction
Step 4: To listen to how the chosen file will look with the selected parameters, select Preview. Re-adjust until you have a sound noise reduction with no interference. When you’re finished, select Reduce and click OK.
Part 3: Why is Audacity Noise Reduction Not Working?
It’s possible that the Noise Reduction function isn’t letting you mop up your recording since your audio isn’t appropriate for it. The disturbance must be continuous, not random or fluctuating, to work for Audacity’s Noise Reduction function.
For example, the Noise Reduction function will not assist if your audio was made in a busy environment with unique noises such as background chatter, random traffic noises, or in an exhibition space or museum. The Noise Reduction feature in Audacity isn’t meant to cope with that kind of distortion. You’ll need to alter your recording approach if you’re capturing voice in either of those situations.
Under the following situations, the Audacity Noise Reduction function might underperform.
- Particular noise in the background, including traffic or people.
- When the harmonics of the sound and voice are comparable.
- There is sound variance where there is fluctuation in the noise.
- The volume of the voice is comparable to or lower than that of the background noise.
- When the noise is irregular or changeable rather than continuous.
- The loudness is deafening.
- The sound is a single click or pop.
Part 4: How to Prevent Background Noise in Audio Recording?
Although Audacity allows eliminating noise very simply, it is still an additional level that takes time to refine your podcast production. These pointers can help you avoid the necessity for noise reduction and cut down on the amount of time you spend processing.
1. Reduce the Computer Fan Noise
Whenever computers become too heated, they can produce a lot of noise. You may limit the amount of software that runs and position your mic away from the keyboard to help lessen this impact and avoid the fan from coming on.
However, even if you observe all of these guidelines, undesired recording sounds may still appear in your program. Fortunately, contemporary software makes this problem quite simple to resolve.
2. Reduce the Gain and Get Close to the Mic
Reduce the gain (sensitivity of the microphone) and go nearer to it. Talking straight into the microphone won’t distort your audio if you reduce the gain, and that would assist your microphone in concentrating on scooping up your voice’s tone.
Bonus Tip: Set your recorder’s (or DAW’s) sensitivity such that your speech peaks between -12 and -10db.
3. Utilize a Versatile Microphone
Condenser and dynamic microphones are the two most common types of podcast microphones. Condenser microphones are significantly more sensitive instruments meant to take up average atmospheric noise, whereas dynamic microphones have a narrower frequency range, picking up fewer ambient noises.
4. Optimize Your Recording Environment
The most significant and most crucial aspect of your podcasts’ sound quality is where you capture it. To optimize your personal podcasting space, we recommend choosing a peaceful, compact area away from HVAC systems, vehicles, external hard drives, background sound, motors, and other distractions. You may also increase the tone of your room by using natural sound absorbents such as curtains, rugs, carpets, and sofas.
Part 5: How to Remove Background Noise in Filmora?
Although there is a lot of software available to eliminate ambient noise, we highly suggest Wondershare Filmora Video Editor to edit audio and video in one place.
In addition to the standard audio editing capabilities, the recently redesigned Filmora currently includes enhanced waveforms, volume Keyframing , peak metering, and audio transitions, giving you a better audio editing interface.
For Win 7 or later (64-bit)
For macOS 10.12 or later
Filmora Video Editor will quickly remove ambient sound from both sound/video. You may also remove the sound from the video with this simple video editor, use the Audio Equalizer or Audio Mixer functions to modify the audio further, and then Export and save the audio in an Mp3 file. Here are the detailed steps:
Step 1: In the Wondershare Filmora Timeline menu, Import your footage. Trim the footage after previewing it and deleting the sections you don’t want to retain.
Step 2: To eliminate the ambient noise immediately, double-click on the video file, and go to the Audio panel to select the Remove Background Noise option. You will find that the background noise is removed automatically.
Step 3: After checking the results, select Export to download the noise-reduced clip to your desktop or upload it immediately to YouTube or Vimeo.
Conclusion
Well, there you have it. In this Audacity Remove Background Noise guide, we have reviewed every possible method you can adopt to get rid of the unnecessary background noise in the Audacity. And if the desired results are still not achieved, we highly recommend using the Wondershare Filmora editing software. Not only will it help you remove the unwanted ambient noise, but it will also allow you to customize your audio or video file further.
Also read:
- [Updated] The Hot New TikTok Moves to Watch for 2024
- [Updated] 2024 Approved Smooth Video Uploads to TikTok with Chrome/Android/iOS (Updated )
- [Updated] Picnic Pioneers 10 Innovative Recipes From TikTok for 2024
- [Updated] Unlock Creative Potential in TikTok with Voice Modification for 2024
- Instant Guide Setup Snapchat for Mac Users
- [New] Time-Lapse TikToks Capturing Anime Elements and Styles
- [Updated] 2024 Approved Rising Above the Rest Marketing Techniques on TikTok
- [Updated] Boosting Popularity on TikTok Top 7 Essential Apps & Strategies for 2024
- In 2024, The Flawless Path to Popularizing TikTok Imagery
- 2024 Approved 10 Ways to Make Your Own Hit TikTok Video Responses
- In 2024, Funny Bone Flickers The Top 20 TikTok Jokes and Pranks
- [New] 2024 Approved Boosting Visibility on TikTok with Smart Hashtags
- [New] 2024 Approved The Crazy Crew's Top 10 Unique TikTok Games
- [New] Rhythmic Rendezvous Combining Beat and Visuals on TikTok for 2024
- [New] In 2024, The Art of Influencing Consumers A Guide to Profitable TikTok Marketing
- Viral Cooking Hits Best TikTok Dishes
- [New] In 2024, No-Cost, High-Quality TikTok Videos for Mac Computers
- The Art of Keeping Up With Snapstreaks
- [Updated] In 2024, Streamlining Content Creation Using Siri in TikTok
- 2024 Approved Best-Kept Secrets Top 5 Social Platforms Beyond TikTok
- Mastering the Art of TikTok Intros on Mac Devices for 2024
- [Updated] Embarking on a Journey Through TikTok’s Anime Culture A Dance, Sound and Meme Extravaganza for 2024
- [Updated] Visual Enthusiasts' List Top 10 Must-Have TikTok Filters for 2024
- [New] 2024 Approved Discovering TikTok’s Anime Essence Dance Movements, Sounds & Visual Expression
- [Updated] Top 30 Must-See TikTok Treasures on Amazon for 2024
- [Updated] 2024 Approved Top 9 Ways to Skyrocket Your TikTok Audience Growth
- Boosting Video Success Tips From Top 50+ Quotes on TikTok for 2024
- [Updated] 2024 Approved Selecting a Distinctive Identifier Code for Your Channel
- [New] Unlock Faster Fame on TikTok with These Key Strategies
- 2024 Approved Explore TikTok's Charms #7 Most Popular Emojis and Their Secrets Revealed
- [Updated] Masterful Media Moments Innovative Bio Ideas for TikTok Audience Expansion via Filmora for 2024
- Revolutionary Bio Blueprint Essential Strategies for Maximum Viewership on TikTok-Filmora Platforms for 2024
- [New] Your Complete TikTok Camera Operation Manual
- In 2024, Revolutionize Your Reach on TikTok's Hot List
- [Updated] Mistakenly Cleared TikTok Videos What to Do Next for 2024
- 2024 Approved Immediate Dance Broadcasts on ROKTV
- [New] 2024 Approved The Ultimate Screen Cutting Companion
- In 2024, Essential Ingredients for Triumphant TikTok Marketing Plans
- In 2024, Unique TikTok PFP Concepts for an Eye-Catching Profile
- New Expertly Curated List of Premier Audio Trimming Software Websites
- [New] In 2024, Streamlining Remote Recordings A Producer’s Guide
- Virality Voyage Navigating Newsfeeds with Noteworthy Posts
- In 2024, Complete Fixes To Solve Apple iPhone 11 Randomly Asking for Apple ID Password
- How to Fix My Samsung Galaxy S24+ Location Is Wrong | Dr.fone
- 11 Best Location Changers for Nokia C12 Plus | Dr.fone
- [Updated] In 2024, World's Top 12 Screensaver Apps (No End in View)
- Updated In 2024, From Full Blast to Quietude Implementing Audio Volume Transitions in iMovie
- Getting the Pokemon Go GPS Signal Not Found 11 Error in Oppo A59 5G | Dr.fone
- [New] Compelling List of Premium-Free Phone Video Chat Applications (iOS/Android) for 2024
- 6 Solutions to Fix Error 505 in Google Play Store on Samsung Galaxy Z Fold 5 | Dr.fone
- Reliving Real-Time Recollections for 2024
- Three Solutions to Hard Reset Vivo T2 5G? | Dr.fone
- Your Complete Guide To Reset Honor 100 | Dr.fone
- Title: "Enhancing TikTok Content 5 Proven Caption Tactics Explored"
- Author: Brian
- Created at : 2024-05-23 13:15:50
- Updated at : 2024-05-24 13:15:50
- Link: https://tiktok-videos.techidaily.com/enhancing-tiktok-content-5-proven-caption-tactics-explored/
- License: This work is licensed under CC BY-NC-SA 4.0.
