
:max_bytes(150000):strip_icc()/car-heater-blows-cold-56a1050d5f9b58eba4b6b774.jpg)
Essential Skills for Effective Discord Message Pinning
Essential Skills for Effective Discord Message Pinning
How to Pin A Message on Discord?

Richard Bennett
Mar 27, 2024• Proven solutions
Like TeamSpeak or Skype, Discord is a chat app aimed at easy mass communication. Although it was made for gamers, it is readily used for communicating in offices, during projects, or for professional collaboration.
Even though it’s straightforward to use, there are several Discord features that you may be unfamiliar with.
One such feature is called pinning messages. It is available to moderators, administrators, server owners, and other users who have permission to “Manage Messages” in various server channels.
This feature helps you find and share vital messages quickly, especially when new users join a specific channel.
It acts like a sticky note for Discord, making sure valuable information such as server rules do not get overshadowed by new messages even months after the pinned messages are first posted.
Today, we will go over how to pin a message on Discord for your desktop app on PC and Mac, as well as on your iPhone and Android mobile devices.
Part 1: How to Pin A Message on Discord Desktop?
If you want to learn how to pin messages on Discord desktop, follow these steps:
- Hover over any message which you wish to pin.
- On the right-hand side of it, there will be a button that would read as More; click it and you will see a screen like below

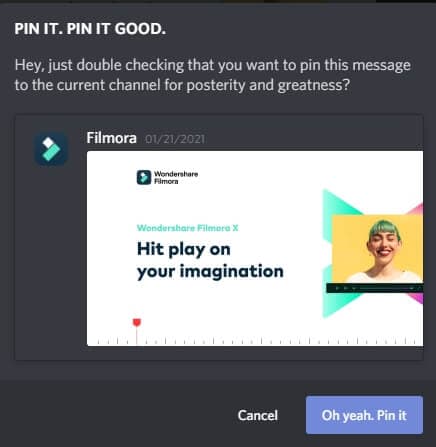
- Now, click on the “Pin Message” option
- After which, you will be presented with a prompt asking you to confirm that you want to pin this particular message. Click on “Oh yeah, pin it.”
That’s it! You have now learned how to pin messages on Discord for the desktop application.
But make sure you don’t pin everything that might seem important at a glance — only pin messages that may have utility in the future.
Also, don’t pin messages that are just important for you. In larger channels, prioritize pinning messages that will benefit most participants.
Part 2: How to Pin Messages on Discord Mobile App?
Pinning messages in the mobile app is very similar to how it is done on the desktop application. Do it by:
- Just hold down your finger on the message you wish to pin
- A couple of seconds later, you will be presented with a list of options
- From here, click on “Pin Message”
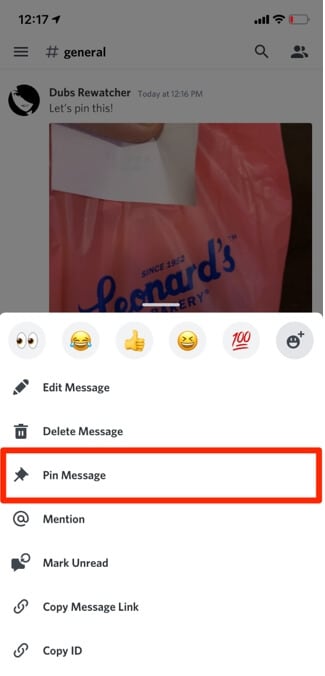
- A pop-up will appear confirming if you want to pin the message. If you are sure you want to pin a particular message, tap the “Yes” button and then your message is pinned
Part 3: How to View Pinned Messages on Discord
Accessing pinned messages is just as easy as pinning them. To access a pinned message on the app’s desktop version:
- Click on the pin icon appearing on the top right-hand side of your screen

- Doing this will present you with a drop-down list of pinned messages. Now, you can tap on the “Jump” button next to the “x” (cross) icon to go directly to the pinned message
- This will allow you to understand the context behind the pinned message. You can also access and share links in the pinned messages from here
Part 4: How to View Pinned Messages on Discord Mobile
View your pins on the mobile version of Discord by:
- Swiping from right to left, which will open up a side menu
- Then click on “Pins,” which is the second option from the left, as shown in the picture below
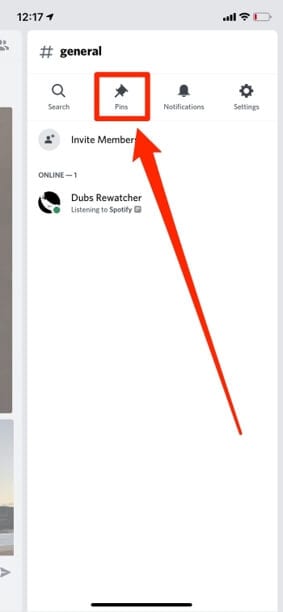
- Now you will be in the pinned messages window
- You can jump to a specific pinned message by clicking on it, allowing you to access any content or links in the message
Part 5: Limit on Pinned Messages
You can only pin 50 messages in the pin box in Discord, meaning if you want to pin new messages, you will have to delete older ones to make space.
This may feel like a disadvantage. However, it makes perfect sense. Pinning messages is only for important information that must be used in the future.
Removing this limit and giving people free rein on the number of messages they can pin will eventually lead to too many pinned messages, defeating the feature’s purpose.
Part 6: How to Delete Pinned Messages on Discord?
If something pinned in the past has become redundant over time, you can remove it from the pinned messages.
This will make sure your pinned messages do not stockpile over time, and there is space to add new messages important to the server.
To remove pinned messages on desktops:
- Go to the pin icon used to access pins
- Next, hover over the message you wish to unpin and click on the “x” (cross) button next to the jump button
- After this, click on the “yeah, remove it please kthx” button
- The message will now stop appearing in the list of pinned messages
To do the same for mobile devices:
- Swipe right to left to access the side menu
- Click on “Pins” to view all the messages pinned by you or other people on the server with permissions to pin
- Then hold down on the message, which will give you an option to unpin it
- Click on “Unpin” to remove the message from the list of pinned messages
Things to keep in mind:
- You can skip the pop-up shown above when trying to remove a pinned message. All you must do is hold shift when clicking on the “x” (cross) button allowing you to go on that spree of unpins
- Another thing to remember is that all these tips on how pin messages apply to both Direct Messages (DM) and Server group chats
All in All
Learning how to pin a message on Discord could be a little tricky at first, mostly if you haven’t done so in the past and someone spontaneously asks you to do so.
However, the feature is pretty intuitive and straightforward once you get the hang of it.
The usefulness of pinning makes it very important for both old and new users as you can relay important information without having to go through tons of old messages.
Richard Bennett
Richard Bennett is a writer and a lover of all things video.
Follow @Richard Bennett
Richard Bennett
Mar 27, 2024• Proven solutions
Like TeamSpeak or Skype, Discord is a chat app aimed at easy mass communication. Although it was made for gamers, it is readily used for communicating in offices, during projects, or for professional collaboration.
Even though it’s straightforward to use, there are several Discord features that you may be unfamiliar with.
One such feature is called pinning messages. It is available to moderators, administrators, server owners, and other users who have permission to “Manage Messages” in various server channels.
This feature helps you find and share vital messages quickly, especially when new users join a specific channel.
It acts like a sticky note for Discord, making sure valuable information such as server rules do not get overshadowed by new messages even months after the pinned messages are first posted.
Today, we will go over how to pin a message on Discord for your desktop app on PC and Mac, as well as on your iPhone and Android mobile devices.
Part 1: How to Pin A Message on Discord Desktop?
If you want to learn how to pin messages on Discord desktop, follow these steps:
- Hover over any message which you wish to pin.
- On the right-hand side of it, there will be a button that would read as More; click it and you will see a screen like below
- Now, click on the “Pin Message” option
- After which, you will be presented with a prompt asking you to confirm that you want to pin this particular message. Click on “Oh yeah, pin it.”
That’s it! You have now learned how to pin messages on Discord for the desktop application.
But make sure you don’t pin everything that might seem important at a glance — only pin messages that may have utility in the future.
Also, don’t pin messages that are just important for you. In larger channels, prioritize pinning messages that will benefit most participants.
Part 2: How to Pin Messages on Discord Mobile App?
Pinning messages in the mobile app is very similar to how it is done on the desktop application. Do it by:
- Just hold down your finger on the message you wish to pin
- A couple of seconds later, you will be presented with a list of options
- From here, click on “Pin Message”
- A pop-up will appear confirming if you want to pin the message. If you are sure you want to pin a particular message, tap the “Yes” button and then your message is pinned
Part 3: How to View Pinned Messages on Discord
Accessing pinned messages is just as easy as pinning them. To access a pinned message on the app’s desktop version:
- Click on the pin icon appearing on the top right-hand side of your screen
- Doing this will present you with a drop-down list of pinned messages. Now, you can tap on the “Jump” button next to the “x” (cross) icon to go directly to the pinned message
- This will allow you to understand the context behind the pinned message. You can also access and share links in the pinned messages from here
Part 4: How to View Pinned Messages on Discord Mobile
View your pins on the mobile version of Discord by:
- Swiping from right to left, which will open up a side menu
- Then click on “Pins,” which is the second option from the left, as shown in the picture below
- Now you will be in the pinned messages window
- You can jump to a specific pinned message by clicking on it, allowing you to access any content or links in the message
Part 5: Limit on Pinned Messages
You can only pin 50 messages in the pin box in Discord, meaning if you want to pin new messages, you will have to delete older ones to make space.
This may feel like a disadvantage. However, it makes perfect sense. Pinning messages is only for important information that must be used in the future.
Removing this limit and giving people free rein on the number of messages they can pin will eventually lead to too many pinned messages, defeating the feature’s purpose.
Part 6: How to Delete Pinned Messages on Discord?
If something pinned in the past has become redundant over time, you can remove it from the pinned messages.
This will make sure your pinned messages do not stockpile over time, and there is space to add new messages important to the server.
To remove pinned messages on desktops:
- Go to the pin icon used to access pins
- Next, hover over the message you wish to unpin and click on the “x” (cross) button next to the jump button
- After this, click on the “yeah, remove it please kthx” button
- The message will now stop appearing in the list of pinned messages
To do the same for mobile devices:
- Swipe right to left to access the side menu
- Click on “Pins” to view all the messages pinned by you or other people on the server with permissions to pin
- Then hold down on the message, which will give you an option to unpin it
- Click on “Unpin” to remove the message from the list of pinned messages
Things to keep in mind:
- You can skip the pop-up shown above when trying to remove a pinned message. All you must do is hold shift when clicking on the “x” (cross) button allowing you to go on that spree of unpins
- Another thing to remember is that all these tips on how pin messages apply to both Direct Messages (DM) and Server group chats
All in All
Learning how to pin a message on Discord could be a little tricky at first, mostly if you haven’t done so in the past and someone spontaneously asks you to do so.
However, the feature is pretty intuitive and straightforward once you get the hang of it.
The usefulness of pinning makes it very important for both old and new users as you can relay important information without having to go through tons of old messages.
Richard Bennett
Richard Bennett is a writer and a lover of all things video.
Follow @Richard Bennett
Perfect Your Discord Voices: Avoiding Background Noise with VoiceMod
How To Use Voicemod On Discord
Richard Bennett
Mar 27, 2024• Proven solutions
A voice changer will allow you to prank friends, create content, and most of all, secure your presence by maintaining anonymity. With it, you can turn your voice into several unique and exciting voices to serve any purpose you deem fit.
And when it comes to voice changers, none is as easy to operate as the Voicemod in Discord. Its claim to fame is that it features numerous voice options to choose from.
With Vociemod, you have to simply run the program in the background and select your desired voice!
Read on as we discuss how to use Voicemod on Discord in detail:
In this article
Part 1: How To Use Voice Changer Voicemod For Discord On Desktop Computer
Part 2: How To Fix Voicemod Not Working Discord?
Part 3: How To Change Voice For Discord On Mobile?
Part 1: How To Use Voice Changer Voicemod For Discord On Desktop Computer
Voicemod is arguably one of the best voice changer tools available on the internet for its excellent features.
But before we jump straight into using Voicemod for Discord, you must know how to install one on your desktop Mac/PC.
Here’s how to install Voicemod
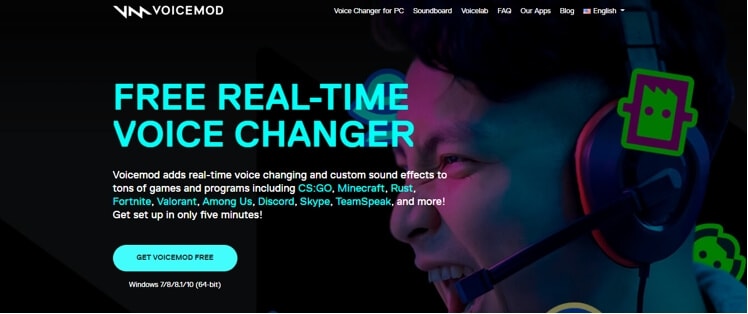
- Visit the Voicemod website to begin the download process.
- You’ll see the button “Get Voicemod Free” on the screen. Click it!
- Upon clicking, the site will ask you to sign in to your account from Discord, Twitch, to Google. Use your Discord login details to sign in.
- After you’re signed in, the “.exe” file will be downloaded to your PC/Mac’s download folder. Open the “.exe” file the moment it’s downloaded.
- An install wizard will open up. Navigate through the wizard’s installation process to install the program on your PC/Mac.
- After installation is complete, the installation wizard will ask to restart your windows’ Mac or PC.
You can skip it, but it’s best to restart it for smooth operations.
Once your Mac/PC restarts, you’ll see the Voicemod app icon on your desktop screen.
Now that you have successfully installed the voice changer Voicemod app into your desktop computer, let’s dive into knowing how to use Voicemod on Discord!
Here’s how to use voice changer on Discord
- Click the Vociemod icon on the desktop to open the app. If you can’t find it there, click the “windows icon” located at the screen’s bottom-left. Just type “Voicemod,” and the program will show up. Double click it to get it opened.
- When the app opens up, you’ll have to choose the output and input it will use. If you’re wondering, why the output? This is to give you an insight into what your voice will sound like on each filter.
Once it’s done, you can play around with different filters!
Every day, you’ll get new free filters to use; however, to unlock and access all filters, you need to upgrade to the “pro-version” of voice changer Voicemod.
On the other hand, if you only need a few filters, the “basic-version” should suffice.
Apart from that, you can unlock an additional free filter in your app by sharing it on your social media accounts.

Step 1
To set up Voicemod with Discord, open your discord account and go to the settings (gear icon) placed at the screen’s bottom-left corner.
Step 2
Click the “Voice and Video” option right under the app settings.
Step 3
To make Voicemod usable, you’ll have to change Voice settings. Within the “Input Device” option, select the option that says “Microphone Voicemod Virtual Audio.”
Step 4
After you have changed settings, you can easily change the voice within the program. Not only this, but other users can also hear your audio alteration.
Step 5
With the “basic version,” you’ll have seven free voice choices that will change each day. On the contrary, with the “pro-version,” you’ll gain access to more than 80 different voice options.
So, if you’re searching for an easy and simple voice-changing app to use, look no further than Voicemod!
Part 2: How To Fix Voicemod Not Working Discord?
Is your voice changer Voicemod not working on Discord? No worries, you can troubleshoot the issues with a few basic steps.
Here are some ways you can use to fix Voicemod not working in Discord:
Method 1: Restart Your Windows PC/Mac
Though it’s not a technical solution, restarting your desktop computer fixes incorrect settings by rebooting them and solves many problems connected with your computer system, programs, and hardware.
So, when your Voicemod suddenly ceases to work in Discord, make sure to restart your Windows PC/Mac before going any further, as it’s the first step in fixing voice issues.
If restarting doesn’t help, slide to the next step!
Method 2: Make Sure The Mic Is Properly Set
The next step is to check if the mic works correctly. This is because faulty settings may stop voice changer Voicemod from operating correctly.
Just follow the steps below to resolve it:
- On the keyboard, press the “Win” logo and the “I” key simultaneously to open Windows settings. Click “System.”
- On the left, you’ll see the option “Sound.” Click it.
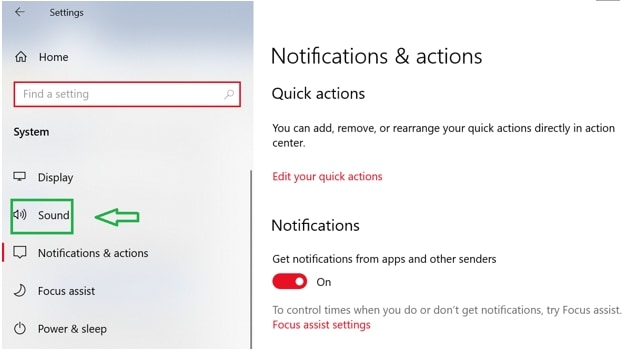
- First, you have to test the microphone! To do so, choose the “Headset” option rather than the Voicemod microphone under the “Input” section
- Click “Device properties & test microphone”
- Make sure to uncheck the “disable” box and keep the volume section 100
- Click the “Start test” button and speak into the microphone
- After that, click “Stop test.” If the greatest value it shows is above “0”, then your microphone works correctly
Now, restart your Voicemod app to see if it’s working properly or not! If the issue still persists, jump to the next solution.
Method 3: Install Windows Updates
If you use Windows 10, it has two kinds of updates that offer performance boost and security patches. Sometimes, an update can fix a few driver and software conflicts automatically.
You can quickly solve the voice chat problem by simply updating the system settings. Here’s how to update your Windows 10:
- Open your windows setting by pressing the “Windows button” and the “I” key together.
- Click on “Update and Security”
- Click the “Check for Updates” button. If an update is found, it will install automatically on the system
Make sure to repeat this process until it says you’re up-to-date. Then, restart the PC. Check whether the Vociemod is properly working or not!
If not, try our next option!
Method 4:Re-Install Voice Changer Voicemod Drivers
In many instances, the issue signifies that you’re using outdated or faulty drivers. To troubleshoot this, simply re-install your Voicemod driver, and you’ll be good to go!
First, uninstall your Voicemod driver from the windows PC/Mac. Here’s how to do it:
- On the keyboard, press the “Windows button” as well as the “I” key to bring up the “Run box”
- Paste or type “devmgmt.msc” and click “OK.” This will open the “Device Manager”
- Click the “expand” option of “Audio Inputs & Outputs.”
- Click the “Microphone WMD” and choose the “Uninstall device” option
- A pop-up window will appear. Click the “Uninstall” button
- Restart the PC
Install the voice changer Voicemod again, whether automatically or manually, and see if it works!
Part 3: How To Change Voice For Discord On Mobile?
“Voicemod clips” is the version for both Apple and Android devices. The app will help you make high-quality content using its wide selection of one-of-a-kind effects, which will change your voice so much that you won’t recognize yourself!
In addition to that, you can add filters, which are connected to your cell phone’s camera to create funny, interesting videos.
Additionally, you’ll have the option to choose from 10 different voices. Plus, you can also make unlimited videos and audio from the humorous to the terrifying.
Some of the Voicemod voices on mobile include male-to-female, different robot effects, famous celebrities, scary voices, and much more. In short, everything is based on how you would like to modify your voice!
Not just that, you can also cross-share creative videos and audio to popular social networking platforms such as Facebook, Twitter, Instagram, TikTok, and Snapchat using your smartphone.
Curious to know how to change your voice for Discord on mobile? Here are step-by-step instructions:
- Make sure the Voicemod app is downloaded on your Apple or Android device and appropriately configured
- Open Discord
- Tap the “cogwheel icon” near your name and avatar
- You’ll see the “settings” page
- Within it, tap the “Voice & Video” option
- Tap Voicemod under the “Input Device” option and the headset under the “Output Device” option and tap escape. You’ll have access to numerous exciting sounds
Richard Bennett
Richard Bennett is a writer and a lover of all things video.
Follow @Richard Bennett
Richard Bennett
Mar 27, 2024• Proven solutions
A voice changer will allow you to prank friends, create content, and most of all, secure your presence by maintaining anonymity. With it, you can turn your voice into several unique and exciting voices to serve any purpose you deem fit.
And when it comes to voice changers, none is as easy to operate as the Voicemod in Discord. Its claim to fame is that it features numerous voice options to choose from.
With Vociemod, you have to simply run the program in the background and select your desired voice!
Read on as we discuss how to use Voicemod on Discord in detail:
In this article
Part 1: How To Use Voice Changer Voicemod For Discord On Desktop Computer
Part 2: How To Fix Voicemod Not Working Discord?
Part 3: How To Change Voice For Discord On Mobile?
Part 1: How To Use Voice Changer Voicemod For Discord On Desktop Computer
Voicemod is arguably one of the best voice changer tools available on the internet for its excellent features.
But before we jump straight into using Voicemod for Discord, you must know how to install one on your desktop Mac/PC.
Here’s how to install Voicemod
- Visit the Voicemod website to begin the download process.
- You’ll see the button “Get Voicemod Free” on the screen. Click it!
- Upon clicking, the site will ask you to sign in to your account from Discord, Twitch, to Google. Use your Discord login details to sign in.
- After you’re signed in, the “.exe” file will be downloaded to your PC/Mac’s download folder. Open the “.exe” file the moment it’s downloaded.
- An install wizard will open up. Navigate through the wizard’s installation process to install the program on your PC/Mac.
- After installation is complete, the installation wizard will ask to restart your windows’ Mac or PC.
You can skip it, but it’s best to restart it for smooth operations.
Once your Mac/PC restarts, you’ll see the Voicemod app icon on your desktop screen.
Now that you have successfully installed the voice changer Voicemod app into your desktop computer, let’s dive into knowing how to use Voicemod on Discord!
Here’s how to use voice changer on Discord
- Click the Vociemod icon on the desktop to open the app. If you can’t find it there, click the “windows icon” located at the screen’s bottom-left. Just type “Voicemod,” and the program will show up. Double click it to get it opened.
- When the app opens up, you’ll have to choose the output and input it will use. If you’re wondering, why the output? This is to give you an insight into what your voice will sound like on each filter.
Once it’s done, you can play around with different filters!
Every day, you’ll get new free filters to use; however, to unlock and access all filters, you need to upgrade to the “pro-version” of voice changer Voicemod.
On the other hand, if you only need a few filters, the “basic-version” should suffice.
Apart from that, you can unlock an additional free filter in your app by sharing it on your social media accounts.
Step 1
To set up Voicemod with Discord, open your discord account and go to the settings (gear icon) placed at the screen’s bottom-left corner.
Step 2
Click the “Voice and Video” option right under the app settings.
Step 3
To make Voicemod usable, you’ll have to change Voice settings. Within the “Input Device” option, select the option that says “Microphone Voicemod Virtual Audio.”
Step 4
After you have changed settings, you can easily change the voice within the program. Not only this, but other users can also hear your audio alteration.
Step 5
With the “basic version,” you’ll have seven free voice choices that will change each day. On the contrary, with the “pro-version,” you’ll gain access to more than 80 different voice options.
So, if you’re searching for an easy and simple voice-changing app to use, look no further than Voicemod!
Part 2: How To Fix Voicemod Not Working Discord?
Is your voice changer Voicemod not working on Discord? No worries, you can troubleshoot the issues with a few basic steps.
Here are some ways you can use to fix Voicemod not working in Discord:
Method 1: Restart Your Windows PC/Mac
Though it’s not a technical solution, restarting your desktop computer fixes incorrect settings by rebooting them and solves many problems connected with your computer system, programs, and hardware.
So, when your Voicemod suddenly ceases to work in Discord, make sure to restart your Windows PC/Mac before going any further, as it’s the first step in fixing voice issues.
If restarting doesn’t help, slide to the next step!
Method 2: Make Sure The Mic Is Properly Set
The next step is to check if the mic works correctly. This is because faulty settings may stop voice changer Voicemod from operating correctly.
Just follow the steps below to resolve it:
- On the keyboard, press the “Win” logo and the “I” key simultaneously to open Windows settings. Click “System.”
- On the left, you’ll see the option “Sound.” Click it.
- First, you have to test the microphone! To do so, choose the “Headset” option rather than the Voicemod microphone under the “Input” section
- Click “Device properties & test microphone”
- Make sure to uncheck the “disable” box and keep the volume section 100
- Click the “Start test” button and speak into the microphone
- After that, click “Stop test.” If the greatest value it shows is above “0”, then your microphone works correctly
Now, restart your Voicemod app to see if it’s working properly or not! If the issue still persists, jump to the next solution.
Method 3: Install Windows Updates
If you use Windows 10, it has two kinds of updates that offer performance boost and security patches. Sometimes, an update can fix a few driver and software conflicts automatically.
You can quickly solve the voice chat problem by simply updating the system settings. Here’s how to update your Windows 10:
- Open your windows setting by pressing the “Windows button” and the “I” key together.
- Click on “Update and Security”
- Click the “Check for Updates” button. If an update is found, it will install automatically on the system
Make sure to repeat this process until it says you’re up-to-date. Then, restart the PC. Check whether the Vociemod is properly working or not!
If not, try our next option!
Method 4:Re-Install Voice Changer Voicemod Drivers
In many instances, the issue signifies that you’re using outdated or faulty drivers. To troubleshoot this, simply re-install your Voicemod driver, and you’ll be good to go!
First, uninstall your Voicemod driver from the windows PC/Mac. Here’s how to do it:
- On the keyboard, press the “Windows button” as well as the “I” key to bring up the “Run box”
- Paste or type “devmgmt.msc” and click “OK.” This will open the “Device Manager”
- Click the “expand” option of “Audio Inputs & Outputs.”
- Click the “Microphone WMD” and choose the “Uninstall device” option
- A pop-up window will appear. Click the “Uninstall” button
- Restart the PC
Install the voice changer Voicemod again, whether automatically or manually, and see if it works!
Part 3: How To Change Voice For Discord On Mobile?
“Voicemod clips” is the version for both Apple and Android devices. The app will help you make high-quality content using its wide selection of one-of-a-kind effects, which will change your voice so much that you won’t recognize yourself!
In addition to that, you can add filters, which are connected to your cell phone’s camera to create funny, interesting videos.
Additionally, you’ll have the option to choose from 10 different voices. Plus, you can also make unlimited videos and audio from the humorous to the terrifying.
Some of the Voicemod voices on mobile include male-to-female, different robot effects, famous celebrities, scary voices, and much more. In short, everything is based on how you would like to modify your voice!
Not just that, you can also cross-share creative videos and audio to popular social networking platforms such as Facebook, Twitter, Instagram, TikTok, and Snapchat using your smartphone.
Curious to know how to change your voice for Discord on mobile? Here are step-by-step instructions:
- Make sure the Voicemod app is downloaded on your Apple or Android device and appropriately configured
- Open Discord
- Tap the “cogwheel icon” near your name and avatar
- You’ll see the “settings” page
- Within it, tap the “Voice & Video” option
- Tap Voicemod under the “Input Device” option and the headset under the “Output Device” option and tap escape. You’ll have access to numerous exciting sounds
Richard Bennett
Richard Bennett is a writer and a lover of all things video.
Follow @Richard Bennett
Also read:
- 2024 Approved Elevate Views The 5 Most Innovative TikTok Typography Solutions of Now
- [New] Seamless iPhone TikTok Downloads, Free of Markers
- [New] In 2024, Maximizing TikTok Influence A Guide to Effective Advertising and Top Examples
- [Updated] Trending Reads BookTok’s Hot List of Must-Have Titles for 2024
- [Updated] Access TikTok Content Directly - No Extra Cost
- [Updated] In 2024, Rhythm Revolution Top 20 Easy-to-Learn Dance Beats
- [New] In 2024, Evasion Techniques for Breaking Free From Shadowban
- [Updated] In 2024, Jujutsu Kaisen TikTok A Step-by-Step Guide
- [New] In 2024, Trending Tastebuds 10 Popular TikTok Food Plays
- [New] Channel Your TikTok Talent Chrome/Android/iOS Guide for 2024
- 2024 Approved Storing TikTok Content Simple Steps for Phones
- [New] Disappear and Reappear Avoiding Shadowbans on TikTok for 2024
- [New] Streamlining TikTok Videos Chrome/Android/iOS Junctions
- [Updated] Invite and Guest at TikTok Lives Easily
- 2024 Approved Uncovering The Best TikTok Personalities on a Global Scale
- 2024 Approved The Essential Guide to Win-Compatible TikTok Editing Software
- In 2024, Captivating TikTok Frames Creative Ideas for Profile Standout
- [Updated] Eye-Catching Profile Elements for Unique TikTok Users
- The Playlist TikTok's Hotspots for Rhythmic Flows and Beats for 2024
- [New] In 2024, Foodie Fad Hottest TikTok Recipes
- [New] 2024 Approved Charting a Course for TikTok's Most Effective Campaigns
- In 2024, Flavor Journeys TikTok's Cross-Country Dishes
- [New] Uncovering TikTok's Hidden Block List for 2024
- 2024 Approved Capture the Vibes - Fast Access to TikTok Content
- [New] Unveiling TikTok's Visual Makeover Techniques
- [Updated] 2024 Approved The Ultimate Breakdown Understanding TikTok's PFP Symbol
- In 2024, The Ultimate PC Guide to Starting Live on TikTok
- Accelerate TikTok Popularity Essential Countdown Guidance for 2024
- Crafting an Irresistible Digital Selfie Replica on TikTok
- In 2024, From Proportions to Portrayals Gigantic Heads in TikTok
- Eye-Catching Profile Elements for Unique TikTok Users
- [New] Flavorful TikTok Kitchen Sensations for 2024
- [New] 2024 Approved Absurd Adventures A Compilation of Extraordinary TikTok Games
- [New] In 2024, Strategic Hashtag Usage for Enhanced Visibility on TikTok
- In 2024, Masterful Media Moments Innovative Bio Ideas for TikTok Audience Expansion via Filmora
- [Updated] Unlocking Voice Functionality in TikTok Videos for 2024
- [Updated] Top 10 TikTok Ideas to Make Your Videos Go Viral
- [New] Expert Selection of PC-Friendly Video Editors for TikTok for 2024
- [New] The Comparison Guide Triller VS TikTok's Features (Max 156 Chars)
- In 2024, Laugh Lab Weekly Roundup of TikTok Humor
- [New] In 2024, Indulge in These 15 Influencer-Led TikTok Recipes That Are a Hit Online
- [New] 2024 Approved Amplify Your Creative Voice on TikTok Designed Themes for You
- [New] In 2024, Top 15 Reading Recommendations From BookTok Stars
- How to Make Your TikTok Reaction Stand Out for 2024
- 2024 Approved Mastering TikTok The Top 20 Best Caption Techniques
- [Updated] Authenticity-Focused TikTok Followers Buying Guide for 2024
- In 2024, Country Rhythms for Relaxation and Danceside Bliss (TikTok Playlist)
- Charting Course Through TikTok's Anime Wonderland Rhythmic Choreographies & Iconic Memes for 2024
- PassFab Apple iPhone 12 mini Backup Unlocker Top 4 Alternatives
- [New] Tweeting at the Top Discover How to Watch in Full HD
- [Updated] 2024 Approved Screen Saving Solutions A Critical Look at Capturers
- A Step-by-Step Guide on Using ADB and Fastboot to Remove FRP Lock on your OnePlus
- Full Tutorial to Bypass Your Oppo Reno 11 5G Face Lock?
- Best Fixes For Samsung Galaxy M14 5G Hard Reset | Dr.fone
- New In 2024, We Tried VN Video Editor Pro Heres What We Found Out
- New In 2024, Fusing Sight and Sound Tips for Merging Audio Elements with Visual Content
- [New] Innovative Tools for High-Definition Gaming Logging Beyond FBX for 2024
- Top-Ranked Recorder, Screen Saving Win11 for 2024
- [Updated] Enhancing Twitter's Visual Capacity to FHD Level for 2024
- How to Factory Reset Oppo Reno 11 5G without Losing Data | Dr.fone
- How To Remove iCloud On Apple iPhone 13 Pro Smoothly
- [Updated] Final Cut Pro X for Instagram Optimizing Vertical Videos for 2024
- New In 2024, How to Make Memes with White Background Step by Step
- How to Hard Reset Honor Magic Vs 2 Without Password | Dr.fone
- Advanced Android Video & Screenshot Tools, Top 5 Selection for 2024
- [New] In 2024, Spice Up Your Instagram Feed Incorporate Video Loops
- How to Upgrade Apple iPhone 6 without Losing Anything? | Dr.fone
- In 2024, Unlock Pro-Level Video Effects A Step-by-Step Guide
- [New] 2024 Approved Unleash Creative Power Instagram's Top 10 Grid Makers
- Is your Oppo A2 working too slow? Heres how you can hard reset it | Dr.fone
- 5 Easy Ways to Copy Contacts from ZTE Axon 40 Lite to iPhone 14 and 15 | Dr.fone
- Proper Techniques for Streaming From GoPro Camera to Social Networks for 2024
- [New] Tips for Immaculate Nighttime Photography
- 2024 Approved Ultimate Guide to Premier Webinar Software
- [New] Expert Video Capture Software for Mac, Moving On From Bandicamp
- [New] How Do I Peruse All the Video and Photo Files Shared by Friends?
- How to Track WhatsApp Messages on Xiaomi 14 Pro Without Them Knowing? | Dr.fone
- In 2024, 4 Most-Known Ways to Find Someone on Tinder For Xiaomi Redmi Note 13 Pro+ 5G by Name | Dr.fone
- Reign as a Tycoon Champion with Our #12 Must-Play Games
- In 2024, How to Transfer Data After Switching From Honor 90 GT to Latest Samsung | Dr.fone
- [Updated] 2024 Approved Cutting Edge Screencasting Harness the Power of Visual Storytelling
- In 2024, 3 Effective Methods to Fake GPS location on Android For your Xiaomi Civi 3 Disney 100th Anniversary Edition | Dr.fone
- [Updated] Unlock Follower Growth Secrets on Facebook in 10 Simple Ways
- [Updated] 2024 Approved Viral Visionaries Most Watched Clips 2023
- How To Bypass Samsung Galaxy S23 Ultra FRP In 3 Different Ways
- [Updated] Firefox's Video Downloader Boost Optimal Extensions & Plugins for Facebook Content for 2024
- 2024 Approved Leading Open Source Streaming Apps Reviewed
- Title: Essential Skills for Effective Discord Message Pinning
- Author: Brian
- Created at : 2024-05-23 13:12:25
- Updated at : 2024-05-24 13:12:25
- Link: https://tiktok-videos.techidaily.com/essential-skills-for-effective-discord-message-pinning/
- License: This work is licensed under CC BY-NC-SA 4.0.
