
"Join the Party Your Guide to Active TikTok Streaming"
Join the Party: Your Guide to Active TikTok Streaming
With the immense growth of TikTok, many people like to use this social app for various purposes. For example, content creators can build their personal community on TikTok to interact with their followers. You can also conduct a question-answer session with your followers on TikTok through a live stream.
Moreover, TikTok also allows you to join someone’s live stream as a guest. Through this feature, you can join the live streaming of your friend instantly. Through this article, you can learn how to join someone’s live on TikTok quickly.
Part 1: How to Join Someone’s Live on TikTok
Is your favorite celebrity live on TikTok? If your favorite celebrity is doing a live stream on TikTok, you may want to interact with him directly. TikTok allows you to join someone’s live on TikTok quickly by sending a guest request. To learn how to join live on TikTok, follow the below steps:
Step1 Select the Live Option
Open your TikTok app on your phone to access the “Discover” page, and type “Live” on the search bar. By doing so, you can find all the live streaming easily. Now select the live stream you want to join in order to proceed.

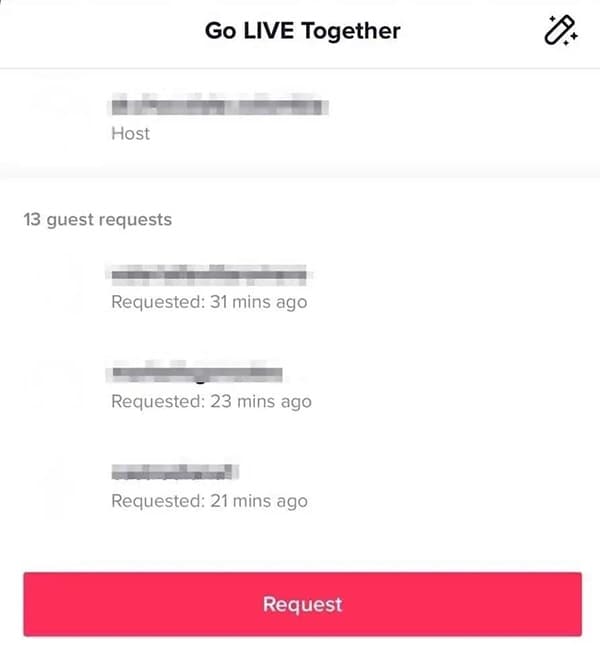
Step2 Send a Guest Request
Once you have found your desired live stream, tap on the “Pink Blue Circles” to send a guest request. Now tap on “Request” to give confirmation. By selecting this option, your guest request will be sent. After sending the guest request, wait for the host to accept it.
Part 2: How to Invite Others to Join Your Live on TikTok
Have you ever invited someone to join your live streaming on TikTok? Being a content creator or an influencer on TikTok, it’s essential to connect with your fans frequently. To communicate with your TikTok audience better, you should know how to invite others on your live stream. By inviting others, you can communicate with your fans directly.
Prerequisites of Going Live on TikTok
Before learning how to invite others on TikTok, let’s shed light on the requirements of going live on this social app. The reason is that not everyone can go for live streaming on TikTok, as there are certain restrictions you need to keep in your mind.
- To start live streaming on your TikTok, you should have at least 1000 followers.
- You should be 16 years old or above to access the live stream feature.
- To use virtual gifts during a live stream on TikTok, you should be 18 years old or above.
Steps to Invite Others to Join Your Live on TikTok Easily
Are you excited to invite your fan to your live stream on TikTok? Check the below steps to invite others to join your TikTok live:
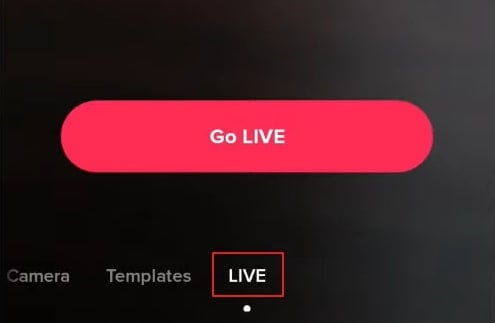
Step1 Go to the Live Option
Open your TikTok app on your mobile phone. After opening it, tap on the “Live” option from the right side. Now you can add a title to your TikTok Live.
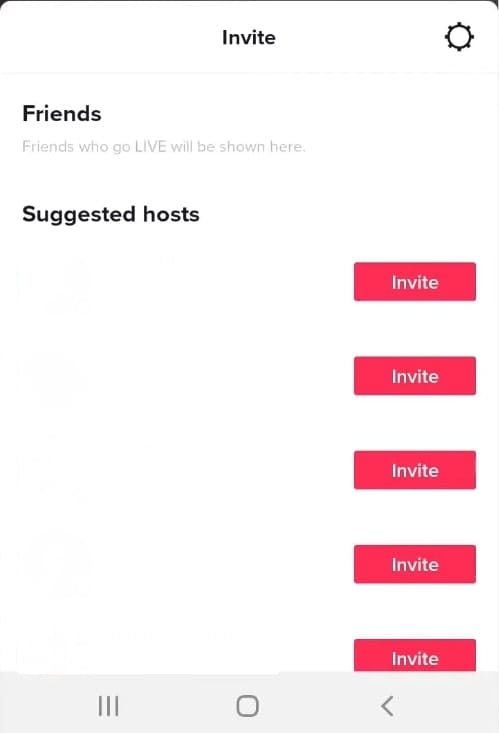
Step2 Invite your Desired User
After adding the title, tap on the “Go Live” button. Once the live streaming initiates, you have to press the “Pink Blue Circle” icon from the bottom left corner. It will open a list of the suggested users. Select the preferred user you want to invite and tap on the “Invite” button. Your selected user will have 20 seconds to accept or reject your request.
Bonus Tip: Easily Record and Edit Someone’s Stream with Filmora
Are you willing to record and edit a live stream on TikTok? If you want to efficiently screen record any live streaming session on TikTok, we highly recommend using Wondershare Filmora . This software provides a professional screen recorder that allows you to capture your desired window or screen. You can customize the settings to record a live stream in your preferred resolution. Thus, by using the screen recorder of Filmora, you can record any live streaming to access it anytime.
Free Download For Win 7 or later(64-bit)
Free Download For macOS 10.14 or later
Along with a screen recorder, Filmora also provides a video editor. If you find flaws in your recorded live stream, the editor of Filmora can help you. By using a video editor, you can enhance your recorded video by adding effects or modifying its speed. There are some advanced editing features that you can explore and use on Filmora. To learn about them, check the below points:
Key Editing Features of Wondershare Filmora
- Speech-to-Text : To increase your editing efficiency, Filmora offers a Speech-to-Text feature. This feature automatically converts your speech to subtitles. Through advanced speech recognition capabilities in this tool, you can generate subtitles in your video automatically and without any hassle. Also, this feature supports up to 16 different languages.
- Keyframing : Do you want to add a dynamic effect to your video? The keyframing feature allows you to add smooth and professional animated effects instantly. It provides 80 preset animation templates you can quickly apply to your video. Moreover, you can also modify the parameters by setting the transparency and view in every keyframe view.
- AI Portrait : Are you annoyed by the dull backgrounds in your video? Through the AI portrait feature, you can remove backgrounds from your video with great precision. This feature also offers more than 70 stickers and AI effects that you can apply. Furthermore, it also recognizes the faces in your video through AI technology. With face recognition, you can apply AI stickers easily.
Conclusion
TikTok has made a significant impact on the social media industry. Due to its high influencing power, many celebrities and famous personalities are now joining TikTok to increase their reach. If you want to invite someone to your TikTok live, this article will help you. We have also provided detailed instructions on how to join someone’s live on TikTok quickly. Also, in order to edit and screen record live streaming on TikTok, Wondershare Filmora is a highly compatible and functional tool.
Transform Into a Social Media Star by Mimicking Yourself on TikTok
How to Clone Yourself on TikTok

Shanoon Cox
Mar 27, 2024• Proven solutions
Every rising pop star needs music videos, but using professional video editing software may be too time-consuming if you want to quickly create a clone video you can share with your fans on TikTok.
Multiplying yourself in a video is a cool way of making sure that your video is going to get the kind of attention it deserves. The process of cloning yourself in a video is a simple one, but there are certain rules you have to follow while recording the footage that will help you avoid overlapping the figures you’re cloning. Here’s how you can make your first clone yourself video on TikTok.

Selecting the Song for your Clone Video
Before you start shooting the video you first need to select the song on TikTok you’re going to use in the video. Once you’ve found the perfect track simply record it and save it as a video to your camera roll. You can then import the video clip that contains the song into the Video Star app.
Here are 10 Popular TikTok Songs for you.

Using the Video Star App to Clone Yourself
1. Download Video Star App
Choosing a location, mounting your iPhone on a tripod, or picking the positions for each of your clones are all important steps you’ll need to take before you actually start recording. There are several apps that enable you to create clone videos easily, but in this article, we are going to show you how you can clone yourself with Video Star. The app can be downloaded from the App Store for free, but additional in-app purchases are necessary if you want to have access to all the power packs Video Star offers. You don’t have to record the video clips with this app since the iPhone’s native camera app is powerful enough to enable you to record high-quality footage.
2. Edit Multiple Video Clips
After you record all the positions for your next clone video with the iPhone’s native camera app, you should cut the video clips and keep only the parts where you are perfectly positioned, so your position in one clip doesn’t overlap with other positions. During the video recording process try to create as much separation between two positions in order to avoid any chance of overlapping. One of the best ways to achieve this is to shoot at a location that is spacious enough so you can make enough separation between two positions. Keep in mind that the maximum number of clips you can combine in the Video Star app is limited to just three, so if you want to have more than three clones in the shot you first have to piece together three clips, save them as a single file and then add more clips to the cloned video you created.
3. Level up Your Videos with Video Star
Video Star also enables you to shoot your videos from the app, and you can adjust the Countdown before the app starts recording or the Recording Speed. Make sure to enter the lowest Recording Speed value possible, because that way you’ll be recording like TikTok does on fast.
Tap the Record button, then select the Multiple options, and play the video that contains the song you previously selected. Once you reach the spot in the song where you want to introduce the clone simply tap Set, so the recording will stop at the designated point and you can move to another position. If at any point during recording you realize that your movements extend to your clone’s location, you can simply tap on the hamburger icon and select the Delete Last option.
To preview the video, you just have to tap on the Scissors icon, and the recorded video will automatically start playing. The Record New Clip in the Scissors menu lets you start from the beginning in case you’re not happy with the results or you can use this option to start recording the video with the second position of your clone.
When done, head back to the Scissors menu, and tap on the Multi-Layer Clip. This feature doesn’t come with the free version of the app, and you must purchase it in order to create a clone video. This action will enable you to select the back and front clips. After selecting the clips, the Mask Front menu will appear on the screen, choose the Shape option and use the hamburger icon on the right side of the screen to change the video’s shape to Rectangle. Drag the rectangle in the preview window so you can crop the first clip to match the demands of your video and press the Next icon to continue the video editing process.
Alternatively, you can use the Erase option to remove the unwanted parts of each video. You can find this option in the Mask Front or Mask Back menu, so just select it and use your finger to remove sections of the shot you don’t want to use.
The Add Effect menu will pop up on the screen so you can add different effects to your first video clip, and then repeat the entire process for the back clip. Once you’ve edited the second clip tap on the Create button to complete the process of making a multilayer clip. Tap Done to save the clip to your camera roll, and upload it to TikTok.
Conclusion
Cloning yourself in a video using the Video Star app is a simple process that can be mastered in a short period of time. The Video Star app lets you create as many clones of yourself as you want, so you just have to make sure that your video clips can be easily combined to feature two or more of your clones and have fun exploring the effects that can make your videos look even cooler. If you want to be a success on the TikTok platform, learning how to make clone videos is one of the best ways to do it, so choose your favorite songs and start producing clone yourself videos.
You can also use Wondershare Filmora to make a split-screen with ease. Check the tutorial below to figure out how to make a split-screen video to clone.


Shanoon Cox
Shanoon Cox is a writer and a lover of all things video.
Follow @Shanoon Cox
Shanoon Cox
Mar 27, 2024• Proven solutions
Every rising pop star needs music videos, but using professional video editing software may be too time-consuming if you want to quickly create a clone video you can share with your fans on TikTok.
Multiplying yourself in a video is a cool way of making sure that your video is going to get the kind of attention it deserves. The process of cloning yourself in a video is a simple one, but there are certain rules you have to follow while recording the footage that will help you avoid overlapping the figures you’re cloning. Here’s how you can make your first clone yourself video on TikTok.
Selecting the Song for your Clone Video
Before you start shooting the video you first need to select the song on TikTok you’re going to use in the video. Once you’ve found the perfect track simply record it and save it as a video to your camera roll. You can then import the video clip that contains the song into the Video Star app.
Here are 10 Popular TikTok Songs for you.
Using the Video Star App to Clone Yourself
1. Download Video Star App
Choosing a location, mounting your iPhone on a tripod, or picking the positions for each of your clones are all important steps you’ll need to take before you actually start recording. There are several apps that enable you to create clone videos easily, but in this article, we are going to show you how you can clone yourself with Video Star. The app can be downloaded from the App Store for free, but additional in-app purchases are necessary if you want to have access to all the power packs Video Star offers. You don’t have to record the video clips with this app since the iPhone’s native camera app is powerful enough to enable you to record high-quality footage.
2. Edit Multiple Video Clips
After you record all the positions for your next clone video with the iPhone’s native camera app, you should cut the video clips and keep only the parts where you are perfectly positioned, so your position in one clip doesn’t overlap with other positions. During the video recording process try to create as much separation between two positions in order to avoid any chance of overlapping. One of the best ways to achieve this is to shoot at a location that is spacious enough so you can make enough separation between two positions. Keep in mind that the maximum number of clips you can combine in the Video Star app is limited to just three, so if you want to have more than three clones in the shot you first have to piece together three clips, save them as a single file and then add more clips to the cloned video you created.
3. Level up Your Videos with Video Star
Video Star also enables you to shoot your videos from the app, and you can adjust the Countdown before the app starts recording or the Recording Speed. Make sure to enter the lowest Recording Speed value possible, because that way you’ll be recording like TikTok does on fast.
Tap the Record button, then select the Multiple options, and play the video that contains the song you previously selected. Once you reach the spot in the song where you want to introduce the clone simply tap Set, so the recording will stop at the designated point and you can move to another position. If at any point during recording you realize that your movements extend to your clone’s location, you can simply tap on the hamburger icon and select the Delete Last option.
To preview the video, you just have to tap on the Scissors icon, and the recorded video will automatically start playing. The Record New Clip in the Scissors menu lets you start from the beginning in case you’re not happy with the results or you can use this option to start recording the video with the second position of your clone.
When done, head back to the Scissors menu, and tap on the Multi-Layer Clip. This feature doesn’t come with the free version of the app, and you must purchase it in order to create a clone video. This action will enable you to select the back and front clips. After selecting the clips, the Mask Front menu will appear on the screen, choose the Shape option and use the hamburger icon on the right side of the screen to change the video’s shape to Rectangle. Drag the rectangle in the preview window so you can crop the first clip to match the demands of your video and press the Next icon to continue the video editing process.
Alternatively, you can use the Erase option to remove the unwanted parts of each video. You can find this option in the Mask Front or Mask Back menu, so just select it and use your finger to remove sections of the shot you don’t want to use.
The Add Effect menu will pop up on the screen so you can add different effects to your first video clip, and then repeat the entire process for the back clip. Once you’ve edited the second clip tap on the Create button to complete the process of making a multilayer clip. Tap Done to save the clip to your camera roll, and upload it to TikTok.
Conclusion
Cloning yourself in a video using the Video Star app is a simple process that can be mastered in a short period of time. The Video Star app lets you create as many clones of yourself as you want, so you just have to make sure that your video clips can be easily combined to feature two or more of your clones and have fun exploring the effects that can make your videos look even cooler. If you want to be a success on the TikTok platform, learning how to make clone videos is one of the best ways to do it, so choose your favorite songs and start producing clone yourself videos.
You can also use Wondershare Filmora to make a split-screen with ease. Check the tutorial below to figure out how to make a split-screen video to clone.
Shanoon Cox
Shanoon Cox is a writer and a lover of all things video.
Follow @Shanoon Cox
Also read:
- [New] In 2024, Top 30 Innovative Anime Concepts for Viral Video Creators
- [New] In 2024, Top 6 Networks Transforming How Firms Connect and Engage
- [New] Top 5 Alternatives to TikTok You Should Know [Updated ] for 2024
- 2024 Approved Elevate Your Virtual Presence Choose From These 7 Devices
- All Must-Knows to Use Fake GPS GO Location Spoofer On Realme C67 5G | Dr.fone
- Comprehensive AndaSeat FlyQuest Gaming Desk Evaluation - Craftsmanship Meets Ergonomic Excellence
- How Many Seconds Is a 20Mb Video, In 2024
- How to Overcome Initialization Failures in Mozilla Thunderbird
- In 2024, Leading the Charge in PC Livestreams with TikTok Features
- Navigating Snapchat's Call Feature in Three Steps
- Take Your Editing to the Next Level Top 40 FCPX Keyboard Shortcuts and Tricks for 2024
- Title: Join the Party Your Guide to Active TikTok Streaming
- Author: Brian
- Created at : 2024-12-09 08:47:58
- Updated at : 2024-12-15 23:37:49
- Link: https://tiktok-videos.techidaily.com/join-the-party-your-guide-to-active-tiktok-streaming/
- License: This work is licensed under CC BY-NC-SA 4.0.