
!["[New] In 2024, Echo Elimination Refining Recordings with Audacity"](https://www.lifewire.com/thmb/Xyb0vuGu9TpKbUdQlZdFVVUv0Bc=/400x300/filters:no_upscale():max_bytes(150000):strip_icc():format(webp)/HotelTransylvaniaTransformania-71f0792728254936864ad509c847c73c.jpg)
"[New] In 2024, Echo Elimination Refining Recordings with Audacity"
Echo Elimination: Refining Recordings with Audacity
The most frequent request you’ll get from video makers is to eliminate irritating noises like rumbling or humming from an original clip. Almost all of the time, capturing high-quality audio during filming is challenging since the conversation is often hard to hear or is made unclear due to surrounding noises, such as the dreadful air conditioners or fans.
To get rid of all these awful noises, this Audacity Noise Reduction feature will serve you a significant purpose in removing unwanted background noise for your future videos. Without further ado, let’s get started!
In this article
01 Things You Need to Prepare for Background Noise Reduction
02 How to Remove Background Noise in Audacity?
03 Why is Audacity Noise Reduction Not Working?
04 How to Prevent Background Noise in Audio Recording?
05 How to Remove Background Noise in Filmora?
Part 1: Things You Need to Prepare for Background Noise Reduction
Here are few things that you need to consider before you apply the noise reduction to your clips:
1. Noise Sample
A decent sample of the noise you wish to eliminate is perhaps the most crucial aspect of the Audacity remove noise procedure.
This will be used by Audacity to understand the noise and build a noise profile. The noise recording should last for a fair amount of time and be devoid of any other noises.
2. Avoid Copy Pasting Tiny Noise Section in Your Spoken Phrases
When you have a tiny part of noise between your stated words on your audio, please don’t copy/paste it to make a more significant piece of sound for Audacity to examine.
You would not be supplying Audacity with any more information that will help it generate a decent noise profile. The noise profile is what enables Audacity to tell the difference between speech and noise.
3. Minimum 2048 Data Samples Required
To build a noise profile, the Noise Reduction function requires a minimum of 2048 sample data. An audio file with a sampling frequency of 44.1kHz is roughly five hundredths of a second.
Note that this is the minor sound level that Audacity needs to generate a noise profile; however, should you supply a larger sample of the noise, Audacity can typically perform a great job of producing a suitable noise profile. As a result, attempt to capture a few seconds of background noises wherever possible.
4. Establish Recording Level and Record “Silence”
Setting your audio volume and capturing some “quiet” prior to speaking is the best way to achieve this. Instead, when you’ve finished talking, keep your camera/recorder going for a few moments.
Don’t move or create any sounds while capturing the background noises, and keep an ear open for any other noises. You only need to capture the ambient noise for a few moments; two to five seconds will suffice.
Part 2: How to Remove Background Noise in Audacity on Windows and Mac?
Whether you are using Windows or macOS, we will show you a step-by-step process to achieve your results using both software in this part of Audacity remove background music guide.
Remove background noise in Audacity on Windows
Step 1: On your recording, select a few moments of sound. Any segment of noise that incorporates other noises should be avoided.

Step 2: From the Effect menu, select Noise Reduction.

Step 3: Select the Get Noise Profile option whenever the Noise Reduction effect screen appears.

Note: Choose whether to implement the noise removal to the entire waveforms or only a portion of it.
Step 4: To access the Noise Reduction effects window, go to Effects > Noise Reduction. Raise the level of noise reduction progressively while previewing the result.

Step 5: Head over to the File section to Export and Save the result. Audacity does not save sound clips when you select Save Project; instead, you must choose Export. Select the file type you want to store and the place wherever you can save it. Select Save after giving the File Name.

Remove background noise in Audacity on Mac
Step 1: Create a room tone-containing audio file. When you don’t have a separate track for room tone, use a recording with a few moments of quiet in it. Click-and-drag to select a segment with a few minutes of silence using the Selection Tool.

Step 2: Select Noise Reduction from the Effects tab. Select the Get Noise Profile tab in the new tab under Step 1. The screen will shut, and Audacity will take noise profile samples of the indicated area.

Step 3: Click-and-drag to select the whole file, which requires noise reduction with the Selection Tool. To re-open the function, go to the Effect tab and pick Noise Reduction. Make modifications to the following parameters under Step 2:
- Reduce and Residue
- Frequency Smoothing (bands)
- Sensitivity
- Noise Reduction

Step 4: To listen to how the chosen file will look with the selected parameters, select Preview. Re-adjust until you have a sound noise reduction with no interference. When you’re finished, select Reduce and click OK.
Part 3: Why is Audacity Noise Reduction Not Working?
It’s possible that the Noise Reduction function isn’t letting you mop up your recording since your audio isn’t appropriate for it. The disturbance must be continuous, not random or fluctuating, to work for Audacity’s Noise Reduction function.
For example, the Noise Reduction function will not assist if your audio was made in a busy environment with unique noises such as background chatter, random traffic noises, or in an exhibition space or museum. The Noise Reduction feature in Audacity isn’t meant to cope with that kind of distortion. You’ll need to alter your recording approach if you’re capturing voice in either of those situations.
Under the following situations, the Audacity Noise Reduction function might underperform.
- Particular noise in the background, including traffic or people.
- When the harmonics of the sound and voice are comparable.
- There is sound variance where there is fluctuation in the noise.
- The volume of the voice is comparable to or lower than that of the background noise.
- When the noise is irregular or changeable rather than continuous.
- The loudness is deafening.
- The sound is a single click or pop.
Part 4: How to Prevent Background Noise in Audio Recording?
Although Audacity allows eliminating noise very simply, it is still an additional level that takes time to refine your podcast production. These pointers can help you avoid the necessity for noise reduction and cut down on the amount of time you spend processing.
1. Reduce the Computer Fan Noise
Whenever computers become too heated, they can produce a lot of noise. You may limit the amount of software that runs and position your mic away from the keyboard to help lessen this impact and avoid the fan from coming on.
However, even if you observe all of these guidelines, undesired recording sounds may still appear in your program. Fortunately, contemporary software makes this problem quite simple to resolve.
2. Reduce the Gain and Get Close to the Mic
Reduce the gain (sensitivity of the microphone) and go nearer to it. Talking straight into the microphone won’t distort your audio if you reduce the gain, and that would assist your microphone in concentrating on scooping up your voice’s tone.
Bonus Tip: Set your recorder’s (or DAW’s) sensitivity such that your speech peaks between -12 and -10db.
3. Utilize a Versatile Microphone
Condenser and dynamic microphones are the two most common types of podcast microphones. Condenser microphones are significantly more sensitive instruments meant to take up average atmospheric noise, whereas dynamic microphones have a narrower frequency range, picking up fewer ambient noises.
4. Optimize Your Recording Environment
The most significant and most crucial aspect of your podcasts’ sound quality is where you capture it. To optimize your personal podcasting space, we recommend choosing a peaceful, compact area away from HVAC systems, vehicles, external hard drives, background sound, motors, and other distractions. You may also increase the tone of your room by using natural sound absorbents such as curtains, rugs, carpets, and sofas.
Part 5: How to Remove Background Noise in Filmora?
Although there is a lot of software available to eliminate ambient noise, we highly suggest Wondershare Filmora Video Editor to edit audio and video in one place.
In addition to the standard audio editing capabilities, the recently redesigned Filmora currently includes enhanced waveforms, volume Keyframing , peak metering, and audio transitions, giving you a better audio editing interface.
For Win 7 or later (64-bit)
For macOS 10.12 or later
Filmora Video Editor will quickly remove ambient sound from both sound/video. You may also remove the sound from the video with this simple video editor, use the Audio Equalizer or Audio Mixer functions to modify the audio further, and then Export and save the audio in an Mp3 file. Here are the detailed steps:
Step 1: In the Wondershare Filmora Timeline menu, Import your footage. Trim the footage after previewing it and deleting the sections you don’t want to retain.

Step 2: To eliminate the ambient noise immediately, double-click on the video file, and go to the Audio panel to select the Remove Background Noise option. You will find that the background noise is removed automatically.

Step 3: After checking the results, select Export to download the noise-reduced clip to your desktop or upload it immediately to YouTube or Vimeo.

Conclusion
Well, there you have it. In this Audacity Remove Background Noise guide, we have reviewed every possible method you can adopt to get rid of the unnecessary background noise in the Audacity. And if the desired results are still not achieved, we highly recommend using the Wondershare Filmora editing software. Not only will it help you remove the unwanted ambient noise, but it will also allow you to customize your audio or video file further.
02 How to Remove Background Noise in Audacity?
03 Why is Audacity Noise Reduction Not Working?
04 How to Prevent Background Noise in Audio Recording?
05 How to Remove Background Noise in Filmora?
Part 1: Things You Need to Prepare for Background Noise Reduction
Here are few things that you need to consider before you apply the noise reduction to your clips:
1. Noise Sample
A decent sample of the noise you wish to eliminate is perhaps the most crucial aspect of the Audacity remove noise procedure.
This will be used by Audacity to understand the noise and build a noise profile. The noise recording should last for a fair amount of time and be devoid of any other noises.
2. Avoid Copy Pasting Tiny Noise Section in Your Spoken Phrases
When you have a tiny part of noise between your stated words on your audio, please don’t copy/paste it to make a more significant piece of sound for Audacity to examine.
You would not be supplying Audacity with any more information that will help it generate a decent noise profile. The noise profile is what enables Audacity to tell the difference between speech and noise.
3. Minimum 2048 Data Samples Required
To build a noise profile, the Noise Reduction function requires a minimum of 2048 sample data. An audio file with a sampling frequency of 44.1kHz is roughly five hundredths of a second.
Note that this is the minor sound level that Audacity needs to generate a noise profile; however, should you supply a larger sample of the noise, Audacity can typically perform a great job of producing a suitable noise profile. As a result, attempt to capture a few seconds of background noises wherever possible.
4. Establish Recording Level and Record “Silence”
Setting your audio volume and capturing some “quiet” prior to speaking is the best way to achieve this. Instead, when you’ve finished talking, keep your camera/recorder going for a few moments.
Don’t move or create any sounds while capturing the background noises, and keep an ear open for any other noises. You only need to capture the ambient noise for a few moments; two to five seconds will suffice.
Part 2: How to Remove Background Noise in Audacity on Windows and Mac?
Whether you are using Windows or macOS, we will show you a step-by-step process to achieve your results using both software in this part of Audacity remove background music guide.
Remove background noise in Audacity on Windows
Step 1: On your recording, select a few moments of sound. Any segment of noise that incorporates other noises should be avoided.
Step 2: From the Effect menu, select Noise Reduction.
Step 3: Select the Get Noise Profile option whenever the Noise Reduction effect screen appears.
Note: Choose whether to implement the noise removal to the entire waveforms or only a portion of it.
Step 4: To access the Noise Reduction effects window, go to Effects > Noise Reduction. Raise the level of noise reduction progressively while previewing the result.
Step 5: Head over to the File section to Export and Save the result. Audacity does not save sound clips when you select Save Project; instead, you must choose Export. Select the file type you want to store and the place wherever you can save it. Select Save after giving the File Name.
Remove background noise in Audacity on Mac
Step 1: Create a room tone-containing audio file. When you don’t have a separate track for room tone, use a recording with a few moments of quiet in it. Click-and-drag to select a segment with a few minutes of silence using the Selection Tool.
Step 2: Select Noise Reduction from the Effects tab. Select the Get Noise Profile tab in the new tab under Step 1. The screen will shut, and Audacity will take noise profile samples of the indicated area.
Step 3: Click-and-drag to select the whole file, which requires noise reduction with the Selection Tool. To re-open the function, go to the Effect tab and pick Noise Reduction. Make modifications to the following parameters under Step 2:
- Reduce and Residue
- Frequency Smoothing (bands)
- Sensitivity
- Noise Reduction
Step 4: To listen to how the chosen file will look with the selected parameters, select Preview. Re-adjust until you have a sound noise reduction with no interference. When you’re finished, select Reduce and click OK.
Part 3: Why is Audacity Noise Reduction Not Working?
It’s possible that the Noise Reduction function isn’t letting you mop up your recording since your audio isn’t appropriate for it. The disturbance must be continuous, not random or fluctuating, to work for Audacity’s Noise Reduction function.
For example, the Noise Reduction function will not assist if your audio was made in a busy environment with unique noises such as background chatter, random traffic noises, or in an exhibition space or museum. The Noise Reduction feature in Audacity isn’t meant to cope with that kind of distortion. You’ll need to alter your recording approach if you’re capturing voice in either of those situations.
Under the following situations, the Audacity Noise Reduction function might underperform.
- Particular noise in the background, including traffic or people.
- When the harmonics of the sound and voice are comparable.
- There is sound variance where there is fluctuation in the noise.
- The volume of the voice is comparable to or lower than that of the background noise.
- When the noise is irregular or changeable rather than continuous.
- The loudness is deafening.
- The sound is a single click or pop.
Part 4: How to Prevent Background Noise in Audio Recording?
Although Audacity allows eliminating noise very simply, it is still an additional level that takes time to refine your podcast production. These pointers can help you avoid the necessity for noise reduction and cut down on the amount of time you spend processing.
1. Reduce the Computer Fan Noise
Whenever computers become too heated, they can produce a lot of noise. You may limit the amount of software that runs and position your mic away from the keyboard to help lessen this impact and avoid the fan from coming on.
However, even if you observe all of these guidelines, undesired recording sounds may still appear in your program. Fortunately, contemporary software makes this problem quite simple to resolve.
2. Reduce the Gain and Get Close to the Mic
Reduce the gain (sensitivity of the microphone) and go nearer to it. Talking straight into the microphone won’t distort your audio if you reduce the gain, and that would assist your microphone in concentrating on scooping up your voice’s tone.
Bonus Tip: Set your recorder’s (or DAW’s) sensitivity such that your speech peaks between -12 and -10db.
3. Utilize a Versatile Microphone
Condenser and dynamic microphones are the two most common types of podcast microphones. Condenser microphones are significantly more sensitive instruments meant to take up average atmospheric noise, whereas dynamic microphones have a narrower frequency range, picking up fewer ambient noises.
4. Optimize Your Recording Environment
The most significant and most crucial aspect of your podcasts’ sound quality is where you capture it. To optimize your personal podcasting space, we recommend choosing a peaceful, compact area away from HVAC systems, vehicles, external hard drives, background sound, motors, and other distractions. You may also increase the tone of your room by using natural sound absorbents such as curtains, rugs, carpets, and sofas.
Part 5: How to Remove Background Noise in Filmora?
Although there is a lot of software available to eliminate ambient noise, we highly suggest Wondershare Filmora Video Editor to edit audio and video in one place.
In addition to the standard audio editing capabilities, the recently redesigned Filmora currently includes enhanced waveforms, volume Keyframing , peak metering, and audio transitions, giving you a better audio editing interface.
For Win 7 or later (64-bit)
For macOS 10.12 or later
Filmora Video Editor will quickly remove ambient sound from both sound/video. You may also remove the sound from the video with this simple video editor, use the Audio Equalizer or Audio Mixer functions to modify the audio further, and then Export and save the audio in an Mp3 file. Here are the detailed steps:
Step 1: In the Wondershare Filmora Timeline menu, Import your footage. Trim the footage after previewing it and deleting the sections you don’t want to retain.
Step 2: To eliminate the ambient noise immediately, double-click on the video file, and go to the Audio panel to select the Remove Background Noise option. You will find that the background noise is removed automatically.
Step 3: After checking the results, select Export to download the noise-reduced clip to your desktop or upload it immediately to YouTube or Vimeo.
Conclusion
Well, there you have it. In this Audacity Remove Background Noise guide, we have reviewed every possible method you can adopt to get rid of the unnecessary background noise in the Audacity. And if the desired results are still not achieved, we highly recommend using the Wondershare Filmora editing software. Not only will it help you remove the unwanted ambient noise, but it will also allow you to customize your audio or video file further.
Exploring Options: A Treasure Hunt for Your TikTok Symbol
TikTok is one of the most famous social media platforms that many people use on a daily basis. Due to high traffic on TikTok, you can reach a larger audience instantly. Through TikTok, you can efficiently market and promote your e-commerce products with live streaming. Moreover, if you are holding an event or conference, you can connect with multiple people through TikTok live streaming.
If you are willing to live stream on TikTok through your PC, you would need a TikTok stream key. To know how to get the TikTok stream key, this article will help you.
Part 1: What is Stream Key?
A stream key is a combination of random letters and numbers which stores the information of your account. It allows different streaming software to live stream your video on your preferred platform. To use streaming software such as OBS Studio for live streaming, the stream key will help you connect with your preferred platform.
If you are using the YouTube platform, its stream key will consist of all the related information, such as login details and permissions. That’s why you should keep the streaming key of your platform confidential. Thus, the stream key can prevent you from hassle as you don’t have to sign in with your YouTube account on OBS Studio for live streaming.
Part 2: How to Get your Own TikTok Stream Key?
Before jumping on how to get the TikTok stream key, there are some basic requirements. To check the prerequisites, read the below points:
- To use the live stream feature on TikTok, you need to have 1,000 followers.
- There is an age restriction to use this feature. You should be 16 years old or older.
- To send and receive virtual gifts during your live stream, the age restriction is 18 years old.
Easy Steps to Get TikTok Stream Key Instantly
Do you want to know how to find TikTok stream key? A streaming key can significantly help you to connect with your platform to ensure high-quality live streaming. Check the following instructions to get your TikTok streaming key quickly.
Step1 Go to Live Option
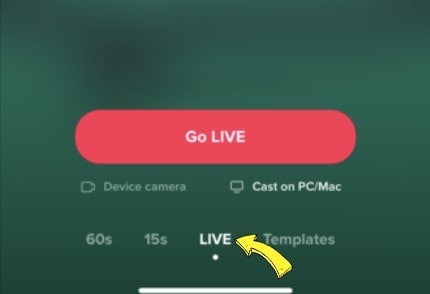
Launch the TikTok app on your iPhone or Android device and tap on the “Plus” icon given below. Now tap on the “Live” option by scrolling right on your screen.
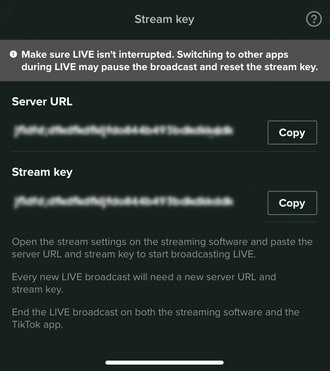
Step2 Copy the Streaming Key
Afterward, tap “Cast/Connect to PC/Mac” and select the “Go Live” button. Now you will be able to see the TikTok Stream Key and Server URL. You can tap on the “Copy” button given adjacent to the stream key and server URL. Make sure to copy both things carefully because they will be used in a later process.
Part 3: How to Go Live on TikTok with your Streaming Key?
Once you have gotten your stream key and server URL, now you can go live on TikTok through different streaming platforms. Read this section to learn how to live stream TikTok using the best streaming software.
Way 1. With OBS
OBS Studio is a famous streaming software that is used by professionals and experts. It is used for high-quality streams with additional features. It has an integrated video encoder that functions with great versatility. Along with producing live content, OBS Studio also offers an efficient screen recorder. Using this software, you can effectively add text and graphics to your video content.
In its clean interface, you have complete freedom to set your hotkeys. Using the hotkeys, you can complete a specific action instantly. While broadcasting your live stream, you can choose your preferred resolution on this software. Hence, it’s a great tool to live stream your TikTok flawlessly.
Instructions to Go Live on TikTok Via OBS Studio
OBS Studio is an advanced broadcasting software offering high-end results. To use OBS for live streaming on TikTok, check the below instructions:
Step1 Navigate to Stream Section
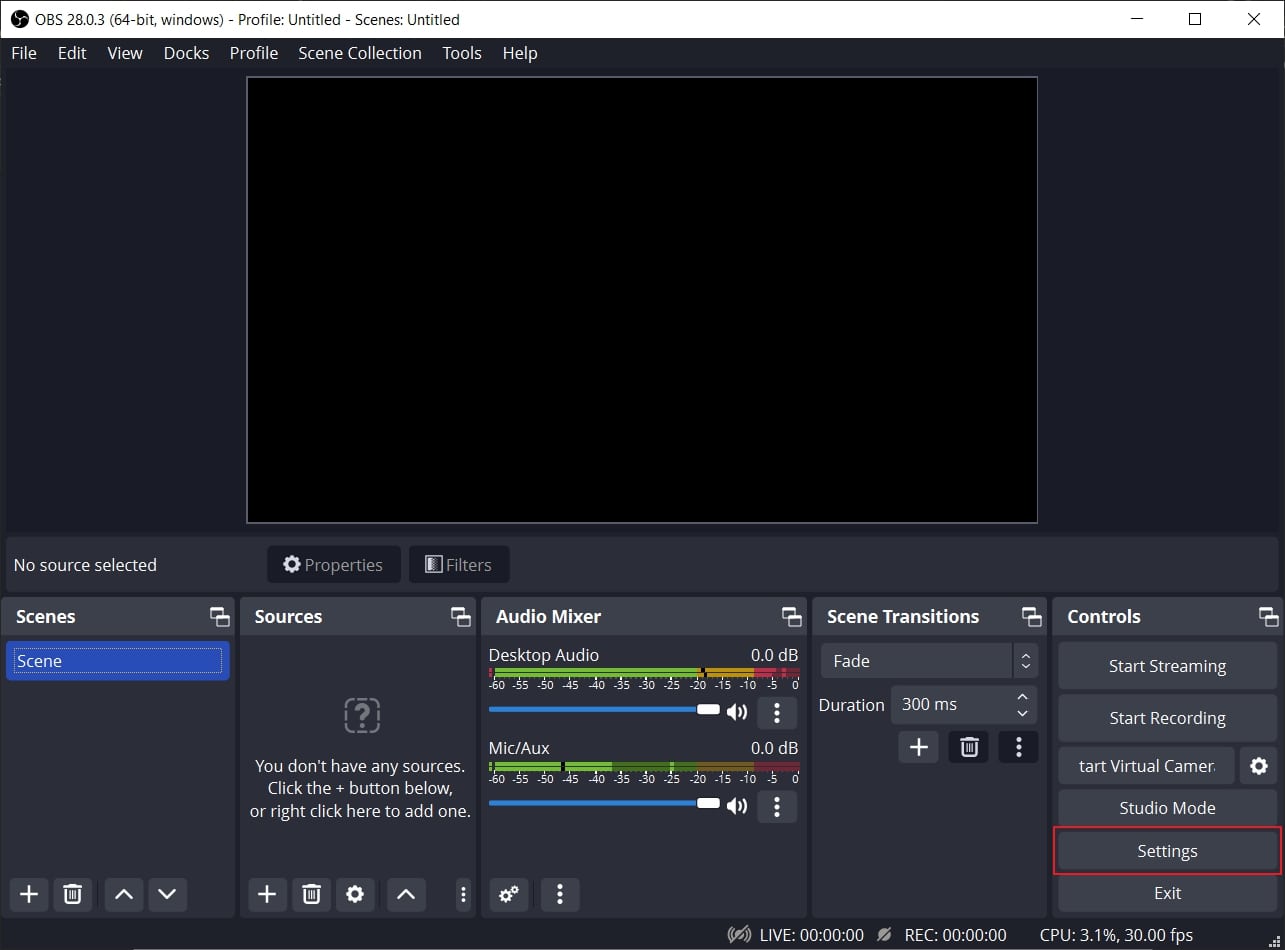
Launch OBS Studio on your PC and click “Settings” under the “Controls” section. On the new window, select “Stream” from the left section.
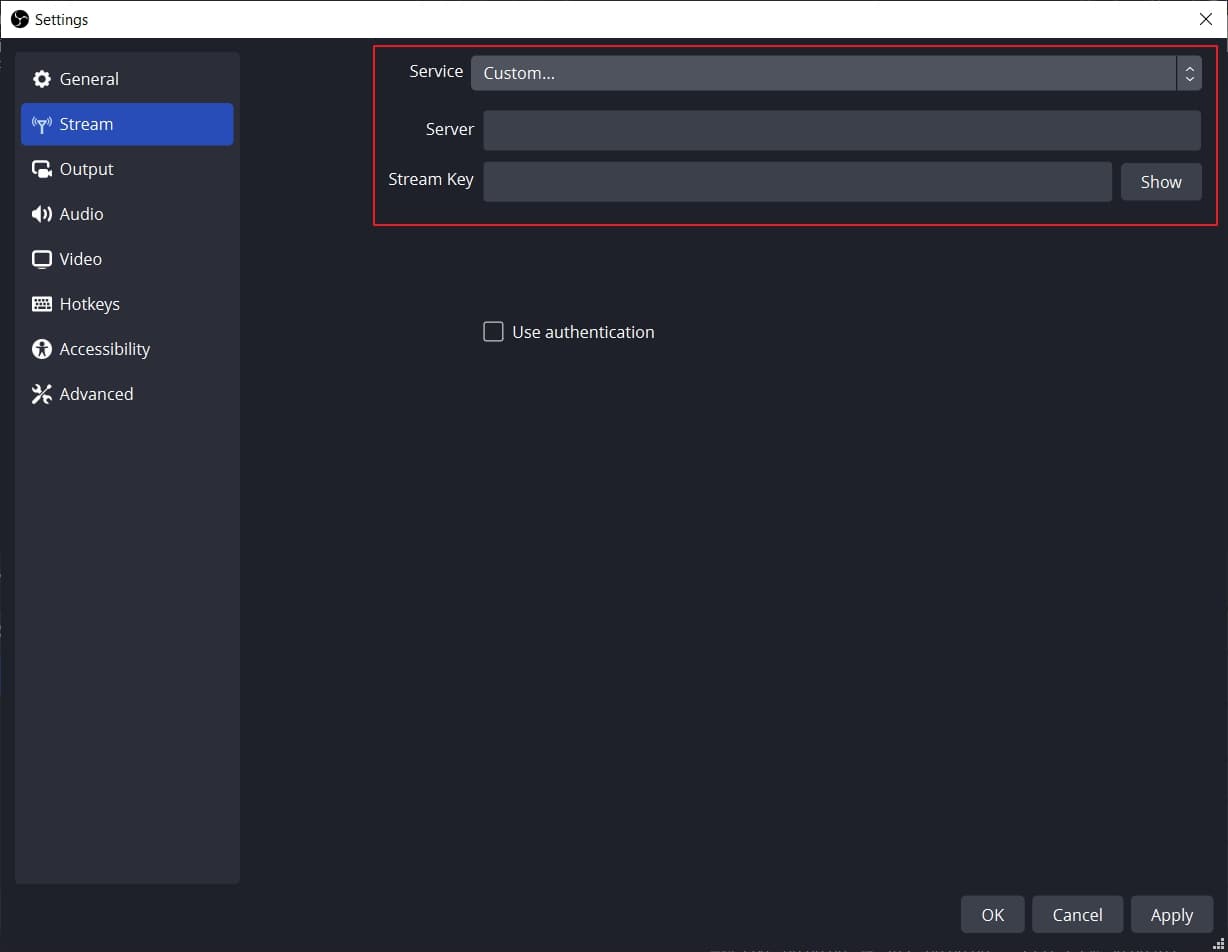
Step2 Enter Server URL and the Stream Key
On the Stream window, select “Custom” on the “Service” option. Once done, enter the Server and Stream Key on the given boxes. Now hit the “Apply” button to proceed with the process of getting live on TikTok with OBS.
Way 2. With Streamlabs
Streamlabs is an all-in-one streaming software that produces captivating results in a cost-effective manner. It shows compatibility with mainstream platforms like YouTube, Twitter, Discord, etc. This software consists of professional themes and overlays that you can utilize during live streaming. Furthermore, it supports multi-streaming, through which you can go live on various platforms simultaneously.
Using Streamlabs, you can get customizable alerts during your live stream. This will help you to check the feedback of your supporters quickly. Hence, Streamlabs is an excellent platform through which you can connect and engage with your audience effortlessly.
Instructions to Go Live on TikTok Using Streamlabs
Are you excited to use Streamlabs for conducting live streaming sessions on TikTok? To learn how to go live on TikTok using Streamlabs, here are the simple steps:
Step1 Open Streamlabs Desktop Settings
Download and install Streamlabs Desktop on your PC. Launch its interface and navigate to the “Gear” icon on the left side. It will open the settings of this tool. From the settings menu, choose “Stream” from the left side.
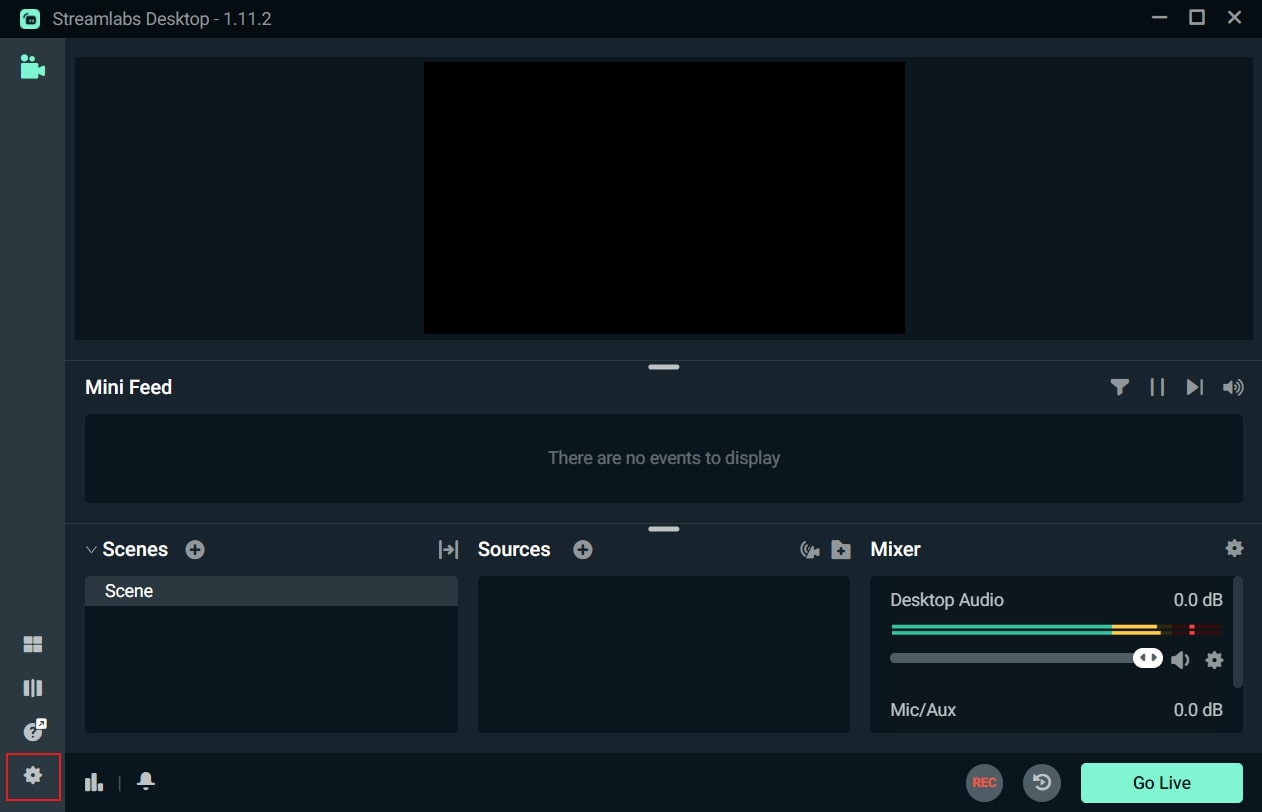
Step2 Add Streaming Key
On the Stream menu, select “Custom Streaming Service” as Stream Type. Afterward, add your Server URL and Stream Key on the given spaces. Once done, click on the “Done” button. Now you can easily go live through this streaming software on TikTok.

Bonus Tips: Easily Record and Edit Your Stream with Filmora
Are you interested in recording your live stream on TikTok? The best tool to capture your live streams efficiently on TikTok is Wondershare Filmora . This screen recorder has the ability to screen record your live streams in your desired resolution. Moreover, while recording your screen, you can simultaneously capture your webcam. It also gives you the option to select the recording area, preferably.
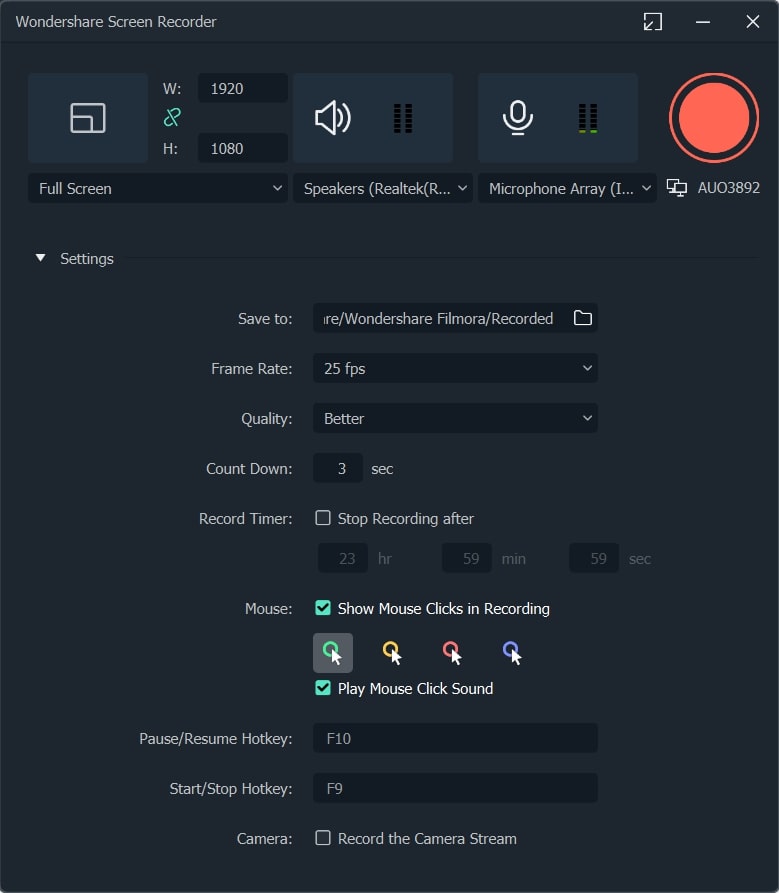
Besides screen recording, Filmora also offers a video editor. This editor offers more than 900 video effects that you can easily apply to your screen recording. Furthermore, you can also adjust the speed of your recorded video through this editor. You can also avail of other options to crop, split, resize, and trim the video. Hence, Filmora works efficiently to screen record and edit your live-stream sessions of TikTok. Watch the video below to learn more about Filmora’s new features.
Conclusion
Live streaming on TikTok is a new trend that many content creators and entrepreneurs are adopting. To go live on TikTok on your desktop, you would need a stream key. This article has provided clear instructions on how to get the TikTok stream key conveniently. Along with that, we have also highlighted a professional software known as Filmora to screen record and edit your TikTok live streaming.
Free Download For Win 7 or later(64-bit)
Free Download For macOS 10.14 or later
Part 1: What is Stream Key?
A stream key is a combination of random letters and numbers which stores the information of your account. It allows different streaming software to live stream your video on your preferred platform. To use streaming software such as OBS Studio for live streaming, the stream key will help you connect with your preferred platform.
If you are using the YouTube platform, its stream key will consist of all the related information, such as login details and permissions. That’s why you should keep the streaming key of your platform confidential. Thus, the stream key can prevent you from hassle as you don’t have to sign in with your YouTube account on OBS Studio for live streaming.
Part 2: How to Get your Own TikTok Stream Key?
Before jumping on how to get the TikTok stream key, there are some basic requirements. To check the prerequisites, read the below points:
- To use the live stream feature on TikTok, you need to have 1,000 followers.
- There is an age restriction to use this feature. You should be 16 years old or older.
- To send and receive virtual gifts during your live stream, the age restriction is 18 years old.
Easy Steps to Get TikTok Stream Key Instantly
Do you want to know how to find TikTok stream key? A streaming key can significantly help you to connect with your platform to ensure high-quality live streaming. Check the following instructions to get your TikTok streaming key quickly.
Step1 Go to Live Option
Launch the TikTok app on your iPhone or Android device and tap on the “Plus” icon given below. Now tap on the “Live” option by scrolling right on your screen.
Step2 Copy the Streaming Key
Afterward, tap “Cast/Connect to PC/Mac” and select the “Go Live” button. Now you will be able to see the TikTok Stream Key and Server URL. You can tap on the “Copy” button given adjacent to the stream key and server URL. Make sure to copy both things carefully because they will be used in a later process.
Part 3: How to Go Live on TikTok with your Streaming Key?
Once you have gotten your stream key and server URL, now you can go live on TikTok through different streaming platforms. Read this section to learn how to live stream TikTok using the best streaming software.
Way 1. With OBS
OBS Studio is a famous streaming software that is used by professionals and experts. It is used for high-quality streams with additional features. It has an integrated video encoder that functions with great versatility. Along with producing live content, OBS Studio also offers an efficient screen recorder. Using this software, you can effectively add text and graphics to your video content.
In its clean interface, you have complete freedom to set your hotkeys. Using the hotkeys, you can complete a specific action instantly. While broadcasting your live stream, you can choose your preferred resolution on this software. Hence, it’s a great tool to live stream your TikTok flawlessly.
Instructions to Go Live on TikTok Via OBS Studio
OBS Studio is an advanced broadcasting software offering high-end results. To use OBS for live streaming on TikTok, check the below instructions:
Step1 Navigate to Stream Section
Launch OBS Studio on your PC and click “Settings” under the “Controls” section. On the new window, select “Stream” from the left section.
Step2 Enter Server URL and the Stream Key
On the Stream window, select “Custom” on the “Service” option. Once done, enter the Server and Stream Key on the given boxes. Now hit the “Apply” button to proceed with the process of getting live on TikTok with OBS.
Way 2. With Streamlabs
Streamlabs is an all-in-one streaming software that produces captivating results in a cost-effective manner. It shows compatibility with mainstream platforms like YouTube, Twitter, Discord, etc. This software consists of professional themes and overlays that you can utilize during live streaming. Furthermore, it supports multi-streaming, through which you can go live on various platforms simultaneously.
Using Streamlabs, you can get customizable alerts during your live stream. This will help you to check the feedback of your supporters quickly. Hence, Streamlabs is an excellent platform through which you can connect and engage with your audience effortlessly.
Instructions to Go Live on TikTok Using Streamlabs
Are you excited to use Streamlabs for conducting live streaming sessions on TikTok? To learn how to go live on TikTok using Streamlabs, here are the simple steps:
Step1 Open Streamlabs Desktop Settings
Download and install Streamlabs Desktop on your PC. Launch its interface and navigate to the “Gear” icon on the left side. It will open the settings of this tool. From the settings menu, choose “Stream” from the left side.
Step2 Add Streaming Key
On the Stream menu, select “Custom Streaming Service” as Stream Type. Afterward, add your Server URL and Stream Key on the given spaces. Once done, click on the “Done” button. Now you can easily go live through this streaming software on TikTok.
Bonus Tips: Easily Record and Edit Your Stream with Filmora
Are you interested in recording your live stream on TikTok? The best tool to capture your live streams efficiently on TikTok is Wondershare Filmora . This screen recorder has the ability to screen record your live streams in your desired resolution. Moreover, while recording your screen, you can simultaneously capture your webcam. It also gives you the option to select the recording area, preferably.
Besides screen recording, Filmora also offers a video editor. This editor offers more than 900 video effects that you can easily apply to your screen recording. Furthermore, you can also adjust the speed of your recorded video through this editor. You can also avail of other options to crop, split, resize, and trim the video. Hence, Filmora works efficiently to screen record and edit your live-stream sessions of TikTok. Watch the video below to learn more about Filmora’s new features.
Conclusion
Live streaming on TikTok is a new trend that many content creators and entrepreneurs are adopting. To go live on TikTok on your desktop, you would need a stream key. This article has provided clear instructions on how to get the TikTok stream key conveniently. Along with that, we have also highlighted a professional software known as Filmora to screen record and edit your TikTok live streaming.
Free Download For Win 7 or later(64-bit)
Free Download For macOS 10.14 or later
Also read:
- [Updated] In 2024, Boost Your TikTok Fandom in a Flash - Critical Insights Shared
- 2024 Approved Can't Skip Them 10 Most Popular TikTok Tests
- [New] In 2024, Expert TikTok Editors Reviewed and Rated
- [New] Expert Strategies for Thriving in the Desktop TikTok Ecosystem
- [New] In 2024, Essential TikTok Strategies Aiming for the Top of the List
- 2024 Approved Navigating Through the Process of TikTok's Slow Motion Filming
- [New] In 2024, Harness Quick-Download Powers for TikTok Videos
- [New] Get Back to Creating Instantly Fixing a Malfunctioning TikTok (Chrome, iOS) for 2024
- [Updated] In 2024, Free Tool for TikTok to MP4 Conversion
- Reimagine Your TikTok Persona Visuals & Text Changes for 2024
- [New] 2024 Approved Mastering Pre-Upload TikTok's Copyright Guidelines
- [Updated] TikTok as a Business Catalyst Strategies for Expansion
- Cult Classic Reimaginings Top 20 Anime on TikTok for 2024
- [New] Mastering TikTok Voiceovers Unveiled
- 2024 Approved Top Hashtags to Leverage on TikTok for More Followers
- [Updated] The Ultimate Guide Turning TikTok Videos Into Popular Graphics
- In 2024, Restoring a Non-Functioning TikTok Account
- [Updated] Convert TikTok to MP4 without Watermark Best TikTok Downloaders
- In 2024, A Bite Into TikTok's Most Engaging Dishes
- [Updated] 2024 Approved Step-by-Step Creating Popular TikTok Reaction Videos
- [Updated] Groove Guru's Top 20 Dances on TikTok for 2024
- In 2024, Leading the Charge in PC Livestreams with TikTok Features
- In 2024, Hit the Trend Hard with These Must-Try TikTok Items on Amazon
- Viral Gourmet Creations on TikTok
- Crucial Info for Navigating TikTok on Mac
- 2024 Approved Breaking Through on TikTok Personal Branding and Differentiation
- [New] In 2024, Best 15 TikTok-Inspired Reading Picks for Avid Readers
- [Updated] In 2024, Mastering Personal Branding on TikTok A Detailed Guide
- [Updated] Essential Skills to Skyrocket Your TikTok Game on Devices
- [Updated] 63 Chuckle Factory on TikTok
- [New] How to Make a Difference on TikTok The Best Practices & Exemplary Case Studies for 2024
- [New] 2024 Approved Crafting Engaging Content with Added Vocal Dimensions in TikTok Videos
- [New] 2024 Approved A Step-By-Step Journey to PC Live Streams – Master TikTok LIVE
- [Updated] 2024 Approved TikTok Creator Fund How to Join It and Make Money
- [Updated] Standing Out on TikTok Masterful PFP Techniques and Concepts
- 100%% Safe Sources for Legitimate TikTok Growth
- [Updated] Transforming Silent Videos to Audible Magic on TikTok
- Unshackling From TikTok's Covert Bans for 2024
- [Updated] Top 15 Most Popular TikTokers that Will Inspire You for 2024
- [New] Perfecting Slow Motion Videos A Step-by-Step Guidebook for 2024
- [New] 5 Hot TikTok Discounts Amazon's Top Picks for Now
- [New] 2024 Approved Top 50+ Powerful TikToks Quotes for Creativity & Virality
- [New] The Ultimate Guide to the Best 7 TikTok Apps for Success for 2024
- [New] Your Complete MacOOTD Filmmaking Handbook
- [Updated] Explore These Viral TikTok Challenges Now
- [New] Rhythm Revolution TikTok's Newest and Most Popular Rap Hits for 2024
- In 2024, 3 Ways to Unlock iPhone 14 Pro without Passcode or Face ID
- [New] Essential Emulators Reviving Sony's PS1 Games
- In 2024, Innovating TikTok Posts for Twitter's Platform
- How To Change OnePlus Nord N30 5G Lock Screen Password?
- Updated The Best Free MPEG Video Splitters for Windows, Mac, and Linux
- How to Screen Mirror on Apple iPhone 15 Plus? | Dr.fone
- Can I recover permanently deleted photos from Realme GT 3
- [Updated] In 2024, The Ultimate Guide to the Top Webcams for Windows 10
- Updated The Best of the Best 5 Free Online Tone Generators for 2024
- A Detailed VPNa Fake GPS Location Free Review On Vivo V29e | Dr.fone
- In 2024, Interplatform Video Uploading Twitter & Tumblr Synced
- Ultimate Guide from Samsung Galaxy Z Fold 5 FRP Bypass
- In 2024, How Do You Get Sun Stone Evolutions in Pokémon For Vivo T2 Pro 5G? | Dr.fone
- What To Do When OnePlus Ace 2 Pro Has Black Screen of Death? | Dr.fone
- New 2024 Approved Subtle Audio Degradation Features in Adobe Rush (New Version, 2023)
- [Updated] In 2024, Unveiling the Secrets of OBS Game Capture
- 2024 Approved Effortless Image Capturing on Chrome Devices (Method #4)
- How To Erase an Apple iPhone 13 Without Apple ID Password?
- In 2024, Unveiling The Most Engaged-With Tweets
- [Updated] 2024 Approved The Ultimate List of Prestige Business Strategy Titles '24
- How to Recover Lost Data from iPhone 12 After iOS Update? | Stellar
- [New] 2024 Approved Sync Video Elements to Captivate Instagram Audiences
- Render Your Social Media Footage for 2024
- In 2024, Prime 8 Instagram Managers for Mobile Devices
- Discovering the Best Practices for a Bigger ROI with FB Videos
- [Updated] Crafting IGTV Content with Multilingual Support for 2024
- Updated 2024 Approved Revolutionizing Music Production A Look at the Leading Audio Editing Suites
- [Updated] In 2024, The Prime Choice Top PS3 Emulators PC Users
- [New] PictureProfessional Expert Guide to Adjusting IG Content Sizes for 2024
- You Are at the Right Post if You Are Surfing for a GIF to MP4 Conversion Tool. This Article Will Provide You with the Top Best Converters that Can Help You Convert GIF to MP4 Videos Quickly and Easily
- In 2024, How to Bypass Google FRP Lock from Oppo A1 5G Devices
- Samsung won’t play AVCHD .mts files
- In 2024, Find Laughing Sound Effect
- How to Change Spotify Location After Moving to Another Country On Xiaomi 14 Pro | Dr.fone
- New 2024 Approved Best Animated Video Makers for Android and iOS (Updated 2023)
- Updated 2024 Approved Speed Up Your Video Editing How to Cut Large Files Fast on Mac
- [New] Streamlabs Versus OBS A Compreran Analysis for Broadcasters
- In 2024, Top 10 Best Spy Watches For your Oppo A56s 5G | Dr.fone
- iPogo will be the new iSpoofer On Oppo F23 5G? | Dr.fone
- Updated Video Editing Mastery Top 4K/8K Software for Beginners and Pros for 2024
- Top-Rated AVI Video Editors for Cutting and Trimming Multi-Platform Support for 2024
- Android Unlock Code Sim Unlock Your Honor X9a Phone and Remove Locked Screen
- Title: "[New] In 2024, Echo Elimination Refining Recordings with Audacity"
- Author: Brian
- Created at : 2024-05-23 14:46:47
- Updated at : 2024-05-24 14:46:47
- Link: https://tiktok-videos.techidaily.com/new-in-2024-echo-elimination-refining-recordings-with-audacity/
- License: This work is licensed under CC BY-NC-SA 4.0.
