![[New] In 2024, Quick TikTok Techniques for Tailoring Trends](https://thmb.techidaily.com/a6ef7d238dd7bb214a3984e4799089ad86b5e4b6f433cd32ec9f580258b7206c.jpg)
[New] In 2024, Quick TikTok Techniques for Tailoring Trends
Quick TikTok Techniques for Tailoring Trends
Best Video Editor for Beginners on Windows and Mac
Wondershare Filmora is one of the most popular video editing software among TikTokers , download and have a try.
TikTok’s collaborative nature is one of its most appealing features. Your video is not finished the moment you publish it. They can be responded to, remixed, and re-shared by anybody. TikTok is meant to allow users to construct on other’s films shared on the network, whether you’re utilizing audio from some other video or making a duet.
Thanks to the stitch tool, creators may remix, remake, and reply to videos with a couple of taps. This article will tell you what you need to know about stitching videos on TikTok. Continue reading to learn more about Stitching and how to stitch on TikTok. Let’s get started!
In this article
02 How to Turn Stitch On or Off?
04 How to Stitch Any TikTok Video withFilmora Video Editor ?
05 FAQs About TikTok Video Stitch
Part 1: What is Stitch on TikTok?
TikTok’s latest video editing tool ‘Stitch,’ lets people incorporate video snippets from other people into their own. Creators may use Stitch to provide a five-second snippet from a TikTok video out of their own. Unlike duets that play videos together, stitched videos play in the sequence they were stitched. Videos containing open-ended questions have gained in popularity with the advent of the stitch.
Whenever you Stitch a clip-on TikTok, you are essentially inserting your video after yet another video that has already been submitted. People frequently utilize this to remark on or reply to other videos. And, when done well, it can add a lot more context to your movies.
The one limitation of the Stitch tool is that you may only publish up to five seconds from some other video. So, if you’re focusing on a Stitch, you must select the five seconds which are most critical to highlight your message.
Part 2: How to Turn Stitch On or Off?
By enabling the Stitch feature, you make your material available to millions of prospective collaborators. Consider the possibilities – it might be a fantastic approach to enhance reach and virility.
If you aren’t comfortable exposing your films to the whole TikTok community, users can opt out of allowing others to Stitch their work. You may modify them under the Privacy Controls. Here’s how to do a Stitch on TikTok:
Step 1: Launch the TikTok app and then head to your profile by clicking on the Profile option at the bottom right. After that, select the three dots to open the settings.
Step 2: After entering the settings, select Privacy to proceed, and then tap on the Stitch option to open the Stitch settings.
Step 3: Now, you will see three options that are No-one, Everyone, and Friends. If you want to allow the Stitching, select either Everyone or Friends. However, to restrict the people from stitching your videos, choose No-one. After you are done selecting, click on the back arrow to save the applied changes.
Part 3: How to Stitch on TikTok?
TikTok keeps giving creators more reasons to continue producing, and fans like us are more committed to continuing to open it. Stitch, a new app functionality from the famous social networking platform, makes things more straightforward than ever for artists to interact with each other.
But, you might be wondering, how to do a stitch on TikTok? Don’t worry; you’ve come to the right place. Here’s how:
Step 1: Launch TikTok and then go to the video that you want to stitch. Select the Share icon, which resembles an arrow. Select the Stitch symbol from the menu that displays, and then wait a few seconds for the video to complete. The lengthier the video is, the more the loading time.

Step 2: When it’s finished, you’ll be sent to a screen where you may take five seconds of the film and use it on your own. To navigate through the movie, use the sliders and the red bars to choose the portion you want. When you’re finished, tap Next.

Step 3: You’ll be sent to TikTok’s normal recording screen. Record the remainder of your TikTok video with all of the features you’re accustomed to utilizing. You may use whatever effects, stickers, texts, voiceovers, or captions you desire. After that, press the Next button.

Step 4: Make a title and hashtags for your TikTok video. You could also choose whether or not these users may Stitch your movie here – hit the toggle switch beside Allow Stitch to turn it off. Following that, hit the Post option, and your stitched video will be uploaded.

Part 4: How to Stitch Any TikTok Video with Filmora Video Editor ?
Before getting started, understand why people opt for Filmora video editor for stitching videos on TikTok when this can be done through the official TikTok application. TikTok app only allows you to stitch a video for up to five seconds which is quite frustrating if you wish to stitch an entire video.
One more reason is that, with TikTok, you cannot stitch the already existing video from the camera roll, which restricts creators from adding the already edited content to the existing video. So, to avoid the above problems, Filmora is used for stitching TikTok videos.
For Win 7 or later (64-bit)
For macOS 10.12 or later
To begin, download the video that you wish to stitch with from TikTok. After, follow the below stepwise guide:
Step 1: Launch the Filmora software on your PC and import the video files by clicking on the File and then Import/Export Media. You can simply drag and drop the videos as well.
Step 2: Drag the clips from the media library to the Timeline’s video track. All video files will be stitched into a single video with no transitions.

Note: To add a transition to the video , go to the Transition tab and drop the desired transition to the junction of two clips.


Step 3: Now, preview the stitched video and, when finished, click the Export option to save numerous video segments to a single file. Choose any format from the Format tab’s list.
Part 5: FAQs About TikTok Video Stitch
1. Can you do a Stitch on TikTok with a video from your Camera Roll?
Unfortunately, you cannot utilize a video from your Camera Roll in a Stitch at the time of this writing. So, whatever your reaction to a Stitch is, you must record 100% unique footage shot with the TikTok camera. However, you may download the video first and then stitch it with some third-party software such as Filmora.
2. Can you stitch longer than 5 seconds?
No, it is not possible to stitch a video for longer than five seconds using the built-in Stitching feature of the TikTok app. But this can be done by stitching the videos using third-party applications and software.
3. How do I see TikTok stitches?
Users who want to view as many stitches as possible can do it by browsing for them on the app. You must first browse to Discover, and from there to the search box. Then type #Stitch @username, where the username is the name of the account from which you wish to view stitches.
4. TikTok Stitch option not showing. How to fix it?
Users may choose whether or not someone else can Stitch their work in their settings. The option may be found under the Settings and Privacy tab, where users can activate or uncheck Stitch for all videos. So, if the Stitch option is not showing, the user may have disabled the Stitch option.
Conclusion
The Stitch feature is an excellent way to continue the discussion with your videos. You may leave comments on popular content on the site. Most importantly, it may be a fun method to generate material different from what you usually publish. And since you know How to Stitch on TikTok after reading this article, stitch the videos today and create unique content!
TikTok’s collaborative nature is one of its most appealing features. Your video is not finished the moment you publish it. They can be responded to, remixed, and re-shared by anybody. TikTok is meant to allow users to construct on other’s films shared on the network, whether you’re utilizing audio from some other video or making a duet.
Thanks to the stitch tool, creators may remix, remake, and reply to videos with a couple of taps. This article will tell you what you need to know about stitching videos on TikTok. Continue reading to learn more about Stitching and how to stitch on TikTok. Let’s get started!
In this article
02 How to Turn Stitch On or Off?
04 How to Stitch Any TikTok Video withFilmora Video Editor ?
05 FAQs About TikTok Video Stitch
Part 1: What is Stitch on TikTok?
TikTok’s latest video editing tool ‘Stitch,’ lets people incorporate video snippets from other people into their own. Creators may use Stitch to provide a five-second snippet from a TikTok video out of their own. Unlike duets that play videos together, stitched videos play in the sequence they were stitched. Videos containing open-ended questions have gained in popularity with the advent of the stitch.
Whenever you Stitch a clip-on TikTok, you are essentially inserting your video after yet another video that has already been submitted. People frequently utilize this to remark on or reply to other videos. And, when done well, it can add a lot more context to your movies.
The one limitation of the Stitch tool is that you may only publish up to five seconds from some other video. So, if you’re focusing on a Stitch, you must select the five seconds which are most critical to highlight your message.
Part 2: How to Turn Stitch On or Off?
By enabling the Stitch feature, you make your material available to millions of prospective collaborators. Consider the possibilities – it might be a fantastic approach to enhance reach and virility.
If you aren’t comfortable exposing your films to the whole TikTok community, users can opt out of allowing others to Stitch their work. You may modify them under the Privacy Controls. Here’s how to do a Stitch on TikTok:
Step 1: Launch the TikTok app and then head to your profile by clicking on the Profile option at the bottom right. After that, select the three dots to open the settings.
Step 2: After entering the settings, select Privacy to proceed, and then tap on the Stitch option to open the Stitch settings.
Step 3: Now, you will see three options that are No-one, Everyone, and Friends. If you want to allow the Stitching, select either Everyone or Friends. However, to restrict the people from stitching your videos, choose No-one. After you are done selecting, click on the back arrow to save the applied changes.
Part 3: How to Stitch on TikTok?
TikTok keeps giving creators more reasons to continue producing, and fans like us are more committed to continuing to open it. Stitch, a new app functionality from the famous social networking platform, makes things more straightforward than ever for artists to interact with each other.
But, you might be wondering, how to do a stitch on TikTok? Don’t worry; you’ve come to the right place. Here’s how:
Step 1: Launch TikTok and then go to the video that you want to stitch. Select the Share icon, which resembles an arrow. Select the Stitch symbol from the menu that displays, and then wait a few seconds for the video to complete. The lengthier the video is, the more the loading time.
Step 2: When it’s finished, you’ll be sent to a screen where you may take five seconds of the film and use it on your own. To navigate through the movie, use the sliders and the red bars to choose the portion you want. When you’re finished, tap Next.
Step 3: You’ll be sent to TikTok’s normal recording screen. Record the remainder of your TikTok video with all of the features you’re accustomed to utilizing. You may use whatever effects, stickers, texts, voiceovers, or captions you desire. After that, press the Next button.
Step 4: Make a title and hashtags for your TikTok video. You could also choose whether or not these users may Stitch your movie here – hit the toggle switch beside Allow Stitch to turn it off. Following that, hit the Post option, and your stitched video will be uploaded.
Part 4: How to Stitch Any TikTok Video with Filmora Video Editor ?
Before getting started, understand why people opt for Filmora video editor for stitching videos on TikTok when this can be done through the official TikTok application. TikTok app only allows you to stitch a video for up to five seconds which is quite frustrating if you wish to stitch an entire video.
One more reason is that, with TikTok, you cannot stitch the already existing video from the camera roll, which restricts creators from adding the already edited content to the existing video. So, to avoid the above problems, Filmora is used for stitching TikTok videos.
For Win 7 or later (64-bit)
For macOS 10.12 or later
To begin, download the video that you wish to stitch with from TikTok. After, follow the below stepwise guide:
Step 1: Launch the Filmora software on your PC and import the video files by clicking on the File and then Import/Export Media. You can simply drag and drop the videos as well.
Step 2: Drag the clips from the media library to the Timeline’s video track. All video files will be stitched into a single video with no transitions.
Note: To add a transition to the video , go to the Transition tab and drop the desired transition to the junction of two clips.
Step 3: Now, preview the stitched video and, when finished, click the Export option to save numerous video segments to a single file. Choose any format from the Format tab’s list.
Part 5: FAQs About TikTok Video Stitch
1. Can you do a Stitch on TikTok with a video from your Camera Roll?
Unfortunately, you cannot utilize a video from your Camera Roll in a Stitch at the time of this writing. So, whatever your reaction to a Stitch is, you must record 100% unique footage shot with the TikTok camera. However, you may download the video first and then stitch it with some third-party software such as Filmora.
2. Can you stitch longer than 5 seconds?
No, it is not possible to stitch a video for longer than five seconds using the built-in Stitching feature of the TikTok app. But this can be done by stitching the videos using third-party applications and software.
3. How do I see TikTok stitches?
Users who want to view as many stitches as possible can do it by browsing for them on the app. You must first browse to Discover, and from there to the search box. Then type #Stitch @username, where the username is the name of the account from which you wish to view stitches.
4. TikTok Stitch option not showing. How to fix it?
Users may choose whether or not someone else can Stitch their work in their settings. The option may be found under the Settings and Privacy tab, where users can activate or uncheck Stitch for all videos. So, if the Stitch option is not showing, the user may have disabled the Stitch option.
Conclusion
The Stitch feature is an excellent way to continue the discussion with your videos. You may leave comments on popular content on the site. Most importantly, it may be a fun method to generate material different from what you usually publish. And since you know How to Stitch on TikTok after reading this article, stitch the videos today and create unique content!
The Proactive Approach to Guesting in Livestreams on TikTok
With the immense growth of TikTok, many people like to use this social app for various purposes. For example, content creators can build their personal community on TikTok to interact with their followers. You can also conduct a question-answer session with your followers on TikTok through a live stream.
Moreover, TikTok also allows you to join someone’s live stream as a guest. Through this feature, you can join the live streaming of your friend instantly. Through this article, you can learn how to join someone’s live on TikTok quickly.
Part 1: How to Join Someone’s Live on TikTok
Is your favorite celebrity live on TikTok? If your favorite celebrity is doing a live stream on TikTok, you may want to interact with him directly. TikTok allows you to join someone’s live on TikTok quickly by sending a guest request. To learn how to join live on TikTok, follow the below steps:
Step1 Select the Live Option
Open your TikTok app on your phone to access the “Discover” page, and type “Live” on the search bar. By doing so, you can find all the live streaming easily. Now select the live stream you want to join in order to proceed.

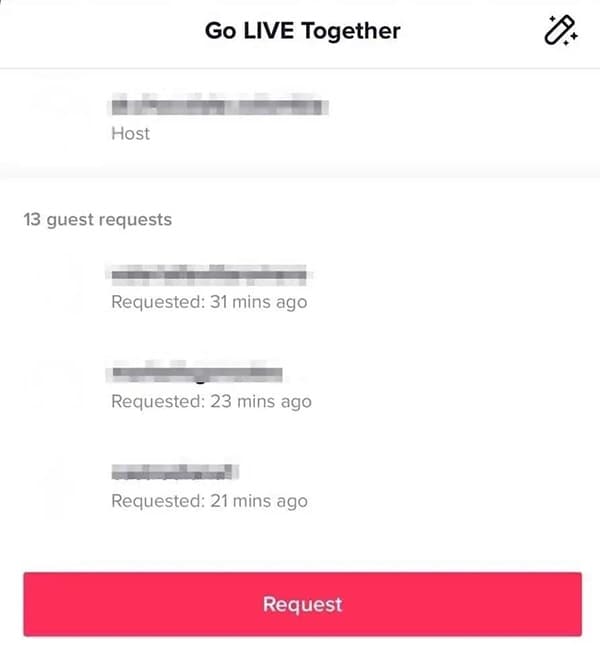
Step2 Send a Guest Request
Once you have found your desired live stream, tap on the “Pink Blue Circles” to send a guest request. Now tap on “Request” to give confirmation. By selecting this option, your guest request will be sent. After sending the guest request, wait for the host to accept it.
Part 2: How to Invite Others to Join Your Live on TikTok
Have you ever invited someone to join your live streaming on TikTok? Being a content creator or an influencer on TikTok, it’s essential to connect with your fans frequently. To communicate with your TikTok audience better, you should know how to invite others on your live stream. By inviting others, you can communicate with your fans directly.
Prerequisites of Going Live on TikTok
Before learning how to invite others on TikTok, let’s shed light on the requirements of going live on this social app. The reason is that not everyone can go for live streaming on TikTok, as there are certain restrictions you need to keep in your mind.
- To start live streaming on your TikTok, you should have at least 1000 followers.
- You should be 16 years old or above to access the live stream feature.
- To use virtual gifts during a live stream on TikTok, you should be 18 years old or above.
Steps to Invite Others to Join Your Live on TikTok Easily
Are you excited to invite your fan to your live stream on TikTok? Check the below steps to invite others to join your TikTok live:
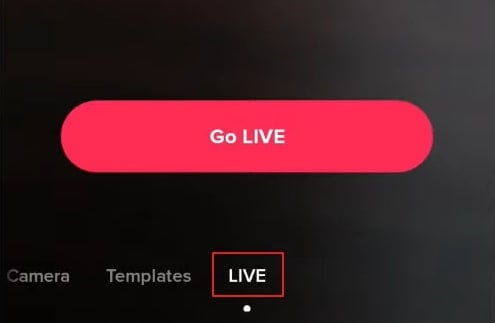
Step1 Go to the Live Option
Open your TikTok app on your mobile phone. After opening it, tap on the “Live” option from the right side. Now you can add a title to your TikTok Live.
Step2 Invite your Desired User
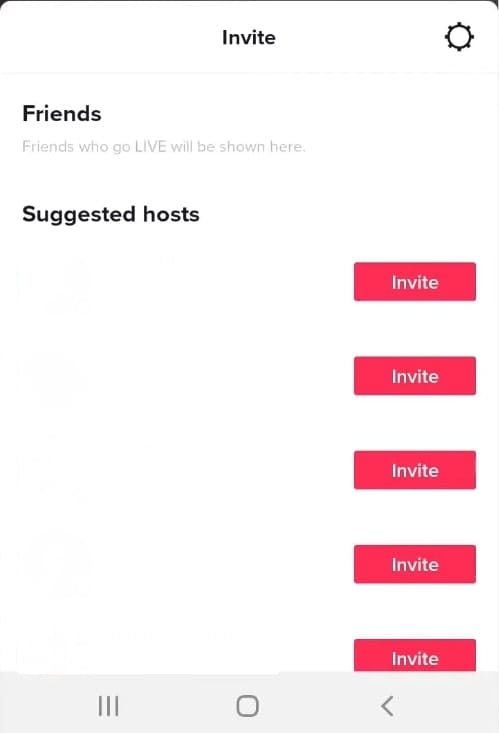
After adding the title, tap on the “Go Live” button. Once the live streaming initiates, you have to press the “Pink Blue Circle” icon from the bottom left corner. It will open a list of the suggested users. Select the preferred user you want to invite and tap on the “Invite” button. Your selected user will have 20 seconds to accept or reject your request.
Bonus Tip: Easily Record and Edit Someone’s Stream with Filmora
Are you willing to record and edit a live stream on TikTok? If you want to efficiently screen record any live streaming session on TikTok, we highly recommend using Wondershare Filmora . This software provides a professional screen recorder that allows you to capture your desired window or screen. You can customize the settings to record a live stream in your preferred resolution. Thus, by using the screen recorder of Filmora, you can record any live streaming to access it anytime.
Free Download For Win 7 or later(64-bit)
Free Download For macOS 10.14 or later
Along with a screen recorder, Filmora also provides a video editor. If you find flaws in your recorded live stream, the editor of Filmora can help you. By using a video editor, you can enhance your recorded video by adding effects or modifying its speed. There are some advanced editing features that you can explore and use on Filmora. To learn about them, check the below points:
Key Editing Features of Wondershare Filmora
- Speech-to-Text : To increase your editing efficiency, Filmora offers a Speech-to-Text feature. This feature automatically converts your speech to subtitles. Through advanced speech recognition capabilities in this tool, you can generate subtitles in your video automatically and without any hassle. Also, this feature supports up to 16 different languages.
- Keyframing : Do you want to add a dynamic effect to your video? The keyframing feature allows you to add smooth and professional animated effects instantly. It provides 80 preset animation templates you can quickly apply to your video. Moreover, you can also modify the parameters by setting the transparency and view in every keyframe view.
- AI Portrait : Are you annoyed by the dull backgrounds in your video? Through the AI portrait feature, you can remove backgrounds from your video with great precision. This feature also offers more than 70 stickers and AI effects that you can apply. Furthermore, it also recognizes the faces in your video through AI technology. With face recognition, you can apply AI stickers easily.
Conclusion
TikTok has made a significant impact on the social media industry. Due to its high influencing power, many celebrities and famous personalities are now joining TikTok to increase their reach. If you want to invite someone to your TikTok live, this article will help you. We have also provided detailed instructions on how to join someone’s live on TikTok quickly. Also, in order to edit and screen record live streaming on TikTok, Wondershare Filmora is a highly compatible and functional tool.
Also read:
- [New] Expert Tips for Zoom Engagement Building Stronger Remote Relationships
- [New] In 2024, Ultimate Low-Cost Smart Home Devices for Gaming
- [New] In 2024, Who Are TikTok’s Gaming Visionaries?
- [Updated] How to Join Someone’s Live on TikTok as a Guest
- [Updated] In 2024, Lenovo Laptop Screen Logging Made Easy
- [Updated] The Ultimate Guide to TikTok's Most Engaging Rap Songs for 2024
- [Updated] Unveil 10 Filter Gems to Elevate Your TikTok Posts
- 2024 Approved Metaverse or Omniverse? Unpacking the Digital Spheres
- 8 Quick Fixes Unfortunately, Snapchat has Stopped on Vivo Y27 4G | Dr.fone
- Elevate Instagram Presence with Professional Video Editing Skills for 2024
- Enhancing GovTech Efficiency with Advanced AI-Driven Identity Verification Techniques
- Enhancing Video Longeayer Android/Mac App Utilization
- How to Erase an Apple iPhone 8 without Apple ID?
- In 2024, Transform Your Imagination Into Visual Masterpieces on Windows 10
- Installing TikTok Made Easy for Mac Users for 2024
- Save Your Android & Mac Snapchat Footage Effectively
- Snapchat Enhancements The Most Acclaimed Video Editing Tools
- Title: [New] In 2024, Quick TikTok Techniques for Tailoring Trends
- Author: Brian
- Created at : 2024-10-17 16:45:23
- Updated at : 2024-10-18 17:36:27
- Link: https://tiktok-videos.techidaily.com/new-in-2024-quick-tiktok-techniques-for-tailoring-trends/
- License: This work is licensed under CC BY-NC-SA 4.0.