
![[New] Tips to Inject Oversized Characters Into TikToks](https://www.lifewire.com/thmb/fFJUg1bto07LonzVAqUNK2rYUOw=/400x300/filters:no_upscale():max_bytes(150000):strip_icc()/how-to-check-your-vram-5235783-628ab89069614d9faf9e129844a91fcd.jpg)
[New] Tips to Inject Oversized Characters Into TikToks
Tips to Inject Oversized Characters Into TikToks
On TikTok, the Big head effect is commonly employed by content producers to generate humorous videos. In particular, the Big head filter may be utilized for various creative production projects, including caricature films, memes, and teaching.
How to get that TikTok Big Head effect? Would you like to make your head look larger than your body in TikTok videos or photos? It’s effortless to do on your Android smartphone. The best part is that we will show you how to use a Big head filter on different applications in this article and how to edit it. Aside from TikTok, there’s another software you can use to enlarge your head in videos or images. Let’s show you!
In this article
01 How to Get the Big Head Filter on TikTok?
02 How to Make a Big Head Effect in CapCut?
03 How to Add Big Head Effect in Filmora Video Editor? [3 Ways]
Part 1: How to Get the Big Head Filter on TikTok?
The TikTok Big Head effect is an extremely entertaining filter. TikTok is a social media platform that specializes in sharing short video content. Its consumer subscription has surpassed Facebook, Instagram, Twitter, and even Snapchat, and its download percentages are much greater than those of the above said social networking sites.
The TikTok Big Head effect on TikTok, on the other hand, was so widespread that it began to be used by more prominent ‘TikTokers.’ Afterward, in a single glance, all users of the social networking in concern began to use it on TikTok live broadcasts. This is how you can use the TikTok Big Head effect:
Step 1: Go to TikTok’s Discover menu to access the Big Head effects.
Step 2: Type “Big Head“ or #bighead into the search bar and choose the top hashtag**_, #bighead_**. Each TikTok video that employs a Big Head filter would then be displayed.
Step 3: To test out a filter, choose one of the numerous videos available and look for the filter’s name in the lower-left corner.
Step 4: Try pressing on the filter’s title, then touch on the Camera icon at the bottom of the display to make a TikTok video employing the Big Head filter in concern.
Here is a detailed video tutorial about how to make a big head effect in TikTok directly.
Part 2: How to Make a Big Head Effect in CapCut?
CapCut is a content creation application that lets users apply various stickers, filters , and effects to their videos. It also has an essential green screen function, a zooming capability that acts like a Ken Burns effect , and many more features.
With the CapCut software, you can quickly enlarge your head in videos. With a single click of the big head effect, your head would instantly become larger than your body. Here’s how to do it step by step:
Step 1: In the CapCut software, create a New Project and then upload a video in which you will enlarge your head.
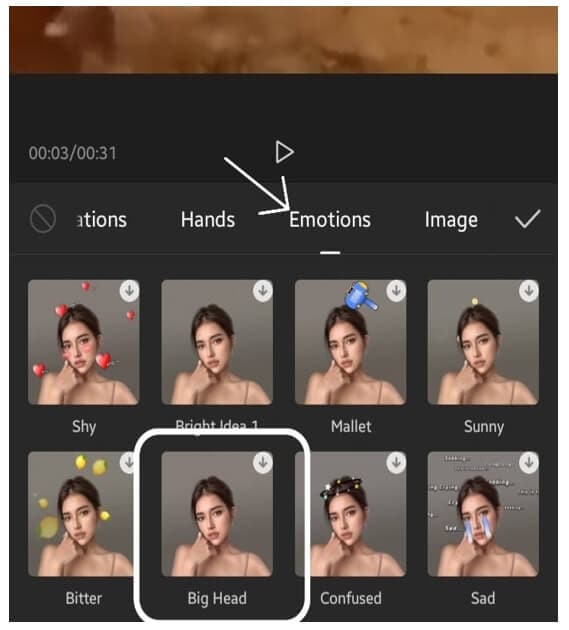
Step 2: Click the Effects option at the bottom of the display, and then tap the Facial or Body Effects option.
Step 3: Locate and choose the Big Head effect from the Emotions effect section.
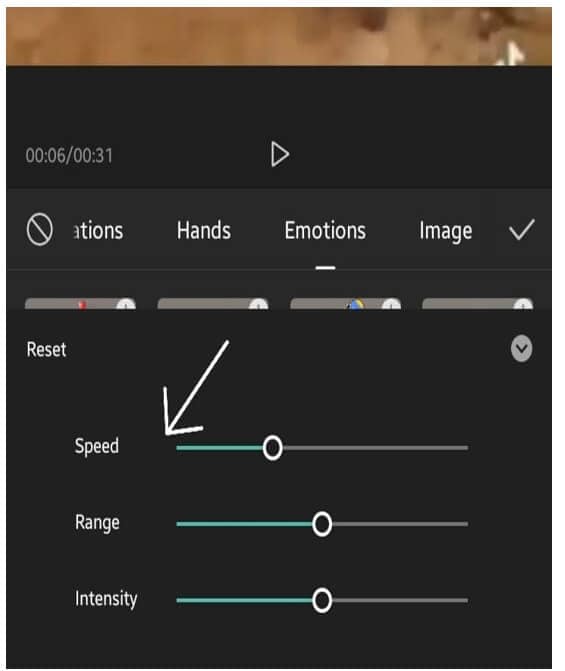
Step 4: The big head effect may be modified in speed, range, and intensity. Finally, adjust the duration of the Big head effect to match the video’s length.
You can check the video tutorial below to find out more details in creating big head and small body effect on video with CapCut.
Part 3: How to Add Big Head Effect in Filmora Video Editor? [3 Ways]
Filmora video editor by Wondershare includes the typical overlays, transitions, trimming, as well as the effects that we’ve grown to expect from the enthusiast-level video editor. It features a user-friendly interface that is clean, minimalistic, and dark. If that wasn’t enough, we’re sure you’ll be pleased to learn that the Filmora program can be used to create the TikTok big head effect in several ways.
With all of the characteristics we’ve discussed so far, you may further customize the Big Head effect with various Filmora effects. Let’s show you how:
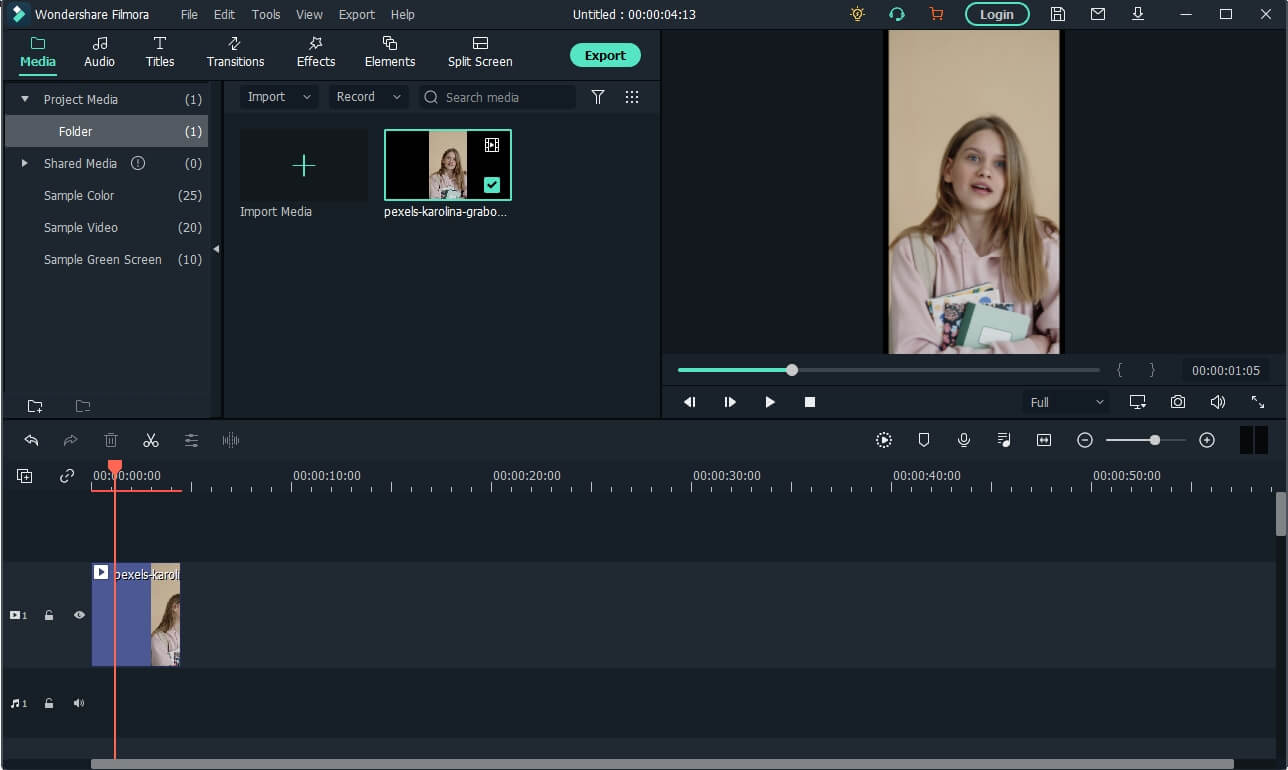
Launch Filmora and click on the Import tab to select the video file you want to use. And then drag and drop the imported media file onto the timeline panel.
For Win 7 or later (64-bit)
For macOS 10.12 or later
Method 1: Create Big Head with AR Stick Bubble Head Effect in Filmora Video Editor
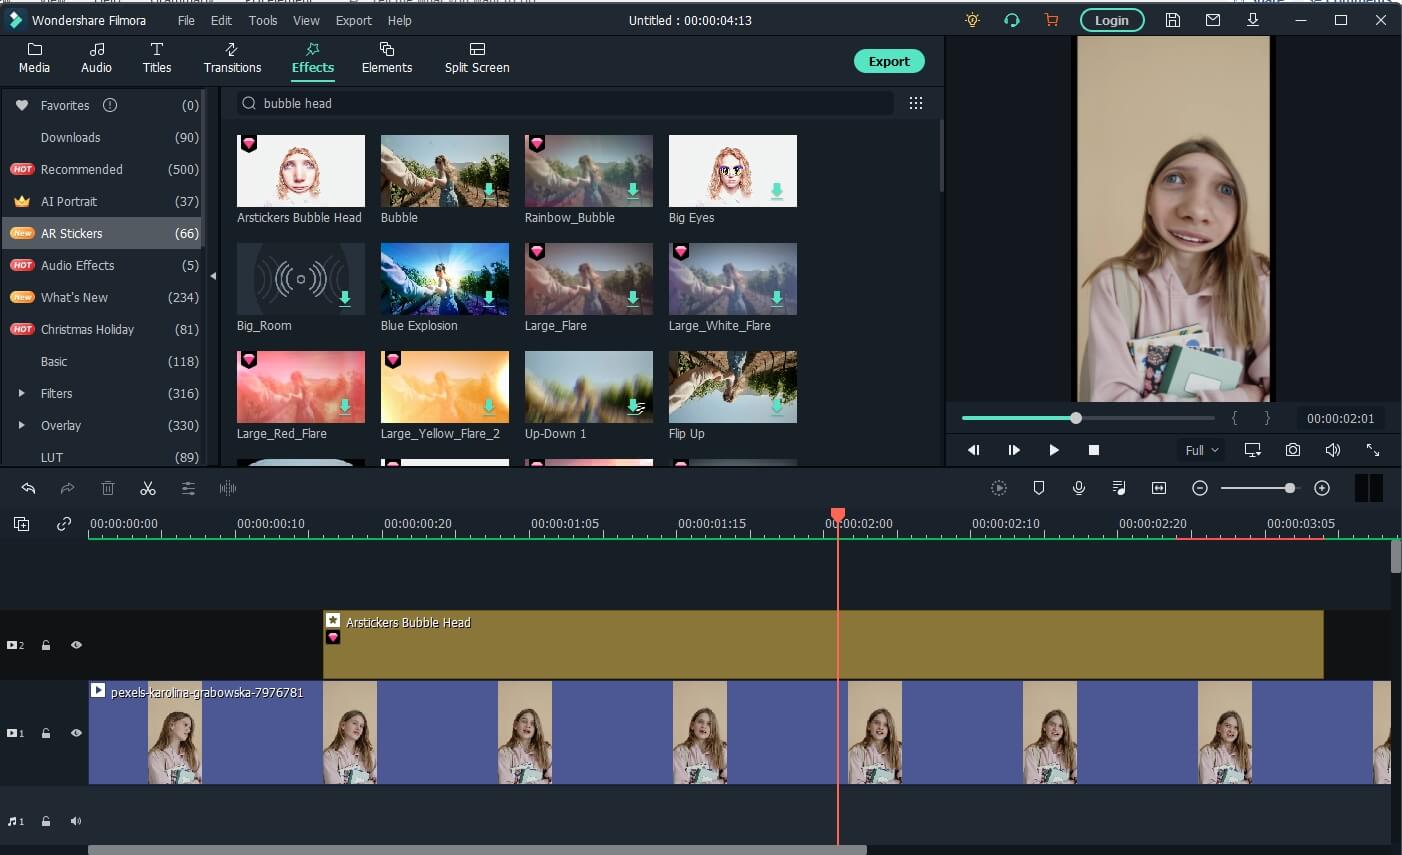
To add the Big Head effect on Filmora, click on the Effects option and select the AR Stickers option. Type bubble head in the search bar and then you will see it in the screen. Then, drag and drop the AR Stickers Bubble Head effect onto the timeline**,** specifically to the portion of the video where you want to add the Big Head filter on the person. As you do that, you will see a Bubble present on the video.
Besides the bubble head effect, there are many more AR stickers available, such as heart eyes, censor bar, emojis, and big eyes. Download the Filmora video editor now and check it yourself.
For Win 7 or later (64-bit)
For macOS 10.12 or later
Method 2: Add Magnify Effect to Video
In the Effects tab, go to the Recommended category, and then you will see the magnify effect. Drag and drop it to the timeline above the video track, and you will see part of the video has been magnified accordingly.
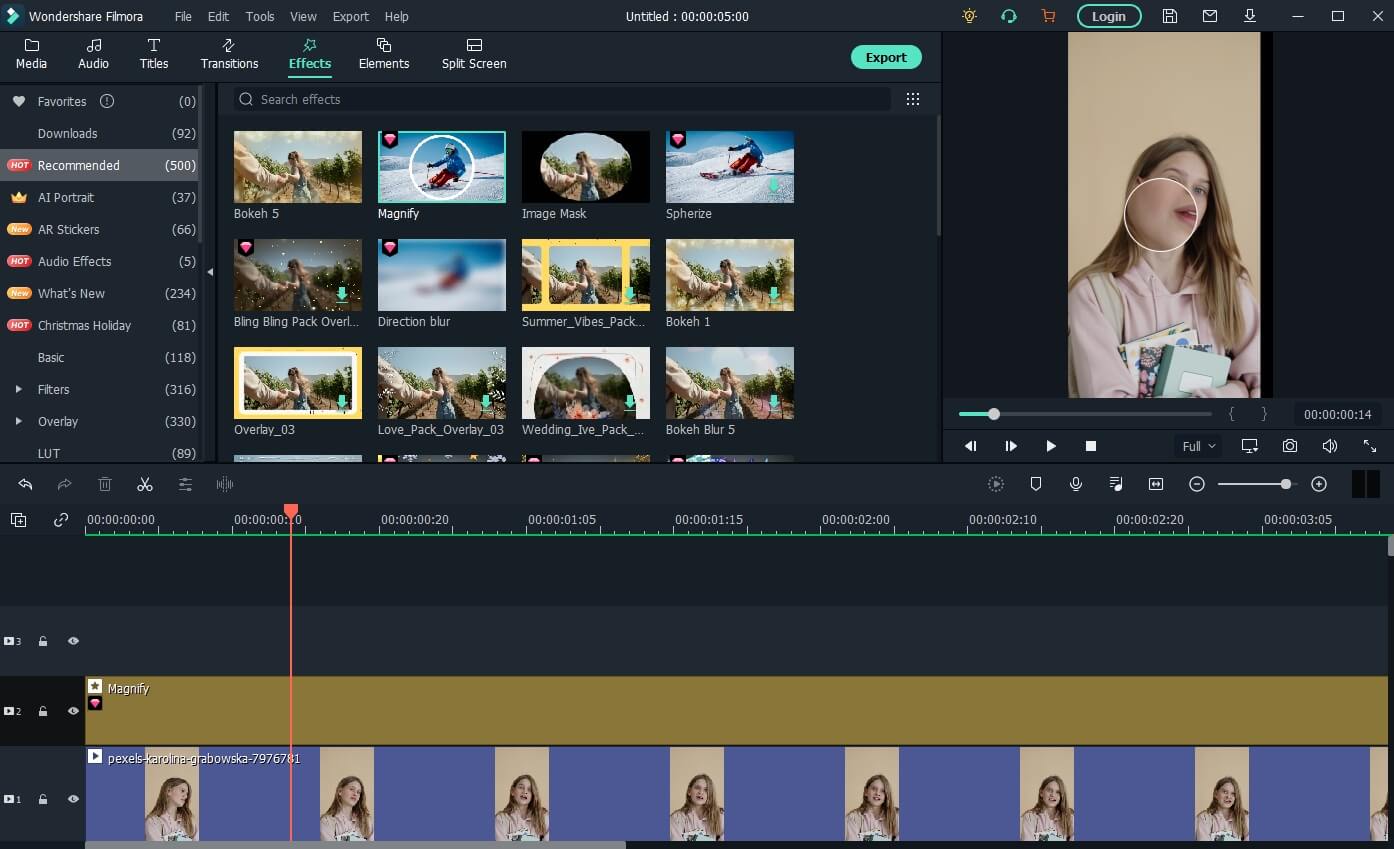
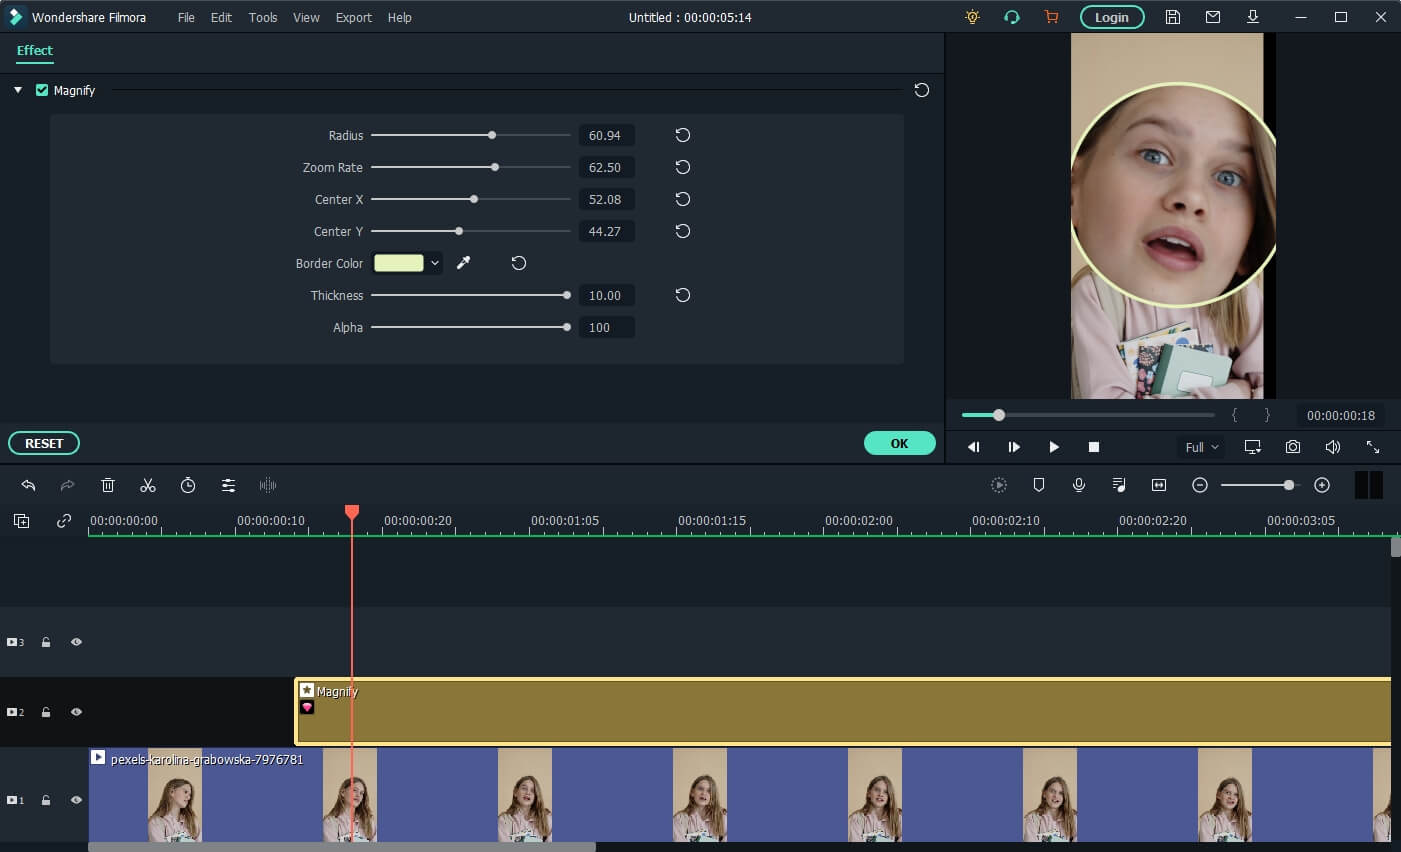
Now, double click on the effect in the timeline and open the Properties of the magnify effect. From the Properties section, you can adjust the size of the bubble using functions such as the Radius, CenterY, CenterX, Alpha, Zoom rate, etc to get a better video with big head effects.
Note: If you’re unable to locate the Magnify option in the Effects tab, please download and install the latest version of Filmora, and then type “Magnify” in the search bar, and the system will directly take you to where the option is present.
Method 3: Use Mask and Scale to Make a Video with Big Head Effect
Besides adding magnify effects and bubblehead effects, you can also use the mask preset to create a big head effect in Filmora.
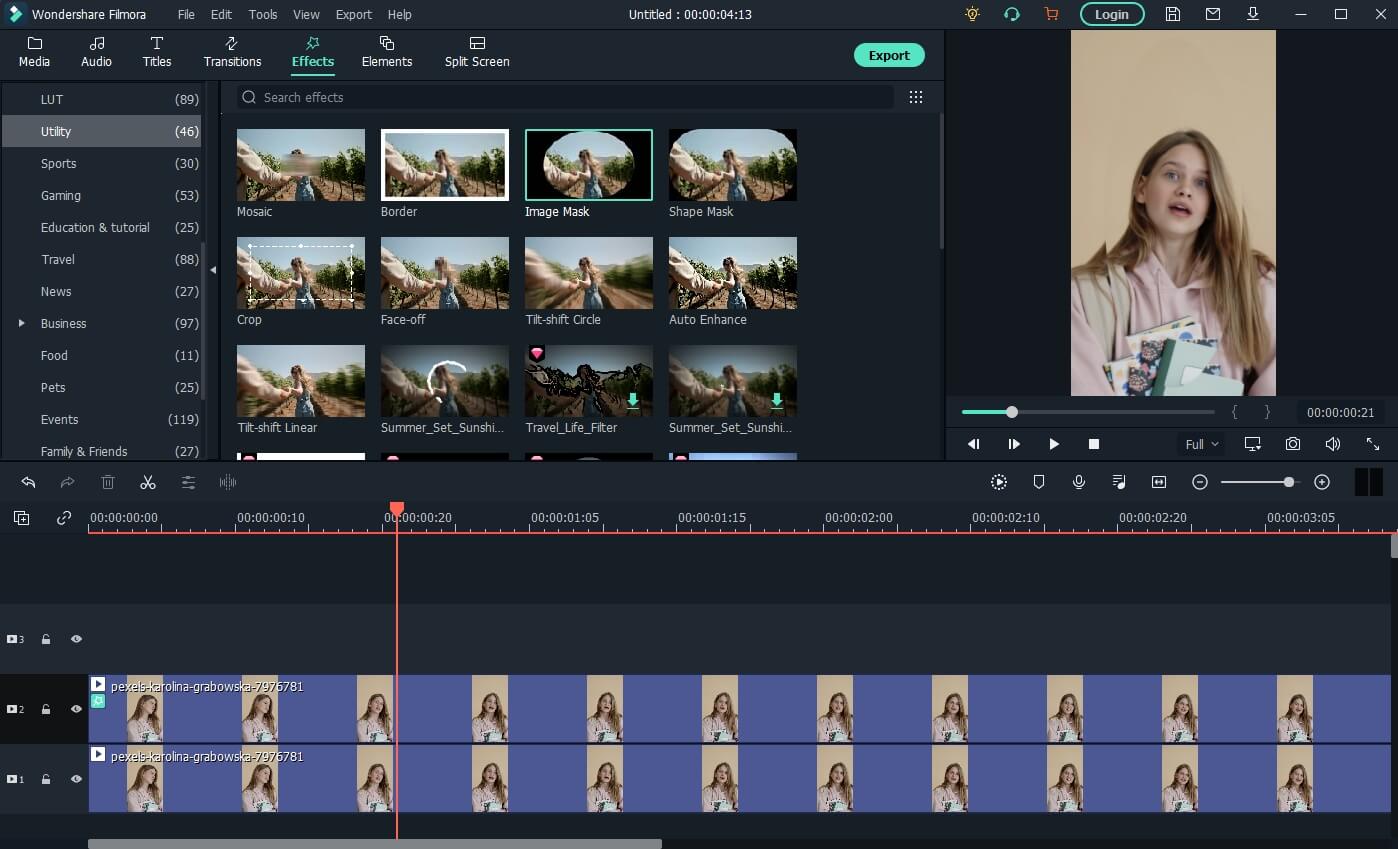
Drag and drop the video to video track 1 and video track 2 respectively in Filmora. Then go to the Effect tab, and scroll down to the Utility category, and place the Image Mask effect to the video above. Or, you can type image mask in the search bar to locate it quickly.
Now, double-click the video with the image mask to adjust the properties. Scroll down to the Video Effects field, and you will see the Image Mask. Click the arrow icon to choose a mask preset, adjust its position and size settings to fit the video.
Tips: You can hide the video in track 1 by clicking the eye icon so you can adjust the video with the image mask conveniently. Click it again then you will see the video.
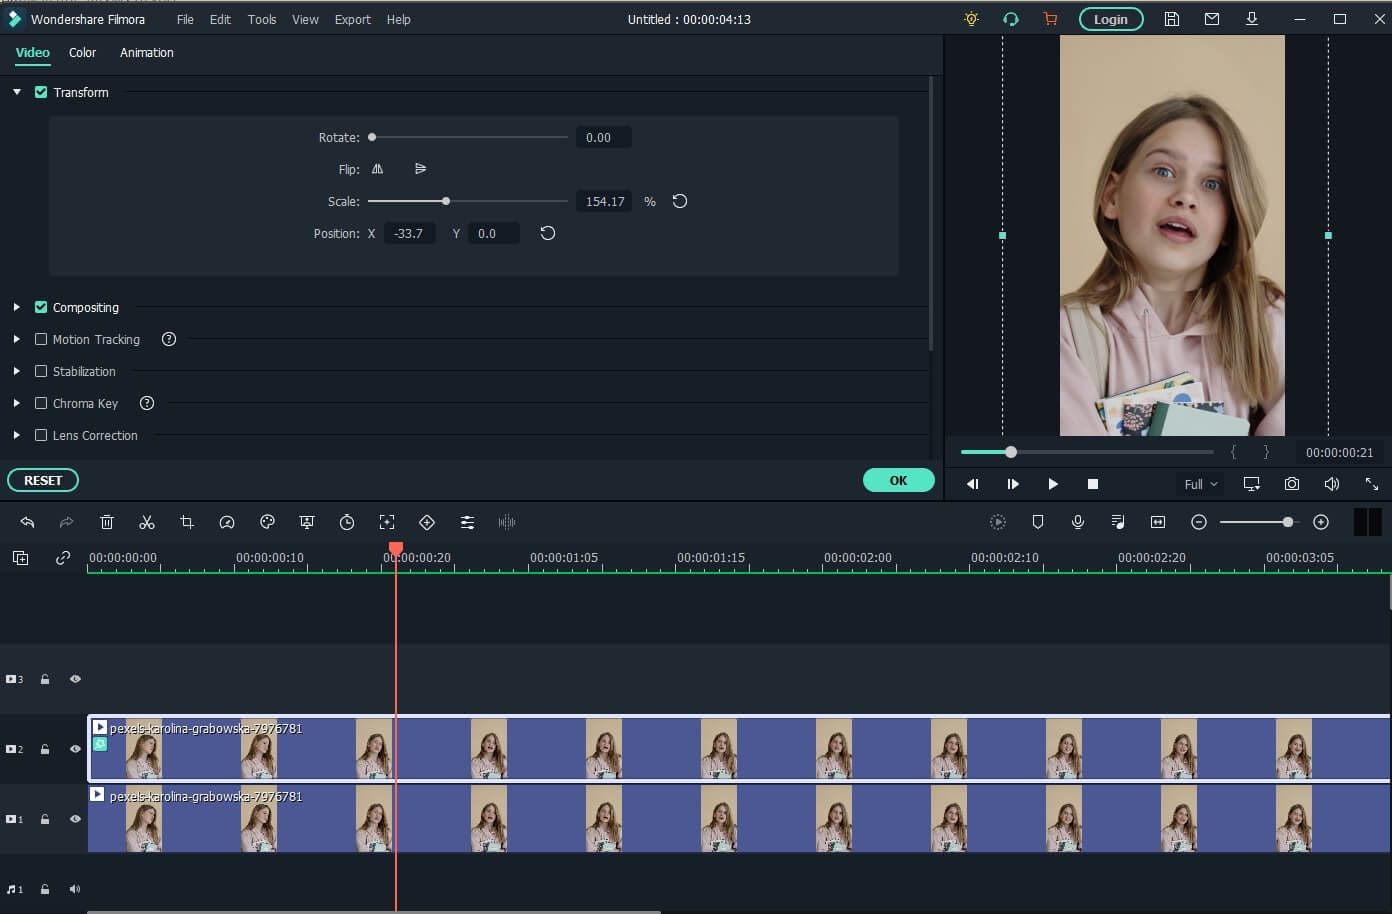
Next, click the video in track 2 again, and then go to the Transform tab, use the Scale slider to adjust the video size to make a big head effect.
Watch the video tutorial below to find out how to use the Image Mask effect to create a video with a big head effect in Filmora.
For Win 7 or later (64-bit)
For macOS 10.12 or later
After creating the video with a big head effect, click the Export button on the screen to save the video on the computer, and then upload it to TikTok from your computer directly.
Conclusion
This article demonstrates the steps you need to take to add the TikTok Big Head filter to your videos. Remember, the Big Head filter is used to make videos more amusing for entertainment purposes.
Not only TikTok, but different apps such as CapCut on Android and Wondershare Filmora on PC can be of great use to you. Especially in Filmora, you get tons of video editing features that unlock your way into the editing world!
02 How to Make a Big Head Effect in CapCut?
03 How to Add Big Head Effect in Filmora Video Editor? [3 Ways]
Part 1: How to Get the Big Head Filter on TikTok?
The TikTok Big Head effect is an extremely entertaining filter. TikTok is a social media platform that specializes in sharing short video content. Its consumer subscription has surpassed Facebook, Instagram, Twitter, and even Snapchat, and its download percentages are much greater than those of the above said social networking sites.
The TikTok Big Head effect on TikTok, on the other hand, was so widespread that it began to be used by more prominent ‘TikTokers.’ Afterward, in a single glance, all users of the social networking in concern began to use it on TikTok live broadcasts. This is how you can use the TikTok Big Head effect:
Step 1: Go to TikTok’s Discover menu to access the Big Head effects.
Step 2: Type “Big Head“ or #bighead into the search bar and choose the top hashtag**_, #bighead_**. Each TikTok video that employs a Big Head filter would then be displayed.
Step 3: To test out a filter, choose one of the numerous videos available and look for the filter’s name in the lower-left corner.
Step 4: Try pressing on the filter’s title, then touch on the Camera icon at the bottom of the display to make a TikTok video employing the Big Head filter in concern.
Here is a detailed video tutorial about how to make a big head effect in TikTok directly.
Part 2: How to Make a Big Head Effect in CapCut?
CapCut is a content creation application that lets users apply various stickers, filters , and effects to their videos. It also has an essential green screen function, a zooming capability that acts like a Ken Burns effect , and many more features.
With the CapCut software, you can quickly enlarge your head in videos. With a single click of the big head effect, your head would instantly become larger than your body. Here’s how to do it step by step:
Step 1: In the CapCut software, create a New Project and then upload a video in which you will enlarge your head.
Step 2: Click the Effects option at the bottom of the display, and then tap the Facial or Body Effects option.
Step 3: Locate and choose the Big Head effect from the Emotions effect section.
Step 4: The big head effect may be modified in speed, range, and intensity. Finally, adjust the duration of the Big head effect to match the video’s length.
You can check the video tutorial below to find out more details in creating big head and small body effect on video with CapCut.
Part 3: How to Add Big Head Effect in Filmora Video Editor? [3 Ways]
Filmora video editor by Wondershare includes the typical overlays, transitions, trimming, as well as the effects that we’ve grown to expect from the enthusiast-level video editor. It features a user-friendly interface that is clean, minimalistic, and dark. If that wasn’t enough, we’re sure you’ll be pleased to learn that the Filmora program can be used to create the TikTok big head effect in several ways.
With all of the characteristics we’ve discussed so far, you may further customize the Big Head effect with various Filmora effects. Let’s show you how:
Launch Filmora and click on the Import tab to select the video file you want to use. And then drag and drop the imported media file onto the timeline panel.
For Win 7 or later (64-bit)
For macOS 10.12 or later
Method 1: Create Big Head with AR Stick Bubble Head Effect in Filmora Video Editor
To add the Big Head effect on Filmora, click on the Effects option and select the AR Stickers option. Type bubble head in the search bar and then you will see it in the screen. Then, drag and drop the AR Stickers Bubble Head effect onto the timeline**,** specifically to the portion of the video where you want to add the Big Head filter on the person. As you do that, you will see a Bubble present on the video.
Besides the bubble head effect, there are many more AR stickers available, such as heart eyes, censor bar, emojis, and big eyes. Download the Filmora video editor now and check it yourself.
For Win 7 or later (64-bit)
For macOS 10.12 or later
Method 2: Add Magnify Effect to Video
In the Effects tab, go to the Recommended category, and then you will see the magnify effect. Drag and drop it to the timeline above the video track, and you will see part of the video has been magnified accordingly.
Now, double click on the effect in the timeline and open the Properties of the magnify effect. From the Properties section, you can adjust the size of the bubble using functions such as the Radius, CenterY, CenterX, Alpha, Zoom rate, etc to get a better video with big head effects.
Note: If you’re unable to locate the Magnify option in the Effects tab, please download and install the latest version of Filmora, and then type “Magnify” in the search bar, and the system will directly take you to where the option is present.
Method 3: Use Mask and Scale to Make a Video with Big Head Effect
Besides adding magnify effects and bubblehead effects, you can also use the mask preset to create a big head effect in Filmora.
Drag and drop the video to video track 1 and video track 2 respectively in Filmora. Then go to the Effect tab, and scroll down to the Utility category, and place the Image Mask effect to the video above. Or, you can type image mask in the search bar to locate it quickly.
Now, double-click the video with the image mask to adjust the properties. Scroll down to the Video Effects field, and you will see the Image Mask. Click the arrow icon to choose a mask preset, adjust its position and size settings to fit the video.
Tips: You can hide the video in track 1 by clicking the eye icon so you can adjust the video with the image mask conveniently. Click it again then you will see the video.
Next, click the video in track 2 again, and then go to the Transform tab, use the Scale slider to adjust the video size to make a big head effect.
Watch the video tutorial below to find out how to use the Image Mask effect to create a video with a big head effect in Filmora.
For Win 7 or later (64-bit)
For macOS 10.12 or later
After creating the video with a big head effect, click the Export button on the screen to save the video on the computer, and then upload it to TikTok from your computer directly.
Conclusion
This article demonstrates the steps you need to take to add the TikTok Big Head filter to your videos. Remember, the Big Head filter is used to make videos more amusing for entertainment purposes.
Not only TikTok, but different apps such as CapCut on Android and Wondershare Filmora on PC can be of great use to you. Especially in Filmora, you get tons of video editing features that unlock your way into the editing world!
Refresh Your TikTok Storytelling with Dynamic Backgrounds
TikTok has dramatically changed the world for digital content creators. It has provided millions of content creators a platform to design and deliver content to influence their followers. TikTok offers state-of-the-art features, such as filters, overlays, and effects to its worldwide customer base. One such feature is the green screen filter that allows changing the background of the TikTok video. Do you want to know more about the green screen in-built feature? If yes, we have got you professionally covered in the guide that will tell you everything about how to change the TikTok video background. Let’s get started.
In this article
01 Change Video Background with Green Screen Effect in TikTok
02 Get a Green Screen Background from Someone’s TikTok
03 Change TikTok Video Background in Filmora [No Green Screen]
Part 1: How to Change TikTok Video Background with Green Screen Effect?
TikTok has a lot to fascinate its users. You will find loads of features that can help you make your video content engaging. Plus, it also facilitates users to polish their content. Hiding or replacing is one of the techniques to enhance the content’s quality. TikTok comes with an in-built filter that lets you change the video background. This is likely to make your video more compelling. Here’s how you can do it by following the simple steps below.
Step 1: Create a new TikTok video
Launch the TikTok application, log in to your account and tap the + button to capture a new video.
Step 2: Open effects and choose the Green Screen option
Select rear or front camera when directed to video recording window. Choose effects at the bottom-right of the screen. From the available options, look for the green screen option and select it.
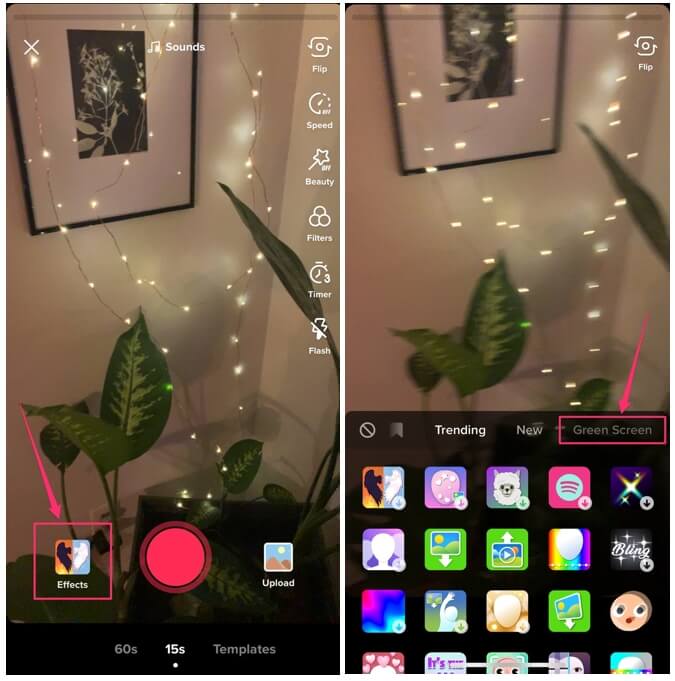
Step 3:: Select the Image to change video background
You can choose any image from your phone’s gallery to utilize it as your background. Once done, hit the Record button to capture video with your customized background.
Note: Apart from selecting your own picture, you can choose from different effects available, including the titled background or AR (augmented reality) features.
Part 2: How to Get a Green Screen Background from Someone’s TikTok?
TikTok recently introduced a fantastic feature to customize or alter your video’s background without even looking for the green screen filter on your own. The “Green Screen Duet Feature.” This feature also lets users apply another person’s video as the background.
Green screens were once only available to those who had access to, well, a green screen. Now the case is different. You can utilize this “Green Screen” feature from the various applications now, allowing you to add a customizable background to your video, and TikTok is one of them. s Various content creators customize their background with effects, a still image, or even a video from their camera roll using the TikTok app.
Imagine scrolling down the TikTok app and finding an eye-catching customized background. Yes! You can utilize it to spice up your videos as well. We have already demonstrated how you can add a green screen effect in TikTok in your videos. But did you also know you can add green screen background from someone else’s video to your TikTok? Even if you didn’t, we have compiled a step-by-step guide that will give you a perfect depiction of how you can pull it off.
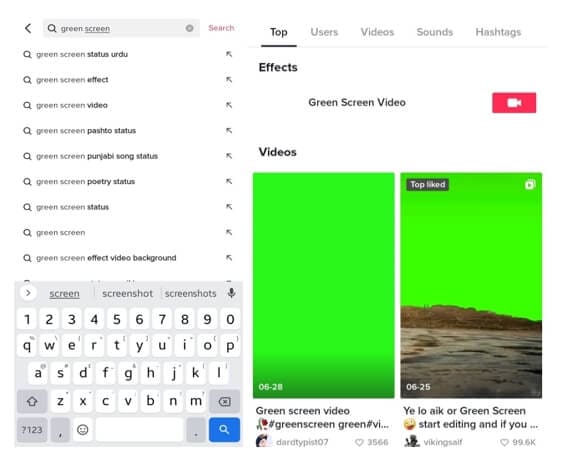
Step 1: Search the Video with Green Screen Effects on TikTok
First and foremost, launch the TikTok app on your phone. Either navigate the video with a green screen effect or type Green Screen in the Search Box to find a video. Open the video and click on the Green Screen Effect in the bottom left of the screen.
Step 2: Make Your Video with the Green Screen Effect
Now, you can record your TikTok video with the green-screen effect used.
Part 3: How to Change TikTok Video Background without Green Screen in Filmora?
For Win 7 or later (64-bit)
For macOS 10.12 or later
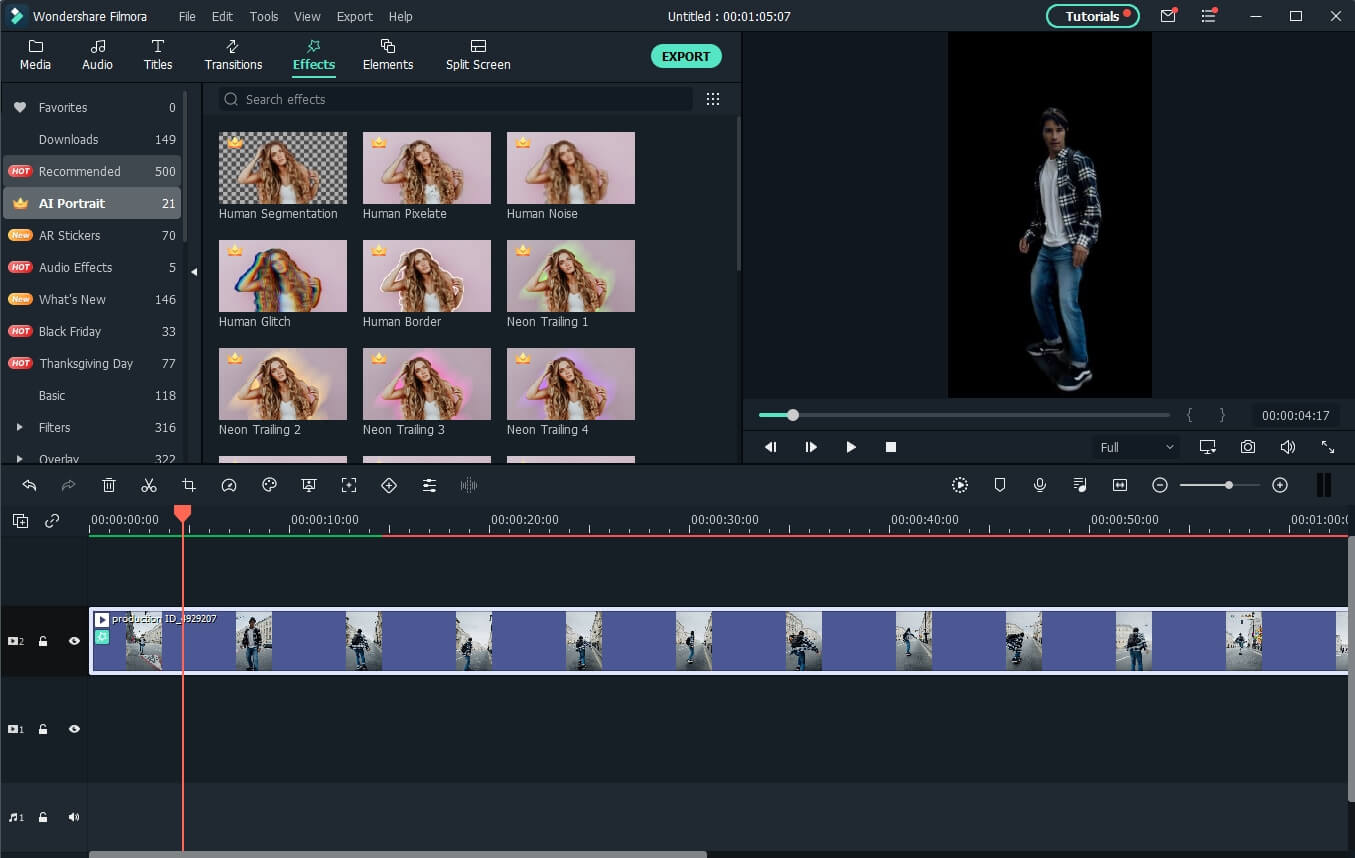
Wondershare Filmora is one of the most popular video editing software among YouTubers. With the latest Auto-Reframe feature, you can create social media videos easier and faster. With Filmora, you can change backgrounds in your videos in various ways, with or without a green screen.
The Human Segmentation effect in Filmora’s AI Portrait lets you eliminate people from a movie’s background instead of using a green screen. It needs a very few mouse clicks, and it works the best when there are people next to the camera.
After you’ve eliminated the background, you’ll be able to see the primary foreground of your video in live time. You can then supplement your actual video with a picture or a background. You can also use the video without the background as an intermediate layer on top of another video. Follow the below steps to change the video background using this feature:
Step 1: Import Video to Timeline
Launch Filmora on your Windows PC or Mac, and then import the video to the timeline by clicking on the File and then Import Media.
Step 2: Apply Human Segmentation
Go to Effects and then select the AI Portrait to see all of the AI Portrait effects. Move the human segmentation effect to the video timeline.
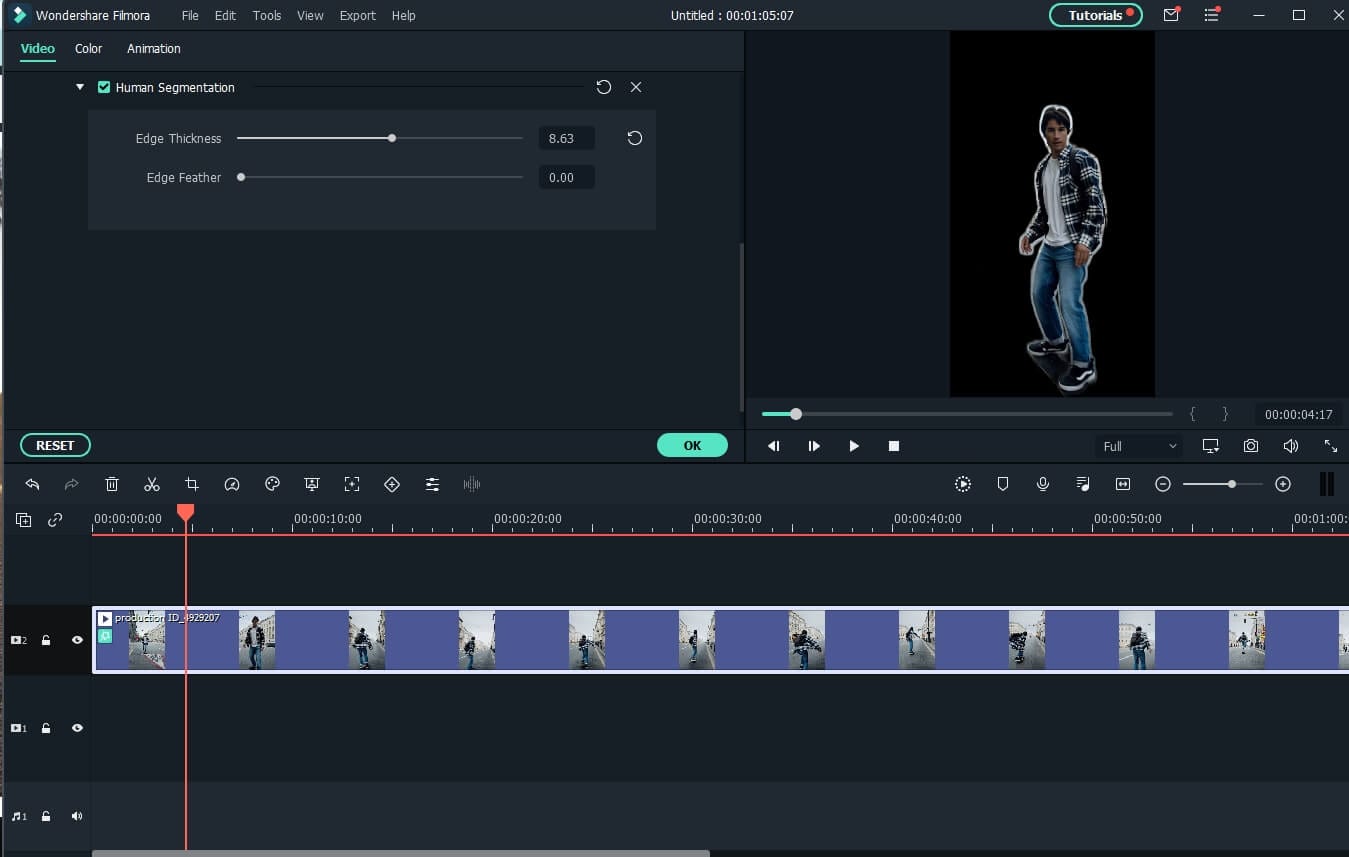
Step 3: Adjust the Effect Setting (Optional)
In the preview window, you’ll notice that the subject has been separated from the video background. If necessary, double-click the video in the timeline and find the video effect field to modify the edge, thickness, and feather. You can also try the neon borders and glowing flow effects under the AI Portrait category to have some fun.
Step 4: Change the Background
Now, drop the background video to the track below the video clip to change the video background.
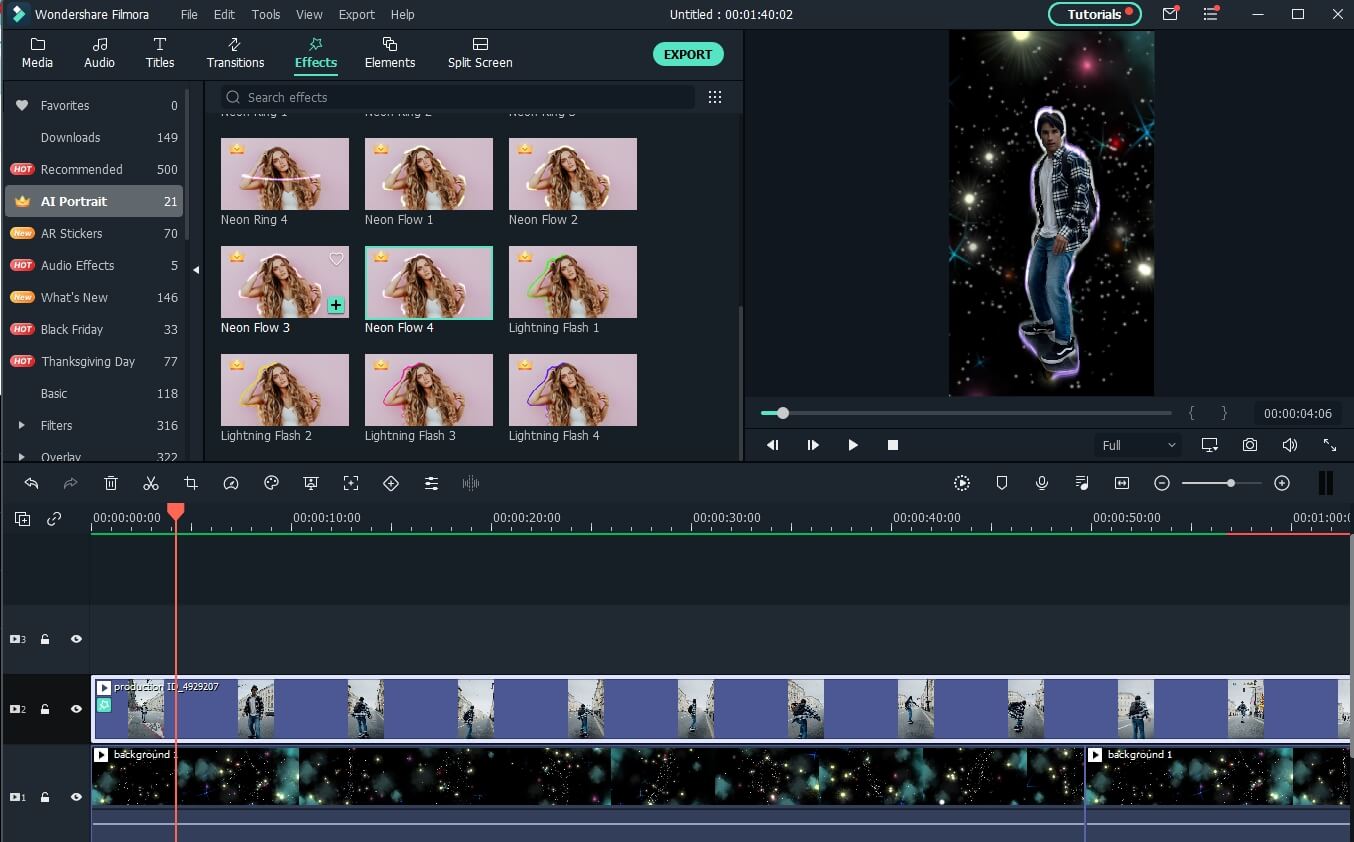
Step 5: Export the video with new background
Preview the final result and then click the Export button to save the video on your computer.
Note: Check this guide to find out how to upload TikTok videos on your desktop
Conclusion
To lure the viewer’s attention, there is always a necessity to create visual and audio effects in a TikTok video. A TikTok video maker may not always have the privilege of the ideal location and surroundings to make a video stand out in the vast online market. A simple way out is to use software-based simulation, which means replacing the video background with the required one rather than the original. After reading the article, we hope that you don’t have any concerns about how to change the TikTok video background.
02 Get a Green Screen Background from Someone’s TikTok
03 Change TikTok Video Background in Filmora [No Green Screen]
Part 1: How to Change TikTok Video Background with Green Screen Effect?
TikTok has a lot to fascinate its users. You will find loads of features that can help you make your video content engaging. Plus, it also facilitates users to polish their content. Hiding or replacing is one of the techniques to enhance the content’s quality. TikTok comes with an in-built filter that lets you change the video background. This is likely to make your video more compelling. Here’s how you can do it by following the simple steps below.
Step 1: Create a new TikTok video
Launch the TikTok application, log in to your account and tap the + button to capture a new video.
Step 2: Open effects and choose the Green Screen option
Select rear or front camera when directed to video recording window. Choose effects at the bottom-right of the screen. From the available options, look for the green screen option and select it.
Step 3:: Select the Image to change video background
You can choose any image from your phone’s gallery to utilize it as your background. Once done, hit the Record button to capture video with your customized background.
Note: Apart from selecting your own picture, you can choose from different effects available, including the titled background or AR (augmented reality) features.
Part 2: How to Get a Green Screen Background from Someone’s TikTok?
TikTok recently introduced a fantastic feature to customize or alter your video’s background without even looking for the green screen filter on your own. The “Green Screen Duet Feature.” This feature also lets users apply another person’s video as the background.
Green screens were once only available to those who had access to, well, a green screen. Now the case is different. You can utilize this “Green Screen” feature from the various applications now, allowing you to add a customizable background to your video, and TikTok is one of them. s Various content creators customize their background with effects, a still image, or even a video from their camera roll using the TikTok app.
Imagine scrolling down the TikTok app and finding an eye-catching customized background. Yes! You can utilize it to spice up your videos as well. We have already demonstrated how you can add a green screen effect in TikTok in your videos. But did you also know you can add green screen background from someone else’s video to your TikTok? Even if you didn’t, we have compiled a step-by-step guide that will give you a perfect depiction of how you can pull it off.
Step 1: Search the Video with Green Screen Effects on TikTok
First and foremost, launch the TikTok app on your phone. Either navigate the video with a green screen effect or type Green Screen in the Search Box to find a video. Open the video and click on the Green Screen Effect in the bottom left of the screen.
Step 2: Make Your Video with the Green Screen Effect
Now, you can record your TikTok video with the green-screen effect used.
Part 3: How to Change TikTok Video Background without Green Screen in Filmora?
For Win 7 or later (64-bit)
For macOS 10.12 or later
Wondershare Filmora is one of the most popular video editing software among YouTubers. With the latest Auto-Reframe feature, you can create social media videos easier and faster. With Filmora, you can change backgrounds in your videos in various ways, with or without a green screen.
The Human Segmentation effect in Filmora’s AI Portrait lets you eliminate people from a movie’s background instead of using a green screen. It needs a very few mouse clicks, and it works the best when there are people next to the camera.
After you’ve eliminated the background, you’ll be able to see the primary foreground of your video in live time. You can then supplement your actual video with a picture or a background. You can also use the video without the background as an intermediate layer on top of another video. Follow the below steps to change the video background using this feature:
Step 1: Import Video to Timeline
Launch Filmora on your Windows PC or Mac, and then import the video to the timeline by clicking on the File and then Import Media.
Step 2: Apply Human Segmentation
Go to Effects and then select the AI Portrait to see all of the AI Portrait effects. Move the human segmentation effect to the video timeline.
Step 3: Adjust the Effect Setting (Optional)
In the preview window, you’ll notice that the subject has been separated from the video background. If necessary, double-click the video in the timeline and find the video effect field to modify the edge, thickness, and feather. You can also try the neon borders and glowing flow effects under the AI Portrait category to have some fun.
Step 4: Change the Background
Now, drop the background video to the track below the video clip to change the video background.
Step 5: Export the video with new background
Preview the final result and then click the Export button to save the video on your computer.
Note: Check this guide to find out how to upload TikTok videos on your desktop
Conclusion
To lure the viewer’s attention, there is always a necessity to create visual and audio effects in a TikTok video. A TikTok video maker may not always have the privilege of the ideal location and surroundings to make a video stand out in the vast online market. A simple way out is to use software-based simulation, which means replacing the video background with the required one rather than the original. After reading the article, we hope that you don’t have any concerns about how to change the TikTok video background.
Also read:
- [New] In 2024, Elevating Your Presence on TikTok Essential 7 Must-Haves
- [Updated] 2024 Approved The Exciting Spectrum of TikTok Music, Dance and Humor
- In 2024, 15 Influential TikTokers Breaking Limits and Inspiring All
- [New] 2024 Approved Comprehensive TikTok Video Upload Strategies for Chrome, Android, and iOS Users
- Jumpstart Your TikTok Presence with These 30 Standout Nicknames for 2024
- [New] A Guide to TikTok's PFP Acronym Explained for 2024
- [Updated] The Beginner's Guide to Perfecting Slow Motion Videos on TikTok for 2024
- In 2024, Crafting Memes Magic Transform Your TikToks Into GIFs
- [New] Unexpected TikTok Rewind – Recover Lost Posts Easily, In 2024
- [Updated] In 2024, Unraveling the Mystery of a Frozen TikTok App on Chrome
- Hilarity Hub Spotlighting Top Comedy Stars and Their Influence on TikTok
- [New] Social Media Riches Joining the Elite of TikTok Creators for 2024
- [New] Effortless iPhone Downloading TikTok Vids Without Markers for 2024
- [Updated] 2024 Approved 8 Must-Have TikTok Tools to Boost Your Growth
- [New] 2024 Approved Direct to the Bottom of the Feed, No Watermark on iPhone
- Android + Mac How to Archive Your Snap Videos
- [Updated] Unleash Your TikTok Potential 50+ Powerful Quotes Reviewed
- In 2024, Dance Away Stress The Most Popular Country Tunes (TikTok Edition)
- [Updated] TikTok App Not Loading on Chrome? Troubleshoot Now for 2024
- [New] 2024 Approved The Right Way to Increase Your TikTok Followers Safely
- [Updated] In 2024, Viral Victory Top 10 Triumphant TikTok Struggles
- In 2024, Expert Tips for Flawless Voice Alteration on TikTok
- [Updated] Step-By-Step Strategies for Creating Stunning Slow Movement Content for 2024
- In 2024, The Leading Analytics Solutions for a Thriving TikTok Presence
- In 2024, Navigating Away From TikTok's Silent Ban
- [New] In 2024, Be a Part of the Buzz Top 10 TikTok Tests
- [Updated] Top Income Estimator Apps for TikTok Content Makers for 2024
- Dance Dynamics The Viral TikTok Step-by-Step
- [New] By Accident, TikTok Rewind Restore Lost Content, In 2024
- [Updated] 2024 Approved Elevate Your Exposure Top Biographical Strategies to Triple Your Following Power in the TikTok-Filmora Realm
- [New] In 2024, The Essential Guide to Win-Compatible TikTok Editing Software
- [New] In 2024, Effortlessly Export TikTok Vids as Premium MP4 Files
- [Updated] In 2024, The Strategy for Flawless Selfies on TikTok, Repeatedly
- The Ultimate Guide to Boosting TikTok Engagement with Essential Apps
- Harnessing Viral Power Marketing for Profit on TikTok
- [New] In 2024, Food Frenzy on TikTok 15 Recipe Hits Worth a Try
- [Updated] Mastering Slow Motion on TikTok A Step-by-Step Guide for 2024
- [New] Relaxation Playlist 20 Sweetest Country Tunes on TikTok
- Best 10 TikTok Tools for Professional Video Makers (PC)
- [New] In 2024, Skyrocket Views Unique TikTok Bio Formats to Triple Your Followers on Filmora
- [Updated] 2024 Approved Optimizing Content Creation on TikTok Incorporating Siri Speech Functions
- [New] 2024 Approved Leading 10 Innovative TikTok Filters Boosting Visibility
- [Updated] Crafting a Distinctive Image with Creative Personal Frames on TikTok
- [New] TikTok Video Sync Chrome, Android & iOS Integration Techniques for 2024
- [Updated] In 2024, The Artisan's Approach to Crafting Compelling TikTok Videos
- [New] 2024 Approved Top TikTok Chefs & Culinary Stars
- [New] Discovering the World of TikTok Anime Celebrating Creativity in Motion and Sound
- In 2024, Misplaced TikTok Redownload – What Are My Options?
- [Updated] 2024 Approved How to Profit on TikTok The 8 Essential Steps You Need
- Rhyme Capsules Shortcuts to Today's Viral Rapping Beats for 2024
- A Comparative Review of Top 6 Chrome Devices Offering Advanced Voice Manipulation Features - FilmMagicWorkshop
- The Easiest Methods to Hard Reset Xiaomi Redmi 13C 5G | Dr.fone
- 2024 Approved Record Like a Pro 10 Best Free Music Production Software
- [New] Unveiling WinTV Magic Compre Written Guide to Capturing Live on Windows PC for 2024
- 2024 Approved Convert PPT to Motion Picture
- [New] In 2024, Securing Your Games with Diverse Screen Capture Options
- 11 Proven Solutions to Fix Google Play Store Not Working Issue on Itel A05s | Dr.fone
- Why Your Vivo V27 Screen Might be Unresponsive and How to Fix It | Dr.fone
- [New] How to Archive Your Minecraft Sessions on a Mac Computer for 2024
- How to Upgrade iPhone 14 Plus without iTunes? | Dr.fone
- In 2024, The Art of Muting Background Sounds in Skype
- [Updated] In 2024, Smart, Eco-Friendly Screen Tech Compilation
- Updated 2024 Approved Audio Delight Index Pinpointing Sources of Mirthful Melodies
- In 2024, Do You Waste Time Making Transparent Background in Paint
- In 2024, Apple ID Locked or Disabled On iPhone 13 mini? 7 Mehtods You Cant-Miss
- How to Use Life360 on Windows PC For Motorola Moto G84 5G? | Dr.fone
- Rise Above the Rest Enhancing Speech Clarity and Volume with Filmora
- 2024 Approved Innovative Ways to Use Your Webcam
- [Updated] 2024 Approved Odin’s Children Ragnarok’s Reign
- New 2024 Approved How to Make an Adobe Slideshow the Easy Way
- 2024 Approved Easy Guide Screen Snapshots in Windows (Free Tutorials)
- Updated In 2024, Advanced Video Editing Made Easy Adobe Premiere Pro on Mac
- Repair Video Tool - Repair all your damaged video files of Oppo on Mac
- 2024 Approved Seamless Change of Screen Capture Types on MacOS
- [New] 2024 Approved Tackle Intermittent FB Reels Display
- In 2024, 6 Ways to Change Spotify Location On Your Itel A60 | Dr.fone
- New AVS Video Editor Software Review Pros, Cons, and Verdict for 2024
- Updated 2024 Approved Searching for Dynamic Echoes From Breaking Containers
- [New] In 2024, Leveraging Edits to Captivate Audiences on Instagram
- In 2024, Next-Gen Screen Capture Unleashed Apeaksoft’s 2023 Review
- Fix Cant Take Screenshot Due to Security Policy on Realme C51 | Dr.fone
- How to Fix My Samsung Galaxy S23 FE Location Is Wrong | Dr.fone
- How To Reset iPhone 12 Pro Max? | Dr.fone
- [Updated] In 2024, Mac's Leading 10 Screen Capture & Recorder Software
- New In 2024, Top 10 Free Animated Logo Creators Boost Your Brand
- Android Screen Stuck General Tecno Spark 10 Pro Partly Screen Unresponsive | Dr.fone
- [New] Elevate Your Farm Adventure Uncovering Stardew's Top 7 Mods for 2024
- Updated In 2024, Audiovisual Enhancement for a Robust Audio Presence in Filmora
- Title: [New] Tips to Inject Oversized Characters Into TikToks
- Author: Brian
- Created at : 2024-05-23 14:18:28
- Updated at : 2024-05-24 14:18:28
- Link: https://tiktok-videos.techidaily.com/new-tips-to-inject-oversized-characters-into-tiktoks/
- License: This work is licensed under CC BY-NC-SA 4.0.
