
:max_bytes(150000):strip_icc()/handstypingonkeyboardCROPPED-6b13200ac0d24ef58817343cc4975ebd.jpg)
"Snapchat Speed Control A Detailed Walkthrough"
Snapchat Speed Control: A Detailed Walkthrough
Snapchat is an instant messaging app that allows you to share your pictures and videos with your family members, friends, and colleagues. In addition, you can even create your stories in the form of movie clips and share them on the app. These stories remain available for the next 24 hours, after which they are automatically removed from the platform.
While sharing the videos, you can apply several filters that are already present in the app, and Slow Motion is one of them. You may want to learn how to slow down a video on Snapchat when you want to emphasize and draw viewers’ attention toward the scene, or wish to make the audience see your actions closely and in detail.
That said, in the following sections, you will see how to slow down videos on Snapchat, and what other methods you can use to reduce the playback speed more professionally.
In this article
01 How to Add Slow Motion Effects to Video Using the Snapchat App
02 How to Record a Slo-Mo Video and Upload to Snapchat
03 How to Make Flash and Smooth Slo Mo Video for Snapchat
04 FAQs about Slowing Down Snapchat Video
Part 1: How to Add Slow Motion Effects to Video Using the Snapchat App
Snapchat has a built-in Slow Motion filter that reduces the playback speed of a video when applied. You can learn how to slow down on Snapchat by following the instructions that are given below:
Step 1: Record a Video
Launch Snapchat on your smartphone (iPhone 13 Pro Max is used here for illustrations), make sure that the Camera section is selected from the bottom, tap and hold down the Capture button that is present at the lower part of the interface, and let go of it when you are done recording.

Step 2: Apply the Slow Motion Filter
Once the video is recorded, swipe the screen from left to right. Repeat this process until you see the Snail (Slow Motion) icon on the screen. This will reduce the playback speed of the clip.

Step 3: Decorate the Video (Optional)
Use the options present on the upper-right area of the screen to further decorate the video and/or add annotations to it.

Step 4: Share or Publish the Video
Once everything is done, tap Send To from the bottom-right corner to share the video with your family, friends, and colleagues, or publish it as a story that remains available for the next 24 hours.
Related: How to Record Slo-Mo videos on iPhone .
Part 2: How to Record a Slo-Mo Video and Upload to Snapchat
With Snapchat, even though you don’t require any third-party tool to reduce the playback speed of a video, the app has certain limitations. For example, it doesn’t allow you to set a zoom level, you are stuck with the framerate that the app has to offer, etc.
Because of this, many people prefer to use different methods to record a video in slow motion with their preferences, and then upload it to Snapchat. This approach also eliminates the need to swipe the screen several times merely to use a single slow-motion filter.
Fortunately, iPhone has a built-in SLO-MO mode in its Camera app that allows you to capture the videos in slow motion. To learn how to do slow mo on Snapchat with the iPhone’s Camera app, you can follow the instructions that are given below:
Step 1: Get to the iPhone’s SLO-MO Mode
Launch the Camera app on your iPhone (iPhone 13 Pro Max is used here for illustrations), and swipe the screen from left to right until you get to the SLO-MO mode.

Step 2: Set Recording Preferences
Tap the number that is present at the top-right corner (240 here) to toggle between different framerates, tap 1x from the lower-center area, swipe slightly up, and then use the wheel that appears next to define your preferred zoom level.

Step 3: Start and Stop the Recording
Tap the Record button to start the recording, and tap Stop when you’re done.
Note: Make sure that the duration of the recorded video doesn’t exceed 60 seconds.
Step 4: Upload the Slow-Motion Video to Snapchat
After the video is recorded in slow motion, close the Camera app, launch Snapchat, and tap the Gallery icon from the left side of the Capture button on the Camera section. From the Memories screen, go to the Camera Roll tab, and tap to select the video that you recorded in the previous step.
Next, optionally, tap the Edit icon from the bottom-left corner to decorate the video and/or add annotations to it, and follow the process as explained in the previous section to share the clip with your family, friends, or colleagues, or publish it as your story.

Part 3: How to Make Flash and Smooth Slo Mo Video for Snapchat
Although iPhone has the built-in SLO-MO mode that even enables you to set your preferred framerate and zoom level before recording, it still doesn’t allow you to slow down different parts of a video in different speed at your convenience. You can either record the entire video in slow motion or at a normal speed.
This is where a third-party app comes into play. While there are several video editing programs available online, the one of the best slow motion apps that helps you slow down the portions of a video with precision is CapCut.
Downloading and installing CapCut on your iPhone or Android phone is simple, and once it is done, you can follow the process given below to learn how to slow things down on Snapchat:
With CapCut, you can either slow down the whole clip or manage the speed for different segments. This section explains both methods.
Method 1: Slow Down the Whole Clip with CapCut
Step 1: Get to the Speed Panel
Launch CapCut, import the video that you want to slow down, and tap the imported media in the Timeline. Next, tap Speed from the bottom of the interface to get to the next window.

Step 2: Reduce the Speed of the Video
Tap Normal from the bottom of the screen that appears next, and drag the Speed slider to the left to reduce the playback speed. Tap OK from the bottom-right corner to save the changes.

Step 3: Upload the Video to Snapchat
Back on the previous interface, optionally tap Volume from the bottom and reduce the slider to 0 to mute the audio of the footage as it may get distorted due to the reduction in the speed.
Next, tap Share from the top-right corner to save the video on your iPhone, and then use the method explained in the previous section to access the clip from the Gallery within Snapchat for uploading.
Method 2: Reduce the Playback Speed of Different Parts of a Video
Step 1: Get to the Speed Panel
Use the process described in the previous method to get to the Speed panel.
Step 2: Reduce the Speed of Different Parts of the Video
Tap Curve from the bottom of the interface. On the next screen, tap Custom from the lower area, and then tap Edit. From the next panel, drag the beat points down to reduce the speed (or drag them above the line to increase).

Notice that each beat point represents a particular section of the video, and dragging it down reduces the playback speed of that segment. You can even tap anywhere on the line to add a new beat point and drag it down as needed for more precise speed management. Once done, tap OK from the bottom-right corner to save the modifications.

Optionally, you can also tap any of the available presets on the Curve screen to reduce the playback speed of the video accordingly.
Step 3: Upload the Video to Snapchat
Use the method explained in the previous method to export the video, upload it to Snapchat, and share the clip with your family, friends, and colleagues, or publish it as your story.
Part 4: FAQs about Slowing Down Snapchat Video
1. Can I record a slow mo video in Snapchat?
Technically speaking, no, you cannot. However, once you have recorded a video at a normal speed in Snapchat, you can apply the built-in Slow Motion filter to it by swiping the screen from left to right until you see the Snail icon at the center. The Snail icon represents the Slow Motion filter that reduces the playback speed when applied.
2. Besides slow-motion, which speed filters does Snapchat have?
In addition to slow motion Snapchat also has Forward and Fast Forward filters that increase the playback speed. While the Forward filter increases the speed slightly, the Fast Forward one enhances it drastically.
Conclusion
When using an iPhone, even though the SLO-MO mode enables you to record footage in slow motion, you don’t get many options. Therefore, it would be safe to say that it is easy to slow down the speed of a video if you have a dedicated third-party post-production app. However, if you want to go for a convenient method, learning how to slow down a video on Snapchat is an extremely simple and straightforward process.
02 How to Record a Slo-Mo Video and Upload to Snapchat
03 How to Make Flash and Smooth Slo Mo Video for Snapchat
04 FAQs about Slowing Down Snapchat Video
Part 1: How to Add Slow Motion Effects to Video Using the Snapchat App
Snapchat has a built-in Slow Motion filter that reduces the playback speed of a video when applied. You can learn how to slow down on Snapchat by following the instructions that are given below:
Step 1: Record a Video
Launch Snapchat on your smartphone (iPhone 13 Pro Max is used here for illustrations), make sure that the Camera section is selected from the bottom, tap and hold down the Capture button that is present at the lower part of the interface, and let go of it when you are done recording.
Step 2: Apply the Slow Motion Filter
Once the video is recorded, swipe the screen from left to right. Repeat this process until you see the Snail (Slow Motion) icon on the screen. This will reduce the playback speed of the clip.
Step 3: Decorate the Video (Optional)
Use the options present on the upper-right area of the screen to further decorate the video and/or add annotations to it.
Step 4: Share or Publish the Video
Once everything is done, tap Send To from the bottom-right corner to share the video with your family, friends, and colleagues, or publish it as a story that remains available for the next 24 hours.
Related: How to Record Slo-Mo videos on iPhone .
Part 2: How to Record a Slo-Mo Video and Upload to Snapchat
With Snapchat, even though you don’t require any third-party tool to reduce the playback speed of a video, the app has certain limitations. For example, it doesn’t allow you to set a zoom level, you are stuck with the framerate that the app has to offer, etc.
Because of this, many people prefer to use different methods to record a video in slow motion with their preferences, and then upload it to Snapchat. This approach also eliminates the need to swipe the screen several times merely to use a single slow-motion filter.
Fortunately, iPhone has a built-in SLO-MO mode in its Camera app that allows you to capture the videos in slow motion. To learn how to do slow mo on Snapchat with the iPhone’s Camera app, you can follow the instructions that are given below:
Step 1: Get to the iPhone’s SLO-MO Mode
Launch the Camera app on your iPhone (iPhone 13 Pro Max is used here for illustrations), and swipe the screen from left to right until you get to the SLO-MO mode.
Step 2: Set Recording Preferences
Tap the number that is present at the top-right corner (240 here) to toggle between different framerates, tap 1x from the lower-center area, swipe slightly up, and then use the wheel that appears next to define your preferred zoom level.
Step 3: Start and Stop the Recording
Tap the Record button to start the recording, and tap Stop when you’re done.
Note: Make sure that the duration of the recorded video doesn’t exceed 60 seconds.
Step 4: Upload the Slow-Motion Video to Snapchat
After the video is recorded in slow motion, close the Camera app, launch Snapchat, and tap the Gallery icon from the left side of the Capture button on the Camera section. From the Memories screen, go to the Camera Roll tab, and tap to select the video that you recorded in the previous step.
Next, optionally, tap the Edit icon from the bottom-left corner to decorate the video and/or add annotations to it, and follow the process as explained in the previous section to share the clip with your family, friends, or colleagues, or publish it as your story.
Part 3: How to Make Flash and Smooth Slo Mo Video for Snapchat
Although iPhone has the built-in SLO-MO mode that even enables you to set your preferred framerate and zoom level before recording, it still doesn’t allow you to slow down different parts of a video in different speed at your convenience. You can either record the entire video in slow motion or at a normal speed.
This is where a third-party app comes into play. While there are several video editing programs available online, the one of the best slow motion apps that helps you slow down the portions of a video with precision is CapCut.
Downloading and installing CapCut on your iPhone or Android phone is simple, and once it is done, you can follow the process given below to learn how to slow things down on Snapchat:
With CapCut, you can either slow down the whole clip or manage the speed for different segments. This section explains both methods.
Method 1: Slow Down the Whole Clip with CapCut
Step 1: Get to the Speed Panel
Launch CapCut, import the video that you want to slow down, and tap the imported media in the Timeline. Next, tap Speed from the bottom of the interface to get to the next window.
Step 2: Reduce the Speed of the Video
Tap Normal from the bottom of the screen that appears next, and drag the Speed slider to the left to reduce the playback speed. Tap OK from the bottom-right corner to save the changes.
Step 3: Upload the Video to Snapchat
Back on the previous interface, optionally tap Volume from the bottom and reduce the slider to 0 to mute the audio of the footage as it may get distorted due to the reduction in the speed.
Next, tap Share from the top-right corner to save the video on your iPhone, and then use the method explained in the previous section to access the clip from the Gallery within Snapchat for uploading.
Method 2: Reduce the Playback Speed of Different Parts of a Video
Step 1: Get to the Speed Panel
Use the process described in the previous method to get to the Speed panel.
Step 2: Reduce the Speed of Different Parts of the Video
Tap Curve from the bottom of the interface. On the next screen, tap Custom from the lower area, and then tap Edit. From the next panel, drag the beat points down to reduce the speed (or drag them above the line to increase).
Notice that each beat point represents a particular section of the video, and dragging it down reduces the playback speed of that segment. You can even tap anywhere on the line to add a new beat point and drag it down as needed for more precise speed management. Once done, tap OK from the bottom-right corner to save the modifications.
Optionally, you can also tap any of the available presets on the Curve screen to reduce the playback speed of the video accordingly.
Step 3: Upload the Video to Snapchat
Use the method explained in the previous method to export the video, upload it to Snapchat, and share the clip with your family, friends, and colleagues, or publish it as your story.
Part 4: FAQs about Slowing Down Snapchat Video
1. Can I record a slow mo video in Snapchat?
Technically speaking, no, you cannot. However, once you have recorded a video at a normal speed in Snapchat, you can apply the built-in Slow Motion filter to it by swiping the screen from left to right until you see the Snail icon at the center. The Snail icon represents the Slow Motion filter that reduces the playback speed when applied.
2. Besides slow-motion, which speed filters does Snapchat have?
In addition to slow motion Snapchat also has Forward and Fast Forward filters that increase the playback speed. While the Forward filter increases the speed slightly, the Fast Forward one enhances it drastically.
Conclusion
When using an iPhone, even though the SLO-MO mode enables you to record footage in slow motion, you don’t get many options. Therefore, it would be safe to say that it is easy to slow down the speed of a video if you have a dedicated third-party post-production app. However, if you want to go for a convenient method, learning how to slow down a video on Snapchat is an extremely simple and straightforward process.
Crafting Moments of Happiness: Animated Filters on Your Phone
How to Use Cartoon Face Lens in Snapchat?

Shanoon Cox
Mar 27, 2024• Proven solutions
The social media apps keep updating themselves and always keep their users thrilled and engaged with the new updates. People love to take selfies, and how exciting it would be, if the selfie turns into Disney and Pixar-style cartoon characters?
Back in 2020, Snapchat released the lens for Disney. Initially, it was tried on pets by the TikTok users, and people loved it. Later, looking to the response on the Disney lens, Snapchat released another filter as Voila AI Artist. Send a snap with the cartoon face lens to get the best response on your click. Also, the Snapchat cartoon face filter is so much famous on Instagram and Facebook.
Is your cellphone camera not good enough? Are you worried about that? You don’t need to now, as the Snapchat lens would help you get various lenses and filters to give you the best clicks. Try out the best lens which you love and get the best images.
Please don’t go away; here, we will get to know about the Snapchat cartoon filter.
- Part 1: What is Snapchat’s Cartoon Lens?
- Part 2: How to Find and Use Snapchat’s Cartoon Lenses?
- Part 3: How to Send a Snap Using the Cartoon Face Lens?
- Part 4: Best App for Disney and Pixal Effect
- Part 5: Differences between Snapchat Cartoon Lens and Anime Filter
Part 1: What is Snapchat’s Cartoon Lens?
Snapchat always keeps on giving the surprise to their users and maintain the selfie crazy on the social media. There are three types of the cartoon lens which is attracting the users and is the latest trend.
- Snapchat Cartoon face Lens - developed and launched way back in August 2020
- Snapchat Cartoon Lens – Quite similar to the Cartoon Face, but the most fantastic thing is it converts your face to a Disney-style character.
- Snapchat Cartoon 3D Style Lens: The most famous Cartoon 3D Style was launched in June 2021 with a Pixar-like funny appearance. Couples love this the most.
Part 2: How to Find and Use Snapchat’s Cartoon Lenses?
Snapchat allows you to use the cartoon lens and send a snap with the cartoon face lens. Ensure you have good internet to get the Snapchat installed first and follow below easy steps below to get your favorite cartoon selfie.
- Open the latest version of Snapchat, and then go to the Camera screen, opt for the smiling face icon as per below.
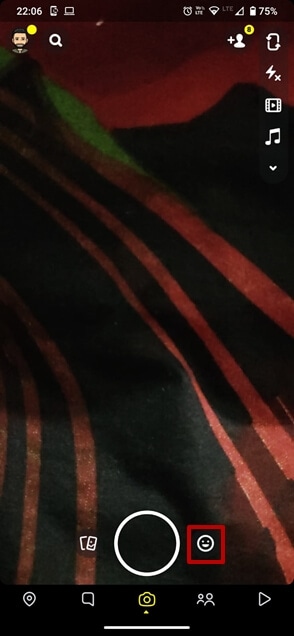
- You need to get to the cartoon lens and hence, click “explore” from the bottom right of the screen.
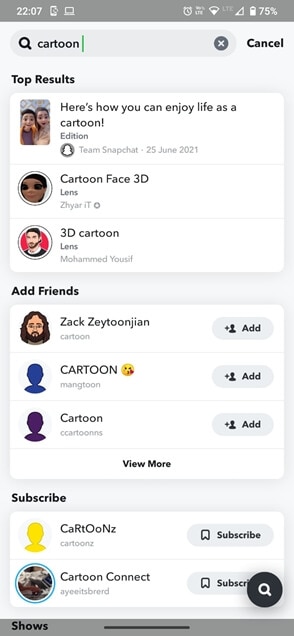
- There are a lot of options and lens; therefore, search for the “cartoon” word. Since there are many cartoon lens, make sure that you have selected the right one developed by Snapchat team. Of course, you can try the cartoon lens created by other creators.
That’s it. You are done. The wait is over. Push the camera button and start taking your video with Snapchat cartoon filter.
Still, if you face difficulty getting the lens for yourself, this link will help you download the cartoon lens and enjoy your video. Further, you can save it or send the stories to your friends. Using the funny lens was never so easy and is so much fun.
Part 3: How to Send a Snap Using the Cartoon Face Lens?
From the above points, you now might know how to get the cartoon lens on the screen. Take the image and video that would make you happy. And now you will be excited to know how it is from your family or friends by sending them the cartoon face Snapchat. But have you added your friends or family members as friends? Make sure to add them to your list or the group, allowing you to send the snap.
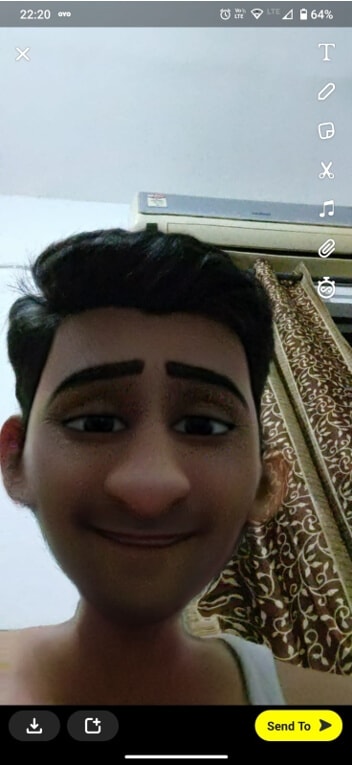
Once you take your snap, click the Send to option on the bottom of the screen to send the snap. Now you will see the list of your added friends or the groups. Tap the friend whom you want to send the snap and tap send.
Your snap has now reached your friends, and you can develop a streak with them. If you send a snap with the cartoon face lens daily to your friends, it will create a specific chain referred to as streak. You can make the streak with them for as long as you can, which means you need to use Snapchat daily. More friends, more fun. The different groups would allow you to stay in touch with more people, and also, you can share the snap with them at one go.
Part 4: Best App for for Disney and Pixal Eeffect
Snapchat is one of the most famous apps which allows the users to take the snap, exchange pictures, and the videos. The Disney Pixar Filter is exclusive on Snapchat. Though you find many similar apps copying the Snapchat filters, the original seems beautiful. You can search the Snapchat cartoon filter 3D style from the search options. Select the filer and click amazing pictures.
Voila Al Artist Carton Photo turns the image into the fantastic pictures of Disney and the Pixal effects. This is the best app giving the Disney and pixal effect specially designed with the help of human capability and artificial intelligence. You can easily take selfies, pictures, and videos with a unique look. If you have the version of 12.0 and Later on iOS , you can easily use this app and click amazing images. Moreover, it only requires 273.6 MB of storage space on iOS.
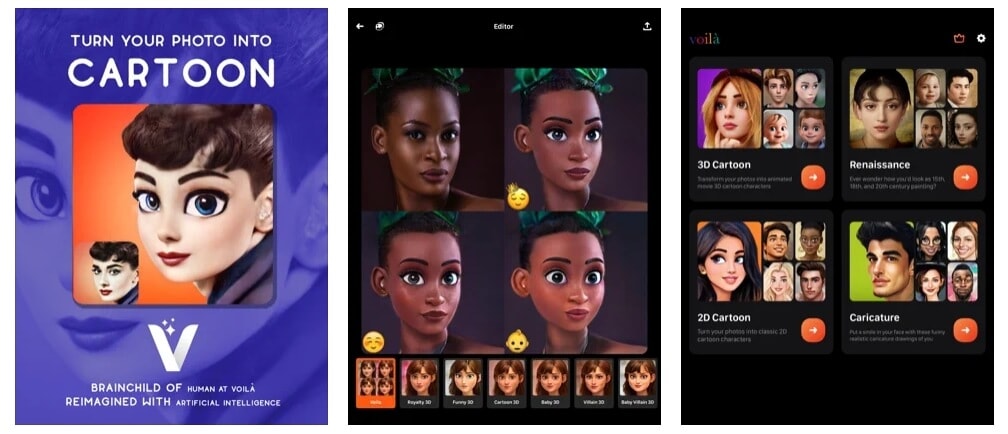
Voila Al Artist is also available on Android , quickly turning the images into cartoon replicas of faces. You can never get tired of this photo app as there are many themes available in the app which can increase your excitement.
The best thing about the Voila Al Artist app is, you can get the app for free. You can use the app on any version of Android. It doesn’t matter if your camera lens is not that good and equipped with high pixels; the Voila Al Artist photo app will make your day with unique photos. If you get tired of the advertisement, you can go for the subscription and enjoy the cartoon selfies.
Part 5: What are the differences between Snapchat Cartoon Lens and Anime Filters ?
Essentially, the difference between a filter and a lens is that the lens is an augmented reality animation, while the filter is a static image overlay.
To Distinguish the difference between Snapchat filters and lenses: Snapchat filters are static and located on top of images or videos. On the other hand, Snapchat lenses are augmented reality animations that can change your voice in addition to changing your appearance on the screen.
Conclusion
Snapchat is primarily known for its lens and filters. Many other apps even try to copy the filers but certainly couldn’t make it up. To develop the longest streak with your friends, you need to use Snapchat daily. Hence, Snapchat would never get you bored if you have to use it and send a snap with the cartoon face lens daily to friends. The regularly updating lens and the streak will keep you engaged in it every day. The app does not demand much high configuration and high storage. Hence, the app can fit into any individual and is easy to operate.
Shanoon Cox
Shanoon Cox is a writer and a lover of all things video.
Follow @Shanoon Cox
Shanoon Cox
Mar 27, 2024• Proven solutions
The social media apps keep updating themselves and always keep their users thrilled and engaged with the new updates. People love to take selfies, and how exciting it would be, if the selfie turns into Disney and Pixar-style cartoon characters?
Back in 2020, Snapchat released the lens for Disney. Initially, it was tried on pets by the TikTok users, and people loved it. Later, looking to the response on the Disney lens, Snapchat released another filter as Voila AI Artist. Send a snap with the cartoon face lens to get the best response on your click. Also, the Snapchat cartoon face filter is so much famous on Instagram and Facebook.
Is your cellphone camera not good enough? Are you worried about that? You don’t need to now, as the Snapchat lens would help you get various lenses and filters to give you the best clicks. Try out the best lens which you love and get the best images.
Please don’t go away; here, we will get to know about the Snapchat cartoon filter.
- Part 1: What is Snapchat’s Cartoon Lens?
- Part 2: How to Find and Use Snapchat’s Cartoon Lenses?
- Part 3: How to Send a Snap Using the Cartoon Face Lens?
- Part 4: Best App for Disney and Pixal Effect
- Part 5: Differences between Snapchat Cartoon Lens and Anime Filter
Part 1: What is Snapchat’s Cartoon Lens?
Snapchat always keeps on giving the surprise to their users and maintain the selfie crazy on the social media. There are three types of the cartoon lens which is attracting the users and is the latest trend.
- Snapchat Cartoon face Lens - developed and launched way back in August 2020
- Snapchat Cartoon Lens – Quite similar to the Cartoon Face, but the most fantastic thing is it converts your face to a Disney-style character.
- Snapchat Cartoon 3D Style Lens: The most famous Cartoon 3D Style was launched in June 2021 with a Pixar-like funny appearance. Couples love this the most.
Part 2: How to Find and Use Snapchat’s Cartoon Lenses?
Snapchat allows you to use the cartoon lens and send a snap with the cartoon face lens. Ensure you have good internet to get the Snapchat installed first and follow below easy steps below to get your favorite cartoon selfie.
- Open the latest version of Snapchat, and then go to the Camera screen, opt for the smiling face icon as per below.
- You need to get to the cartoon lens and hence, click “explore” from the bottom right of the screen.
- There are a lot of options and lens; therefore, search for the “cartoon” word. Since there are many cartoon lens, make sure that you have selected the right one developed by Snapchat team. Of course, you can try the cartoon lens created by other creators.
That’s it. You are done. The wait is over. Push the camera button and start taking your video with Snapchat cartoon filter.
Still, if you face difficulty getting the lens for yourself, this link will help you download the cartoon lens and enjoy your video. Further, you can save it or send the stories to your friends. Using the funny lens was never so easy and is so much fun.
Part 3: How to Send a Snap Using the Cartoon Face Lens?
From the above points, you now might know how to get the cartoon lens on the screen. Take the image and video that would make you happy. And now you will be excited to know how it is from your family or friends by sending them the cartoon face Snapchat. But have you added your friends or family members as friends? Make sure to add them to your list or the group, allowing you to send the snap.
Once you take your snap, click the Send to option on the bottom of the screen to send the snap. Now you will see the list of your added friends or the groups. Tap the friend whom you want to send the snap and tap send.
Your snap has now reached your friends, and you can develop a streak with them. If you send a snap with the cartoon face lens daily to your friends, it will create a specific chain referred to as streak. You can make the streak with them for as long as you can, which means you need to use Snapchat daily. More friends, more fun. The different groups would allow you to stay in touch with more people, and also, you can share the snap with them at one go.
Part 4: Best App for for Disney and Pixal Eeffect
Snapchat is one of the most famous apps which allows the users to take the snap, exchange pictures, and the videos. The Disney Pixar Filter is exclusive on Snapchat. Though you find many similar apps copying the Snapchat filters, the original seems beautiful. You can search the Snapchat cartoon filter 3D style from the search options. Select the filer and click amazing pictures.
Voila Al Artist Carton Photo turns the image into the fantastic pictures of Disney and the Pixal effects. This is the best app giving the Disney and pixal effect specially designed with the help of human capability and artificial intelligence. You can easily take selfies, pictures, and videos with a unique look. If you have the version of 12.0 and Later on iOS , you can easily use this app and click amazing images. Moreover, it only requires 273.6 MB of storage space on iOS.
Voila Al Artist is also available on Android , quickly turning the images into cartoon replicas of faces. You can never get tired of this photo app as there are many themes available in the app which can increase your excitement.
The best thing about the Voila Al Artist app is, you can get the app for free. You can use the app on any version of Android. It doesn’t matter if your camera lens is not that good and equipped with high pixels; the Voila Al Artist photo app will make your day with unique photos. If you get tired of the advertisement, you can go for the subscription and enjoy the cartoon selfies.
Part 5: What are the differences between Snapchat Cartoon Lens and Anime Filters ?
Essentially, the difference between a filter and a lens is that the lens is an augmented reality animation, while the filter is a static image overlay.
To Distinguish the difference between Snapchat filters and lenses: Snapchat filters are static and located on top of images or videos. On the other hand, Snapchat lenses are augmented reality animations that can change your voice in addition to changing your appearance on the screen.
Conclusion
Snapchat is primarily known for its lens and filters. Many other apps even try to copy the filers but certainly couldn’t make it up. To develop the longest streak with your friends, you need to use Snapchat daily. Hence, Snapchat would never get you bored if you have to use it and send a snap with the cartoon face lens daily to friends. The regularly updating lens and the streak will keep you engaged in it every day. The app does not demand much high configuration and high storage. Hence, the app can fit into any individual and is easy to operate.
Shanoon Cox
Shanoon Cox is a writer and a lover of all things video.
Follow @Shanoon Cox
Also read:
- Uncover the Art of Participating in TikTok Live Shows for 2024
- [Updated] Top TikTok Insight Crunchers to Boost Account Visibility for 2024
- [Updated] In 2024, Mastering TikTok's Popularity with #7 Iconic Emojis and Clandestine Icons
- 2024 Approved 10 Viral Culinary TikToks to Watch
- [Updated] Tickling Your Brain The Best Joke Threads on TikTok for 2024
- Crafting Share-Worthy Videos with Top TikTok Ideas
- [Updated] 2024 Approved The Ultimate Collection of Popular TikTok Reactions
- [New] In 2024, Charting a Course for TikTok's Most Effective Campaigns
- Perfecting Your Content Chrome-Compatible TikTok Uploads
- Meme Mayhem Meets Madness Top 10 Craziest TikTok Game Screencaps
- [Updated] Trusted Agencies for Safe Follower Additions
- [Updated] 2024 Approved Quietude Craft Isolating Vocal Frequencies in Audacity
- 2024 Approved Boosting Engagement Best Practices for Desktop-Made TikToks
- In 2024, The Art of Rapid Navigation Fast Forwarding Made Simple for TikTokers
- [New] Defining Your Uniqueness Amongst Viral TikTok Stars for 2024
- In 2024, Secrets for Snatching Unmarked TikTok Content on iPhones
- [Updated] 2024 Approved Unifying Media Mosaic The Ultimate TikTok Stitching Playbook
- [New] Dive Into High-End Slow Motion Filming A Guide for Aspiring TikTok Stars for 2024
- [Updated] 2024 Approved Master the Art of Viral Success on TikTok with Top 7 Must-Haves
- [New] In 2024, Premier Tools for TikTok Video Creators
- [Updated] Country Rhythms for Relaxation and Danceside Bliss (TikTok Playlist)
- [Updated] Captivating Crowds Essential Biographical Elements Boosting Follower Count on TikTok-Filmora for 2024
- Fine-Tuning Speed Settings for Snapchat Vids
- [Updated] Unlock Viewer Interest with These 5 Effective TikTok Captions
- [Updated] 2024 Approved The Comprehensive Guide to Adding Sound in TikTok Videos
- Groove Guru's Top 20 Dances on TikTok for 2024
- [Updated] In 2024, Access to High-Quality TikTok Videos Without Watermarks Online
- [New] Bringing Favorite Manga Characters to Life in TikTok
- Embrace These Hits Top 10 Viral TikTok Challenges for 2024
- [Updated] In 2024, Captivating Creativity Top 30 Unique TikTok Profile Photos
- [Updated] Download and Preserve TikTok Videos Free of Apple's Watermark
- [New] 2024 Approved Gentle Grooves A Selection of Chill Country Songs for Relaxing Dancing (TikTok)
- Melody Mixin' Adding Tracks to Snapchat Vids
- [Updated] Behind-the-Scenes The Secret to Stunning TikTok Backdrop Updates
- [New] Top 7 Emojis to Rule Your TikTok Experience
- [Updated] Comedy Crescendo Noteworthy Trends in TikTok Laughs
- [New] Adding Descriptive Overlays to Your TikTok Clips
- [New] In 2024, Top Strategies Unleashed Dominating the TikTok Marketing Landscape
- 2024 Approved Embark on a Joyful Journey Downloading TikTok for MacBook
- 2024 Approved Mastering TikTok Step-by-Step Caption Techniques
- [Updated] 2024 Approved Overcoming TikTok's Covert Ban A Guide to Re-Emerge
- 15 Best Booktok Books Recommendation [TikTok Books] for 2024
- Unveiling the Artistry in TikTok's Anime Culture From Choreographies to Memes
- [Updated] In 2024, Unlock the Secrets of TikTok Voiceacting
- [New] Binge on the Best TikTok's Viral Video Collection for 2024
- Revolutionary Bio Blueprint Essential Strategies for Maximum Viewership on TikTok-Filmora Platforms
- [Updated] Must-Know Basics for Mac Users on TikTok
- [Updated] In 2024, Mastering Marks Top iOS/Android TikTok Watermark Tools
- [Updated] 2024 Approved The Ultimate Guide to TikTok Substitutes (Updated List)
- [New] A Guide to TikTok's PFP Acronym Explained for 2024
- 2024 Approved DaVinci Resolve Scopes Have Undergone Significant Improvements. Find Out How to Use These Scopes and Improve Your Video Editing Skills
- New Pro-Level Video Stabilization on Android Our Top Picks for Free Apps
- [New] How to Download Facebook Status Videos?
- Updated In 2024, Best of the Best 10 WebM to MP4 Converters for Easy Conversion
- How To Unlock a Oppo Reno 11 5G Easily?
- [Updated] Combating an Unresponsive OBS Camera Input Stream for 2024
- How do I reset my Vivo G2 Phone without technical knowledge? | Dr.fone
- Prank Your Friends! Easy Ways to Fake and Share Google Maps Location On Vivo S18 Pro | Dr.fone
- New How to Insert a GIF Into Powerpoint
- AddROM Bypass An Android Tool to Unlock FRP Lock Screen For your OnePlus Nord CE 3 5G
- New Download VLLO for macOS and Explore Other Options
- The Ultimate Guide to Unlocking Your Apple iPhone 7 on MetroPCS
- New 2024 Approved Top-Rated Facebook MP3 Converters for Online Use
- List of Supported Whatsapp Video Format You May Want to Know
- [New] 2024 Approved 15 Leading Windows 10 Recorders
- Ultimate guide to get the meltan box pokemon go For Honor Magic Vs 2 | Dr.fone
- [Updated] Perfecting Slide Deck Sharing How to Use Your Webcam
- 2024 Approved The Ultimate Selection of 5 Premium Mac Audio Equipment
- [New] In 2024, Navigating Video Streaming Tools A Focus on OBS, YouTube & Twitch
- [New] A Viral Phenomenon in Micro-Bites
- Updated 6 Best Movie Intro Maker to Custom Your Intro Videos
- How To Revive Your Bricked Asus ROG Phone 7 in Minutes | Dr.fone
- 2024 Approved Why Mp3 Converter Windows Should Be Your Go-To Tool An Insiders Look
- New In 2024, Essential Music Libraries for Film and Video Editing - Free Edition
- How to Restore Deleted Oppo Find X6 Pro Photos An Easy Method Explained.
- [New] A Comparative Analysis of Top 10 Budget-Friendly Video Calls
- 4 Feasible Ways to Fake Location on Facebook For your Honor X50 | Dr.fone
- [New] 2024 Approved Unveiling the Best Tools to Snip on Your Mac
- [Updated] Top Screen Capture Contenders A Comprehensive Review
- How to Quickly Fix Bluetooth Not Working on Motorola Edge 2023 | Dr.fone
- A Step-by-Step Roadmap for Masterful Instagram Photos
- [Updated] In 2024, Explore Best Android Emulators for PlayStation 2 Gaming
- Does Life360 Notify When You Log Out On Samsung Galaxy A24? | Dr.fone
- 2024 Approved Premium Access to the Best 6 Vids
- [Updated] 2024 Approved Unveiling The Leading Mac Speech Recorders Our Curated List of 5
- How to Change Lock Screen Wallpaper on Tecno Spark 20
- Title: "Snapchat Speed Control A Detailed Walkthrough"
- Author: Brian
- Created at : 2024-05-23 13:10:37
- Updated at : 2024-05-24 13:10:37
- Link: https://tiktok-videos.techidaily.com/snapchat-speed-control-a-detailed-walkthrough/
- License: This work is licensed under CC BY-NC-SA 4.0.
