
:max_bytes(150000):strip_icc():format(webp)/how-to-watch-tiktok-without-the-app-63a4562e4c4b4bd69477425853809a35.jpg)
"Streamlined Processes for Crafting Smooth Multi-Snap Videos"
Streamlined Processes for Crafting Smooth Multi-Snap Videos
How to Make and Edit Multi Snapchat Videos Easily

Ollie Mattison
Mar 27, 2024• Proven solutions
Recording and sharing videos are now easy with Snapchat. With a maximum limit of 10 seconds, these videos are kept short in duration. Whether posting the Snapchat video to the story, sharing it with friends or in a Snapchat group, Snapchat was always a hit until numerous competitors started ripping its features.
But, Snapchat is back with a bounce with its multi snaps feature which is a new addition to video sharing feature in Snapchat. What is a multi snap? Snapchat, allows users to make more than 10 seconds snap video now, which is called multi snaps.
In this feature, you can record footages as long as 1 minute, which is divided into 6 snaps. Do you know how to make a video on Snapchat? Here you will learn how to make and edit multi Snapchat videos even without holding the button.
- Part1: How to Make Snapchat Multi Video Easily
- Part2: Notes About Multi Snapchat Videos
- Part3: How to Make Multi Video Without Holding the Button On iPhone
- Part4: How To Edit Video With The Built-In Features
Part1: How to Make Snapchat Multi Video Easily
If you wish to make a multi video in a few minutes very quickly, you just need to tap the big round button on the screen of the camera app and hold it.
Don’t leave the button even after the time is over. As you keep holding the button, the next snap starts recording automatically.
When you think it’s complete, at the bottom of the screen you can see the snaps appearing.
The ones you wish to keep must be saved and the rest can be dragged in order to delete.
Finally, you may edit the snaps and add effects like you do with any usual snap at the same time.

Part2: Notes About Multi Snapchat Videos
- In the Memories tab, you can find the multi snaps under the ‘Snaps’ icon and ‘All’ tabs
- When a multi snap is added and saved to the Camera Roll folder, it will be saved as a seamless single video. You cannot divide the video or break it into parts.
- One particular snap cannot be extracted from the multi snap
- Are you looking forward to sending multi snaps to My Story but facing difficulty? In such a situation you can always find it in My Stories screen and send each snap one by one.
- In multi snap, you cannot include 3D stickers, and it also cannot be reversed or looped at present.
Part3: How to Make Multi Video Without Holding the Button On iPhone
Pressing and holding the button constantly for recording multi snaps can be quite tiresome as it keeps your finger held down. But, the iPhone users can record multi video even without holding the button. Do your know how? Let’s learn the trick.
- Firstly, go to the Settings and select General from the drop-down menu. Tap on Accessibility and click the Assistive Touch. The Assistive Touch option helps to access the iPhone when you are unable to touch the screen.

- Turn the Assistive Touch On from the of mode and then Create New Gesture, under Custom Gestures. With this mode, you can record the gestures. You can activate it from the Favorites in Menu bar. Then, use one finger to press and hold your iPhone screen’s center to allow recording your Touch. You can see at the bottom there’s a blue bar which once filled indicates that your Touch is recorded. Now, Save the gesture and open Snapchat. You can find a grey dot on the screen, tap it. Now, tap on the Custom and the saved gesture.

- Once you click the saved gesture, you can see another grey dot on the screen. Drag the grey dot over record button of Snapchat and let go. One thing must be noted that you can only record 8 seconds video in iPhone than usual 10 seconds because gestures can be set only for 8 seconds.

Your hands are free to move anywhere, meanwhile, the Snapchat video is recording.
Part4: How To Edit Video With The Built-In Features
Editing snaps and videos have always been fun whether it’s for trial or for work. After recording a snapshot video, you can edit it by swiping right or left to add special effects.
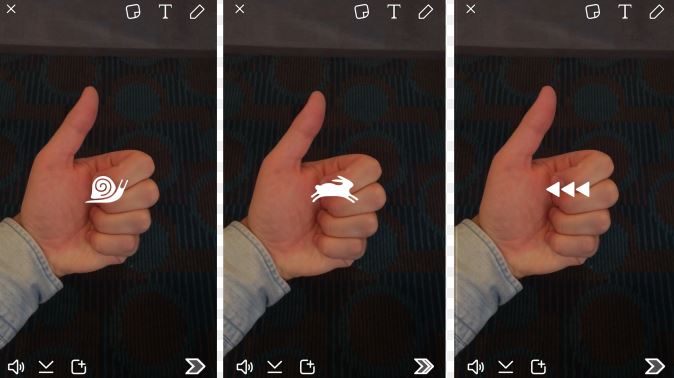
- Filters must be enabled to access the special effects. So turn it on. Rabbit will speed up your Snapchat video whereas, the snail will slow it down.
- If you wish to play your video is reverse mode then use the 3 backward arrows.The brightness of your Snapchat video can be adjusted with some of the filters. Your time, location, and speed can also be transformed by adding effects with some filters.
- There’s a magic eraser tool that can help you in erasing any object like a tree or your ex-girlfriend from the snap. You may also use a tint brush to pick a color and then touch the object you wish to tint with the brush. This feature is available for both the Android and iOS users.
Conclusion
If you want to have fun and better video effects, you can use Filmora to edit video on desktop before uploading Snapchat videos from the camera roll. Filmora is one of the best applications with a range of features. You can add graphic overlays and filters, color tuning, noise removal, 4k video resolution, pan zoom, and many more features to make your Snapchat video attractive and amazing. This article gives you a detailed information on how to make a video on Snapchat, even without pressing the button. Enjoy multi snaps feature on Snapchat videos and use by following the steps mentioned above.
Ollie Mattison
Ollie Mattison is a writer and a lover of all things video.
Follow @Ollie Mattison
Ollie Mattison
Mar 27, 2024• Proven solutions
Recording and sharing videos are now easy with Snapchat. With a maximum limit of 10 seconds, these videos are kept short in duration. Whether posting the Snapchat video to the story, sharing it with friends or in a Snapchat group, Snapchat was always a hit until numerous competitors started ripping its features.
But, Snapchat is back with a bounce with its multi snaps feature which is a new addition to video sharing feature in Snapchat. What is a multi snap? Snapchat, allows users to make more than 10 seconds snap video now, which is called multi snaps.
In this feature, you can record footages as long as 1 minute, which is divided into 6 snaps. Do you know how to make a video on Snapchat? Here you will learn how to make and edit multi Snapchat videos even without holding the button.
- Part1: How to Make Snapchat Multi Video Easily
- Part2: Notes About Multi Snapchat Videos
- Part3: How to Make Multi Video Without Holding the Button On iPhone
- Part4: How To Edit Video With The Built-In Features
Part1: How to Make Snapchat Multi Video Easily
If you wish to make a multi video in a few minutes very quickly, you just need to tap the big round button on the screen of the camera app and hold it.
Don’t leave the button even after the time is over. As you keep holding the button, the next snap starts recording automatically.
When you think it’s complete, at the bottom of the screen you can see the snaps appearing.
The ones you wish to keep must be saved and the rest can be dragged in order to delete.
Finally, you may edit the snaps and add effects like you do with any usual snap at the same time.
Part2: Notes About Multi Snapchat Videos
- In the Memories tab, you can find the multi snaps under the ‘Snaps’ icon and ‘All’ tabs
- When a multi snap is added and saved to the Camera Roll folder, it will be saved as a seamless single video. You cannot divide the video or break it into parts.
- One particular snap cannot be extracted from the multi snap
- Are you looking forward to sending multi snaps to My Story but facing difficulty? In such a situation you can always find it in My Stories screen and send each snap one by one.
- In multi snap, you cannot include 3D stickers, and it also cannot be reversed or looped at present.
Part3: How to Make Multi Video Without Holding the Button On iPhone
Pressing and holding the button constantly for recording multi snaps can be quite tiresome as it keeps your finger held down. But, the iPhone users can record multi video even without holding the button. Do your know how? Let’s learn the trick.
- Firstly, go to the Settings and select General from the drop-down menu. Tap on Accessibility and click the Assistive Touch. The Assistive Touch option helps to access the iPhone when you are unable to touch the screen.
- Turn the Assistive Touch On from the of mode and then Create New Gesture, under Custom Gestures. With this mode, you can record the gestures. You can activate it from the Favorites in Menu bar. Then, use one finger to press and hold your iPhone screen’s center to allow recording your Touch. You can see at the bottom there’s a blue bar which once filled indicates that your Touch is recorded. Now, Save the gesture and open Snapchat. You can find a grey dot on the screen, tap it. Now, tap on the Custom and the saved gesture.
- Once you click the saved gesture, you can see another grey dot on the screen. Drag the grey dot over record button of Snapchat and let go. One thing must be noted that you can only record 8 seconds video in iPhone than usual 10 seconds because gestures can be set only for 8 seconds.
Your hands are free to move anywhere, meanwhile, the Snapchat video is recording.
Part4: How To Edit Video With The Built-In Features
Editing snaps and videos have always been fun whether it’s for trial or for work. After recording a snapshot video, you can edit it by swiping right or left to add special effects.
- Filters must be enabled to access the special effects. So turn it on. Rabbit will speed up your Snapchat video whereas, the snail will slow it down.
- If you wish to play your video is reverse mode then use the 3 backward arrows.The brightness of your Snapchat video can be adjusted with some of the filters. Your time, location, and speed can also be transformed by adding effects with some filters.
- There’s a magic eraser tool that can help you in erasing any object like a tree or your ex-girlfriend from the snap. You may also use a tint brush to pick a color and then touch the object you wish to tint with the brush. This feature is available for both the Android and iOS users.
Conclusion
If you want to have fun and better video effects, you can use Filmora to edit video on desktop before uploading Snapchat videos from the camera roll. Filmora is one of the best applications with a range of features. You can add graphic overlays and filters, color tuning, noise removal, 4k video resolution, pan zoom, and many more features to make your Snapchat video attractive and amazing. This article gives you a detailed information on how to make a video on Snapchat, even without pressing the button. Enjoy multi snaps feature on Snapchat videos and use by following the steps mentioned above.
Ollie Mattison
Ollie Mattison is a writer and a lover of all things video.
Follow @Ollie Mattison
Step by Step Guide to Managing Video Speed on Snapchat
Snapchat is an instant messaging app that allows you to share your pictures and videos with your family members, friends, and colleagues. In addition, you can even create your stories in the form of movie clips and share them on the app. These stories remain available for the next 24 hours, after which they are automatically removed from the platform.
While sharing the videos, you can apply several filters that are already present in the app, and Slow Motion is one of them. You may want to learn how to slow down a video on Snapchat when you want to emphasize and draw viewers’ attention toward the scene, or wish to make the audience see your actions closely and in detail.
That said, in the following sections, you will see how to slow down videos on Snapchat, and what other methods you can use to reduce the playback speed more professionally.
In this article
01 How to Add Slow Motion Effects to Video Using the Snapchat App
02 How to Record a Slo-Mo Video and Upload to Snapchat
03 How to Make Flash and Smooth Slo Mo Video for Snapchat
04 FAQs about Slowing Down Snapchat Video
Part 1: How to Add Slow Motion Effects to Video Using the Snapchat App
Snapchat has a built-in Slow Motion filter that reduces the playback speed of a video when applied. You can learn how to slow down on Snapchat by following the instructions that are given below:
Step 1: Record a Video
Launch Snapchat on your smartphone (iPhone 13 Pro Max is used here for illustrations), make sure that the Camera section is selected from the bottom, tap and hold down the Capture button that is present at the lower part of the interface, and let go of it when you are done recording.

Step 2: Apply the Slow Motion Filter
Once the video is recorded, swipe the screen from left to right. Repeat this process until you see the Snail (Slow Motion) icon on the screen. This will reduce the playback speed of the clip.

Step 3: Decorate the Video (Optional)
Use the options present on the upper-right area of the screen to further decorate the video and/or add annotations to it.

Step 4: Share or Publish the Video
Once everything is done, tap Send To from the bottom-right corner to share the video with your family, friends, and colleagues, or publish it as a story that remains available for the next 24 hours.
Related: How to Record Slo-Mo videos on iPhone .
Part 2: How to Record a Slo-Mo Video and Upload to Snapchat
With Snapchat, even though you don’t require any third-party tool to reduce the playback speed of a video, the app has certain limitations. For example, it doesn’t allow you to set a zoom level, you are stuck with the framerate that the app has to offer, etc.
Because of this, many people prefer to use different methods to record a video in slow motion with their preferences, and then upload it to Snapchat. This approach also eliminates the need to swipe the screen several times merely to use a single slow-motion filter.
Fortunately, iPhone has a built-in SLO-MO mode in its Camera app that allows you to capture the videos in slow motion. To learn how to do slow mo on Snapchat with the iPhone’s Camera app, you can follow the instructions that are given below:
Step 1: Get to the iPhone’s SLO-MO Mode
Launch the Camera app on your iPhone (iPhone 13 Pro Max is used here for illustrations), and swipe the screen from left to right until you get to the SLO-MO mode.

Step 2: Set Recording Preferences
Tap the number that is present at the top-right corner (240 here) to toggle between different framerates, tap 1x from the lower-center area, swipe slightly up, and then use the wheel that appears next to define your preferred zoom level.

Step 3: Start and Stop the Recording
Tap the Record button to start the recording, and tap Stop when you’re done.
Note: Make sure that the duration of the recorded video doesn’t exceed 60 seconds.
Step 4: Upload the Slow-Motion Video to Snapchat
After the video is recorded in slow motion, close the Camera app, launch Snapchat, and tap the Gallery icon from the left side of the Capture button on the Camera section. From the Memories screen, go to the Camera Roll tab, and tap to select the video that you recorded in the previous step.
Next, optionally, tap the Edit icon from the bottom-left corner to decorate the video and/or add annotations to it, and follow the process as explained in the previous section to share the clip with your family, friends, or colleagues, or publish it as your story.

Part 3: How to Make Flash and Smooth Slo Mo Video for Snapchat
Although iPhone has the built-in SLO-MO mode that even enables you to set your preferred framerate and zoom level before recording, it still doesn’t allow you to slow down different parts of a video in different speed at your convenience. You can either record the entire video in slow motion or at a normal speed.
This is where a third-party app comes into play. While there are several video editing programs available online, the one of the best slow motion apps that helps you slow down the portions of a video with precision is CapCut.
Downloading and installing CapCut on your iPhone or Android phone is simple, and once it is done, you can follow the process given below to learn how to slow things down on Snapchat:
With CapCut, you can either slow down the whole clip or manage the speed for different segments. This section explains both methods.
Method 1: Slow Down the Whole Clip with CapCut
Step 1: Get to the Speed Panel
Launch CapCut, import the video that you want to slow down, and tap the imported media in the Timeline. Next, tap Speed from the bottom of the interface to get to the next window.

Step 2: Reduce the Speed of the Video
Tap Normal from the bottom of the screen that appears next, and drag the Speed slider to the left to reduce the playback speed. Tap OK from the bottom-right corner to save the changes.

Step 3: Upload the Video to Snapchat
Back on the previous interface, optionally tap Volume from the bottom and reduce the slider to 0 to mute the audio of the footage as it may get distorted due to the reduction in the speed.
Next, tap Share from the top-right corner to save the video on your iPhone, and then use the method explained in the previous section to access the clip from the Gallery within Snapchat for uploading.
Method 2: Reduce the Playback Speed of Different Parts of a Video
Step 1: Get to the Speed Panel
Use the process described in the previous method to get to the Speed panel.
Step 2: Reduce the Speed of Different Parts of the Video
Tap Curve from the bottom of the interface. On the next screen, tap Custom from the lower area, and then tap Edit. From the next panel, drag the beat points down to reduce the speed (or drag them above the line to increase).

Notice that each beat point represents a particular section of the video, and dragging it down reduces the playback speed of that segment. You can even tap anywhere on the line to add a new beat point and drag it down as needed for more precise speed management. Once done, tap OK from the bottom-right corner to save the modifications.

Optionally, you can also tap any of the available presets on the Curve screen to reduce the playback speed of the video accordingly.
Step 3: Upload the Video to Snapchat
Use the method explained in the previous method to export the video, upload it to Snapchat, and share the clip with your family, friends, and colleagues, or publish it as your story.
Part 4: FAQs about Slowing Down Snapchat Video
1. Can I record a slow mo video in Snapchat?
Technically speaking, no, you cannot. However, once you have recorded a video at a normal speed in Snapchat, you can apply the built-in Slow Motion filter to it by swiping the screen from left to right until you see the Snail icon at the center. The Snail icon represents the Slow Motion filter that reduces the playback speed when applied.
2. Besides slow-motion, which speed filters does Snapchat have?
In addition to slow motion Snapchat also has Forward and Fast Forward filters that increase the playback speed. While the Forward filter increases the speed slightly, the Fast Forward one enhances it drastically.
Conclusion
When using an iPhone, even though the SLO-MO mode enables you to record footage in slow motion, you don’t get many options. Therefore, it would be safe to say that it is easy to slow down the speed of a video if you have a dedicated third-party post-production app. However, if you want to go for a convenient method, learning how to slow down a video on Snapchat is an extremely simple and straightforward process.
02 How to Record a Slo-Mo Video and Upload to Snapchat
03 How to Make Flash and Smooth Slo Mo Video for Snapchat
04 FAQs about Slowing Down Snapchat Video
Part 1: How to Add Slow Motion Effects to Video Using the Snapchat App
Snapchat has a built-in Slow Motion filter that reduces the playback speed of a video when applied. You can learn how to slow down on Snapchat by following the instructions that are given below:
Step 1: Record a Video
Launch Snapchat on your smartphone (iPhone 13 Pro Max is used here for illustrations), make sure that the Camera section is selected from the bottom, tap and hold down the Capture button that is present at the lower part of the interface, and let go of it when you are done recording.
Step 2: Apply the Slow Motion Filter
Once the video is recorded, swipe the screen from left to right. Repeat this process until you see the Snail (Slow Motion) icon on the screen. This will reduce the playback speed of the clip.
Step 3: Decorate the Video (Optional)
Use the options present on the upper-right area of the screen to further decorate the video and/or add annotations to it.
Step 4: Share or Publish the Video
Once everything is done, tap Send To from the bottom-right corner to share the video with your family, friends, and colleagues, or publish it as a story that remains available for the next 24 hours.
Related: How to Record Slo-Mo videos on iPhone .
Part 2: How to Record a Slo-Mo Video and Upload to Snapchat
With Snapchat, even though you don’t require any third-party tool to reduce the playback speed of a video, the app has certain limitations. For example, it doesn’t allow you to set a zoom level, you are stuck with the framerate that the app has to offer, etc.
Because of this, many people prefer to use different methods to record a video in slow motion with their preferences, and then upload it to Snapchat. This approach also eliminates the need to swipe the screen several times merely to use a single slow-motion filter.
Fortunately, iPhone has a built-in SLO-MO mode in its Camera app that allows you to capture the videos in slow motion. To learn how to do slow mo on Snapchat with the iPhone’s Camera app, you can follow the instructions that are given below:
Step 1: Get to the iPhone’s SLO-MO Mode
Launch the Camera app on your iPhone (iPhone 13 Pro Max is used here for illustrations), and swipe the screen from left to right until you get to the SLO-MO mode.
Step 2: Set Recording Preferences
Tap the number that is present at the top-right corner (240 here) to toggle between different framerates, tap 1x from the lower-center area, swipe slightly up, and then use the wheel that appears next to define your preferred zoom level.
Step 3: Start and Stop the Recording
Tap the Record button to start the recording, and tap Stop when you’re done.
Note: Make sure that the duration of the recorded video doesn’t exceed 60 seconds.
Step 4: Upload the Slow-Motion Video to Snapchat
After the video is recorded in slow motion, close the Camera app, launch Snapchat, and tap the Gallery icon from the left side of the Capture button on the Camera section. From the Memories screen, go to the Camera Roll tab, and tap to select the video that you recorded in the previous step.
Next, optionally, tap the Edit icon from the bottom-left corner to decorate the video and/or add annotations to it, and follow the process as explained in the previous section to share the clip with your family, friends, or colleagues, or publish it as your story.
Part 3: How to Make Flash and Smooth Slo Mo Video for Snapchat
Although iPhone has the built-in SLO-MO mode that even enables you to set your preferred framerate and zoom level before recording, it still doesn’t allow you to slow down different parts of a video in different speed at your convenience. You can either record the entire video in slow motion or at a normal speed.
This is where a third-party app comes into play. While there are several video editing programs available online, the one of the best slow motion apps that helps you slow down the portions of a video with precision is CapCut.
Downloading and installing CapCut on your iPhone or Android phone is simple, and once it is done, you can follow the process given below to learn how to slow things down on Snapchat:
With CapCut, you can either slow down the whole clip or manage the speed for different segments. This section explains both methods.
Method 1: Slow Down the Whole Clip with CapCut
Step 1: Get to the Speed Panel
Launch CapCut, import the video that you want to slow down, and tap the imported media in the Timeline. Next, tap Speed from the bottom of the interface to get to the next window.
Step 2: Reduce the Speed of the Video
Tap Normal from the bottom of the screen that appears next, and drag the Speed slider to the left to reduce the playback speed. Tap OK from the bottom-right corner to save the changes.
Step 3: Upload the Video to Snapchat
Back on the previous interface, optionally tap Volume from the bottom and reduce the slider to 0 to mute the audio of the footage as it may get distorted due to the reduction in the speed.
Next, tap Share from the top-right corner to save the video on your iPhone, and then use the method explained in the previous section to access the clip from the Gallery within Snapchat for uploading.
Method 2: Reduce the Playback Speed of Different Parts of a Video
Step 1: Get to the Speed Panel
Use the process described in the previous method to get to the Speed panel.
Step 2: Reduce the Speed of Different Parts of the Video
Tap Curve from the bottom of the interface. On the next screen, tap Custom from the lower area, and then tap Edit. From the next panel, drag the beat points down to reduce the speed (or drag them above the line to increase).
Notice that each beat point represents a particular section of the video, and dragging it down reduces the playback speed of that segment. You can even tap anywhere on the line to add a new beat point and drag it down as needed for more precise speed management. Once done, tap OK from the bottom-right corner to save the modifications.
Optionally, you can also tap any of the available presets on the Curve screen to reduce the playback speed of the video accordingly.
Step 3: Upload the Video to Snapchat
Use the method explained in the previous method to export the video, upload it to Snapchat, and share the clip with your family, friends, and colleagues, or publish it as your story.
Part 4: FAQs about Slowing Down Snapchat Video
1. Can I record a slow mo video in Snapchat?
Technically speaking, no, you cannot. However, once you have recorded a video at a normal speed in Snapchat, you can apply the built-in Slow Motion filter to it by swiping the screen from left to right until you see the Snail icon at the center. The Snail icon represents the Slow Motion filter that reduces the playback speed when applied.
2. Besides slow-motion, which speed filters does Snapchat have?
In addition to slow motion Snapchat also has Forward and Fast Forward filters that increase the playback speed. While the Forward filter increases the speed slightly, the Fast Forward one enhances it drastically.
Conclusion
When using an iPhone, even though the SLO-MO mode enables you to record footage in slow motion, you don’t get many options. Therefore, it would be safe to say that it is easy to slow down the speed of a video if you have a dedicated third-party post-production app. However, if you want to go for a convenient method, learning how to slow down a video on Snapchat is an extremely simple and straightforward process.
Also read:
- [New] Top 5 Essentials for Mac Users on the TikTok Web
- [Updated] Ethical and Safe TikTok Following Hacks
- [New] 2024 Approved Your Essential Guide to New TikTok Acts Now
- [Updated] Share Your Vibes with Free, Unmarked TikTok Videos
- Mystical Environments Transforming Spaces with Anime on TikTok for 2024
- 2024 Approved Select Best TikTok Video Apps Reviewed
- Stitches & Scrolls A Guide to Textile Talent on the App
- [Updated] In 2024, 30 Top Funny TikTok Jokes & Riddles
- [Updated] 2024 Approved How to Perfectly Alter Your Vocal Audio on TikTok
- [New] In 2024, Top Tools to Decode TikTok Engagement and Growth Patterns
- [New] In 2024, Unlock More Views with These TikTok Text Tools of 2023
- [Updated] Savory Stories #Tiktok's 10 Culinary Craze for 2024
- [New] In 2024, Fantastic Faces in Filters Top 15 for TikTok Enthusiasts
- [Updated] In 2024, Leveraging TikTok for Business Growth Strategies
- [New] Capture the Perfect Pace A Beginner's Approach to Slow Mo Videos on TikTok for 2024
- Steps to Become a Live Spectator on TikTok
- [New] In 2024, Eats of the Earth Delicacies From Around The Globe
- [New] Epicurean Escapades on TikTok
- Hit After Hit Top 20 Rap Hits on TikTok Platform
- Maximizing Creativity on TikTok Essential Elements Overview for 2024
- Direct Linking Spotify's Journey Into Discord
- In 2024, Dissecting the Distinctions Triller V/S TikTok's Interface (Max 156 Chars)
- Mastering Bigger-Head Effects The Ultimate Guide for TikTok Creators (3 Steps)
- 2024 Approved Rhythmic Respite Top 20 Easygoing Country Hits for Stress-Relief Dance on TikTok
- In 2024, Regain Lost Content After an Unexpected TikTok Reload
- 2024 Approved Innovative Auditory Experiences Mastering Vocal Changes in TikTok Videos
- In 2024, Unlock Xiaomi Redmi Note 12 5G Phone Password Without Factory Reset Full Guide Here
- In 2024, How to Change Netflix Location to Get More Country Version On Motorola Moto G73 5G | Dr.fone
- Updated 2024 Approved Videoleap on MacBook A Quick Start Guide to Downloading and Using
- [Updated] Unleash Your Potential Navigating the World of Switch Pro in Steam for 2024
- iPogo will be the new iSpoofer On Honor X9a? | Dr.fone
- [New] Snap Into FB Shorts Saga for 2024
- [Updated] Essential List 5 Superior Webcams with Sound Capture
- In 2024, How to Change/Fake Your HTC U23 Location on Viber | Dr.fone
- Three Solutions to Hard Reset Xiaomi Redmi 12? | Dr.fone
- In 2024, Unlocking the Power of Memes A Guide to Creating Funny Videos
- In 2024, For People Wanting to Mock GPS on Nokia 150 (2023) Devices | Dr.fone
- 2024 Approved Premier Movie Access on Facebook Ranked #8 List
- In 2024, Shrink Your Videos 10 Free Online Compressors with No Installation
- Upgraded Audio Methods for Video Enhancement The Current State of Practice for 2024
- Updated In 2024, Demystifying Aspect Ratios A Calculator Tutorial for Designers and Photographers
- In 2024, How to Come up With the Best Pokemon Team On Tecno Pop 7 Pro? | Dr.fone
- 2024 Approved Looking for VSDC on Mac? Try These Alternative Editors
- In 2024, Two Ways to Track My Boyfriends Realme C67 5G without Him Knowing | Dr.fone
- How to Cast Asus ROG Phone 7 Screen to PC Using WiFi | Dr.fone
- 4 Methods to Turn off Life 360 On Lava Yuva 3 Pro without Anyone Knowing | Dr.fone
- Remove Google FRP lock on Tecno Spark 10C
- How to Transfer Photos from Nokia 130 Music to New Android? | Dr.fone
- 2024 Approved Explore Free FB Visual Creation Tools - Best
- Title: "Streamlined Processes for Crafting Smooth Multi-Snap Videos"
- Author: Brian
- Created at : 2024-05-23 13:11:01
- Updated at : 2024-05-24 13:11:01
- Link: https://tiktok-videos.techidaily.com/streamlined-processes-for-crafting-smooth-multi-snap-videos/
- License: This work is licensed under CC BY-NC-SA 4.0.
