
:max_bytes(150000):strip_icc()/GettyImages-1196161943-e9120b3d8d4f44eda218337fb8f68740.jpg)
Triumph Over TikTok's Unseen Ban Barriers for 2024
Triumph Over TikTok’s Unseen Ban Barriers
TikTok Shadowban: How to Get Unshadowbanned on Tiktok

Shanoon Cox
Mar 27, 2024• Proven solutions
Fame is a very fickle friend. Anyone can go viral and become TikTok famous by gaining more likes, lots of views, and video shares. TikTok’s algorithm can put your videos at the top of the “For You” scroll and turn you into a sensation overnight, thus skyrocketing your followers count in a matter of few days. But, did you know that TikTok removed almost 50 million videos in just 6 months because those videos violated its rules?
While this social media site can easily be your shot to fame, it can even take away your audience. Or worse, it can ban you from using the app if you do not follow its community guidelines and rules. And, if you’ve been on TikTok for a while now, chances are you’ve heard about users getting ‘shadowbanned’. It’s not unusual for users to unknowingly stop receiving likes, views, and traffic on their accounts due to TikTok shadowban.
Ever since the influx of social media, shadow banning, also known as ghost banning or stealth banning, has been around. It comes up when content has been blocked or partially blocked. Sadly, when your TikTok account is shadowbanned, it will negatively affect your reach and halt your growth. Influencers and businesses rely on social media to create a community. And when they lose a part of that community, they feel a loss of support.
Wondering what shadowbanning entails, how to determine if you’ve been shadowbanned, and how to get unshadowbanned on TikTok? Check out below.
![]()
A cross-platform for making videos anywhere for all creators

Why your video editing isn’t good enough? How about some creative inspo?
- 100 Million+ Users
- 150+ Countries and Regions
- 4 Million+ Social Media Followers
- 5 Million+ Stock Media for Use
* Secure Download

- Part 1: What is a Shadowban On TikTok?
- Part 2: How Long is TikTok Shadowban?
- Part 3: How Do I Know If I am Shadowbanned?
- Part 4: Why am I Getting Shadowbanned On TikTok?
- Part 5: How to Fix TikTok Shadowban and Get Unshadowbanned?
- Part 6: Use Excellent Video Editors to Make Amazing TikTok Videos
Part 1: What is a Shadowban On TikTok?
The word “shadowban” is relatively self-explanatory. Basically, it means your account has been banned. But, the shadow part of the term means that you won’t know about the ban.
Shadowban on TikTok is a restriction that prevents your videos from appearing on the For You page or on hashtag results. It is a situation where your visibility has been reduced or where you have been banned from the platform, without your knowledge.
The act of shadowbanning a TikTok account is an automatic process done by TikTok’s algorithm to protect other users against spam content, copyright issues, and adult content. When you get shadowbanned, you stop receiving likes, views, and traffic from the For You page. Often, shadowbans go unnoticed until another user who stumbled upon your video points it out.
Part 2: How Long is TikTok Shadowban?
At the early stages of TikTok, shadowbans lasted for 24 hours. But, with the latest update in the TikTok algorithm, the length of TikTok shadowban is growing. Nowadays, a TikTok account is shadowbanned for approximately up to 2 weeks.
Within the first week, there will be a drop in your followers and so will the views. After a few days of the account shadowban being in place, you won’t be able to enter any tags or make new videos on TikTok unless they are public.

Part 3: How Do I Know If I am Shadowbanned?
The TikTok app doesn’t ever actually tell if you are shadowbanned. But, if you are then you can probably notice it. If you are shadowbanned, your videos will neither show up on the TikTok “For You” page nor will they appear when you search them via hashtag.
During a TikTok shadowban, your videos and content will not:
- be visible in the search results
- be visible on the feed
- receive new followers
- receive likes from others
- receive comments from others
Part 4: Why am I Getting Shadowbanned On TikTok?
TikTok has not issued any explanation on its shadowbanning techniques. However, what makes complete sense is that TikTok shadowbans its users for creating videos that violate its community guidelines.
Any video with offensive content that can harm the sentiments of people or anything that can trigger other users can attract TikTok shadowban. The app might limit the visibility of your content for reasons such as your account acting as spam or you are posting inappropriate content.

Spam Behavior
The primary reason why a user’s TikTok account can get shadowbanned is that they behave like a spammer. Usually, new people go on a spree of liking and following people in the hope that they will like and follow back. However, TikTok might recognize this behavior as spam and consider you as a robot.
If you like more than 100 posts daily, you might want to slow down. If you follow more than 50 TikTok accounts in a day, it is best to re-evaluate that strategy.
Inappropriate Content
Posting videos that go against the TikTok rules and community guidelines can get you shadowbanned or permanently banned.
The following content is considered inappropriate by TikTok:
- hate speech
- fake news
- violence
- nudity
- drugs
- copyrighted music
TikTok is committed to make its platform an inclusive and safe space. So, if you have experienced a drop in views or engagement, consider reassessing your recent content.
Part 5: How to Fix TikTok Shadowban and Get Unshadowbanned?
Wondering about how do you get unshadowbanned on TikTok? Here’s what you can do to remove your shadowban:
Uninstall and Reinstall TikTok
Firstly, delete your recent video. If it doesn’t work, uninstall and then reinstall the TikTok app. Sometimes, your app might just need an update to become functional once again.
Switch to A Pro Account
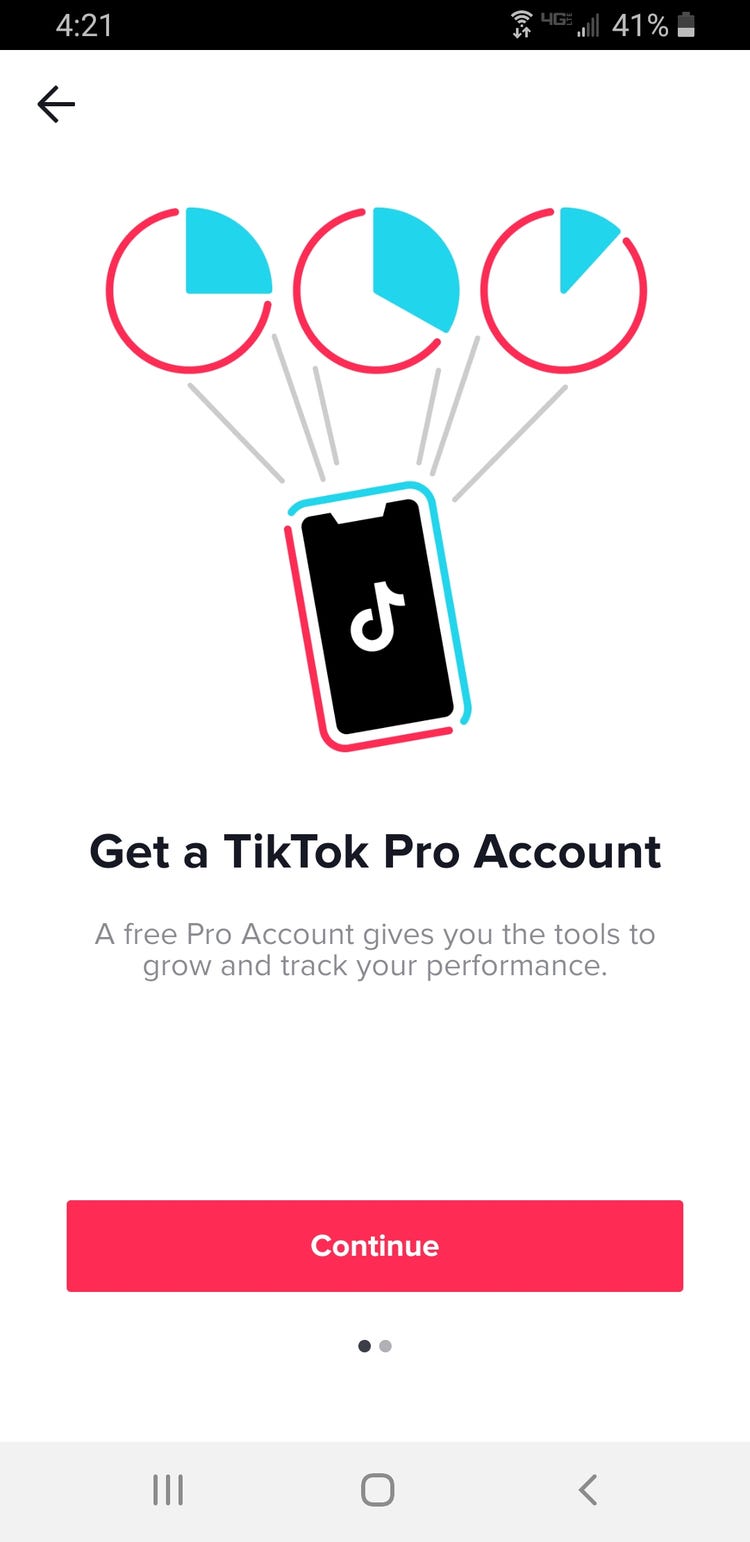
When doing a Google search on how to get unshadowbanned on TikTok, the most common tip you’ll find is to go into the Settings of your TikTok account and tap “Switch to a Pro Account”. The reason is that making the switch will allow you to see analytics for your posts and find out how people access your videos. By doing this, you can easily monitor how far your engagement has increased or dropped.
Delete Offensive Content
You should delete content that goes against the rules and community guidelines laid down by TikTok. After deleting inappropriate content, you have to wait for at least two weeks to get the shadowban lifted. You can refresh your device once in a while to check if you have finally managed to lift the ban.
Put TikTok On Hold for Sometime
Once you have deleted offensive content, clear the cache, close your app, ensure it is updated and then take a break from TikTok for a few days. Coming back after you have cleaned up your account and taken the needed break might get you unshadowbanned on TikTok.
Post Original, Innovative Content
When you return to posting content, you need to make sure your TikTok account doesn’t get shadowbanned again. Your account has already been flagged for something and so you need to try even harder to behave. If you go back to posting the same kind of content that got you banned in the first place, you will be booted off the stage again.
Ensure you always post original content with innovative ideas. Brainstorm new ideas with your team and come up with something new and unique. This way, you can avoid copyright infringement laws on TikTok.
Know Your Audience More
These days, there are many kids and minor accounts on TikTok, and maintaining a healthy environment is a part of your responsibility. Keep your videos free from sexualized themes, nudity, pornographic material, and suggestive themes. Remember; posting such content can land you in serious trouble with TikTok shadowban.
Part 6: Use Excellent Video Editors to Make Amazing TikTok Videos
With increasing competition among TikTok users, it is important to use a powerful video editing tool to make your TikTok videos stand out. That’s where Wondershare Filmora comes in. Whether it’s family, business, music, travel, game, education, and vlog, Fimora Video Editor can help with advanced editing solutions.
With Filmora video editor, TikTok users can avail salient editing features like:
- Easy to use video editing software
- A plethora of amazing video effects and templates to create incredible TikTok videos
- Offers a range of stunning overlays and filters for exceptional editing
- Advanced audio editing to make flawless TikTok videos
- Tools to trim, cut, merge, and extract videos
- Ability to make a video soundtrack
- Loads of royalty-free audio files, video effects, video files, and stock images
- Multiple visual effects like tilt-shift, picture-in-picture, green screen, etc.
- Offers full 4K support, color correction, action camera tools, a built-in music library
- Fantastic exporting capabilities
- 24/7 user-friendly support with useful tips on growth and other support channels


Conclusion
TikTok is an effective marketing tool. Although it might seem easy to become famous and get viral on TikTok, keep in mind to use the social media platform wisely. It is better to create content that abides by TikTok’s community guidelines and post entertaining content that resonates with your audience.
Shanoon Cox
Shanoon Cox is a writer and a lover of all things video.
Follow @Shanoon Cox
Shanoon Cox
Mar 27, 2024• Proven solutions
Fame is a very fickle friend. Anyone can go viral and become TikTok famous by gaining more likes, lots of views, and video shares. TikTok’s algorithm can put your videos at the top of the “For You” scroll and turn you into a sensation overnight, thus skyrocketing your followers count in a matter of few days. But, did you know that TikTok removed almost 50 million videos in just 6 months because those videos violated its rules?
While this social media site can easily be your shot to fame, it can even take away your audience. Or worse, it can ban you from using the app if you do not follow its community guidelines and rules. And, if you’ve been on TikTok for a while now, chances are you’ve heard about users getting ‘shadowbanned’. It’s not unusual for users to unknowingly stop receiving likes, views, and traffic on their accounts due to TikTok shadowban.
Ever since the influx of social media, shadow banning, also known as ghost banning or stealth banning, has been around. It comes up when content has been blocked or partially blocked. Sadly, when your TikTok account is shadowbanned, it will negatively affect your reach and halt your growth. Influencers and businesses rely on social media to create a community. And when they lose a part of that community, they feel a loss of support.
Wondering what shadowbanning entails, how to determine if you’ve been shadowbanned, and how to get unshadowbanned on TikTok? Check out below.
![]()
A cross-platform for making videos anywhere for all creators
Why your video editing isn’t good enough? How about some creative inspo?
- 100 Million+ Users
- 150+ Countries and Regions
- 4 Million+ Social Media Followers
- 5 Million+ Stock Media for Use
* Secure Download
- Part 1: What is a Shadowban On TikTok?
- Part 2: How Long is TikTok Shadowban?
- Part 3: How Do I Know If I am Shadowbanned?
- Part 4: Why am I Getting Shadowbanned On TikTok?
- Part 5: How to Fix TikTok Shadowban and Get Unshadowbanned?
- Part 6: Use Excellent Video Editors to Make Amazing TikTok Videos
Part 1: What is a Shadowban On TikTok?
The word “shadowban” is relatively self-explanatory. Basically, it means your account has been banned. But, the shadow part of the term means that you won’t know about the ban.
Shadowban on TikTok is a restriction that prevents your videos from appearing on the For You page or on hashtag results. It is a situation where your visibility has been reduced or where you have been banned from the platform, without your knowledge.
The act of shadowbanning a TikTok account is an automatic process done by TikTok’s algorithm to protect other users against spam content, copyright issues, and adult content. When you get shadowbanned, you stop receiving likes, views, and traffic from the For You page. Often, shadowbans go unnoticed until another user who stumbled upon your video points it out.
Part 2: How Long is TikTok Shadowban?
At the early stages of TikTok, shadowbans lasted for 24 hours. But, with the latest update in the TikTok algorithm, the length of TikTok shadowban is growing. Nowadays, a TikTok account is shadowbanned for approximately up to 2 weeks.
Within the first week, there will be a drop in your followers and so will the views. After a few days of the account shadowban being in place, you won’t be able to enter any tags or make new videos on TikTok unless they are public.
Part 3: How Do I Know If I am Shadowbanned?
The TikTok app doesn’t ever actually tell if you are shadowbanned. But, if you are then you can probably notice it. If you are shadowbanned, your videos will neither show up on the TikTok “For You” page nor will they appear when you search them via hashtag.
During a TikTok shadowban, your videos and content will not:
- be visible in the search results
- be visible on the feed
- receive new followers
- receive likes from others
- receive comments from others
Part 4: Why am I Getting Shadowbanned On TikTok?
TikTok has not issued any explanation on its shadowbanning techniques. However, what makes complete sense is that TikTok shadowbans its users for creating videos that violate its community guidelines.
Any video with offensive content that can harm the sentiments of people or anything that can trigger other users can attract TikTok shadowban. The app might limit the visibility of your content for reasons such as your account acting as spam or you are posting inappropriate content.
Spam Behavior
The primary reason why a user’s TikTok account can get shadowbanned is that they behave like a spammer. Usually, new people go on a spree of liking and following people in the hope that they will like and follow back. However, TikTok might recognize this behavior as spam and consider you as a robot.
If you like more than 100 posts daily, you might want to slow down. If you follow more than 50 TikTok accounts in a day, it is best to re-evaluate that strategy.
Inappropriate Content
Posting videos that go against the TikTok rules and community guidelines can get you shadowbanned or permanently banned.
The following content is considered inappropriate by TikTok:
- hate speech
- fake news
- violence
- nudity
- drugs
- copyrighted music
TikTok is committed to make its platform an inclusive and safe space. So, if you have experienced a drop in views or engagement, consider reassessing your recent content.
Part 5: How to Fix TikTok Shadowban and Get Unshadowbanned?
Wondering about how do you get unshadowbanned on TikTok? Here’s what you can do to remove your shadowban:
Uninstall and Reinstall TikTok
Firstly, delete your recent video. If it doesn’t work, uninstall and then reinstall the TikTok app. Sometimes, your app might just need an update to become functional once again.
Switch to A Pro Account
When doing a Google search on how to get unshadowbanned on TikTok, the most common tip you’ll find is to go into the Settings of your TikTok account and tap “Switch to a Pro Account”. The reason is that making the switch will allow you to see analytics for your posts and find out how people access your videos. By doing this, you can easily monitor how far your engagement has increased or dropped.
Delete Offensive Content
You should delete content that goes against the rules and community guidelines laid down by TikTok. After deleting inappropriate content, you have to wait for at least two weeks to get the shadowban lifted. You can refresh your device once in a while to check if you have finally managed to lift the ban.
Put TikTok On Hold for Sometime
Once you have deleted offensive content, clear the cache, close your app, ensure it is updated and then take a break from TikTok for a few days. Coming back after you have cleaned up your account and taken the needed break might get you unshadowbanned on TikTok.
Post Original, Innovative Content
When you return to posting content, you need to make sure your TikTok account doesn’t get shadowbanned again. Your account has already been flagged for something and so you need to try even harder to behave. If you go back to posting the same kind of content that got you banned in the first place, you will be booted off the stage again.
Ensure you always post original content with innovative ideas. Brainstorm new ideas with your team and come up with something new and unique. This way, you can avoid copyright infringement laws on TikTok.
Know Your Audience More
These days, there are many kids and minor accounts on TikTok, and maintaining a healthy environment is a part of your responsibility. Keep your videos free from sexualized themes, nudity, pornographic material, and suggestive themes. Remember; posting such content can land you in serious trouble with TikTok shadowban.
Part 6: Use Excellent Video Editors to Make Amazing TikTok Videos
With increasing competition among TikTok users, it is important to use a powerful video editing tool to make your TikTok videos stand out. That’s where Wondershare Filmora comes in. Whether it’s family, business, music, travel, game, education, and vlog, Fimora Video Editor can help with advanced editing solutions.
With Filmora video editor, TikTok users can avail salient editing features like:
- Easy to use video editing software
- A plethora of amazing video effects and templates to create incredible TikTok videos
- Offers a range of stunning overlays and filters for exceptional editing
- Advanced audio editing to make flawless TikTok videos
- Tools to trim, cut, merge, and extract videos
- Ability to make a video soundtrack
- Loads of royalty-free audio files, video effects, video files, and stock images
- Multiple visual effects like tilt-shift, picture-in-picture, green screen, etc.
- Offers full 4K support, color correction, action camera tools, a built-in music library
- Fantastic exporting capabilities
- 24/7 user-friendly support with useful tips on growth and other support channels
Conclusion
TikTok is an effective marketing tool. Although it might seem easy to become famous and get viral on TikTok, keep in mind to use the social media platform wisely. It is better to create content that abides by TikTok’s community guidelines and post entertaining content that resonates with your audience.
Shanoon Cox
Shanoon Cox is a writer and a lover of all things video.
Follow @Shanoon Cox
The Art of Sound Sculpting: Minimizing Auditory Clutter
The most frequent request you’ll get from video makers is to eliminate irritating noises like rumbling or humming from an original clip. Almost all of the time, capturing high-quality audio during filming is challenging since the conversation is often hard to hear or is made unclear due to surrounding noises, such as the dreadful air conditioners or fans.
To get rid of all these awful noises, this Audacity Noise Reduction feature will serve you a significant purpose in removing unwanted background noise for your future videos. Without further ado, let’s get started!
In this article
01 Things You Need to Prepare for Background Noise Reduction
02 How to Remove Background Noise in Audacity?
03 Why is Audacity Noise Reduction Not Working?
04 How to Prevent Background Noise in Audio Recording?
05 How to Remove Background Noise in Filmora?
Part 1: Things You Need to Prepare for Background Noise Reduction
Here are few things that you need to consider before you apply the noise reduction to your clips:
1. Noise Sample
A decent sample of the noise you wish to eliminate is perhaps the most crucial aspect of the Audacity remove noise procedure.
This will be used by Audacity to understand the noise and build a noise profile. The noise recording should last for a fair amount of time and be devoid of any other noises.
2. Avoid Copy Pasting Tiny Noise Section in Your Spoken Phrases
When you have a tiny part of noise between your stated words on your audio, please don’t copy/paste it to make a more significant piece of sound for Audacity to examine.
You would not be supplying Audacity with any more information that will help it generate a decent noise profile. The noise profile is what enables Audacity to tell the difference between speech and noise.
3. Minimum 2048 Data Samples Required
To build a noise profile, the Noise Reduction function requires a minimum of 2048 sample data. An audio file with a sampling frequency of 44.1kHz is roughly five hundredths of a second.
Note that this is the minor sound level that Audacity needs to generate a noise profile; however, should you supply a larger sample of the noise, Audacity can typically perform a great job of producing a suitable noise profile. As a result, attempt to capture a few seconds of background noises wherever possible.
4. Establish Recording Level and Record “Silence”
Setting your audio volume and capturing some “quiet” prior to speaking is the best way to achieve this. Instead, when you’ve finished talking, keep your camera/recorder going for a few moments.
Don’t move or create any sounds while capturing the background noises, and keep an ear open for any other noises. You only need to capture the ambient noise for a few moments; two to five seconds will suffice.
Part 2: How to Remove Background Noise in Audacity on Windows and Mac?
Whether you are using Windows or macOS, we will show you a step-by-step process to achieve your results using both software in this part of Audacity remove background music guide.
Remove background noise in Audacity on Windows
Step 1: On your recording, select a few moments of sound. Any segment of noise that incorporates other noises should be avoided.

Step 2: From the Effect menu, select Noise Reduction.

Step 3: Select the Get Noise Profile option whenever the Noise Reduction effect screen appears.

Note: Choose whether to implement the noise removal to the entire waveforms or only a portion of it.
Step 4: To access the Noise Reduction effects window, go to Effects > Noise Reduction. Raise the level of noise reduction progressively while previewing the result.

Step 5: Head over to the File section to Export and Save the result. Audacity does not save sound clips when you select Save Project; instead, you must choose Export. Select the file type you want to store and the place wherever you can save it. Select Save after giving the File Name.

Remove background noise in Audacity on Mac
Step 1: Create a room tone-containing audio file. When you don’t have a separate track for room tone, use a recording with a few moments of quiet in it. Click-and-drag to select a segment with a few minutes of silence using the Selection Tool.

Step 2: Select Noise Reduction from the Effects tab. Select the Get Noise Profile tab in the new tab under Step 1. The screen will shut, and Audacity will take noise profile samples of the indicated area.

Step 3: Click-and-drag to select the whole file, which requires noise reduction with the Selection Tool. To re-open the function, go to the Effect tab and pick Noise Reduction. Make modifications to the following parameters under Step 2:
- Reduce and Residue
- Frequency Smoothing (bands)
- Sensitivity
- Noise Reduction

Step 4: To listen to how the chosen file will look with the selected parameters, select Preview. Re-adjust until you have a sound noise reduction with no interference. When you’re finished, select Reduce and click OK.
Part 3: Why is Audacity Noise Reduction Not Working?
It’s possible that the Noise Reduction function isn’t letting you mop up your recording since your audio isn’t appropriate for it. The disturbance must be continuous, not random or fluctuating, to work for Audacity’s Noise Reduction function.
For example, the Noise Reduction function will not assist if your audio was made in a busy environment with unique noises such as background chatter, random traffic noises, or in an exhibition space or museum. The Noise Reduction feature in Audacity isn’t meant to cope with that kind of distortion. You’ll need to alter your recording approach if you’re capturing voice in either of those situations.
Under the following situations, the Audacity Noise Reduction function might underperform.
- Particular noise in the background, including traffic or people.
- When the harmonics of the sound and voice are comparable.
- There is sound variance where there is fluctuation in the noise.
- The volume of the voice is comparable to or lower than that of the background noise.
- When the noise is irregular or changeable rather than continuous.
- The loudness is deafening.
- The sound is a single click or pop.
Part 4: How to Prevent Background Noise in Audio Recording?
Although Audacity allows eliminating noise very simply, it is still an additional level that takes time to refine your podcast production. These pointers can help you avoid the necessity for noise reduction and cut down on the amount of time you spend processing.
1. Reduce the Computer Fan Noise
Whenever computers become too heated, they can produce a lot of noise. You may limit the amount of software that runs and position your mic away from the keyboard to help lessen this impact and avoid the fan from coming on.
However, even if you observe all of these guidelines, undesired recording sounds may still appear in your program. Fortunately, contemporary software makes this problem quite simple to resolve.
2. Reduce the Gain and Get Close to the Mic
Reduce the gain (sensitivity of the microphone) and go nearer to it. Talking straight into the microphone won’t distort your audio if you reduce the gain, and that would assist your microphone in concentrating on scooping up your voice’s tone.
Bonus Tip: Set your recorder’s (or DAW’s) sensitivity such that your speech peaks between -12 and -10db.
3. Utilize a Versatile Microphone
Condenser and dynamic microphones are the two most common types of podcast microphones. Condenser microphones are significantly more sensitive instruments meant to take up average atmospheric noise, whereas dynamic microphones have a narrower frequency range, picking up fewer ambient noises.
4. Optimize Your Recording Environment
The most significant and most crucial aspect of your podcasts’ sound quality is where you capture it. To optimize your personal podcasting space, we recommend choosing a peaceful, compact area away from HVAC systems, vehicles, external hard drives, background sound, motors, and other distractions. You may also increase the tone of your room by using natural sound absorbents such as curtains, rugs, carpets, and sofas.
Part 5: How to Remove Background Noise in Filmora?
Although there is a lot of software available to eliminate ambient noise, we highly suggest Wondershare Filmora Video Editor to edit audio and video in one place.
In addition to the standard audio editing capabilities, the recently redesigned Filmora currently includes enhanced waveforms, volume Keyframing , peak metering, and audio transitions, giving you a better audio editing interface.
For Win 7 or later (64-bit)
For macOS 10.12 or later
Filmora Video Editor will quickly remove ambient sound from both sound/video. You may also remove the sound from the video with this simple video editor, use the Audio Equalizer or Audio Mixer functions to modify the audio further, and then Export and save the audio in an Mp3 file. Here are the detailed steps:
Step 1: In the Wondershare Filmora Timeline menu, Import your footage. Trim the footage after previewing it and deleting the sections you don’t want to retain.

Step 2: To eliminate the ambient noise immediately, double-click on the video file, and go to the Audio panel to select the Remove Background Noise option. You will find that the background noise is removed automatically.

Step 3: After checking the results, select Export to download the noise-reduced clip to your desktop or upload it immediately to YouTube or Vimeo.

Conclusion
Well, there you have it. In this Audacity Remove Background Noise guide, we have reviewed every possible method you can adopt to get rid of the unnecessary background noise in the Audacity. And if the desired results are still not achieved, we highly recommend using the Wondershare Filmora editing software. Not only will it help you remove the unwanted ambient noise, but it will also allow you to customize your audio or video file further.
02 How to Remove Background Noise in Audacity?
03 Why is Audacity Noise Reduction Not Working?
04 How to Prevent Background Noise in Audio Recording?
05 How to Remove Background Noise in Filmora?
Part 1: Things You Need to Prepare for Background Noise Reduction
Here are few things that you need to consider before you apply the noise reduction to your clips:
1. Noise Sample
A decent sample of the noise you wish to eliminate is perhaps the most crucial aspect of the Audacity remove noise procedure.
This will be used by Audacity to understand the noise and build a noise profile. The noise recording should last for a fair amount of time and be devoid of any other noises.
2. Avoid Copy Pasting Tiny Noise Section in Your Spoken Phrases
When you have a tiny part of noise between your stated words on your audio, please don’t copy/paste it to make a more significant piece of sound for Audacity to examine.
You would not be supplying Audacity with any more information that will help it generate a decent noise profile. The noise profile is what enables Audacity to tell the difference between speech and noise.
3. Minimum 2048 Data Samples Required
To build a noise profile, the Noise Reduction function requires a minimum of 2048 sample data. An audio file with a sampling frequency of 44.1kHz is roughly five hundredths of a second.
Note that this is the minor sound level that Audacity needs to generate a noise profile; however, should you supply a larger sample of the noise, Audacity can typically perform a great job of producing a suitable noise profile. As a result, attempt to capture a few seconds of background noises wherever possible.
4. Establish Recording Level and Record “Silence”
Setting your audio volume and capturing some “quiet” prior to speaking is the best way to achieve this. Instead, when you’ve finished talking, keep your camera/recorder going for a few moments.
Don’t move or create any sounds while capturing the background noises, and keep an ear open for any other noises. You only need to capture the ambient noise for a few moments; two to five seconds will suffice.
Part 2: How to Remove Background Noise in Audacity on Windows and Mac?
Whether you are using Windows or macOS, we will show you a step-by-step process to achieve your results using both software in this part of Audacity remove background music guide.
Remove background noise in Audacity on Windows
Step 1: On your recording, select a few moments of sound. Any segment of noise that incorporates other noises should be avoided.
Step 2: From the Effect menu, select Noise Reduction.
Step 3: Select the Get Noise Profile option whenever the Noise Reduction effect screen appears.
Note: Choose whether to implement the noise removal to the entire waveforms or only a portion of it.
Step 4: To access the Noise Reduction effects window, go to Effects > Noise Reduction. Raise the level of noise reduction progressively while previewing the result.
Step 5: Head over to the File section to Export and Save the result. Audacity does not save sound clips when you select Save Project; instead, you must choose Export. Select the file type you want to store and the place wherever you can save it. Select Save after giving the File Name.
Remove background noise in Audacity on Mac
Step 1: Create a room tone-containing audio file. When you don’t have a separate track for room tone, use a recording with a few moments of quiet in it. Click-and-drag to select a segment with a few minutes of silence using the Selection Tool.
Step 2: Select Noise Reduction from the Effects tab. Select the Get Noise Profile tab in the new tab under Step 1. The screen will shut, and Audacity will take noise profile samples of the indicated area.
Step 3: Click-and-drag to select the whole file, which requires noise reduction with the Selection Tool. To re-open the function, go to the Effect tab and pick Noise Reduction. Make modifications to the following parameters under Step 2:
- Reduce and Residue
- Frequency Smoothing (bands)
- Sensitivity
- Noise Reduction
Step 4: To listen to how the chosen file will look with the selected parameters, select Preview. Re-adjust until you have a sound noise reduction with no interference. When you’re finished, select Reduce and click OK.
Part 3: Why is Audacity Noise Reduction Not Working?
It’s possible that the Noise Reduction function isn’t letting you mop up your recording since your audio isn’t appropriate for it. The disturbance must be continuous, not random or fluctuating, to work for Audacity’s Noise Reduction function.
For example, the Noise Reduction function will not assist if your audio was made in a busy environment with unique noises such as background chatter, random traffic noises, or in an exhibition space or museum. The Noise Reduction feature in Audacity isn’t meant to cope with that kind of distortion. You’ll need to alter your recording approach if you’re capturing voice in either of those situations.
Under the following situations, the Audacity Noise Reduction function might underperform.
- Particular noise in the background, including traffic or people.
- When the harmonics of the sound and voice are comparable.
- There is sound variance where there is fluctuation in the noise.
- The volume of the voice is comparable to or lower than that of the background noise.
- When the noise is irregular or changeable rather than continuous.
- The loudness is deafening.
- The sound is a single click or pop.
Part 4: How to Prevent Background Noise in Audio Recording?
Although Audacity allows eliminating noise very simply, it is still an additional level that takes time to refine your podcast production. These pointers can help you avoid the necessity for noise reduction and cut down on the amount of time you spend processing.
1. Reduce the Computer Fan Noise
Whenever computers become too heated, they can produce a lot of noise. You may limit the amount of software that runs and position your mic away from the keyboard to help lessen this impact and avoid the fan from coming on.
However, even if you observe all of these guidelines, undesired recording sounds may still appear in your program. Fortunately, contemporary software makes this problem quite simple to resolve.
2. Reduce the Gain and Get Close to the Mic
Reduce the gain (sensitivity of the microphone) and go nearer to it. Talking straight into the microphone won’t distort your audio if you reduce the gain, and that would assist your microphone in concentrating on scooping up your voice’s tone.
Bonus Tip: Set your recorder’s (or DAW’s) sensitivity such that your speech peaks between -12 and -10db.
3. Utilize a Versatile Microphone
Condenser and dynamic microphones are the two most common types of podcast microphones. Condenser microphones are significantly more sensitive instruments meant to take up average atmospheric noise, whereas dynamic microphones have a narrower frequency range, picking up fewer ambient noises.
4. Optimize Your Recording Environment
The most significant and most crucial aspect of your podcasts’ sound quality is where you capture it. To optimize your personal podcasting space, we recommend choosing a peaceful, compact area away from HVAC systems, vehicles, external hard drives, background sound, motors, and other distractions. You may also increase the tone of your room by using natural sound absorbents such as curtains, rugs, carpets, and sofas.
Part 5: How to Remove Background Noise in Filmora?
Although there is a lot of software available to eliminate ambient noise, we highly suggest Wondershare Filmora Video Editor to edit audio and video in one place.
In addition to the standard audio editing capabilities, the recently redesigned Filmora currently includes enhanced waveforms, volume Keyframing , peak metering, and audio transitions, giving you a better audio editing interface.
For Win 7 or later (64-bit)
For macOS 10.12 or later
Filmora Video Editor will quickly remove ambient sound from both sound/video. You may also remove the sound from the video with this simple video editor, use the Audio Equalizer or Audio Mixer functions to modify the audio further, and then Export and save the audio in an Mp3 file. Here are the detailed steps:
Step 1: In the Wondershare Filmora Timeline menu, Import your footage. Trim the footage after previewing it and deleting the sections you don’t want to retain.
Step 2: To eliminate the ambient noise immediately, double-click on the video file, and go to the Audio panel to select the Remove Background Noise option. You will find that the background noise is removed automatically.
Step 3: After checking the results, select Export to download the noise-reduced clip to your desktop or upload it immediately to YouTube or Vimeo.
Conclusion
Well, there you have it. In this Audacity Remove Background Noise guide, we have reviewed every possible method you can adopt to get rid of the unnecessary background noise in the Audacity. And if the desired results are still not achieved, we highly recommend using the Wondershare Filmora editing software. Not only will it help you remove the unwanted ambient noise, but it will also allow you to customize your audio or video file further.
Also read:
- Understanding TikTok's Use and Interpretation of PFP
- [New] In 2024, Decoding BookTok’s Best Reads for Today' Writers and Audiences Alike
- [Updated] Sync Your Creativity Across Chrome, Android & iOS for TikTok for 2024
- Amplify Your TikTok Content with Current Trends for 2024
- Cutting-Edge Creativity on TikTok Mastering Video Designs in Minutes
- 2024 Approved Unlock Siri Integration in TikTok Videos Comprehensive Walkthrough
- [Updated] Trending Reads BookTok’s Hot List of Must-Have Titles for 2024
- [Updated] Giggle Glance Top Trending Comedy Talents for 2024
- [New] In 2024, Enhancing Visual Storytelling in TikTok The Role of Narration
- [Updated] 2024 Approved Erase Your TikTok Signatures with Apps on Devices
- 2024 Approved Take Control How to Involve Yourself in a Friend's Live on TikTok
- [New] In 2024, Cooking Craze Hot TikTok Recipes Worth Sharing
- The Efficient TikTok Watcher's Toolkit (Fast Forward Edition)
- [Updated] In 2024, From Novice to Pro Crafting Excellent Slow Mo Videos in TikTok
- 2024 Approved Connecting with Real-Time TikToks Practical Guide
- [New] Crafting Captivating TikTok Reacts Filmmaker’s Guide with Filmora Pro for 2024
- [New] Your Personalized Blueprint to Livestreaming on TikTok via Desktop
- [New] Craft Your Ideal TikTok Image with Our Step-by-Step Guide for 2024
- [New] Versatile Video Tools Exporting TikTok Content as MP4
- [New] Unleash Potential The Ultimate Guide to Spectacous TikTok Openers (Mac) for 2024
- 2024 Approved Extreme Escape Top 10 Unpredictable TikTok Challenges
- In 2024, Lost in the Loop? Fix a Faulty TikTok Reload
- [Updated] In 2024, Fresh Insights Top Video Sharing Sites Without TikTok
- Yearbook Beatdowns The Top Ten TikTok Hits of the New Decade
- [New] 2024 Approved How to Record a TikTok All About TikTok Camera
- 2024 Approved Time-Lapse TikToks Capturing Anime Elements and Styles
- Stop the Frenzy – Fixing a Mistaken TikTok Reload for 2024
- 2024 Approved The Game-Changing Impact of TikTok in Modern Business Marketing
- [New] In 2024, Explore Amazon's Hot TikTok Products That Can’t Be Missed
- [New] Spotlight TikTok Trends Shaping the Social Stage for 2024
- [New] Dive Deep Into the World of TikTok Emojis - Discover #7 Favorites and Hidden Messages for 2024
- [New] Revitalize Your Content 3 Advanced Methods for Changing TikTok Backdrops
- Mastering Fast Forward on TikTok App
- [New] 25 Popular TikTok Creators with Anime Flair for 2024
- [New] Engaging and Eye-Catching TikTok Videos Made Simple for 2024
- [New] Capture the Rhythm Rapid Tap Into TikTok Videos
- 2024 Approved Accelerating Filming on TikTok for Real-Time Results
- [Updated] 2024 Approved Discover the 10 Cutest/Scariest TikTok Filters Ever
- Step Into Trendy Territory with These Top 20 Moves
- [New] 2024 Approved Ultimate 20 Country Chill-Out Playlist for Relaxing Dance Moves (TikTok)
- 2024 Approved Unveiling TikTok's Hidden Emoji Gems Top 7 List
- [Updated] The Best 7 TikTok Instruments to Increase Your View Count for 2024
- [Updated] Aural Clean-Up Purifying Recordings on Audacity
- [Updated] Instant TikTok Content Access - A Step-by-Step
- [New] In-Depth Guide to Adding Sound to TikTok Media
- [Updated] Strategies to Skyrocket Your Popularity on TikTok
- Mastery Manual for Dynamic, Distracting Filters
- Perfecting Text Placement in TikTok Video Content for 2024
- [Updated] 2024 Approved Enhance Visibility on TikTok - A List of Powerful Username Concepts
- Updated In 2024, Omegle Explained Navigating Free Chat Engagements with a Lens on Security Concerns
- [Updated] 2024 Approved Open Air FB Audio Downloads
- In 2024, 2 Ways to Transfer Text Messages from Vivo Y36i to iPhone 15/14/13/12/11/X/8/ | Dr.fone
- 2024 Approved Animate Like a Pro Top 10 Tools for Beginners and Experts Alike
- Updated In 2024, How to Make a Photoshop Collage in Simple Steps
- Simple Solutions to Fix Android SystemUI Has Stopped Error For Google Pixel 7a | Dr.fone
- [New] How to Amplify Your Online Presence with Google Meet's Aesthetic Tools
- [New] In 2024, The Hot List Viral Video Threads for the Week
- New 2024 Approved You Can Turn a TikTok Into a GIF Now
- The Noise Negators Handbook Removing Unwanted Soundscapes From Audio Experience
- New Replace VSDC with These Powerful Mac Video Editors
- [Updated] Proven Methods for Sensational Instagram Puzzle Creation
- New Learning How to Slow Down a Video on iPhone Properly for 2024
- [Updated] Unlock Laughter Traps 20 Quirky FB Detention Anecdotes for Amusement for 2024
- How To Fix Unresponsive Phone Touchscreen Of Realme C67 4G | Dr.fone
- [Updated] The Secrets to Seamless Zoom Talks Mastering Online Communication Skills for 2024
- [Updated] VLC Media Recorder Assessment Report for 2024
- Effortless Group Chats Joining Zoom on Your Android
- In 2024, 3 Ways to Unlock iPhone 14 Plus without Passcode or Face ID | Dr.fone
- [New] Essential 10 Online Collaboration Tools Ensuring Privacy for 2024
- How to Change Google Play Location On Xiaomi Redmi Note 12R | Dr.fone
- In 2024, How To Track IMEI Number Of Xiaomi 14 Through Google Earth?
- In 2024, How to Fake Snapchat Location on OnePlus 11R | Dr.fone
- [New] Diligent Duplication in the World of Insta
- 2024 Approved Leading Slideshow Converter to Film
- Updated 2024 Approved Speed Up or Slow Down Top GIF Editing Software and Apps
- In 2024, How to Change Google Play Location On Tecno Spark 10 Pro | Dr.fone
- In 2024, About Nokia C02 FRP Bypass
- How Can We Bypass Realme 12 Pro 5G FRP?
- Updated How to Speed Up Video on Instagram Reels?
- New Create Motion Effect with Path Blur In Photoshop
- In 2024, Bypass Activation Lock From iPhone SE (2020) - 4 Easy Ways
- New Premiere Pro CS6 Mac Free Download, Installation, and Activation for 2024
- Title: Triumph Over TikTok's Unseen Ban Barriers for 2024
- Author: Brian
- Created at : 2024-05-23 14:21:45
- Updated at : 2024-05-24 14:21:45
- Link: https://tiktok-videos.techidaily.com/triumph-over-tiktoks-unseen-ban-barriers-for-2024/
- License: This work is licensed under CC BY-NC-SA 4.0.
