
!["[Updated] 2024 Approved Guide to Large Prop Integration in TikTok Productions"](https://www.lifewire.com/thmb/qNkFgtP2CzmQ0IlAZm65I2IKxgw=/540x405/filters:no_upscale():max_bytes(150000):strip_icc()/how-to-fix-a-400-bad-request-error-2617988-70ec8d87146e462cae353c32d0dcb64a.png)
"[Updated] 2024 Approved Guide to Large Prop Integration in TikTok Productions"
Guide to Large Prop Integration in TikTok Productions
On TikTok, the Big head effect is commonly employed by content producers to generate humorous videos. In particular, the Big head filter may be utilized for various creative production projects, including caricature films, memes, and teaching.
How to get that TikTok Big Head effect? Would you like to make your head look larger than your body in TikTok videos or photos? It’s effortless to do on your Android smartphone. The best part is that we will show you how to use a Big head filter on different applications in this article and how to edit it. Aside from TikTok, there’s another software you can use to enlarge your head in videos or images. Let’s show you!
In this article
01 How to Get the Big Head Filter on TikTok?
02 How to Make a Big Head Effect in CapCut?
03 How to Add Big Head Effect in Filmora Video Editor? [3 Ways]
Part 1: How to Get the Big Head Filter on TikTok?
The TikTok Big Head effect is an extremely entertaining filter. TikTok is a social media platform that specializes in sharing short video content. Its consumer subscription has surpassed Facebook, Instagram, Twitter, and even Snapchat, and its download percentages are much greater than those of the above said social networking sites.
The TikTok Big Head effect on TikTok, on the other hand, was so widespread that it began to be used by more prominent ‘TikTokers.’ Afterward, in a single glance, all users of the social networking in concern began to use it on TikTok live broadcasts. This is how you can use the TikTok Big Head effect:
Step 1: Go to TikTok’s Discover menu to access the Big Head effects.
Step 2: Type “Big Head“ or #bighead into the search bar and choose the top hashtag**_, #bighead_**. Each TikTok video that employs a Big Head filter would then be displayed.
Step 3: To test out a filter, choose one of the numerous videos available and look for the filter’s name in the lower-left corner.
Step 4: Try pressing on the filter’s title, then touch on the Camera icon at the bottom of the display to make a TikTok video employing the Big Head filter in concern.
Here is a detailed video tutorial about how to make a big head effect in TikTok directly.
Part 2: How to Make a Big Head Effect in CapCut?
CapCut is a content creation application that lets users apply various stickers, filters , and effects to their videos. It also has an essential green screen function, a zooming capability that acts like a Ken Burns effect , and many more features.
With the CapCut software, you can quickly enlarge your head in videos. With a single click of the big head effect, your head would instantly become larger than your body. Here’s how to do it step by step:
Step 1: In the CapCut software, create a New Project and then upload a video in which you will enlarge your head.
Step 2: Click the Effects option at the bottom of the display, and then tap the Facial or Body Effects option.
Step 3: Locate and choose the Big Head effect from the Emotions effect section.
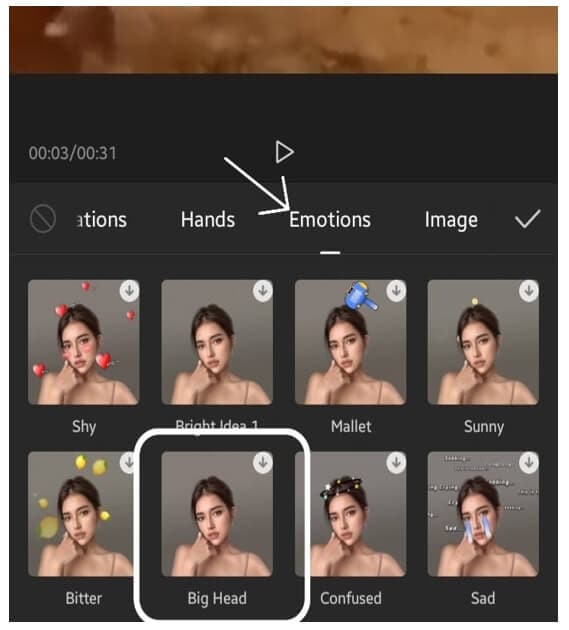
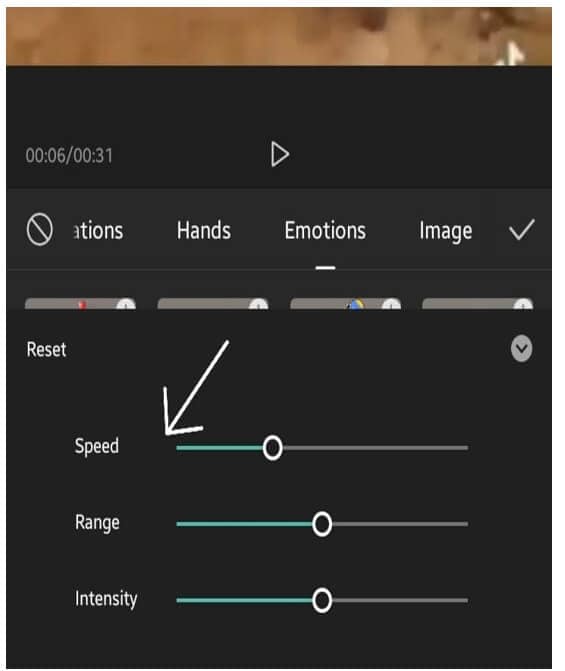
Step 4: The big head effect may be modified in speed, range, and intensity. Finally, adjust the duration of the Big head effect to match the video’s length.
You can check the video tutorial below to find out more details in creating big head and small body effect on video with CapCut.
Part 3: How to Add Big Head Effect in Filmora Video Editor? [3 Ways]
Filmora video editor by Wondershare includes the typical overlays, transitions, trimming, as well as the effects that we’ve grown to expect from the enthusiast-level video editor. It features a user-friendly interface that is clean, minimalistic, and dark. If that wasn’t enough, we’re sure you’ll be pleased to learn that the Filmora program can be used to create the TikTok big head effect in several ways.
With all of the characteristics we’ve discussed so far, you may further customize the Big Head effect with various Filmora effects. Let’s show you how:
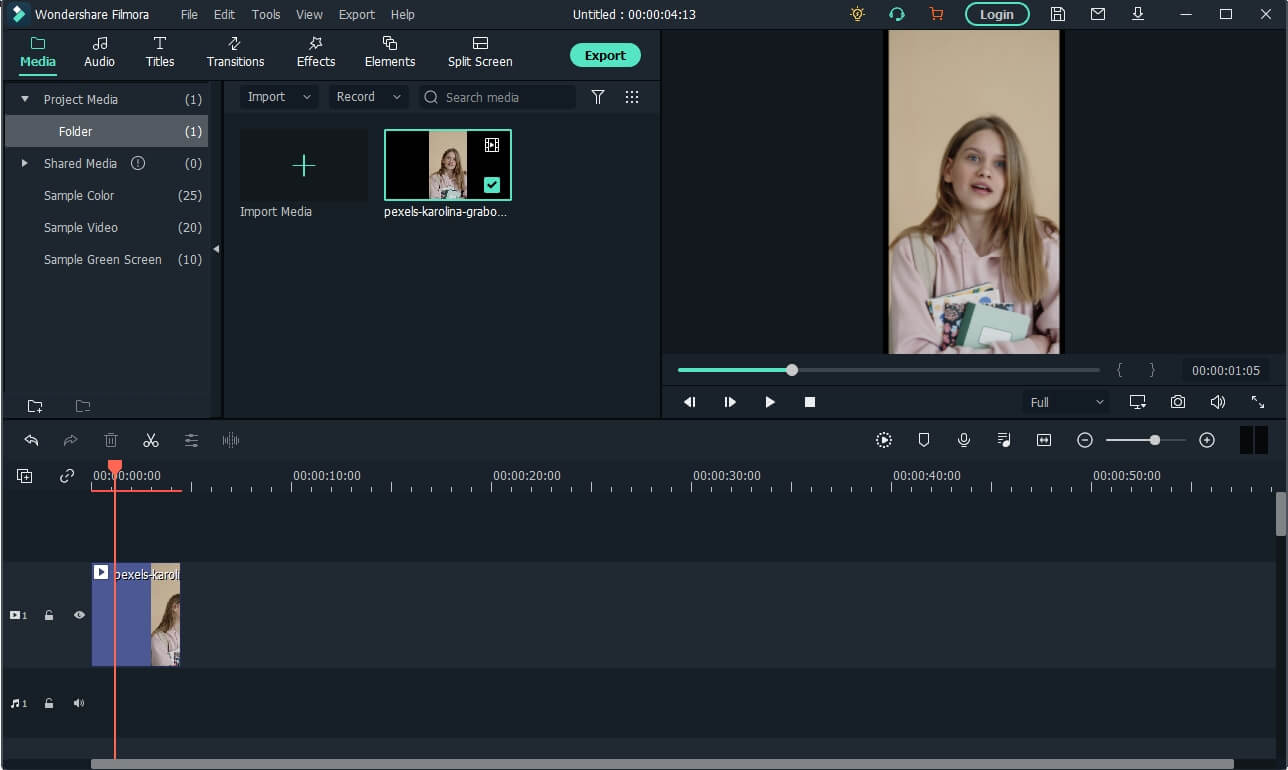
Launch Filmora and click on the Import tab to select the video file you want to use. And then drag and drop the imported media file onto the timeline panel.
For Win 7 or later (64-bit)
For macOS 10.12 or later
Method 1: Create Big Head with AR Stick Bubble Head Effect in Filmora Video Editor
To add the Big Head effect on Filmora, click on the Effects option and select the AR Stickers option. Type bubble head in the search bar and then you will see it in the screen. Then, drag and drop the AR Stickers Bubble Head effect onto the timeline**,** specifically to the portion of the video where you want to add the Big Head filter on the person. As you do that, you will see a Bubble present on the video.
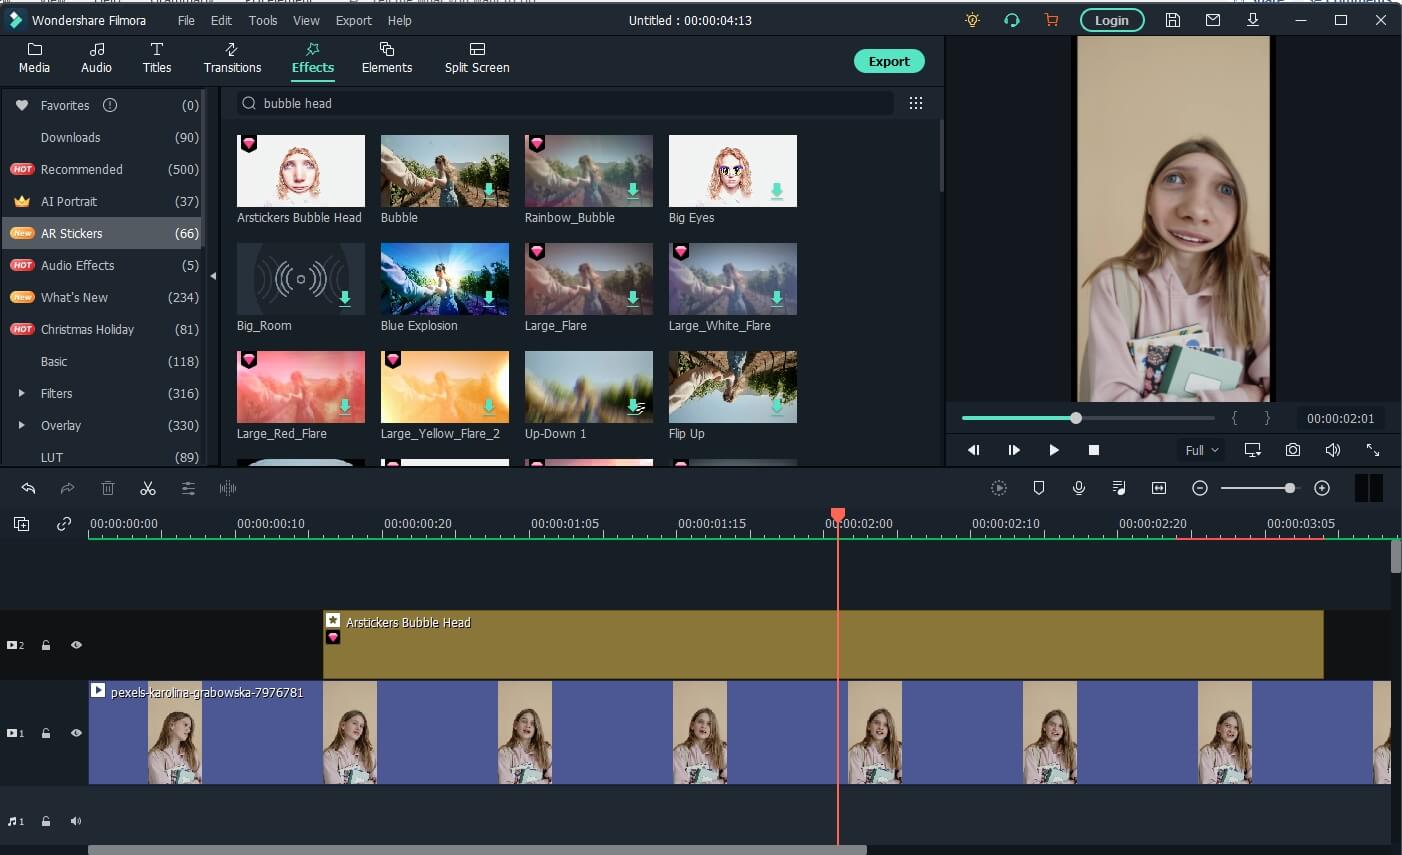
Besides the bubble head effect, there are many more AR stickers available, such as heart eyes, censor bar, emojis, and big eyes. Download the Filmora video editor now and check it yourself.
For Win 7 or later (64-bit)
For macOS 10.12 or later
Method 2: Add Magnify Effect to Video
In the Effects tab, go to the Recommended category, and then you will see the magnify effect. Drag and drop it to the timeline above the video track, and you will see part of the video has been magnified accordingly.
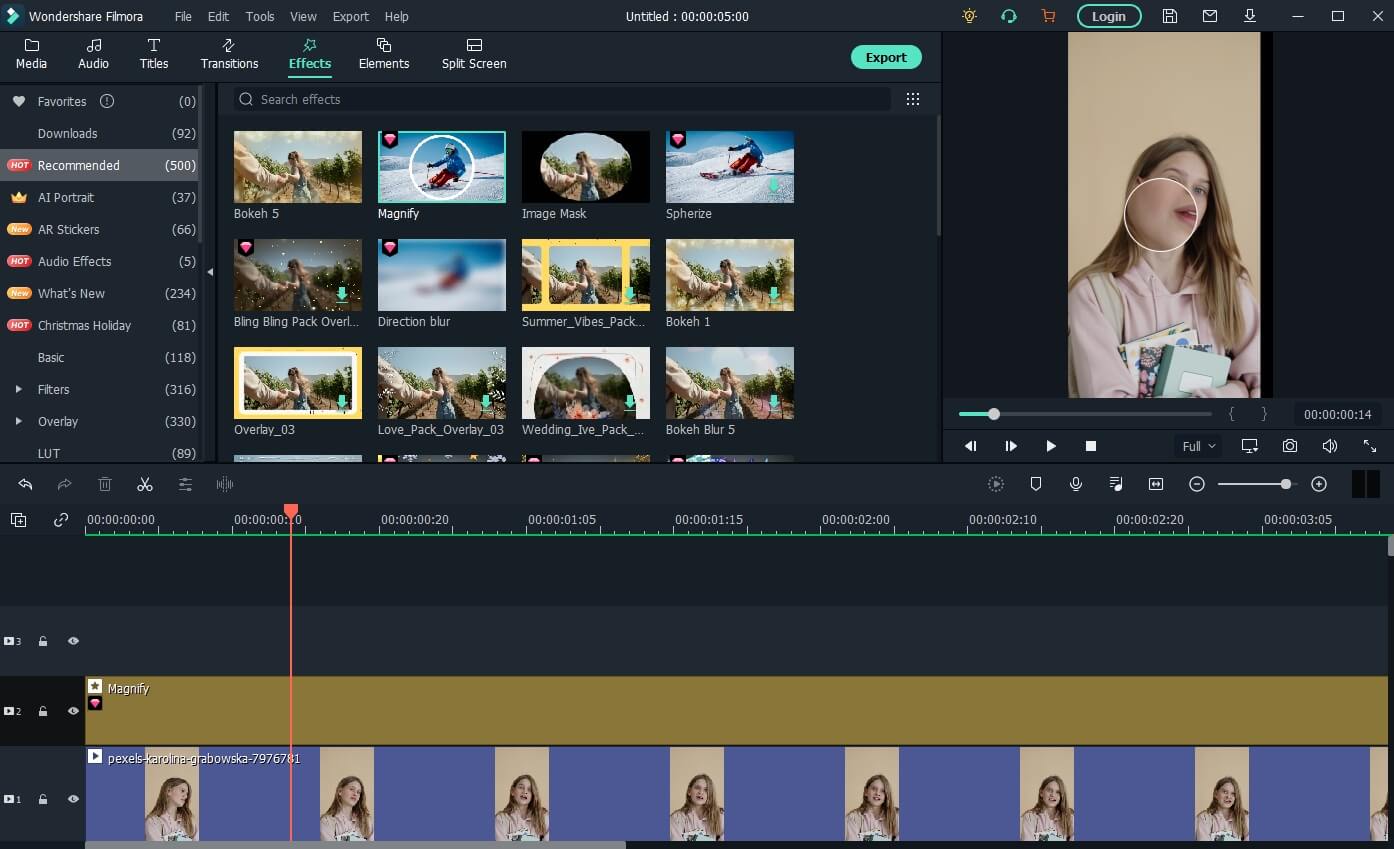
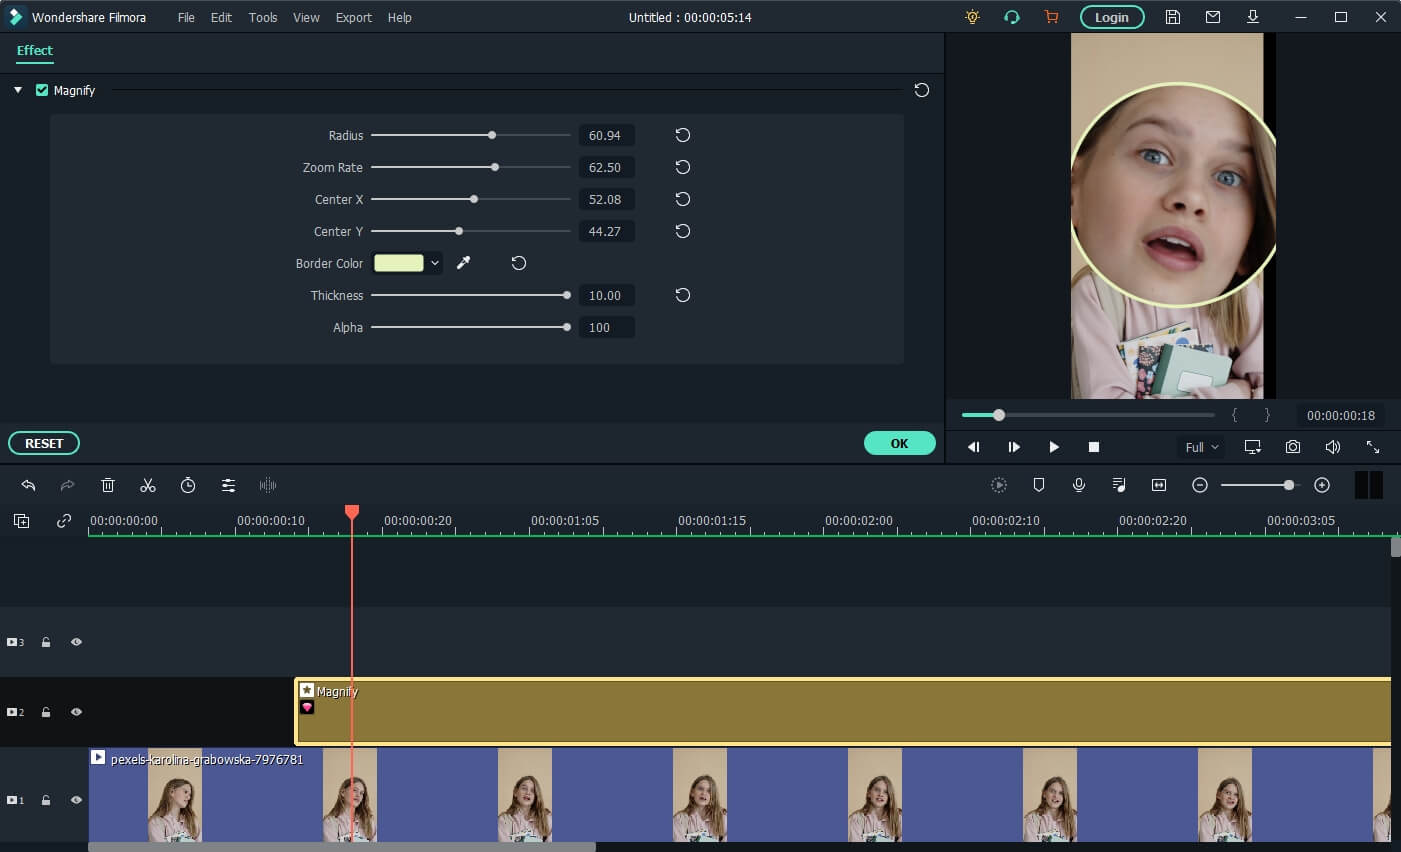
Now, double click on the effect in the timeline and open the Properties of the magnify effect. From the Properties section, you can adjust the size of the bubble using functions such as the Radius, CenterY, CenterX, Alpha, Zoom rate, etc to get a better video with big head effects.
Note: If you’re unable to locate the Magnify option in the Effects tab, please download and install the latest version of Filmora, and then type “Magnify” in the search bar, and the system will directly take you to where the option is present.
Method 3: Use Mask and Scale to Make a Video with Big Head Effect
Besides adding magnify effects and bubblehead effects, you can also use the mask preset to create a big head effect in Filmora.
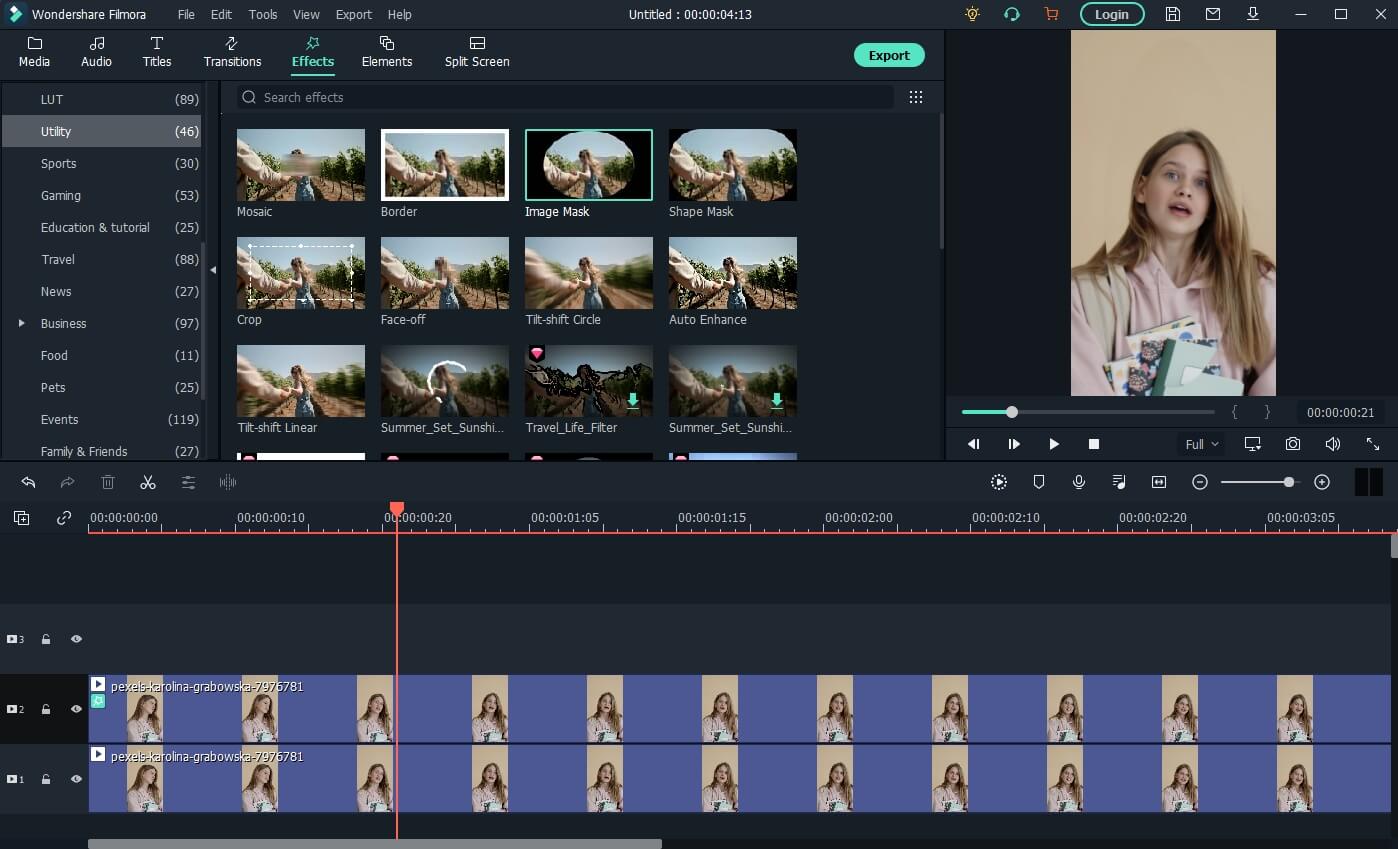
Drag and drop the video to video track 1 and video track 2 respectively in Filmora. Then go to the Effect tab, and scroll down to the Utility category, and place the Image Mask effect to the video above. Or, you can type image mask in the search bar to locate it quickly.
Now, double-click the video with the image mask to adjust the properties. Scroll down to the Video Effects field, and you will see the Image Mask. Click the arrow icon to choose a mask preset, adjust its position and size settings to fit the video.
Tips: You can hide the video in track 1 by clicking the eye icon so you can adjust the video with the image mask conveniently. Click it again then you will see the video.
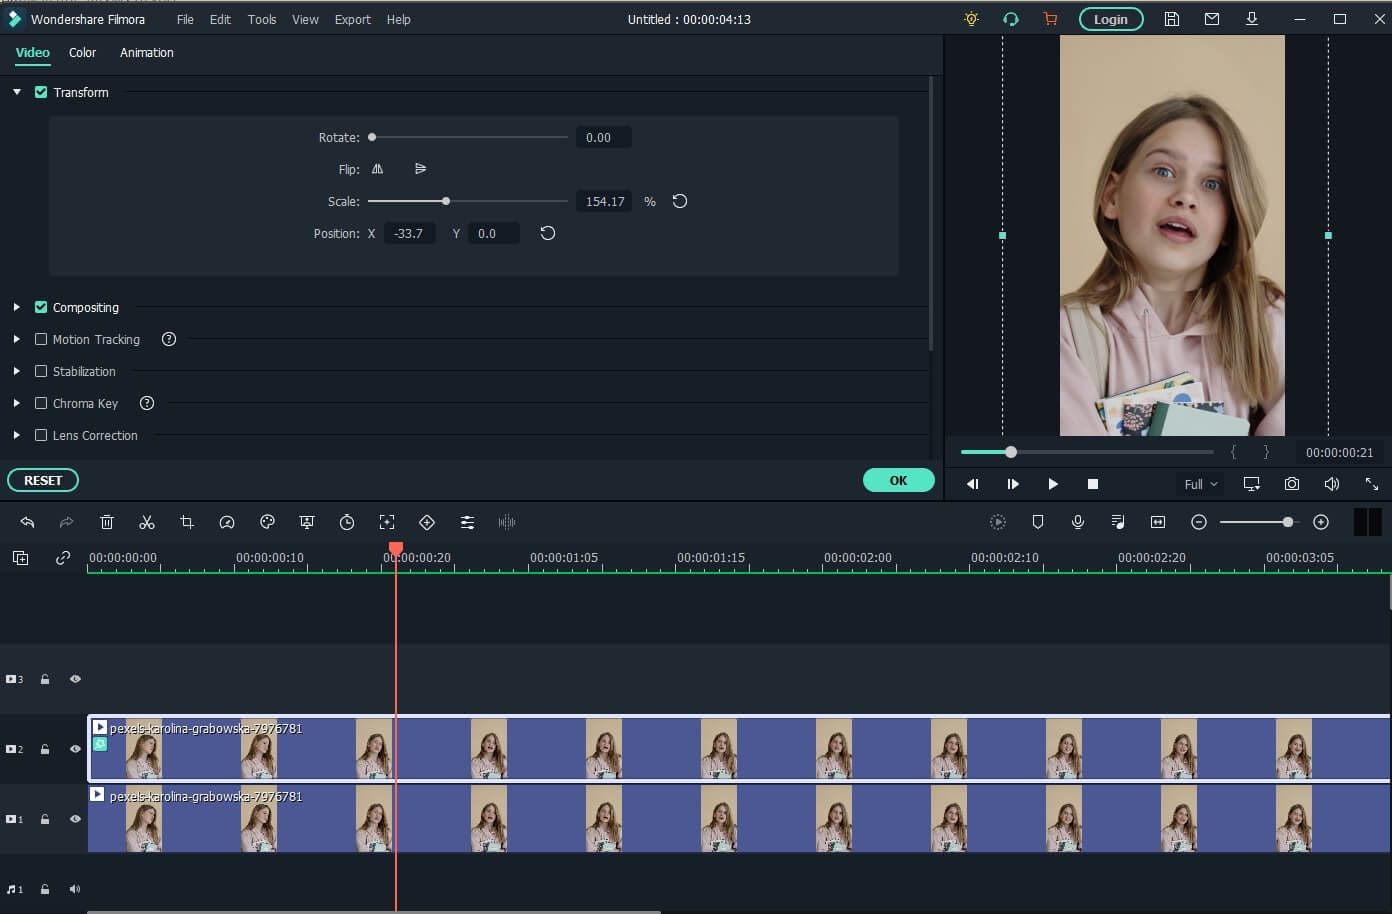
Next, click the video in track 2 again, and then go to the Transform tab, use the Scale slider to adjust the video size to make a big head effect.
Watch the video tutorial below to find out how to use the Image Mask effect to create a video with a big head effect in Filmora.
For Win 7 or later (64-bit)
For macOS 10.12 or later
After creating the video with a big head effect, click the Export button on the screen to save the video on the computer, and then upload it to TikTok from your computer directly.
Conclusion
This article demonstrates the steps you need to take to add the TikTok Big Head filter to your videos. Remember, the Big Head filter is used to make videos more amusing for entertainment purposes.
Not only TikTok, but different apps such as CapCut on Android and Wondershare Filmora on PC can be of great use to you. Especially in Filmora, you get tons of video editing features that unlock your way into the editing world!
02 How to Make a Big Head Effect in CapCut?
03 How to Add Big Head Effect in Filmora Video Editor? [3 Ways]
Part 1: How to Get the Big Head Filter on TikTok?
The TikTok Big Head effect is an extremely entertaining filter. TikTok is a social media platform that specializes in sharing short video content. Its consumer subscription has surpassed Facebook, Instagram, Twitter, and even Snapchat, and its download percentages are much greater than those of the above said social networking sites.
The TikTok Big Head effect on TikTok, on the other hand, was so widespread that it began to be used by more prominent ‘TikTokers.’ Afterward, in a single glance, all users of the social networking in concern began to use it on TikTok live broadcasts. This is how you can use the TikTok Big Head effect:
Step 1: Go to TikTok’s Discover menu to access the Big Head effects.
Step 2: Type “Big Head“ or #bighead into the search bar and choose the top hashtag**_, #bighead_**. Each TikTok video that employs a Big Head filter would then be displayed.
Step 3: To test out a filter, choose one of the numerous videos available and look for the filter’s name in the lower-left corner.
Step 4: Try pressing on the filter’s title, then touch on the Camera icon at the bottom of the display to make a TikTok video employing the Big Head filter in concern.
Here is a detailed video tutorial about how to make a big head effect in TikTok directly.
Part 2: How to Make a Big Head Effect in CapCut?
CapCut is a content creation application that lets users apply various stickers, filters , and effects to their videos. It also has an essential green screen function, a zooming capability that acts like a Ken Burns effect , and many more features.
With the CapCut software, you can quickly enlarge your head in videos. With a single click of the big head effect, your head would instantly become larger than your body. Here’s how to do it step by step:
Step 1: In the CapCut software, create a New Project and then upload a video in which you will enlarge your head.
Step 2: Click the Effects option at the bottom of the display, and then tap the Facial or Body Effects option.
Step 3: Locate and choose the Big Head effect from the Emotions effect section.
Step 4: The big head effect may be modified in speed, range, and intensity. Finally, adjust the duration of the Big head effect to match the video’s length.
You can check the video tutorial below to find out more details in creating big head and small body effect on video with CapCut.
Part 3: How to Add Big Head Effect in Filmora Video Editor? [3 Ways]
Filmora video editor by Wondershare includes the typical overlays, transitions, trimming, as well as the effects that we’ve grown to expect from the enthusiast-level video editor. It features a user-friendly interface that is clean, minimalistic, and dark. If that wasn’t enough, we’re sure you’ll be pleased to learn that the Filmora program can be used to create the TikTok big head effect in several ways.
With all of the characteristics we’ve discussed so far, you may further customize the Big Head effect with various Filmora effects. Let’s show you how:
Launch Filmora and click on the Import tab to select the video file you want to use. And then drag and drop the imported media file onto the timeline panel.
For Win 7 or later (64-bit)
For macOS 10.12 or later
Method 1: Create Big Head with AR Stick Bubble Head Effect in Filmora Video Editor
To add the Big Head effect on Filmora, click on the Effects option and select the AR Stickers option. Type bubble head in the search bar and then you will see it in the screen. Then, drag and drop the AR Stickers Bubble Head effect onto the timeline**,** specifically to the portion of the video where you want to add the Big Head filter on the person. As you do that, you will see a Bubble present on the video.
Besides the bubble head effect, there are many more AR stickers available, such as heart eyes, censor bar, emojis, and big eyes. Download the Filmora video editor now and check it yourself.
For Win 7 or later (64-bit)
For macOS 10.12 or later
Method 2: Add Magnify Effect to Video
In the Effects tab, go to the Recommended category, and then you will see the magnify effect. Drag and drop it to the timeline above the video track, and you will see part of the video has been magnified accordingly.
Now, double click on the effect in the timeline and open the Properties of the magnify effect. From the Properties section, you can adjust the size of the bubble using functions such as the Radius, CenterY, CenterX, Alpha, Zoom rate, etc to get a better video with big head effects.
Note: If you’re unable to locate the Magnify option in the Effects tab, please download and install the latest version of Filmora, and then type “Magnify” in the search bar, and the system will directly take you to where the option is present.
Method 3: Use Mask and Scale to Make a Video with Big Head Effect
Besides adding magnify effects and bubblehead effects, you can also use the mask preset to create a big head effect in Filmora.
Drag and drop the video to video track 1 and video track 2 respectively in Filmora. Then go to the Effect tab, and scroll down to the Utility category, and place the Image Mask effect to the video above. Or, you can type image mask in the search bar to locate it quickly.
Now, double-click the video with the image mask to adjust the properties. Scroll down to the Video Effects field, and you will see the Image Mask. Click the arrow icon to choose a mask preset, adjust its position and size settings to fit the video.
Tips: You can hide the video in track 1 by clicking the eye icon so you can adjust the video with the image mask conveniently. Click it again then you will see the video.
Next, click the video in track 2 again, and then go to the Transform tab, use the Scale slider to adjust the video size to make a big head effect.
Watch the video tutorial below to find out how to use the Image Mask effect to create a video with a big head effect in Filmora.
For Win 7 or later (64-bit)
For macOS 10.12 or later
After creating the video with a big head effect, click the Export button on the screen to save the video on the computer, and then upload it to TikTok from your computer directly.
Conclusion
This article demonstrates the steps you need to take to add the TikTok Big Head filter to your videos. Remember, the Big Head filter is used to make videos more amusing for entertainment purposes.
Not only TikTok, but different apps such as CapCut on Android and Wondershare Filmora on PC can be of great use to you. Especially in Filmora, you get tons of video editing features that unlock your way into the editing world!
Enhancing Visual Storytelling in TikTok: The Role of Narration
Edit TikTok Videos with Filmora
Wondershare Filmora is one of the best video editors to level up your TikTok video with stunning effects. Download and have a try.
TikTok is becoming increasingly popular among digital content creators. It has provided an opportunity to millions of content makers to produce captivating and creative digital stories. In addition, this app is also continuously upgrading its platform to help you create compelling content.
One such unique addition to its framework is the TikTok voice-over. Voiceovers are added to TikTok videos for narration purposes. So, if you are making a vlog, a voiceover is a must. Likewise, the TikTok voice-over also helps you add sounds and effects to the videos. If you want to know how to do voiceover on TikTok, the following article will explain everything in a step-by-step guide.
Part 1: How to Add Voiceover on TikTok When Recording Video?
TikTok helps you polish your content in a number of ways. Voiceover is one such method to add spice and life to your video content. TikTok allows in-app voiceover addition to the videos. This means you can directly add voiceover when recording video in TikTok. The process is pretty simple. Learn to add a voiceover in a step-by-step guide below.
Step 1: Open TikTok app, and add voice
Launch the TikTok application and click on the + button to open a new window. Tap the voiceover option at the top right corner of the screen.
Step 2: Record video and Save
Long-press the record button to add the voice to the video. Click on the Save option at the top of the screen.
Note: The original sound of the video can also be removed when recording voiceover. However, if you want to keep the original video sound, tick the keep original sound box.
Part 2: How to Add Voiceover on TikTok After Video Recorded?
Videos can be imported to TikTok from your gallery or local files. This means you can use TikTok to edit the pre-recorded videos. Video content can be enhanced using filters, texts, and effects available in TikTok in-built library. Moreover, it also enables you to add voiceovers to videos already saved in your gallery. If you want to know how to do voiceover on TikTok, the process is summarized in the simple steps below.
Step 1: launch TikTok and upload a video
Open the application and click the upload button after pressing the + option.
Note: Performing the above step will direct you to your gallery. Select the videos that you want to import to TikTok for adding a voiceover.
Step 2: Add Voiceover
Click on the voiceover option and keep the record button pressed. Select the save option after finishing the voiceover.
Note: The imported video can be trimmed before the voiceover is added. Trim the video to the desired size and click on the Next button.
Part 3: Why You Should Add a Voiceover to a TikTok Video
Using TikTok is fun. You can enjoy exciting features on TikTok, such as sharing your content, enhancing your videos using filters and effects, and much more. In addition to this, you may also create your own content using TikTok versatile tools. One of the state-of-the-art tools that TikTok has added to its toolkit is the voiceover facility. Voiceover plays an important role in making video content clear and compelling. TikTok videos are no exception. If you want to know about the benefits of TikTok voiceovers, we have got you covered in the following section. Let’s get started.
1. Connects content creators to their audience
Voiceover facilitates you to communicate with your audience. There are high chances that the idea you are trying to present in your video content might not be clear to the viewers. So, voiceovers are effective in adding clarity to your content.
2. Create impact
The primary objective of sharing video content is to influence your followers. However, sometimes visuals are not enough to create impact. Thus, you may need an explanation or narration to convey your message in TikTok videos. So, voiceover is the only way of translating your imagination.
3. Humor
In addition to instructional content and storytelling, TikTok is also known for adding humor. Humorous content can be enhanced further by adding a voiceover. So, the voiceover feature gives you a chance to show your humor skills in TikTok videos.
Part 4: How to Record Voiceover for TikTok on Desktop?
TikTok videos are commonly recorded using its smartphone application. However, this does not imply that you have to perform all the video editing on your phone. You can easily do it on your desktop too. But, what if you are in the middle of editing a TikTok video in some video editing tool on your desktop and want to add a voiceover to it? Don’t worry!! You can also record the voiceover for TikTok on the desktop as well.
Wondershare Filmora is one such advanced video editing tool that allows you to record a voiceover. Do you want to know how to do a voiceover on TikTok? If yes, follow the simple steps below.
Step 1: Make a video for TikTok with Filmora
Launch Filmora, and then import the TikTok video to the timeline by dragging and dropping.
Note: Filmora also has the camera recording feature , if your computer has a camera, you can also record a video in Filmora.
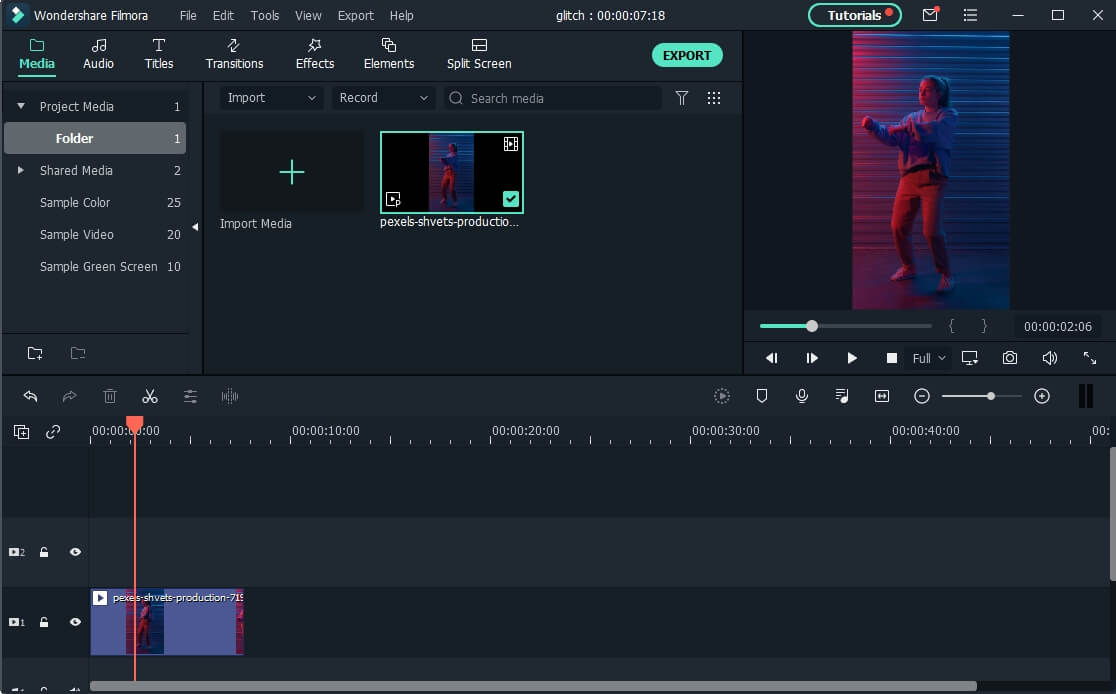
Step 2: Record a voiceover
Open the Record tab and click on the record a voiceover from the list of options. Or click the microphone icon on the screen to start the voiceover recording.
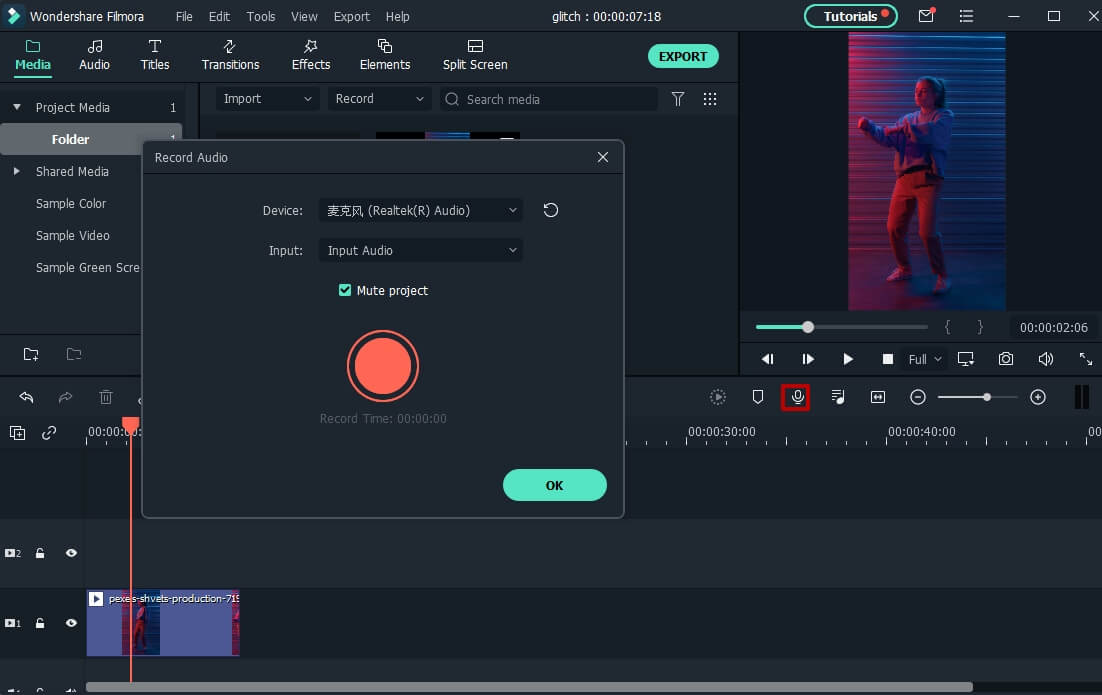
After recording, you can try the audio editing features to change the voice from a female to male, or adjust the speed of voiceover.
Step 3: Export the video
Sync the voiceover to the video and select the export button to save and share the video file.

Now, you can upload the edited video to your TikTok account on a desktop computer.
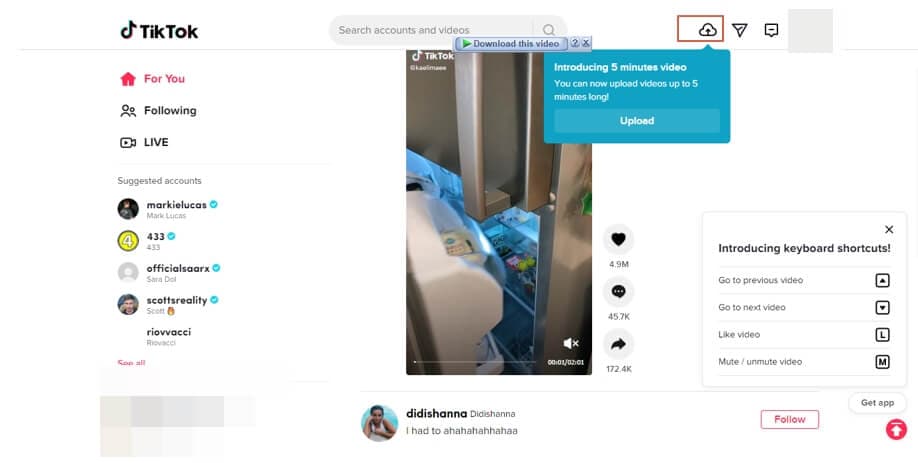
Step 1: Log in to your TikTok on desktop
Go to the official TikTok website and press the red Login button.
Step 2: Click on Upload video
Click on the cloud button at the top left corner to upload your edited video.
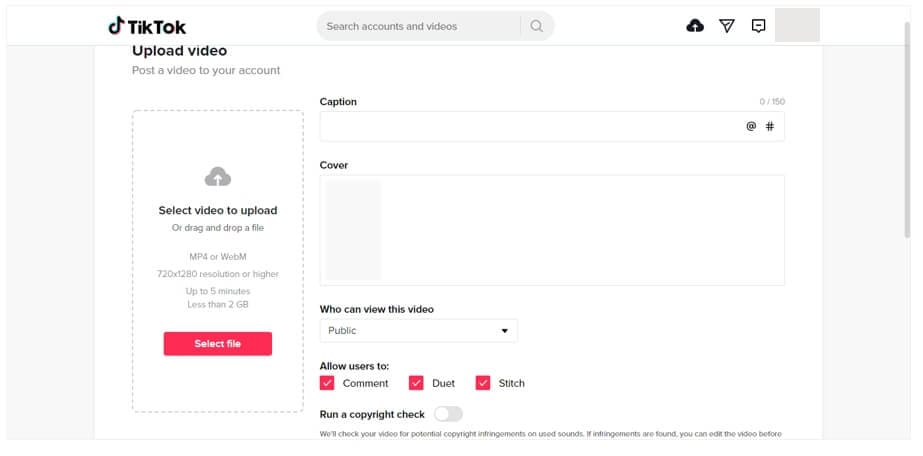
Step 3: Upload video
Select the video from your PC, add the caption and fill in other information before you upload the video.
FAQs about TikTok Voiceover
1. Where can I find the Voiceover Tool on TikTok?
The voiceover tool is incorporated in the TikTok video editing toolkit. The tool can be accessed by clicking the drop-down menu appearing on the right side of the editing window.
2. How to make voiceover louder on TikTok?
Volume can be enhanced using the volume tool in the same drop-down menu where voiceover is found. This allows you to make the voiceover louder on TikTok. So, you can adjust the volume as per your requirements.
Conclusion
TikTok has several features to make your content exciting. Voiceover is one of such features that can polish your video content and make storytelling easy for you. So, we have summarized all the relevant information to give you a detailed insight into how to do a voiceover on TikTok. Hopefully, all concerns will be addressed after reading this article.
TikTok is becoming increasingly popular among digital content creators. It has provided an opportunity to millions of content makers to produce captivating and creative digital stories. In addition, this app is also continuously upgrading its platform to help you create compelling content.
One such unique addition to its framework is the TikTok voice-over. Voiceovers are added to TikTok videos for narration purposes. So, if you are making a vlog, a voiceover is a must. Likewise, the TikTok voice-over also helps you add sounds and effects to the videos. If you want to know how to do voiceover on TikTok, the following article will explain everything in a step-by-step guide.
Part 1: How to Add Voiceover on TikTok When Recording Video?
TikTok helps you polish your content in a number of ways. Voiceover is one such method to add spice and life to your video content. TikTok allows in-app voiceover addition to the videos. This means you can directly add voiceover when recording video in TikTok. The process is pretty simple. Learn to add a voiceover in a step-by-step guide below.
Step 1: Open TikTok app, and add voice
Launch the TikTok application and click on the + button to open a new window. Tap the voiceover option at the top right corner of the screen.
Step 2: Record video and Save
Long-press the record button to add the voice to the video. Click on the Save option at the top of the screen.
Note: The original sound of the video can also be removed when recording voiceover. However, if you want to keep the original video sound, tick the keep original sound box.
Part 2: How to Add Voiceover on TikTok After Video Recorded?
Videos can be imported to TikTok from your gallery or local files. This means you can use TikTok to edit the pre-recorded videos. Video content can be enhanced using filters, texts, and effects available in TikTok in-built library. Moreover, it also enables you to add voiceovers to videos already saved in your gallery. If you want to know how to do voiceover on TikTok, the process is summarized in the simple steps below.
Step 1: launch TikTok and upload a video
Open the application and click the upload button after pressing the + option.
Note: Performing the above step will direct you to your gallery. Select the videos that you want to import to TikTok for adding a voiceover.
Step 2: Add Voiceover
Click on the voiceover option and keep the record button pressed. Select the save option after finishing the voiceover.
Note: The imported video can be trimmed before the voiceover is added. Trim the video to the desired size and click on the Next button.
Part 3: Why You Should Add a Voiceover to a TikTok Video
Using TikTok is fun. You can enjoy exciting features on TikTok, such as sharing your content, enhancing your videos using filters and effects, and much more. In addition to this, you may also create your own content using TikTok versatile tools. One of the state-of-the-art tools that TikTok has added to its toolkit is the voiceover facility. Voiceover plays an important role in making video content clear and compelling. TikTok videos are no exception. If you want to know about the benefits of TikTok voiceovers, we have got you covered in the following section. Let’s get started.
1. Connects content creators to their audience
Voiceover facilitates you to communicate with your audience. There are high chances that the idea you are trying to present in your video content might not be clear to the viewers. So, voiceovers are effective in adding clarity to your content.
2. Create impact
The primary objective of sharing video content is to influence your followers. However, sometimes visuals are not enough to create impact. Thus, you may need an explanation or narration to convey your message in TikTok videos. So, voiceover is the only way of translating your imagination.
3. Humor
In addition to instructional content and storytelling, TikTok is also known for adding humor. Humorous content can be enhanced further by adding a voiceover. So, the voiceover feature gives you a chance to show your humor skills in TikTok videos.
Part 4: How to Record Voiceover for TikTok on Desktop?
TikTok videos are commonly recorded using its smartphone application. However, this does not imply that you have to perform all the video editing on your phone. You can easily do it on your desktop too. But, what if you are in the middle of editing a TikTok video in some video editing tool on your desktop and want to add a voiceover to it? Don’t worry!! You can also record the voiceover for TikTok on the desktop as well.
Wondershare Filmora is one such advanced video editing tool that allows you to record a voiceover. Do you want to know how to do a voiceover on TikTok? If yes, follow the simple steps below.
Step 1: Make a video for TikTok with Filmora
Launch Filmora, and then import the TikTok video to the timeline by dragging and dropping.
Note: Filmora also has the camera recording feature , if your computer has a camera, you can also record a video in Filmora.
Step 2: Record a voiceover
Open the Record tab and click on the record a voiceover from the list of options. Or click the microphone icon on the screen to start the voiceover recording.
After recording, you can try the audio editing features to change the voice from a female to male, or adjust the speed of voiceover.
Step 3: Export the video
Sync the voiceover to the video and select the export button to save and share the video file.
Now, you can upload the edited video to your TikTok account on a desktop computer.
Step 1: Log in to your TikTok on desktop
Go to the official TikTok website and press the red Login button.
Step 2: Click on Upload video
Click on the cloud button at the top left corner to upload your edited video.
Step 3: Upload video
Select the video from your PC, add the caption and fill in other information before you upload the video.
FAQs about TikTok Voiceover
1. Where can I find the Voiceover Tool on TikTok?
The voiceover tool is incorporated in the TikTok video editing toolkit. The tool can be accessed by clicking the drop-down menu appearing on the right side of the editing window.
2. How to make voiceover louder on TikTok?
Volume can be enhanced using the volume tool in the same drop-down menu where voiceover is found. This allows you to make the voiceover louder on TikTok. So, you can adjust the volume as per your requirements.
Conclusion
TikTok has several features to make your content exciting. Voiceover is one of such features that can polish your video content and make storytelling easy for you. So, we have summarized all the relevant information to give you a detailed insight into how to do a voiceover on TikTok. Hopefully, all concerns will be addressed after reading this article.
Also read:
- [Updated] Bold & Creative PFP Options for a Unique TikTok Look for 2024
- [Updated] Be Moved by Motivation Top 15 TikTok Talents Today for 2024
- [New] 2024 Approved Ranked Top 6 TikTok Profit Analyzers for Creators
- 2024 Approved Key Points to Consider When Navigating TikTok Web on macOS
- [Updated] In 2024, Transform Your TikTok Avatar Instruction Manual for Change
- [New] 2024 Approved Share-It-All Free, Unwatermarked TikTok Downloads
- [New] Live Choreo Streaming on Shouqi Media for 2024
- Top 5 Video Sharing Platforms to Watch Instead of TikTok for 2024
- [Updated] Unique TikTok PFP Concepts for an Eye-Catching Profile
- [New] Gastronomic Gurus Who's Dining on Virality, In 2024
- [Updated] 2024 Approved TikTok Performance Enhancers Top 10 Tools Reviewed
- [Updated] In 2024, The Ultimate Step-by-Step Guide to Your TikTok Clone
- [Updated] 2024 Approved Quotable Content Essential Lyrics for Virality on TikTok
- [New] Optimal Solutions to Clear Logos on TikTok Media
- Stepwise Journey to Master Large Heads in TikTok Filmmaking (3 Strategies) for 2024
- [Updated] Mastering High-Quality Slow Motions for Standout TikTok Content
- [New] 2024 Approved Finding the Right Wordmark for Your Personalized TikTok Stream
- [Updated] 2024 Approved Boosting Your TikTok Following - A Selection of Engaging Username Ideas
- [New] How to Un-Reload Your Loved TikTok Videos for 2024
- [New] In 2024, Elevate Your TikTok Presence Camera Techniques and Post-Production Expertise
- [Updated] 2024 Approved Capture Your Best Selfie on TikTok Essential Recording Techniques Explained
- [New] 2024 Approved Peak Engagement Top 20 Strategic TikTok Caption Techniques
- Become a Video Virtuoso on TikTok by Leveraging Template Artistry for 2024
- In 2024, Savor the Viral TikTok's Culinary Hitslist
- [New] 2024 Approved 10 Best TikTok Campaigns and How to Make a Successful Campaign
- 2024 Approved Avoiding TikTok's Ghost Mode Strategies to Stay Visible
- The Clear-Sky Route to Free, Unmarked TikTok Videos
- [Updated] 2024 Approved Gastronomic Gala Top Food Videos Sweeping Social Media
- [New] Ethical Buyers of TikTok Popularity Boost for 2024
- [Updated] Exceptional List Superior TikTok Downloaders (Watermark-Free) for 2024
- [New] In 2024, Boost Your Content 20 Premium TikTok Caption Strategies
- [Updated] Bite-Size Flavors Top Eating Moments on TikTok
- [Updated] Leveraging TikTok's Potential Cutting-Edge Advertising Strategies for 2024
- [Updated] 2024 Approved 8 Must-Have TikTok Tools to Boost Your Growth
- [Updated] Culinary Chronicles World's Most Popular Eats & Cooking
- [Updated] In 2024, The Complete Guide to Adjusting Your TikTok Voice
- [New] Dive Into the Pool of Free, Unmarked TikTok Treasures for 2024
- 2024 Approved How to Join Someone's Live on TikTok
- [New] Revolutionize Your TikTok Videos Streamlined Methods for New Borders for 2024
- Reach the Top 30+ Original Biography Concepts to Skyrocket Your TikTok Popularity on Filmora
- [Updated] Embarking on a Digital Persona Makeover TikTok Username Transformation Techniques
- [New] 2024 Approved Sneaky Techniques to Download TikTok Videos on iPhone
- 2024 Approved A Comprehensive Guide to Shooting High-Quality Slow Mo on TikTok
- 2024 Approved Add Context and Meaning with Strategic Text Overlays on TikTok Videos
- [New] In 2024, Innovative Audio Design on TikTok How to Change Your Speaking Style
- [Updated] In 2024, The Ultimate Breakdown Understanding TikTok's PFP Symbol
- 2024 Approved Vocalizing Your Visual Content A Complete TikTok Manual
- How to Cast Motorola Moto G34 5G to Computer for iPhone and Android? | Dr.fone
- [New] Simplified Screen Capture Methods for Stories for 2024
- [New] Cross-Monitors Data Synthesis
- In 2024, The Most Useful Tips for Pokemon Go Ultra League On Samsung Galaxy XCover 6 Pro Tactical Edition | Dr.fone
- Removing Your Facebook Live Video Tech Steps for 2024
- [New] In 2024, Popular TikTok Creations Dominating Twitter Discussions
- Updated 2024 Approved Top 10 Website to Download Montage Music
- New In 2024, VN Video Editor Pro Review Does It Live Up to the Hype?
- [New] Expert Tips to Enhance Your Live FB Broadcast Quality (PC/Mac)
- Top 10 AirPlay Apps in Asus ROG Phone 7 Ultimate for Streaming | Dr.fone
- The Best Android SIM Unlock Code Generators Unlock Your Vivo Y78t Phone Hassle-Free
- Learn to Record Mi 11'S Display Effortlessly
- New Complementing Your Visual Storytelling with Cost-Free Melodies Techniques for PC/Mobile Devices
- How to Unlock Realme C67 5G Bootloader Easily
- 11 Ways to Fix it When My Tecno Phantom V Flip Wont Charge | Dr.fone
- New Use Path Blur In Photoshop To Create Motion Effect for 2024
- Top 5 Motorola Bypass FRP Tools for PC That Actually Work
- ShareX's Standards Met by Others for 2024
- New 2024 Approved Discover the Ideal Aspect Ratio for Twitter Videos
- Free Meeting Tools Ranked - Your Ultimate Video Call Companion
- Essential 8 Schedulers to Optimize Your Instagram Posts for 2024
- How to Remove Apple ID from iPhone 13 Pro Max without Password?
- [Updated] In 2024, 5 Premier Recording Software Tips for Windows Enthusiasts
- 3 Solutions to Hard Reset Vivo S18e Phone Using PC | Dr.fone
- New Download 8 Best Audio Spectrum Templates for Video
- [New] In 2024, Perfect Past Moments on FB A Look Back Edition
- In 2024, Capturing Spoken Content with PowerPoint Step-by-Step Instructions for Audio Integration on Windows and Mac OS Users
- Mute Movie Tracks Steps to Strip Audio From MOV Files in Windows and Mac OS for 2024
- [New] SegmentViewer Study Notes
- In 2024, How I Transferred Messages from Lenovo ThinkPhone to iPhone 12/XS (Max) in Seconds | Dr.fone
- Updated The Digital DJ Harnessing Software to Separate Song Beats
- In 2024, How to Transfer Apps from Motorola Edge 2023 to Another | Dr.fone
- New 2024 Approved Some Facts That Few People Know on How to Make Transparent Background in Canva
- [New] In 2024, Streamlining the Process of PPT Recording
- New 2024 Approved Easy Peasy Animation 8 Best Tools for Animated Photos
- [New] In-Depth Look Techniques for Screen Capturing on Android
- In 2024, How To Remove iCloud From iPhone 13 mini Smoothly
- [New] 2024 Approved Facebook's Brief Broadcasts Unpacked
- [New] Mastering Video Spin Perfecting Instagram Posts for 2024
- 9 Best Phone Monitoring Apps for Samsung Galaxy A05 | Dr.fone
- Guide How To Unbrick a Bricked Samsung Galaxy S23 Phone | Dr.fone
- Title: "[Updated] 2024 Approved Guide to Large Prop Integration in TikTok Productions"
- Author: Brian
- Created at : 2024-05-23 14:58:09
- Updated at : 2024-05-24 14:58:09
- Link: https://tiktok-videos.techidaily.com/updated-2024-approved-guide-to-large-prop-integration-in-tiktok-productions/
- License: This work is licensed under CC BY-NC-SA 4.0.
