
!["[Updated] 2024 Approved Hottest 10 TikTok Filter Trends to Captivate Viewers"](https://www.lifewire.com/thmb/6hc5zn_zIHrjy6UzXp8_C9GmM70=/400x300/filters:no_upscale():max_bytes(150000):strip_icc()/SamsungGalaxyA555GandA355G-693d193230af475da9878cc17351f724.jpg)
"[Updated] 2024 Approved Hottest 10 TikTok Filter Trends to Captivate Viewers"
Hottest 10 TikTok Filter Trends to Captivate Viewers
Versatile Video Editor - Wondershare Filmora
An easy yet powerful editor
Numerous effects to choose from
Detailed tutorials provided by official channel


TikTok is also known for its creative filters and effects. In fact, unlike Instagram, which offers a limited selection of filters and effects to test, TikTok has an extensive library of filters and effects to attempt.
TikTok filters alter the look and feel of your videos. You may, however, add stuff to your films using effects. You may entirely transform the look of your videos by applying TikTok filters. A green screen can transfer you to any location, change your hair color, transform yourself into an extraterrestrial, and much more.
Trending, New, Interactive, Editing, Beauty, Funny, and World are the best TikTok filter categories. Before you begin recording, you must first decide the effects you wish to utilize. So, this is the time if you haven’t tried either the G6 filter or the Dog Face effect yet. Continue reading to know more about the TikTok filter trend.
In this article
01 10 Best TikTok Filters You’d Love to Use
02 How to Make Use of Filters for TikTok by Filmora?
Part 1: 10 Best TikTok Filters You’d Love to Use
We will look at some of the top TikTok filters that make your video stand out from the crowd.
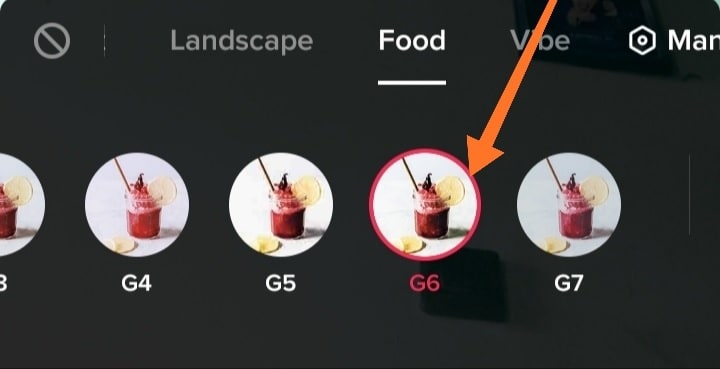
1.TikTok’s G6 filter
On TikTok, filters are identified by a single maker and number. While G6 is labeled a food-related filter, it’s become increasingly popular due to its bright, colorful, and slightly retro feel.
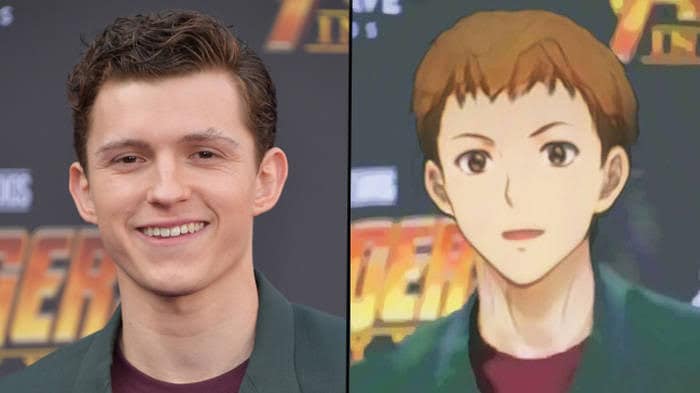
2.TikTok’s Anime Filter
When individuals uploaded their Snapchat videos to TikTok, the anime filter became quite popular. This filter transforms you into an animated character, but you’ll need to download Snapchat first and get an account if you don’t already have one.
3.TikTok’s Invisible filter
Another outcome of viral videos is TikTok’s Invisible filter. This one gives you the ability to become invisible, which is fantastic if you’ve ever wanted to try out that superpower.

4.TikTok’s Bling Effect
The Bling effect is another effect that is likely to appear on your For You page. This effect imitates the flash of a diamond being struck by the sun in different locations across the film.

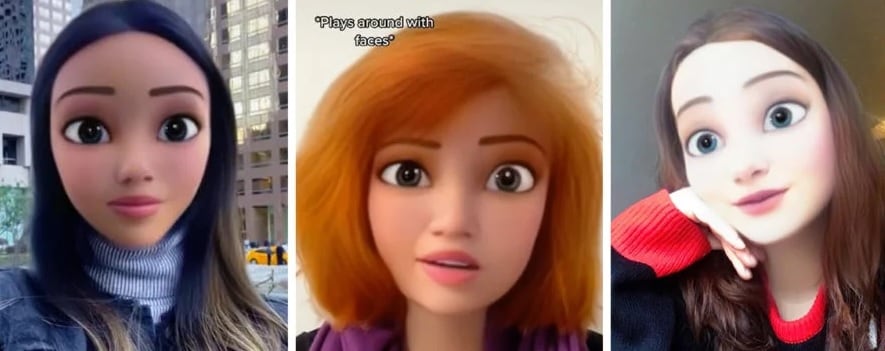
5.TikTok’s Disney Effect
The Disney TikTok filter gives you a chance to experience what it’s like to be a Disney princess or prince. This effect transforms your face into a Disney-inspired cartoon character.
This filter, like the anime filter, is available on Snapchat. So make sure you’ve downloaded that app first.
6.TikTok Dog Face
The Dog Face filter is another amusing face to experiment on. You get dog ears, a nose, and even a tongue with this one. However, you must record another filter in Snapchat before publishing it to TikTok.

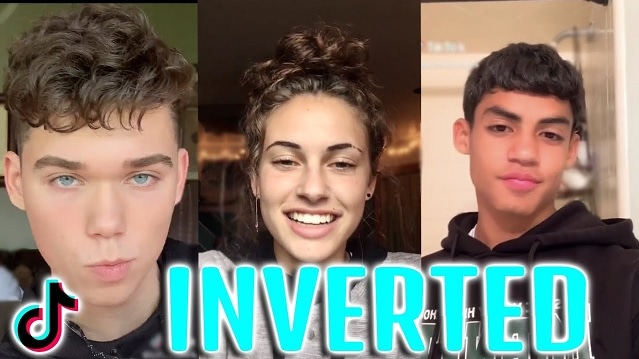
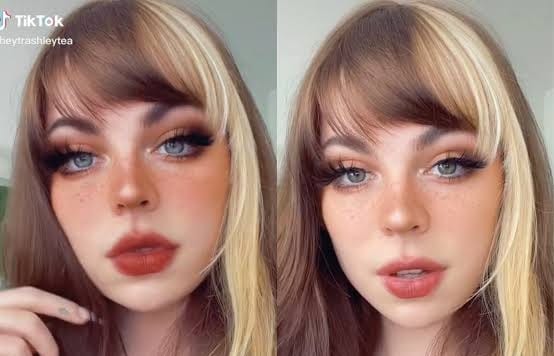
7.TikTok’s Inverted Filter
The Inverted filter is a little more divisive than the others. This filter flips any video you capture, and it’s famous for using the front-facing camera because it’s said to mimic how other people perceive you. So, what’s the big deal about it? On the other hand, the inverted filter has enraged some users, who don’t always appreciate their “true” reflection. However, the only way to see what all the fuss (or hysteria) is about is to give it a try.
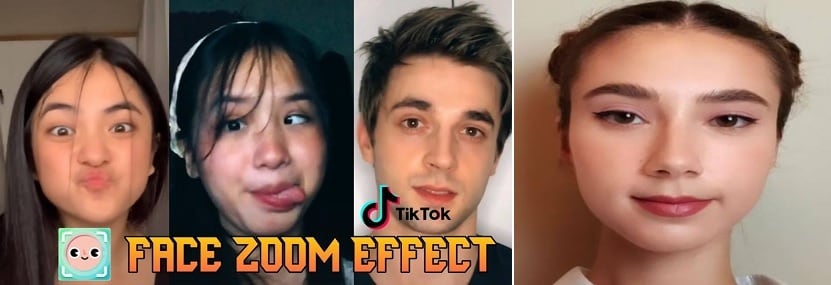
8.TikTok’s Face Zoom effect
As the name suggests, the Face Zoom effect zooms-in on your face. Some people use it in group videos to see which face the filter lands on, while others use the same to compare how you look up close versus how you look from a distance.
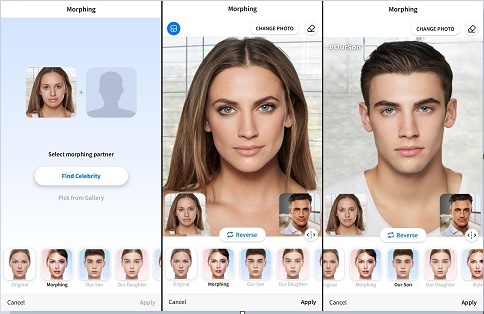
9.TikTok’s Face Morph
The Face Morph effect is another popular effect. This one lets you morph and transition between multiple images of someone else’s face. The effect may be under TikTok’s Templates area because it employs graphics rather than video.
10.TikTok’s Beauty Filter
For obvious reasons, the Beauty filter is popular on TikTok. It improves your appearance by evening out skin tone, adding color, and improving overall appearance. It’s commonly useful in conjunction with other filters and effects.
Part 2: How to Make Use of Filters for TikTok by Filmora?
Wondershare’s Filmora video editor features the standard overlays, transitions, editing, and effects that we’ve come to expect from enthusiast-level video editors. It has a clean, minimalistic, and black interface that is user-friendly. If that wasn’t enough, we’re confident you’ll be thrilled to learn that the Filmora application can be valuable in a variety of ways to make TikTok filters.
You may further personalize the celebrities look alike filter and other TikTok filter trends, with numerous Filmora effects using all of the features we’ve mentioned thus far. Here’s how to do it:
Wondershare Filmora
Get started easily with Filmora’s powerful performance, intuitive interface, and countless effects!
Try It Free Try It Free Learn More >

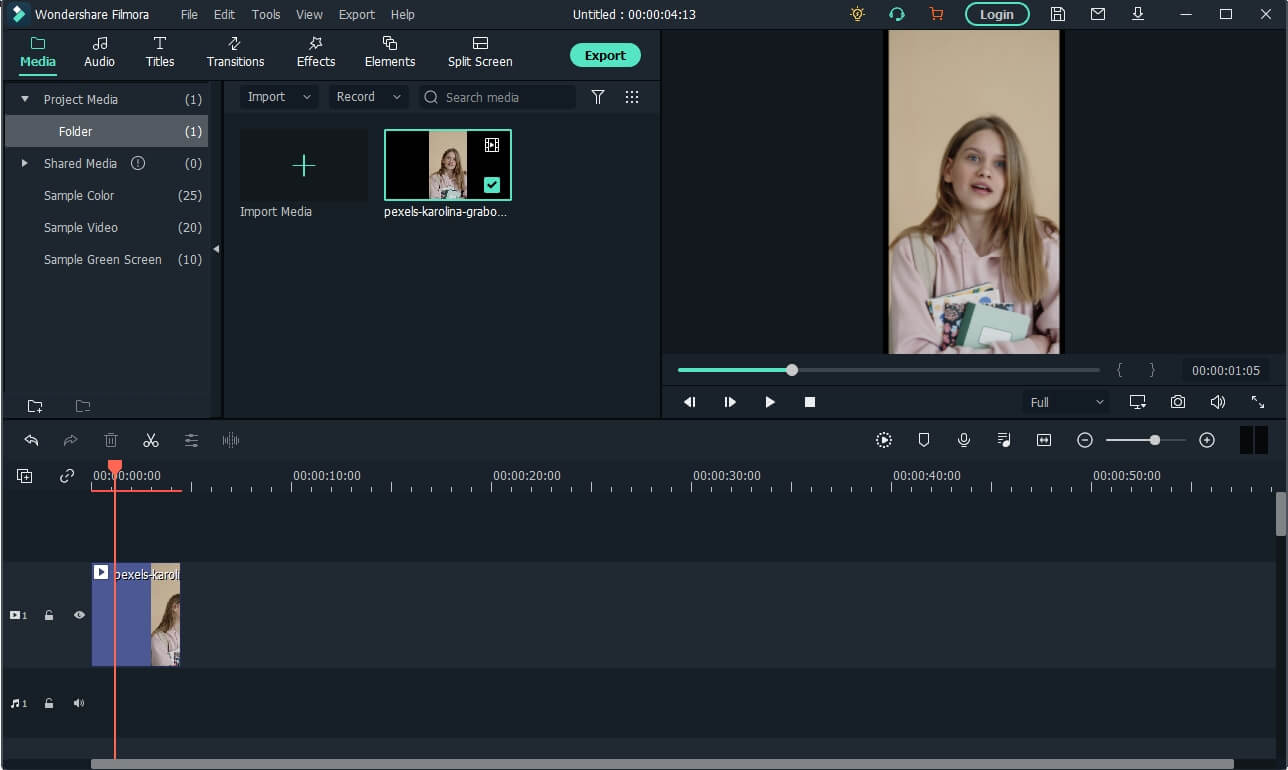
Step 1: Launch Filmora and select video
Launch Filmora and click on the Import option that will select the video file you want to edit. Now, drag and drop the imported media file to the timeline panel.
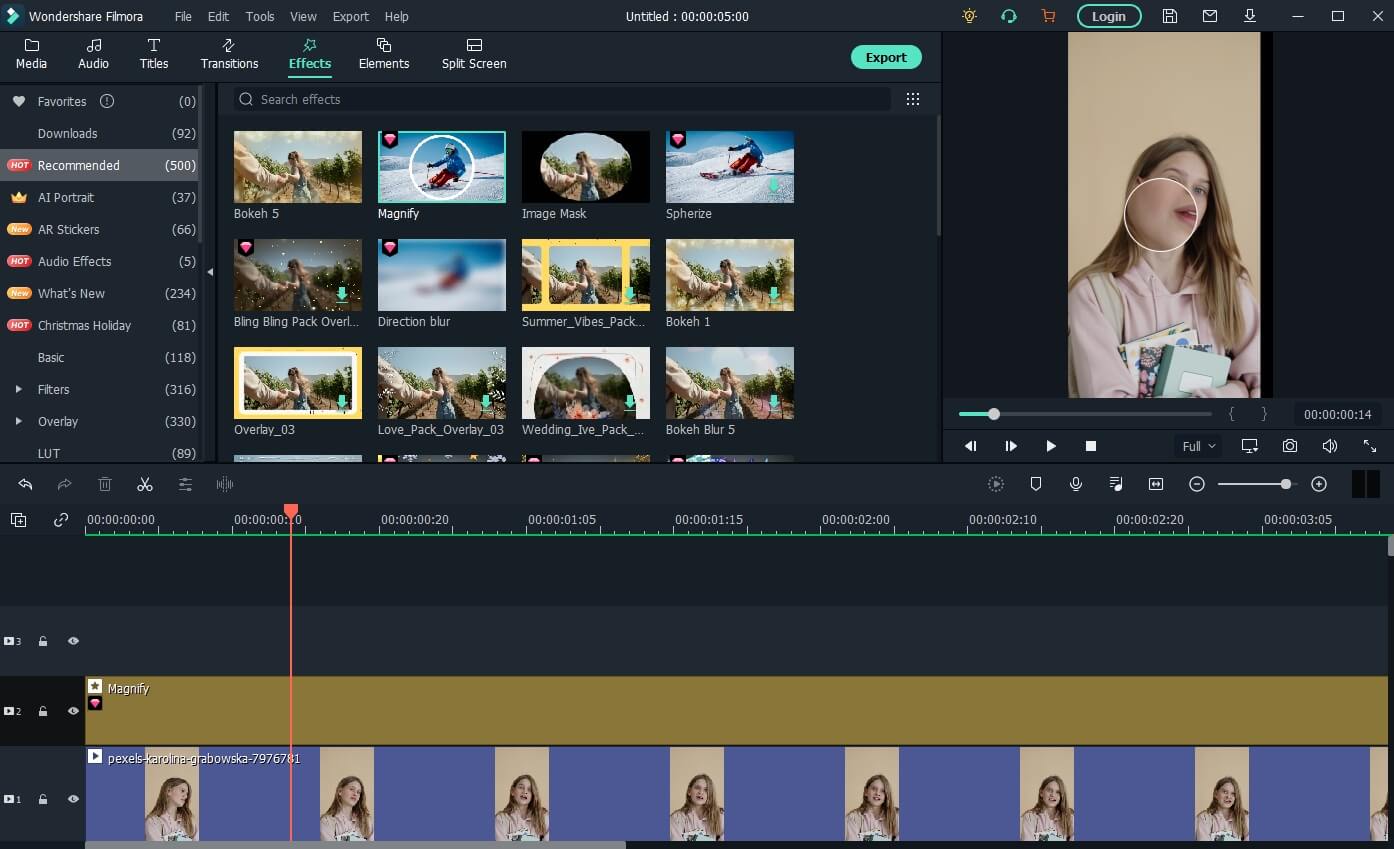
Step 2: Add effect on Filmora
Click on the effect options and select the AR sticker option to add effect. Type the TikTok filter you want on the search bar, then drag the effect to the portion of the video where you want it.
Step 3: Add effect with Filmora
Drag and Drop the video to video tracks 1 and 2 on Filmora. Then go to the effect tab, scroll down to the utility category, and place the image mask effect.
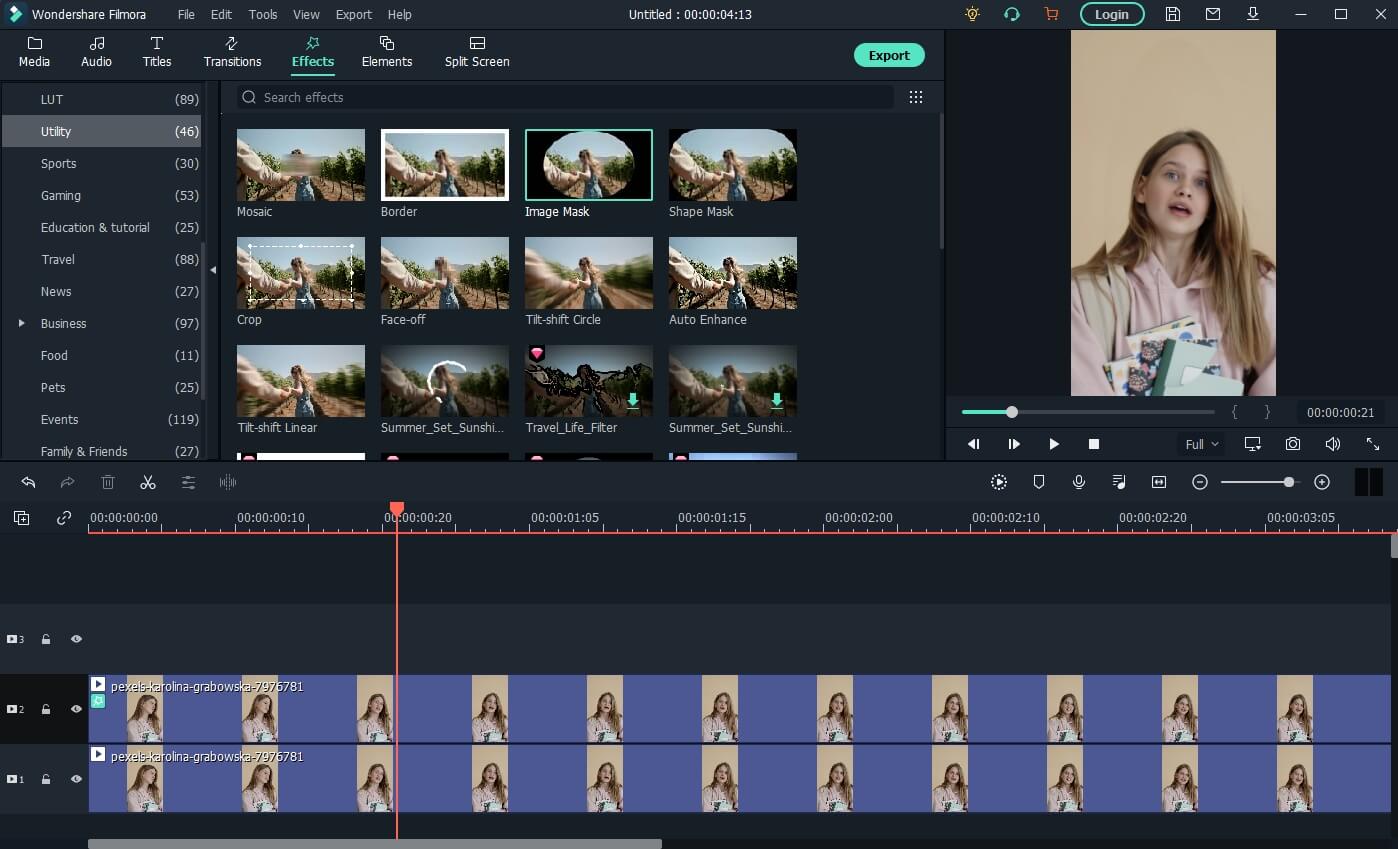
Step 4: Choose a Mask
Double-click the video with the image mask. Then, please scroll down to the video effect field and choose a mask, adjusting its position and size to fit the video.
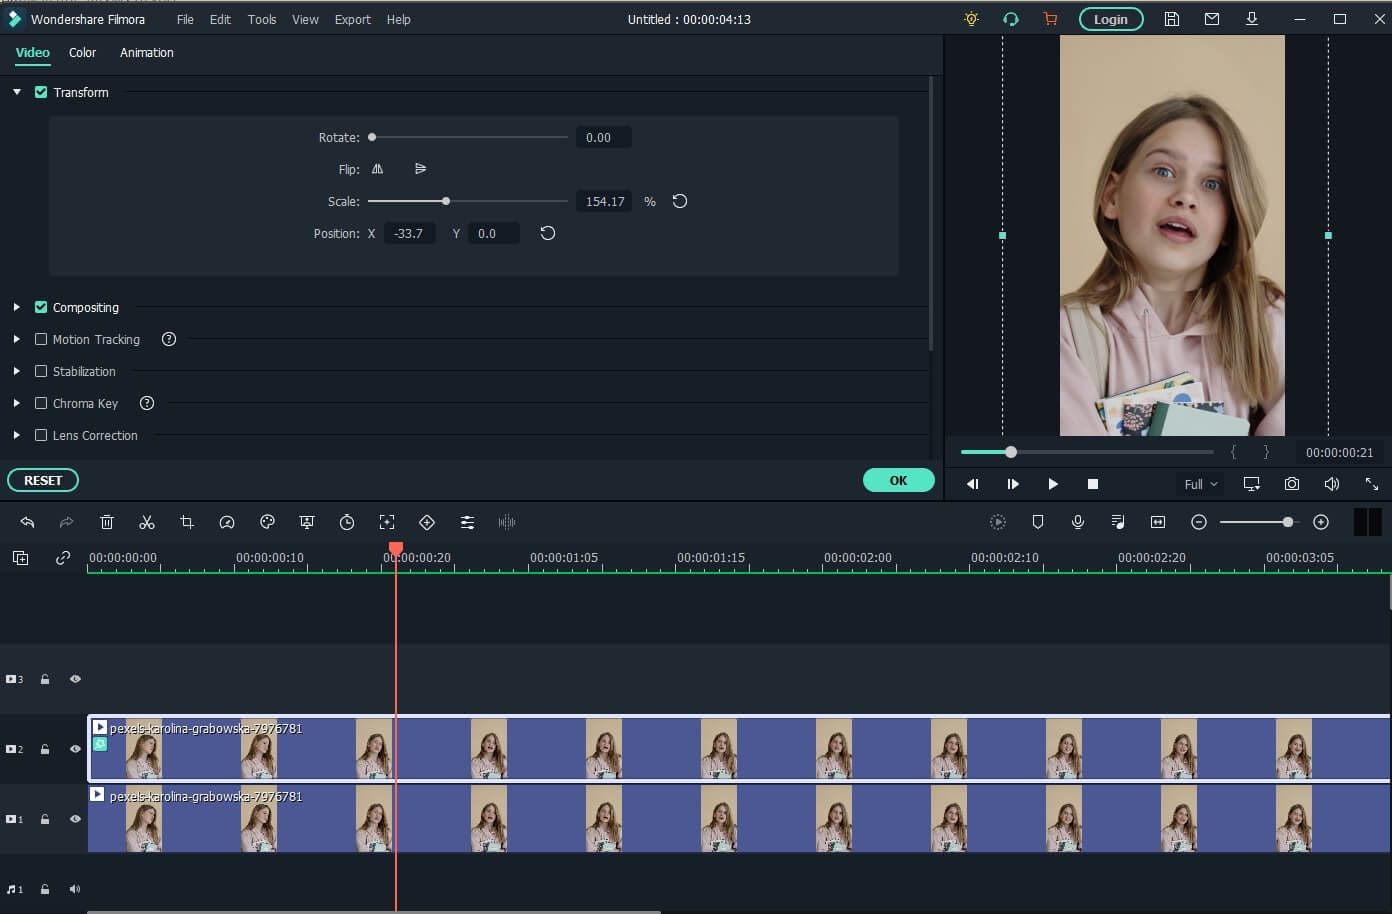
Now click on the video in track two and go to the “Transform” tab. Use the scaler slider to adjust the size of the video to fit the effect.
Conclusion
Filters and effects from TikTok can be applicable in a variety of ways. It’s all about enjoying a good time and putting your twist on TikTok videos that have gone viral. So, using our step-by-step tutorial, you may experiment with various filters on TikTok, such as the no beard filter TikTok. Now go ahead and experiment with these widespread effects and filters to see what kind of creative videos you can come up with.
TikTok is also known for its creative filters and effects. In fact, unlike Instagram, which offers a limited selection of filters and effects to test, TikTok has an extensive library of filters and effects to attempt.
TikTok filters alter the look and feel of your videos. You may, however, add stuff to your films using effects. You may entirely transform the look of your videos by applying TikTok filters. A green screen can transfer you to any location, change your hair color, transform yourself into an extraterrestrial, and much more.
Trending, New, Interactive, Editing, Beauty, Funny, and World are the best TikTok filter categories. Before you begin recording, you must first decide the effects you wish to utilize. So, this is the time if you haven’t tried either the G6 filter or the Dog Face effect yet. Continue reading to know more about the TikTok filter trend.
In this article
01 10 Best TikTok Filters You’d Love to Use
02 How to Make Use of Filters for TikTok by Filmora?
Part 1: 10 Best TikTok Filters You’d Love to Use
We will look at some of the top TikTok filters that make your video stand out from the crowd.
1.TikTok’s G6 filter
On TikTok, filters are identified by a single maker and number. While G6 is labeled a food-related filter, it’s become increasingly popular due to its bright, colorful, and slightly retro feel.
2.TikTok’s Anime Filter
When individuals uploaded their Snapchat videos to TikTok, the anime filter became quite popular. This filter transforms you into an animated character, but you’ll need to download Snapchat first and get an account if you don’t already have one.
3.TikTok’s Invisible filter
Another outcome of viral videos is TikTok’s Invisible filter. This one gives you the ability to become invisible, which is fantastic if you’ve ever wanted to try out that superpower.
4.TikTok’s Bling Effect
The Bling effect is another effect that is likely to appear on your For You page. This effect imitates the flash of a diamond being struck by the sun in different locations across the film.
5.TikTok’s Disney Effect
The Disney TikTok filter gives you a chance to experience what it’s like to be a Disney princess or prince. This effect transforms your face into a Disney-inspired cartoon character.
This filter, like the anime filter, is available on Snapchat. So make sure you’ve downloaded that app first.
6.TikTok Dog Face
The Dog Face filter is another amusing face to experiment on. You get dog ears, a nose, and even a tongue with this one. However, you must record another filter in Snapchat before publishing it to TikTok.
7.TikTok’s Inverted Filter
The Inverted filter is a little more divisive than the others. This filter flips any video you capture, and it’s famous for using the front-facing camera because it’s said to mimic how other people perceive you. So, what’s the big deal about it? On the other hand, the inverted filter has enraged some users, who don’t always appreciate their “true” reflection. However, the only way to see what all the fuss (or hysteria) is about is to give it a try.
8.TikTok’s Face Zoom effect
As the name suggests, the Face Zoom effect zooms-in on your face. Some people use it in group videos to see which face the filter lands on, while others use the same to compare how you look up close versus how you look from a distance.
9.TikTok’s Face Morph
The Face Morph effect is another popular effect. This one lets you morph and transition between multiple images of someone else’s face. The effect may be under TikTok’s Templates area because it employs graphics rather than video.
10.TikTok’s Beauty Filter
For obvious reasons, the Beauty filter is popular on TikTok. It improves your appearance by evening out skin tone, adding color, and improving overall appearance. It’s commonly useful in conjunction with other filters and effects.
Part 2: How to Make Use of Filters for TikTok by Filmora?
Wondershare’s Filmora video editor features the standard overlays, transitions, editing, and effects that we’ve come to expect from enthusiast-level video editors. It has a clean, minimalistic, and black interface that is user-friendly. If that wasn’t enough, we’re confident you’ll be thrilled to learn that the Filmora application can be valuable in a variety of ways to make TikTok filters.
You may further personalize the celebrities look alike filter and other TikTok filter trends, with numerous Filmora effects using all of the features we’ve mentioned thus far. Here’s how to do it:
Wondershare Filmora
Get started easily with Filmora’s powerful performance, intuitive interface, and countless effects!
Try It Free Try It Free Learn More >
Step 1: Launch Filmora and select video
Launch Filmora and click on the Import option that will select the video file you want to edit. Now, drag and drop the imported media file to the timeline panel.
Step 2: Add effect on Filmora
Click on the effect options and select the AR sticker option to add effect. Type the TikTok filter you want on the search bar, then drag the effect to the portion of the video where you want it.
Step 3: Add effect with Filmora
Drag and Drop the video to video tracks 1 and 2 on Filmora. Then go to the effect tab, scroll down to the utility category, and place the image mask effect.
Step 4: Choose a Mask
Double-click the video with the image mask. Then, please scroll down to the video effect field and choose a mask, adjusting its position and size to fit the video.
Now click on the video in track two and go to the “Transform” tab. Use the scaler slider to adjust the size of the video to fit the effect.
Conclusion
Filters and effects from TikTok can be applicable in a variety of ways. It’s all about enjoying a good time and putting your twist on TikTok videos that have gone viral. So, using our step-by-step tutorial, you may experiment with various filters on TikTok, such as the no beard filter TikTok. Now go ahead and experiment with these widespread effects and filters to see what kind of creative videos you can come up with.
From One to a Hundred: A Guide to Creating Multiple TikToks of Youself
How to Clone Yourself on TikTok

Shanoon Cox
Mar 27, 2024• Proven solutions
Every rising pop star needs music videos, but using professional video editing software may be too time-consuming if you want to quickly create a clone video you can share with your fans on TikTok.
Multiplying yourself in a video is a cool way of making sure that your video is going to get the kind of attention it deserves. The process of cloning yourself in a video is a simple one, but there are certain rules you have to follow while recording the footage that will help you avoid overlapping the figures you’re cloning. Here’s how you can make your first clone yourself video on TikTok.

Selecting the Song for your Clone Video
Before you start shooting the video you first need to select the song on TikTok you’re going to use in the video. Once you’ve found the perfect track simply record it and save it as a video to your camera roll. You can then import the video clip that contains the song into the Video Star app.
Here are 10 Popular TikTok Songs for you.

Using the Video Star App to Clone Yourself
1. Download Video Star App
Choosing a location, mounting your iPhone on a tripod, or picking the positions for each of your clones are all important steps you’ll need to take before you actually start recording. There are several apps that enable you to create clone videos easily, but in this article, we are going to show you how you can clone yourself with Video Star. The app can be downloaded from the App Store for free, but additional in-app purchases are necessary if you want to have access to all the power packs Video Star offers. You don’t have to record the video clips with this app since the iPhone’s native camera app is powerful enough to enable you to record high-quality footage.
2. Edit Multiple Video Clips
After you record all the positions for your next clone video with the iPhone’s native camera app, you should cut the video clips and keep only the parts where you are perfectly positioned, so your position in one clip doesn’t overlap with other positions. During the video recording process try to create as much separation between two positions in order to avoid any chance of overlapping. One of the best ways to achieve this is to shoot at a location that is spacious enough so you can make enough separation between two positions. Keep in mind that the maximum number of clips you can combine in the Video Star app is limited to just three, so if you want to have more than three clones in the shot you first have to piece together three clips, save them as a single file and then add more clips to the cloned video you created.
3. Level up Your Videos with Video Star
Video Star also enables you to shoot your videos from the app, and you can adjust the Countdown before the app starts recording or the Recording Speed. Make sure to enter the lowest Recording Speed value possible, because that way you’ll be recording like TikTok does on fast.
Tap the Record button, then select the Multiple options, and play the video that contains the song you previously selected. Once you reach the spot in the song where you want to introduce the clone simply tap Set, so the recording will stop at the designated point and you can move to another position. If at any point during recording you realize that your movements extend to your clone’s location, you can simply tap on the hamburger icon and select the Delete Last option.
To preview the video, you just have to tap on the Scissors icon, and the recorded video will automatically start playing. The Record New Clip in the Scissors menu lets you start from the beginning in case you’re not happy with the results or you can use this option to start recording the video with the second position of your clone.
When done, head back to the Scissors menu, and tap on the Multi-Layer Clip. This feature doesn’t come with the free version of the app, and you must purchase it in order to create a clone video. This action will enable you to select the back and front clips. After selecting the clips, the Mask Front menu will appear on the screen, choose the Shape option and use the hamburger icon on the right side of the screen to change the video’s shape to Rectangle. Drag the rectangle in the preview window so you can crop the first clip to match the demands of your video and press the Next icon to continue the video editing process.
Alternatively, you can use the Erase option to remove the unwanted parts of each video. You can find this option in the Mask Front or Mask Back menu, so just select it and use your finger to remove sections of the shot you don’t want to use.
The Add Effect menu will pop up on the screen so you can add different effects to your first video clip, and then repeat the entire process for the back clip. Once you’ve edited the second clip tap on the Create button to complete the process of making a multilayer clip. Tap Done to save the clip to your camera roll, and upload it to TikTok.
Conclusion
Cloning yourself in a video using the Video Star app is a simple process that can be mastered in a short period of time. The Video Star app lets you create as many clones of yourself as you want, so you just have to make sure that your video clips can be easily combined to feature two or more of your clones and have fun exploring the effects that can make your videos look even cooler. If you want to be a success on the TikTok platform, learning how to make clone videos is one of the best ways to do it, so choose your favorite songs and start producing clone yourself videos.
You can also use Wondershare Filmora to make a split-screen with ease. Check the tutorial below to figure out how to make a split-screen video to clone.


Shanoon Cox
Shanoon Cox is a writer and a lover of all things video.
Follow @Shanoon Cox
Shanoon Cox
Mar 27, 2024• Proven solutions
Every rising pop star needs music videos, but using professional video editing software may be too time-consuming if you want to quickly create a clone video you can share with your fans on TikTok.
Multiplying yourself in a video is a cool way of making sure that your video is going to get the kind of attention it deserves. The process of cloning yourself in a video is a simple one, but there are certain rules you have to follow while recording the footage that will help you avoid overlapping the figures you’re cloning. Here’s how you can make your first clone yourself video on TikTok.
Selecting the Song for your Clone Video
Before you start shooting the video you first need to select the song on TikTok you’re going to use in the video. Once you’ve found the perfect track simply record it and save it as a video to your camera roll. You can then import the video clip that contains the song into the Video Star app.
Here are 10 Popular TikTok Songs for you.
Using the Video Star App to Clone Yourself
1. Download Video Star App
Choosing a location, mounting your iPhone on a tripod, or picking the positions for each of your clones are all important steps you’ll need to take before you actually start recording. There are several apps that enable you to create clone videos easily, but in this article, we are going to show you how you can clone yourself with Video Star. The app can be downloaded from the App Store for free, but additional in-app purchases are necessary if you want to have access to all the power packs Video Star offers. You don’t have to record the video clips with this app since the iPhone’s native camera app is powerful enough to enable you to record high-quality footage.
2. Edit Multiple Video Clips
After you record all the positions for your next clone video with the iPhone’s native camera app, you should cut the video clips and keep only the parts where you are perfectly positioned, so your position in one clip doesn’t overlap with other positions. During the video recording process try to create as much separation between two positions in order to avoid any chance of overlapping. One of the best ways to achieve this is to shoot at a location that is spacious enough so you can make enough separation between two positions. Keep in mind that the maximum number of clips you can combine in the Video Star app is limited to just three, so if you want to have more than three clones in the shot you first have to piece together three clips, save them as a single file and then add more clips to the cloned video you created.
3. Level up Your Videos with Video Star
Video Star also enables you to shoot your videos from the app, and you can adjust the Countdown before the app starts recording or the Recording Speed. Make sure to enter the lowest Recording Speed value possible, because that way you’ll be recording like TikTok does on fast.
Tap the Record button, then select the Multiple options, and play the video that contains the song you previously selected. Once you reach the spot in the song where you want to introduce the clone simply tap Set, so the recording will stop at the designated point and you can move to another position. If at any point during recording you realize that your movements extend to your clone’s location, you can simply tap on the hamburger icon and select the Delete Last option.
To preview the video, you just have to tap on the Scissors icon, and the recorded video will automatically start playing. The Record New Clip in the Scissors menu lets you start from the beginning in case you’re not happy with the results or you can use this option to start recording the video with the second position of your clone.
When done, head back to the Scissors menu, and tap on the Multi-Layer Clip. This feature doesn’t come with the free version of the app, and you must purchase it in order to create a clone video. This action will enable you to select the back and front clips. After selecting the clips, the Mask Front menu will appear on the screen, choose the Shape option and use the hamburger icon on the right side of the screen to change the video’s shape to Rectangle. Drag the rectangle in the preview window so you can crop the first clip to match the demands of your video and press the Next icon to continue the video editing process.
Alternatively, you can use the Erase option to remove the unwanted parts of each video. You can find this option in the Mask Front or Mask Back menu, so just select it and use your finger to remove sections of the shot you don’t want to use.
The Add Effect menu will pop up on the screen so you can add different effects to your first video clip, and then repeat the entire process for the back clip. Once you’ve edited the second clip tap on the Create button to complete the process of making a multilayer clip. Tap Done to save the clip to your camera roll, and upload it to TikTok.
Conclusion
Cloning yourself in a video using the Video Star app is a simple process that can be mastered in a short period of time. The Video Star app lets you create as many clones of yourself as you want, so you just have to make sure that your video clips can be easily combined to feature two or more of your clones and have fun exploring the effects that can make your videos look even cooler. If you want to be a success on the TikTok platform, learning how to make clone videos is one of the best ways to do it, so choose your favorite songs and start producing clone yourself videos.
You can also use Wondershare Filmora to make a split-screen with ease. Check the tutorial below to figure out how to make a split-screen video to clone.
Shanoon Cox
Shanoon Cox is a writer and a lover of all things video.
Follow @Shanoon Cox
Also read:
- [New] Speedy TikTok Video Creation A Comprehensible Guide for 2024
- [Updated] In 2024, Mastering TikTok Identity Ultimate Profile Transformation Guide
- [Updated] Ultimate Guide to Mark-Banishing Tools in TikTok Videos for 2024
- [Updated] Audacity's Silence Secret Eliminating Rests of Noise
- [Updated] In 2024, Triumph Over TikTok's Unseen Ban Barriers
- [New] Unlocking TikTok A Comprehensive Guide for Mac/PC
- [Updated] 30 Awesome TikTok-Inspired Finds on Amazon – Don’t Miss Them
- [Updated] 7 Leading Free TikTok Audio Tools for Seamless MP3 Conversion
- 2024 Approved Essential Guide to Text-Enhanced TikToks
- [Updated] 2024 Approved Unraveling the Mystery of Hidden TikTok Penalties
- [New] 2024 Approved Strategies to Overcome Unseen TikTok Limitations
- Epic Anime Quotes & Phrases for Viral TikTok Challenges
- Spotlight Series The Best Gamers on TikTok for 2024
- Professional Tips to Create Impressive Head Size in TikToks (3 Methods)
- [New] Pros of Posting to TikTok From Your Personal Computer or MAC
- Transforming TikTok Videos with Effortless Text Enhancement Techniques
- In 2024, Unlock Your TikTok Experience with Top 7 Emoji Hacks
- Discovering the Newest TikTok Songs that Excite Us
- [New] 100%% Secure & Ethical Actions for TikTok Success for 2024
- [Updated] TikTok Foundations A Complete User's Manual
- [Updated] 2024 Approved Voice-in-Unison for the Digital Stage
- [New] In 2024, Creative Edge Ideas to Make Your TikTok FP Memorable
- Installing TikTok Made Easy for Mac Users for 2024
- Streamline Your Snapchat Chat and Calls with 3 Key Steps
- [Updated] In 2024, TasteBudsTribe Leading Foodie Influencers
- Expedite Growth on TikTok with These Top Strategies
- [New] How to Un-Reload Your Loved TikTok Videos for 2024
- [Updated] Decoding the Similarities & Differences Between Triller & TikTok (Max 156 Chars)
- Snap, Edit & Share Spectacularly on TikTok with Themes
- 2024 Approved Discovering TikTok's Most Popular Gamers
- In 2024, Dance the Night Away with These Trending TikTok Patterns
- [New] Crafting Captivating Content Secrets to Thriving in TikTok Marketing
- [Updated] Propel Your Passion Profits Joining the Elite of TikTok Creators for 2024
- In 2024, Enhancing Your Presence on TikTok From Mac and Windows PCs
- [New] In 2024, 104 Chuckle-Inducing TikTok Skits for All Ages
- [New] In 2024, Plotting the Perfect TikTok Outro Journey
- [New] In 2024, The Top Ten Ways to Propel Your TikTok Campaigns Forward
- Ultimate List 10 Mac Apps for TikTok Video Magic
- [Updated] Anime Soundtracks Setting the Mood for Viral Shorts for 2024
- In 2024, Top 6 Online-Free TikTop To MP3 Converter Tools
- [New] Dinner Dramas The Most Entertaining Food Moments on TikTok for 2024
- Ingenious FP Designs Strategies for an Outstanding TikTok Profile
- In 2024, How To Remove or Bypass Knox Enrollment Service On Poco M6 Pro 5G
- How to Stop Google Chrome from Tracking Your Location On HTC U23 Pro? | Dr.fone
- Updated 2024 Approved Filmmaking for All A Beginners Guide to Creating a Movie
- How to play MP4 files on Xiaomi Redmi A2?
- MP4 won't play on my Redmi K70E
- In 2024, Pokemon Go No GPS Signal? Heres Every Possible Solution On Tecno Spark 20 Pro | Dr.fone
- In 2024, Audacity Pro Audio Recording Techniques Focusing on Computer Sounds
- In 2024, Overview of the Best Vivo V30 Pro Screen Mirroring App | Dr.fone
- 2024 Approved The Ultimate Guide to Video Makers with Music for Android & iPhone
- How to Reset a Honor V Purse Phone that is Locked?
- Sony Camcorder Video Editing Tutorial From Capture to Completion for 2024
- [New] 2024 Approved Chat to Tune Downloader for FB
- 15 Best Strongest Pokémon To Use in Pokémon GO PvP Leagues For Vivo Y78 5G | Dr.fone
- [Updated] In 2024, Echoes of Now Strategies for Downloading Current Events
- In 2024, Effortless Facebook Live Streams From Your Smartphone
- [New] Cam Division Is SplitCam the #1 Choice?
- Sharing Videos Tweet-Tumble Route for 2024
- In 2024, What Legendaries Are In Pokemon Platinum On Vivo Y27s? | Dr.fone
- [Updated] Investing in the Future Learning to Proficiently Record Skype Calls
- 3 Solutions to Hard Reset Tecno Spark Go (2024) Phone Using PC | Dr.fone
- Updated 2024 Approved Top-Rated Free MPEG Video Joining Software
- Elevate Your IGTV Storytelling With Musical Elements
- A Working Guide For Pachirisu Pokemon Go Map On Apple iPhone 13 Pro | Dr.fone
- Unlock the Full Potential of Your Videos on Instagram Platform for 2024
- [Updated] In 2024, Optimizing Your Video Conferencing Process with Slack and Filmora Tools
- [New] Navigate Through Screens The Best Recorders for W11/W10
- [Updated] Top-Tier Screen Capture Tools for Windows & macOS for 2024
- [New] Direct Compare OBS and Twitch Studio Benefits
- Ultimate Guide to Free PPTP VPN For Beginners On Honor X9a | Dr.fone
- Pixels and Players Advanced Tactics for Recording Gaming
- [Updated] Principled Steps in Logging Live YouTube Videos for 2024
- How to Bypass Google FRP Lock from Nokia C02 Devices
- New In 2024, Breaking Down Beats to Words Effective Online MP3-to-Text Transcription Methods
- Tech's Picks The Ultimate Screenshot List for 2024
- New 2024 Approved How To Record Video in Slow Motion Comprehending Important Points
- 2024 Approved From Bland Visuals to Dynamic Displays Adding Audio Elements to Your Digital Videos
- 3 Easy Ways to Factory Reset a Locked iPhone XS Without iTunes
- In 2024, 3 Effective Methods to Fake GPS location on Android For your HTC U23 | Dr.fone
- 2024 Approved Animate Like a Pro Top 10 Tools for Beginners and Experts Alike
- Full Guide to Unlock Your Vivo X Fold 2
- [New] Mastering Screen Recordings on Windows 10 Systems for 2024
- Title: "[Updated] 2024 Approved Hottest 10 TikTok Filter Trends to Captivate Viewers"
- Author: Brian
- Created at : 2024-05-23 14:59:08
- Updated at : 2024-05-24 14:59:08
- Link: https://tiktok-videos.techidaily.com/updated-2024-approved-hottest-10-tiktok-filter-trends-to-captivate-viewers/
- License: This work is licensed under CC BY-NC-SA 4.0.
