
!["[Updated] 2024 Approved How to Fast Forward on TikTok?"](https://www.lifewire.com/thmb/jkTzGxTQj6GZdoRByOnef64Ubf0=/540x405/filters:no_upscale():max_bytes(150000):strip_icc():format(webp)/windows_search-56aa11bd3df78cf772ac3ea5.jpg)
"[Updated] 2024 Approved How to Fast Forward on TikTok?"
How to Fast Forward on TikTok?
When we state that TikTok is a gift, we know that we speak for many, if not all. Undoubtedly, it made the summer of 2020 much more bearable, and today it has become a leader in entertainment for the rest of the globe. The software has had a profound impact on many people’s daily lives.
Only a few factors hold TikTok back from becoming the finest among the best. One of the drawbacks is that it doesn’t allow you to pause or fast-forward. There are instances when you would like to go back and review a particular video from a TikTok and wouldn’t want to have to watch the entire thing again to see it. So far, it appears like that’s the case. Or is it? We have come here with the answers to all of your questions in this ‘How to Fast Forward on TikTok’ guide. Let’s explore!
In this article
01 How to Fast Forward on Tiktok When Playing?
02 How to Record Fast Motion Video on TikTok on iPhone and Android?
03 How to Add Fast Motion Effect to Uploaded Video on TikTok?
04 How to Download A TikTok Video to Fast Forward on iPhone and Android?
05 How to Fast Forward Videos in TikTok on a PC?
Part 1: How to Fast Forward on Tiktok When Playing?
TikTok videos include a progress bar, which allows you to jump between them; nevertheless, this feature is not accessible for all videos. For the time being, the function is only visible on lengthier films.
Although it is unlikely, it is also possible to download a TikTok clip and then fast forward or rewind it at your convenience without using the TikTok app. But how to do it is the real question here. Follow the steps below to learn the trick:
Step 1: Find a white progress bar at the bottom of the clip on TikTok by opening the app and selecting it.

Step 2: The dot on the progress bar that appears like a white line may be moved forward or backward by tapping and dragging it along the bar. Note that the revised location will be reflected above the bar in the first timecode number.

Step 3: Using your finger, touch on the White circle and move it forward or backward to the place indicated by the timecode figure displayed above it.
Step 4: When you let go of the dot, you would have shifted your position in the clip.
Part 2: How to Record Fast Motion Video on TikTok on iPhone and Android?
A rapid-motion movie must be recorded with an increased speed between each frame to get a faster playback speed. Videos that move at a high rate of speed have a hypnotic impact on viewers. The procedures of creating a fast-motion video in TikTok for Android are outlined in the following section.
Record fast motion video on TikTok Android
Step 1: After launching the app, the feed area will appear. It would help if you touched on the “+” option in the feed area to get to the “Add new“ section.
Step 2: Speed control must be enabled when adding a new option. To change the speed, use the speed control option in the upper right corner of the screen.
![]()
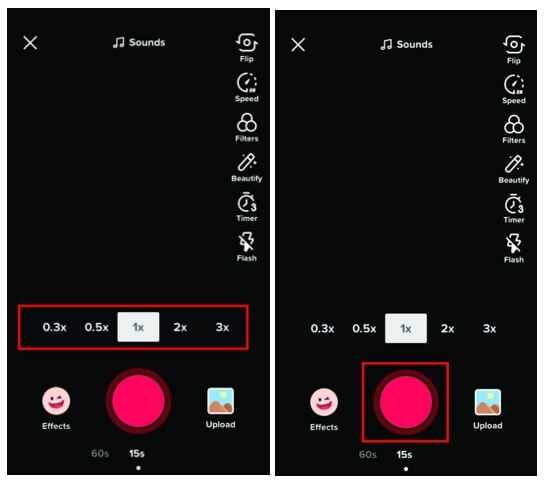
Step 3: The next step is to decide on the video’s frame rate. The rectangular bar lets you choose a speed. Tap on the chosen speed from here.
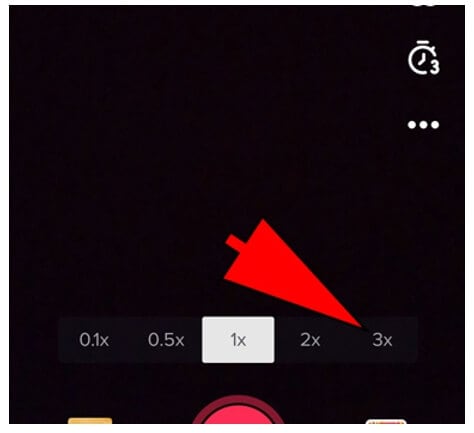
Step 4: You may begin recording your video after selecting the required frame rate. You may accomplish this by holding down the red circular recording option as indicated in the image below while tapping and holding.
Step 5: The next step is to go on to the next stage. Tap the Red color checkmark option in the bottom right corner as indicated in the image below to proceed. Only once you’ve finished recording a video will you see the Tick mark.
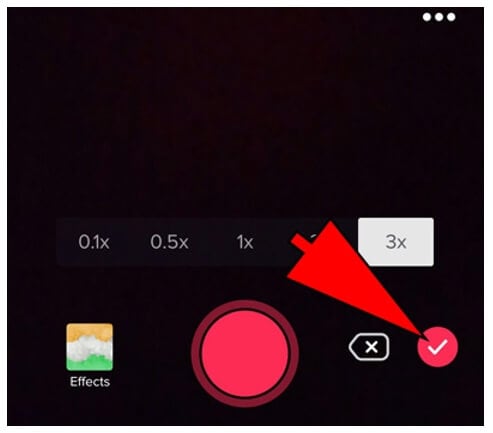
Step 6: You’ll get this screen once you press the tick option provided below. In this section, you may apply various effects and filters.
(Note: There is nothing you can adjust here that will influence the speed of the movie. Finally, it would help if you pressed the “Next“ button shown by clicking on it).
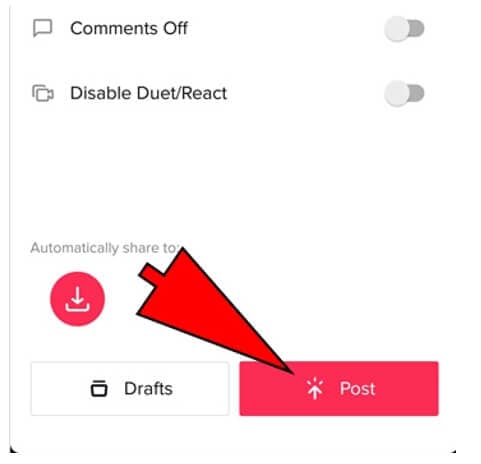
Step 7: The screen below will appear after selecting the next option. On this page, you’ll see a Post button where you may share the video with your followers.
Record TikTok Video with Fast Motion Effect on iPhone
Step 1: Launch TikTok app. At the bottom of the screen, click on the “+” symbol. That link will lead you to a page where you can start creating a new video.
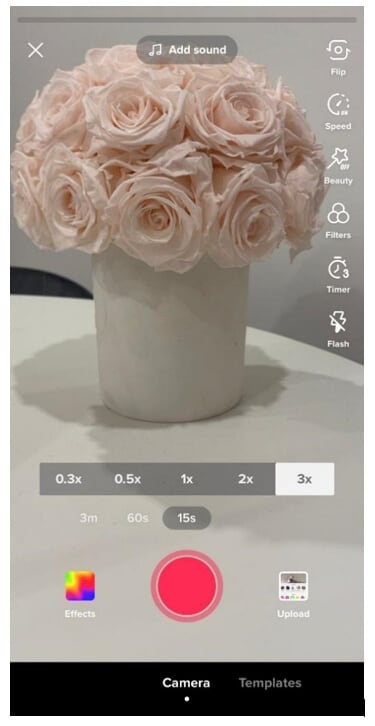
Step 2: The right-hand side of the screen has several icons that represent various recording choices. Choose the second option, Speed.
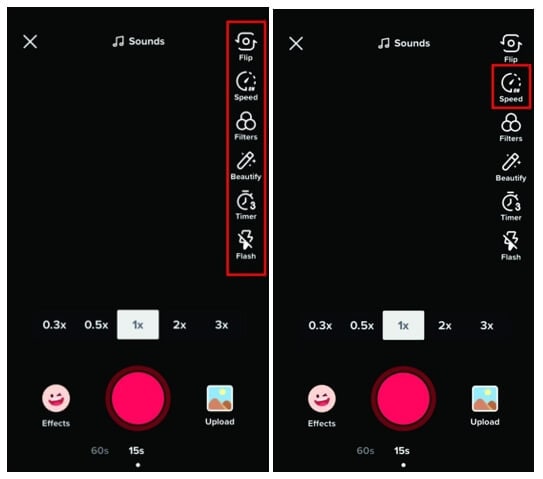
Step 3: Select the ideal recording speed at which you wish to capture your video. For a video with fast motion effect, you should choose 2X or 3X. To record a video, click on the red circle symbol on the screen.
Part 3: How to Add Fast Motion Effect to Uploaded Video on TikTok?
TikTok offers an almost limitless amount of unique features, which combine to make it one of the most engaging platforms available on the internet today. Read the information below to find out how to speed up a video on TikTok after it has been recorded on your smartphone is one of the best ways you can utilize to take your videos to the next level.
Step 1: Make a new video by opening your TikTok app and clicking the + sign at the bottom of the screen to start from scratch.
Step 2: Prior to pressing the red record button, however, make sure you have the “Speed“ symbol on the right-hand side of the display selected. You may change the game’s speed to be up to three times quicker than it would generally be.
Step 3: After you’ve made the necessary adjustments, press the red record button to begin recording your clip. There is no need for you to do anything else since everything will be automatically sped up.
Part 4: How to Download A TikTok Video to Fast Forward on iPhone and Android?
TikTok users were not allowed to fast forward or rewind videos inside the app for the longest time. TikTok recently added this feature; however, this new feature is not accessible for all users.
So, for those of you without this feature, we have found a way around it to let you fast forward and rewind your favorite TikTok videos; download them and that too without watermark on your iPhone or Android. Here’s how.
Step 1: Open the TikTok app, and select the video that you wish to download for fast-forwarding or rewinding.
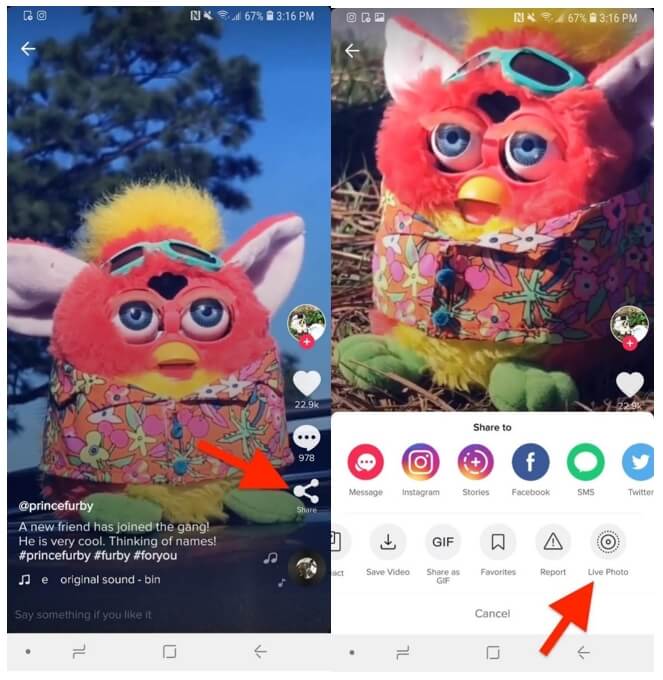
Step 2: Share this video page by clicking on the arrow icon located at the bottom-right of the page. If the publisher has enabled the download feature, you’ll be able to save the video to your gallery.
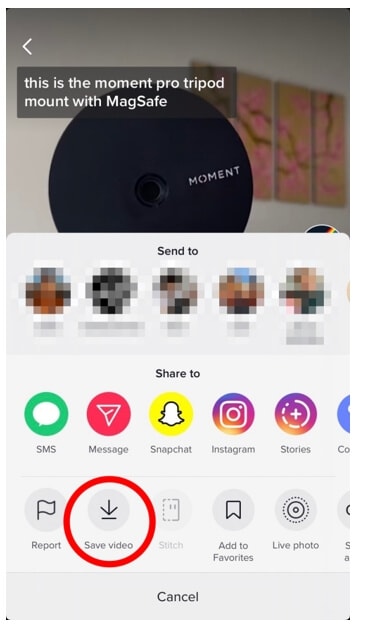
Step 3: If you’re an iPhone user, press on the Live Photo icon in the share tab.
Step 4: Now open your camera roll and go to the Live Photo you saved. Simply share the video after selecting the Save as Video option. Once saved, you may fast forward or rewind the video as often as you like!
Check this article to find out how to speed up a video on iPhone.
Part 5: How to Fast Forward Videos in TikTok on a PC?
Following its meteoric increase in popularity, most users expressed a desire to utilize it on their PC to connect with friends and explore new musical and video compositions by like-minded individuals. This is why TikTok made significant improvements in its PC version. The majority of the features formerly restricted to mobile applications can now be accessed using a web browser.
Even though certain features are still restricted for PC TikTok, there is little need to utilize additional features to get the most out of your TikTok use. In addition, you can simply fast forward and rewind video recordings on a computer with relative ease. To learn more, just follow these easy steps:
Step 1: Log in to your TikTok account by going to the TikTok website on your PC.
Step 2: Once you’re on the home page, click on any video that you may wish to view.
Step 3: Once the video opens, you will see a progress meter at the bottom of the video. The bar continues to thicken throughout the video. A white dot will emerge if you hold your cursor above the bar. Now, you can conveniently fast forward and rewind any video just by moving the white dot forward or backward.
Find out more details about how to use TikTok o n computer.
Conclusion
Well, there you have it – your How to Fast Forward On TikTo k guide. We have tried to cover every aspect of the fast forward TikTok videos that would enable you to have more entertainment in a short time by increasing the playback speed of your videos. Whether you’re an iPhone or an Android user or like to use TikTok on your PC, fast-forwarding videos have become much easier!
02 How to Record Fast Motion Video on TikTok on iPhone and Android?
03 How to Add Fast Motion Effect to Uploaded Video on TikTok?
04 How to Download A TikTok Video to Fast Forward on iPhone and Android?
05 How to Fast Forward Videos in TikTok on a PC?
Part 1: How to Fast Forward on Tiktok When Playing?
TikTok videos include a progress bar, which allows you to jump between them; nevertheless, this feature is not accessible for all videos. For the time being, the function is only visible on lengthier films.
Although it is unlikely, it is also possible to download a TikTok clip and then fast forward or rewind it at your convenience without using the TikTok app. But how to do it is the real question here. Follow the steps below to learn the trick:
Step 1: Find a white progress bar at the bottom of the clip on TikTok by opening the app and selecting it.
Step 2: The dot on the progress bar that appears like a white line may be moved forward or backward by tapping and dragging it along the bar. Note that the revised location will be reflected above the bar in the first timecode number.
Step 3: Using your finger, touch on the White circle and move it forward or backward to the place indicated by the timecode figure displayed above it.
Step 4: When you let go of the dot, you would have shifted your position in the clip.
Part 2: How to Record Fast Motion Video on TikTok on iPhone and Android?
A rapid-motion movie must be recorded with an increased speed between each frame to get a faster playback speed. Videos that move at a high rate of speed have a hypnotic impact on viewers. The procedures of creating a fast-motion video in TikTok for Android are outlined in the following section.
Record fast motion video on TikTok Android
Step 1: After launching the app, the feed area will appear. It would help if you touched on the “+” option in the feed area to get to the “Add new“ section.
Step 2: Speed control must be enabled when adding a new option. To change the speed, use the speed control option in the upper right corner of the screen.
![]()
Step 3: The next step is to decide on the video’s frame rate. The rectangular bar lets you choose a speed. Tap on the chosen speed from here.
Step 4: You may begin recording your video after selecting the required frame rate. You may accomplish this by holding down the red circular recording option as indicated in the image below while tapping and holding.
Step 5: The next step is to go on to the next stage. Tap the Red color checkmark option in the bottom right corner as indicated in the image below to proceed. Only once you’ve finished recording a video will you see the Tick mark.
Step 6: You’ll get this screen once you press the tick option provided below. In this section, you may apply various effects and filters.
(Note: There is nothing you can adjust here that will influence the speed of the movie. Finally, it would help if you pressed the “Next“ button shown by clicking on it).
Step 7: The screen below will appear after selecting the next option. On this page, you’ll see a Post button where you may share the video with your followers.
Record TikTok Video with Fast Motion Effect on iPhone
Step 1: Launch TikTok app. At the bottom of the screen, click on the “+” symbol. That link will lead you to a page where you can start creating a new video.
Step 2: The right-hand side of the screen has several icons that represent various recording choices. Choose the second option, Speed.
Step 3: Select the ideal recording speed at which you wish to capture your video. For a video with fast motion effect, you should choose 2X or 3X. To record a video, click on the red circle symbol on the screen.
Part 3: How to Add Fast Motion Effect to Uploaded Video on TikTok?
TikTok offers an almost limitless amount of unique features, which combine to make it one of the most engaging platforms available on the internet today. Read the information below to find out how to speed up a video on TikTok after it has been recorded on your smartphone is one of the best ways you can utilize to take your videos to the next level.
Step 1: Make a new video by opening your TikTok app and clicking the + sign at the bottom of the screen to start from scratch.
Step 2: Prior to pressing the red record button, however, make sure you have the “Speed“ symbol on the right-hand side of the display selected. You may change the game’s speed to be up to three times quicker than it would generally be.
Step 3: After you’ve made the necessary adjustments, press the red record button to begin recording your clip. There is no need for you to do anything else since everything will be automatically sped up.
Part 4: How to Download A TikTok Video to Fast Forward on iPhone and Android?
TikTok users were not allowed to fast forward or rewind videos inside the app for the longest time. TikTok recently added this feature; however, this new feature is not accessible for all users.
So, for those of you without this feature, we have found a way around it to let you fast forward and rewind your favorite TikTok videos; download them and that too without watermark on your iPhone or Android. Here’s how.
Step 1: Open the TikTok app, and select the video that you wish to download for fast-forwarding or rewinding.
Step 2: Share this video page by clicking on the arrow icon located at the bottom-right of the page. If the publisher has enabled the download feature, you’ll be able to save the video to your gallery.
Step 3: If you’re an iPhone user, press on the Live Photo icon in the share tab.
Step 4: Now open your camera roll and go to the Live Photo you saved. Simply share the video after selecting the Save as Video option. Once saved, you may fast forward or rewind the video as often as you like!
Check this article to find out how to speed up a video on iPhone.
Part 5: How to Fast Forward Videos in TikTok on a PC?
Following its meteoric increase in popularity, most users expressed a desire to utilize it on their PC to connect with friends and explore new musical and video compositions by like-minded individuals. This is why TikTok made significant improvements in its PC version. The majority of the features formerly restricted to mobile applications can now be accessed using a web browser.
Even though certain features are still restricted for PC TikTok, there is little need to utilize additional features to get the most out of your TikTok use. In addition, you can simply fast forward and rewind video recordings on a computer with relative ease. To learn more, just follow these easy steps:
Step 1: Log in to your TikTok account by going to the TikTok website on your PC.
Step 2: Once you’re on the home page, click on any video that you may wish to view.
Step 3: Once the video opens, you will see a progress meter at the bottom of the video. The bar continues to thicken throughout the video. A white dot will emerge if you hold your cursor above the bar. Now, you can conveniently fast forward and rewind any video just by moving the white dot forward or backward.
Find out more details about how to use TikTok o n computer.
Conclusion
Well, there you have it – your How to Fast Forward On TikTo k guide. We have tried to cover every aspect of the fast forward TikTok videos that would enable you to have more entertainment in a short time by increasing the playback speed of your videos. Whether you’re an iPhone or an Android user or like to use TikTok on your PC, fast-forwarding videos have become much easier!
Precision Production: Isolating Essence in Recording
The most frequent request you’ll get from video makers is to eliminate irritating noises like rumbling or humming from an original clip. Almost all of the time, capturing high-quality audio during filming is challenging since the conversation is often hard to hear or is made unclear due to surrounding noises, such as the dreadful air conditioners or fans.
To get rid of all these awful noises, this Audacity Noise Reduction feature will serve you a significant purpose in removing unwanted background noise for your future videos. Without further ado, let’s get started!
In this article
01 Things You Need to Prepare for Background Noise Reduction
02 How to Remove Background Noise in Audacity?
03 Why is Audacity Noise Reduction Not Working?
04 How to Prevent Background Noise in Audio Recording?
05 How to Remove Background Noise in Filmora?
Part 1: Things You Need to Prepare for Background Noise Reduction
Here are few things that you need to consider before you apply the noise reduction to your clips:
1. Noise Sample
A decent sample of the noise you wish to eliminate is perhaps the most crucial aspect of the Audacity remove noise procedure.
This will be used by Audacity to understand the noise and build a noise profile. The noise recording should last for a fair amount of time and be devoid of any other noises.
2. Avoid Copy Pasting Tiny Noise Section in Your Spoken Phrases
When you have a tiny part of noise between your stated words on your audio, please don’t copy/paste it to make a more significant piece of sound for Audacity to examine.
You would not be supplying Audacity with any more information that will help it generate a decent noise profile. The noise profile is what enables Audacity to tell the difference between speech and noise.
3. Minimum 2048 Data Samples Required
To build a noise profile, the Noise Reduction function requires a minimum of 2048 sample data. An audio file with a sampling frequency of 44.1kHz is roughly five hundredths of a second.
Note that this is the minor sound level that Audacity needs to generate a noise profile; however, should you supply a larger sample of the noise, Audacity can typically perform a great job of producing a suitable noise profile. As a result, attempt to capture a few seconds of background noises wherever possible.
4. Establish Recording Level and Record “Silence”
Setting your audio volume and capturing some “quiet” prior to speaking is the best way to achieve this. Instead, when you’ve finished talking, keep your camera/recorder going for a few moments.
Don’t move or create any sounds while capturing the background noises, and keep an ear open for any other noises. You only need to capture the ambient noise for a few moments; two to five seconds will suffice.
Part 2: How to Remove Background Noise in Audacity on Windows and Mac?
Whether you are using Windows or macOS, we will show you a step-by-step process to achieve your results using both software in this part of Audacity remove background music guide.
Remove background noise in Audacity on Windows
Step 1: On your recording, select a few moments of sound. Any segment of noise that incorporates other noises should be avoided.

Step 2: From the Effect menu, select Noise Reduction.

Step 3: Select the Get Noise Profile option whenever the Noise Reduction effect screen appears.

Note: Choose whether to implement the noise removal to the entire waveforms or only a portion of it.
Step 4: To access the Noise Reduction effects window, go to Effects > Noise Reduction. Raise the level of noise reduction progressively while previewing the result.

Step 5: Head over to the File section to Export and Save the result. Audacity does not save sound clips when you select Save Project; instead, you must choose Export. Select the file type you want to store and the place wherever you can save it. Select Save after giving the File Name.

Remove background noise in Audacity on Mac
Step 1: Create a room tone-containing audio file. When you don’t have a separate track for room tone, use a recording with a few moments of quiet in it. Click-and-drag to select a segment with a few minutes of silence using the Selection Tool.

Step 2: Select Noise Reduction from the Effects tab. Select the Get Noise Profile tab in the new tab under Step 1. The screen will shut, and Audacity will take noise profile samples of the indicated area.

Step 3: Click-and-drag to select the whole file, which requires noise reduction with the Selection Tool. To re-open the function, go to the Effect tab and pick Noise Reduction. Make modifications to the following parameters under Step 2:
- Reduce and Residue
- Frequency Smoothing (bands)
- Sensitivity
- Noise Reduction

Step 4: To listen to how the chosen file will look with the selected parameters, select Preview. Re-adjust until you have a sound noise reduction with no interference. When you’re finished, select Reduce and click OK.
Part 3: Why is Audacity Noise Reduction Not Working?
It’s possible that the Noise Reduction function isn’t letting you mop up your recording since your audio isn’t appropriate for it. The disturbance must be continuous, not random or fluctuating, to work for Audacity’s Noise Reduction function.
For example, the Noise Reduction function will not assist if your audio was made in a busy environment with unique noises such as background chatter, random traffic noises, or in an exhibition space or museum. The Noise Reduction feature in Audacity isn’t meant to cope with that kind of distortion. You’ll need to alter your recording approach if you’re capturing voice in either of those situations.
Under the following situations, the Audacity Noise Reduction function might underperform.
- Particular noise in the background, including traffic or people.
- When the harmonics of the sound and voice are comparable.
- There is sound variance where there is fluctuation in the noise.
- The volume of the voice is comparable to or lower than that of the background noise.
- When the noise is irregular or changeable rather than continuous.
- The loudness is deafening.
- The sound is a single click or pop.
Part 4: How to Prevent Background Noise in Audio Recording?
Although Audacity allows eliminating noise very simply, it is still an additional level that takes time to refine your podcast production. These pointers can help you avoid the necessity for noise reduction and cut down on the amount of time you spend processing.
1. Reduce the Computer Fan Noise
Whenever computers become too heated, they can produce a lot of noise. You may limit the amount of software that runs and position your mic away from the keyboard to help lessen this impact and avoid the fan from coming on.
However, even if you observe all of these guidelines, undesired recording sounds may still appear in your program. Fortunately, contemporary software makes this problem quite simple to resolve.
2. Reduce the Gain and Get Close to the Mic
Reduce the gain (sensitivity of the microphone) and go nearer to it. Talking straight into the microphone won’t distort your audio if you reduce the gain, and that would assist your microphone in concentrating on scooping up your voice’s tone.
Bonus Tip: Set your recorder’s (or DAW’s) sensitivity such that your speech peaks between -12 and -10db.
3. Utilize a Versatile Microphone
Condenser and dynamic microphones are the two most common types of podcast microphones. Condenser microphones are significantly more sensitive instruments meant to take up average atmospheric noise, whereas dynamic microphones have a narrower frequency range, picking up fewer ambient noises.
4. Optimize Your Recording Environment
The most significant and most crucial aspect of your podcasts’ sound quality is where you capture it. To optimize your personal podcasting space, we recommend choosing a peaceful, compact area away from HVAC systems, vehicles, external hard drives, background sound, motors, and other distractions. You may also increase the tone of your room by using natural sound absorbents such as curtains, rugs, carpets, and sofas.
Part 5: How to Remove Background Noise in Filmora?
Although there is a lot of software available to eliminate ambient noise, we highly suggest Wondershare Filmora Video Editor to edit audio and video in one place.
In addition to the standard audio editing capabilities, the recently redesigned Filmora currently includes enhanced waveforms, volume Keyframing , peak metering, and audio transitions, giving you a better audio editing interface.
For Win 7 or later (64-bit)
For macOS 10.12 or later
Filmora Video Editor will quickly remove ambient sound from both sound/video. You may also remove the sound from the video with this simple video editor, use the Audio Equalizer or Audio Mixer functions to modify the audio further, and then Export and save the audio in an Mp3 file. Here are the detailed steps:
Step 1: In the Wondershare Filmora Timeline menu, Import your footage. Trim the footage after previewing it and deleting the sections you don’t want to retain.

Step 2: To eliminate the ambient noise immediately, double-click on the video file, and go to the Audio panel to select the Remove Background Noise option. You will find that the background noise is removed automatically.

Step 3: After checking the results, select Export to download the noise-reduced clip to your desktop or upload it immediately to YouTube or Vimeo.

Conclusion
Well, there you have it. In this Audacity Remove Background Noise guide, we have reviewed every possible method you can adopt to get rid of the unnecessary background noise in the Audacity. And if the desired results are still not achieved, we highly recommend using the Wondershare Filmora editing software. Not only will it help you remove the unwanted ambient noise, but it will also allow you to customize your audio or video file further.
02 How to Remove Background Noise in Audacity?
03 Why is Audacity Noise Reduction Not Working?
04 How to Prevent Background Noise in Audio Recording?
05 How to Remove Background Noise in Filmora?
Part 1: Things You Need to Prepare for Background Noise Reduction
Here are few things that you need to consider before you apply the noise reduction to your clips:
1. Noise Sample
A decent sample of the noise you wish to eliminate is perhaps the most crucial aspect of the Audacity remove noise procedure.
This will be used by Audacity to understand the noise and build a noise profile. The noise recording should last for a fair amount of time and be devoid of any other noises.
2. Avoid Copy Pasting Tiny Noise Section in Your Spoken Phrases
When you have a tiny part of noise between your stated words on your audio, please don’t copy/paste it to make a more significant piece of sound for Audacity to examine.
You would not be supplying Audacity with any more information that will help it generate a decent noise profile. The noise profile is what enables Audacity to tell the difference between speech and noise.
3. Minimum 2048 Data Samples Required
To build a noise profile, the Noise Reduction function requires a minimum of 2048 sample data. An audio file with a sampling frequency of 44.1kHz is roughly five hundredths of a second.
Note that this is the minor sound level that Audacity needs to generate a noise profile; however, should you supply a larger sample of the noise, Audacity can typically perform a great job of producing a suitable noise profile. As a result, attempt to capture a few seconds of background noises wherever possible.
4. Establish Recording Level and Record “Silence”
Setting your audio volume and capturing some “quiet” prior to speaking is the best way to achieve this. Instead, when you’ve finished talking, keep your camera/recorder going for a few moments.
Don’t move or create any sounds while capturing the background noises, and keep an ear open for any other noises. You only need to capture the ambient noise for a few moments; two to five seconds will suffice.
Part 2: How to Remove Background Noise in Audacity on Windows and Mac?
Whether you are using Windows or macOS, we will show you a step-by-step process to achieve your results using both software in this part of Audacity remove background music guide.
Remove background noise in Audacity on Windows
Step 1: On your recording, select a few moments of sound. Any segment of noise that incorporates other noises should be avoided.
Step 2: From the Effect menu, select Noise Reduction.
Step 3: Select the Get Noise Profile option whenever the Noise Reduction effect screen appears.
Note: Choose whether to implement the noise removal to the entire waveforms or only a portion of it.
Step 4: To access the Noise Reduction effects window, go to Effects > Noise Reduction. Raise the level of noise reduction progressively while previewing the result.
Step 5: Head over to the File section to Export and Save the result. Audacity does not save sound clips when you select Save Project; instead, you must choose Export. Select the file type you want to store and the place wherever you can save it. Select Save after giving the File Name.
Remove background noise in Audacity on Mac
Step 1: Create a room tone-containing audio file. When you don’t have a separate track for room tone, use a recording with a few moments of quiet in it. Click-and-drag to select a segment with a few minutes of silence using the Selection Tool.
Step 2: Select Noise Reduction from the Effects tab. Select the Get Noise Profile tab in the new tab under Step 1. The screen will shut, and Audacity will take noise profile samples of the indicated area.
Step 3: Click-and-drag to select the whole file, which requires noise reduction with the Selection Tool. To re-open the function, go to the Effect tab and pick Noise Reduction. Make modifications to the following parameters under Step 2:
- Reduce and Residue
- Frequency Smoothing (bands)
- Sensitivity
- Noise Reduction
Step 4: To listen to how the chosen file will look with the selected parameters, select Preview. Re-adjust until you have a sound noise reduction with no interference. When you’re finished, select Reduce and click OK.
Part 3: Why is Audacity Noise Reduction Not Working?
It’s possible that the Noise Reduction function isn’t letting you mop up your recording since your audio isn’t appropriate for it. The disturbance must be continuous, not random or fluctuating, to work for Audacity’s Noise Reduction function.
For example, the Noise Reduction function will not assist if your audio was made in a busy environment with unique noises such as background chatter, random traffic noises, or in an exhibition space or museum. The Noise Reduction feature in Audacity isn’t meant to cope with that kind of distortion. You’ll need to alter your recording approach if you’re capturing voice in either of those situations.
Under the following situations, the Audacity Noise Reduction function might underperform.
- Particular noise in the background, including traffic or people.
- When the harmonics of the sound and voice are comparable.
- There is sound variance where there is fluctuation in the noise.
- The volume of the voice is comparable to or lower than that of the background noise.
- When the noise is irregular or changeable rather than continuous.
- The loudness is deafening.
- The sound is a single click or pop.
Part 4: How to Prevent Background Noise in Audio Recording?
Although Audacity allows eliminating noise very simply, it is still an additional level that takes time to refine your podcast production. These pointers can help you avoid the necessity for noise reduction and cut down on the amount of time you spend processing.
1. Reduce the Computer Fan Noise
Whenever computers become too heated, they can produce a lot of noise. You may limit the amount of software that runs and position your mic away from the keyboard to help lessen this impact and avoid the fan from coming on.
However, even if you observe all of these guidelines, undesired recording sounds may still appear in your program. Fortunately, contemporary software makes this problem quite simple to resolve.
2. Reduce the Gain and Get Close to the Mic
Reduce the gain (sensitivity of the microphone) and go nearer to it. Talking straight into the microphone won’t distort your audio if you reduce the gain, and that would assist your microphone in concentrating on scooping up your voice’s tone.
Bonus Tip: Set your recorder’s (or DAW’s) sensitivity such that your speech peaks between -12 and -10db.
3. Utilize a Versatile Microphone
Condenser and dynamic microphones are the two most common types of podcast microphones. Condenser microphones are significantly more sensitive instruments meant to take up average atmospheric noise, whereas dynamic microphones have a narrower frequency range, picking up fewer ambient noises.
4. Optimize Your Recording Environment
The most significant and most crucial aspect of your podcasts’ sound quality is where you capture it. To optimize your personal podcasting space, we recommend choosing a peaceful, compact area away from HVAC systems, vehicles, external hard drives, background sound, motors, and other distractions. You may also increase the tone of your room by using natural sound absorbents such as curtains, rugs, carpets, and sofas.
Part 5: How to Remove Background Noise in Filmora?
Although there is a lot of software available to eliminate ambient noise, we highly suggest Wondershare Filmora Video Editor to edit audio and video in one place.
In addition to the standard audio editing capabilities, the recently redesigned Filmora currently includes enhanced waveforms, volume Keyframing , peak metering, and audio transitions, giving you a better audio editing interface.
For Win 7 or later (64-bit)
For macOS 10.12 or later
Filmora Video Editor will quickly remove ambient sound from both sound/video. You may also remove the sound from the video with this simple video editor, use the Audio Equalizer or Audio Mixer functions to modify the audio further, and then Export and save the audio in an Mp3 file. Here are the detailed steps:
Step 1: In the Wondershare Filmora Timeline menu, Import your footage. Trim the footage after previewing it and deleting the sections you don’t want to retain.
Step 2: To eliminate the ambient noise immediately, double-click on the video file, and go to the Audio panel to select the Remove Background Noise option. You will find that the background noise is removed automatically.
Step 3: After checking the results, select Export to download the noise-reduced clip to your desktop or upload it immediately to YouTube or Vimeo.
Conclusion
Well, there you have it. In this Audacity Remove Background Noise guide, we have reviewed every possible method you can adopt to get rid of the unnecessary background noise in the Audacity. And if the desired results are still not achieved, we highly recommend using the Wondershare Filmora editing software. Not only will it help you remove the unwanted ambient noise, but it will also allow you to customize your audio or video file further.
Also read:
- [New] Masterful Filters 10 Must-Have Tools to Transform Videos for 2024
- [New] 2024 Approved No Budget, Maximum Fun Best FREE TikTok Editors for MacOS
- Top 10 TikTok Edits Android & iOS Leaders for 2024
- [Updated] Crafting Impactful Content on TikTok with These Best Quotes
- In 2024, Capturing TikTok Videos Saving on Modern Smartphones
- In 2024, Weaving Your Way to Greatness in TikTok Content
- [New] 2024 Approved Strategies to Bypass Invisible Restrictions on TikTok
- [Updated] In 2024, Ethical TikTok Following Purchase with Peace of Mind
- [Updated] 2024 Approved From Your Computer's Vision Mastering TikTok Video Uploads
- [New] 2024 Approved Instantly and Indefinitely Remove Yourself From TikTok Landscape
- [Updated] Unforeseen TikTok Reset – Are Posts Retrievable?
- [New] Bring Your TikTok Visuals to Life with Sound for 2024
- [New] Sonic Sieve Extracting Pure Audio in Audacity for 2024
- [Updated] Integrating Siri with TikTok for Effortless Video Filming for 2024
- Seamless Process for Everlasting TikTok Deactivation for 2024
- [Updated] 60 Quick Witty TikTok One-Liners for 2024
- [New] In 2024, How to Do Slow Mo On Tik Tok? [Step by Step]
- [Updated] Crafting Shareable TikToks with 50+ Influential Phrases
- Harmonizing Music and Video on TikTok
- [New] 2024 Approved Amazon's Hot Take TikToks Shop Smart with Top Picks
- [Updated] In 2024, The Art of Augmentation Creating Big Head Scenes for TikTok
- [New] How to Make TikTok Reaction Videos Easily in 2 Ways for 2024
- [New] In 2024, Top 10 Gaming Tiktokers
- [Updated] 2024 Approved Top TikTok Anthems Melodies You Can't Get Out of Your Head
- [Updated] In 2024, A Closer Look at TikTok's Hot Reaction Videos
- [Updated] Stop Stalling How to Overcome a Glitchy TikTok Experience (Chrome)
- [Updated] Streamlined Mac TikTok Editing Tools (All Free)
- Top 6 Online-Free TikTop To MP3 Converter Tools for 2024
- [Updated] Struggling with Stuck TikToks Common Glitches and Solutions for 2024
- [Updated] 2024 Approved Relax & Rhythm Discover 20 Country Songs That Promote Dance and Calm on TikTok
- [Updated] 2024 Approved Social Media Mastery Expanding Business Through TikTok Techniques
- [New] In 2024, Anime-Inspired Dance Routines Top 20 TikTok Trends
- [New] In 2024, Avoid Breaches The Pre-Upload Guide to Copyright on TikTok
- 2024 Approved Instagrammable Vs. Trendy Will LikeBeat TikTok?
- [Updated] In 2024, Fresh PFP Designs for Captivating TikTok Profiles
- [Updated] From Silence to Sound A Guide to TikTok Voiceover
- [Updated] TikTok Captioning Guide Adding Descriptive Texts for 2024
- [New] Masterful Persona Design on TikTok - The Ultimate How To
- [New] 2024 Approved Charting a Course to Your Personalized TikTok Marker
- [New] 2024 Approved Master the Art of TikTok Video Making with Ease & Flair
- Top 10 Shoutouts TikTok's Favorite Video Responses for 2024
- 2 Ways to Monitor Tecno Spark Go (2024) Activity | Dr.fone
- Full Tutorial to Bypass Your Asus ROG Phone 7 Ultimate Face Lock?
- Full Guide on Mirroring Your Tecno Spark Go (2023) to Your PC/Mac | Dr.fone
- [Updated] Simple Steps for iPhone Screen Capture
- [Updated] Remove Distractions in Webcam Captures
- [Updated] 2024 Approved How to Stream A Pre-Recorded Video Live on Facebook?
- Updated In 2024, The Ultimate List of Free Green Screen Apps for Mobile Creators
- New 2024 Approved Eleven Strategies of Online Bliss A Listicle for a Tranquil State of Mind
- How to Multiply Engagement on Your Instagram Story for 2024
- What Legendaries Are In Pokemon Platinum On Honor Play 7T? | Dr.fone
- New Exploring the Best Vocal Transformation Options for Gamers for 2024
- [New] Top Quality Economical Cam Recorder
- New Enhance Your Speaking Style with AV Voice Changers A Comprehensive Guide
- Updated Best Green Screen Apps for Mac A Comprehensive Guide for 2024
- 2024 Approved Reviewing VN Video Editor Is It Worth It for PC Users?
- Updated Mastering XML Files in Final Cut Pro X The Ultimate Guide
- How to Unlock a Network Locked Xiaomi Phone?
- 5 Ways to Restart Meizu 21 Without Power Button | Dr.fone
- Best 10 Mock Location Apps Worth Trying On Tecno Camon 20 | Dr.fone
- In 2024, Insta Rotation Rituals Mastering Angles that Engage, Captivate, and Amaze
- A Detailed Guide on Faking Your Location in Mozilla Firefox On Vivo V29 Pro | Dr.fone
- In 2024, Assessing Camera Multicam Systems in Modern Living Spaces
- [Updated] 2024 Approved Screen to Streamer, Effortlessly Reviewed
- Updated In 2024, Craft a No-Cost, Audio-Driven Visual Experience
- All About Apple iPhone 13 Pro Max Unlock Chip You Need to Know
- [Updated] How to Search Filters on Instagram for 2024
- [Updated] In 2024, Utilizing Snap Camera for Interactive Online Gatherings
- Unlock the Power of Online Interaction Essential Tips for Successful Zoom Chats
- In 2024, How to Reset Gmail Password on Nokia C12 Pro Devices
- 2024 Approved Exploring the Finest Text-to-Speech Male Voice Tools for Natural Output
- How to Track a Lost Xiaomi Civi 3 for Free? | Dr.fone
- In 2024, Ways to trade pokemon go from far away On Realme GT Neo 5? | Dr.fone
- [New] Maximizing Xbox Broadcast Transitioning to FB Live
- Updated A Roster of 15 Top Disney Channel Cartoons
- Updated If You Want to Improve Your Animation Skills or Look for Professional Animation Software, This Article Will Recommend 8 Best Tools on Mac and Windows for 2024
- In 2024, Here are Some Pro Tips for Pokemon Go PvP Battles On Tecno Camon 20 Pro 5G | Dr.fone
- [Updated] In 2024, Enhance Your Livestream Quality Learn 4 Innovative Techniques
- In 2024, iSpoofer is not working On Vivo S17? Fixed | Dr.fone
- Title: "[Updated] 2024 Approved How to Fast Forward on TikTok?"
- Author: Brian
- Created at : 2024-05-23 14:59:56
- Updated at : 2024-05-24 14:59:56
- Link: https://tiktok-videos.techidaily.com/updated-2024-approved-how-to-fast-forward-on-tiktok/
- License: This work is licensed under CC BY-NC-SA 4.0.
