![[Updated] 2024 Approved Making Magic TikTok Dancing Masterclass for Mac Users](https://thmb.techidaily.com/d8bc1833c243f47afb83a105ed80a45f4c9ab816dfbd913fea0d2186dd349bdd.jpg)
"[Updated] 2024 Approved Making Magic TikTok Dancing Masterclass for Mac Users"
Making Magic: TikTok Dancing Masterclass for Mac Users
How to make TikTok dance on Mac

Shanoon Cox
Oct 26, 2023• Proven solutions
TikTok is one of the most famous social media apps currently on social media. It has started to take the world by storm since the day it came out. With more than 1 billion downloads, around 700 million people use this app daily.
There are many things to do on Tiktok, such as imitating dialogues, viral videos, songs or you can even make your original video content. The famous forms of entertainment on this application are TikTok dances.
It started with Lil Nas X’s song Old Town Road, which introduced a dance challenge. The song didn’t gain much attention till it produced a dance routine on Tiktok. Since then, every now and then there is a new dance routine challenge on Tiktok which goes viral on almost all social media platforms.
You May Also Like: How to Make a Best Tiktok Intro Video on Mac?>>>
Special Effects That Can Make Your Tiktok Dance Routine Special
Tik Tok comes with various options of different effects on its own. Whenever you make a video on Tik Tok, you can easily add effects from the app after you are done recording. Nevertheless, there is always a limit to the number of effects offered by the app.
You can however add effects to your content via different applications. One of the best and most amazing video effects you can add to your videos is motion tracking. Motion tracking function allows any sticker or animation to follow your actions.
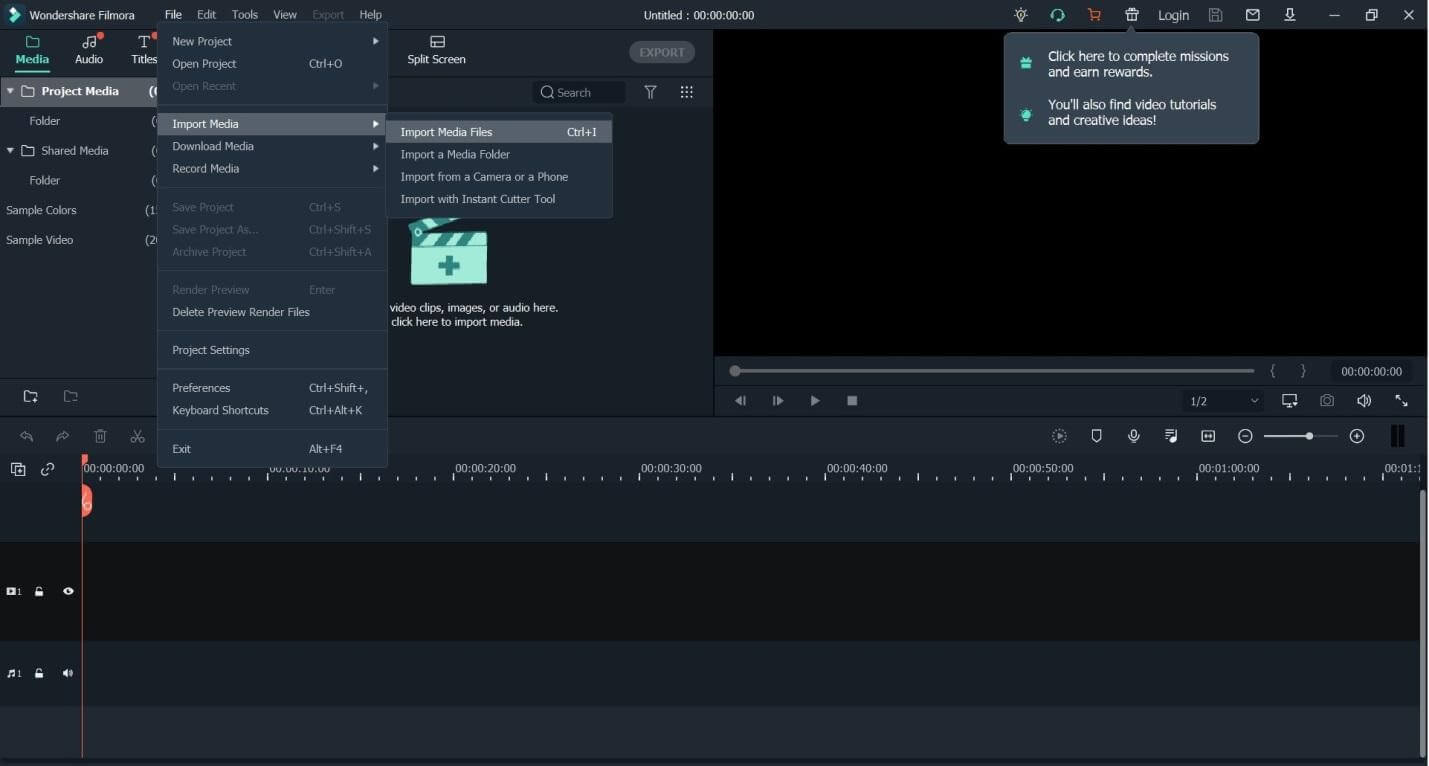
For that execution, you will need an external video editing app to edit your videos. Wondershare’s FilmoraX is recommended to be the best video editing software used for these purposes.
Motion Tracking Function With Wondershare FilmoraX


Using the motion tracking function is extremely easy. Here is how you do it:
1.First, you select and open the Tik Tok dance video you want to use on FilmoraX and drag it into the timeline.
2.Now you will want to check that the main body of the subject is in the entire frame. If it is not, then you will need to cut and trim the video accordingly.
3.The next step is to start the motion tracking. For this, you will need to make sure that your play head is at the point from where you want to start your motion tracking. The tracking will only start wherever your play head is.

4.Once that is done, you can open the tool used for motion tracking from the timeline toolbar. You can also do it by double-clicking your clip to find the motion tracking function in the editing menu.
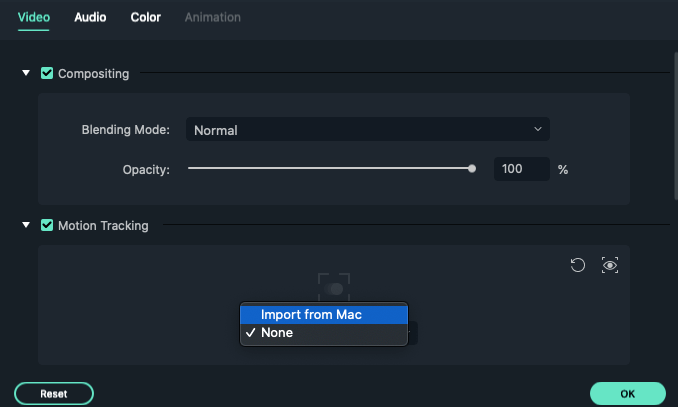
5.When you have done that, the motion tracking box will appear in the preview. Move and resize it according to the subject that you wish to track. Then, select the “render-effect” option so that Filmora can analyze the video.

6.Now you can add the object you want to have to follow the track. You can choose that from the title menu or add a new image from your Mac.
7.Once you choose your object, you simply need to drag that object to the track above your footage.
8.Next, you will need to place the object where you want it to be concerning the subject in the preview box. Make sure that you drag the edge of it on the timeline to match it with the timeline of your subject.
9.When it has been set up, you will need to double-click the footage you have added the tracking function to and go to the motion tracking menu.
10.The drop-down menu will show all the texts and images or animations available. Select the one you want to see.
11.Adjust the size of your object and voila!! You are done.
With these easy steps, you have managed to make a normal Tik Tok Dance challenge into a unique and zestful piece of art.

Other Visual Effects For Your Tik Tok Dance
Other than motion tracking several other effects can make your Tik Tok dance alluring and special. Here are some of them.
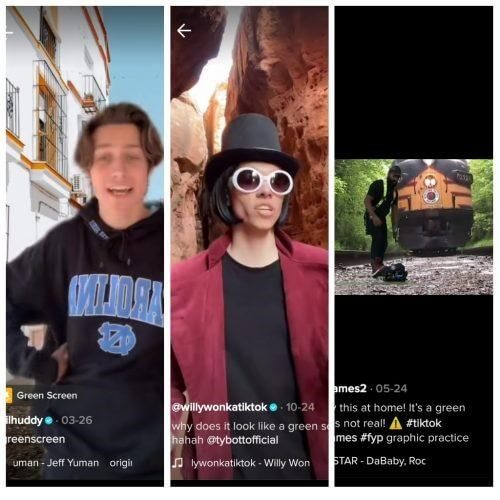
Green Screen for TikTok Dance
This is also one of the most famous effects that are used for the Tik Tok dance challenge. Green Screen in a built-in app effect that allows you to add any background to your current video. Tik Tok provides some default backgrounds to its users but you can also choose from your camera roll.
Disco effects for TikTok Dance
This is another one of the extremely fun built-in effects that allow you to add disco lights to your amazing Tik Tok dance.

Double Screen Effect for TikTok Dance
This effect allows you to have two screens at once. The brilliant thing about this effect is that you can perform different actions on both screens and also create an illusion of moving from one screen to another. This effect can help make some creative Tik Tok dance videos depending on your imagination.

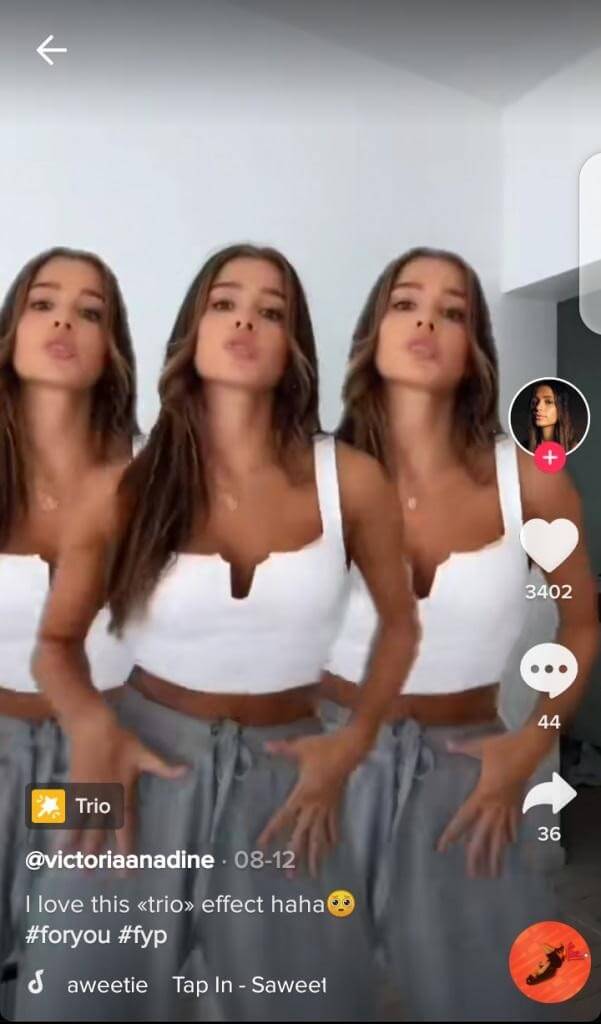
Trio Effect for TikTok Dance
This effect allows you to make two other clones of yourself. Now imagine three of you dancing together on some good choreography. Sounds sensational; doesn’t it? When using trio, both of your clones will be doing the same moves, you cannot assign different moves to your clones.
Conclusion
Tik Tok dance challenges have been going viral for a long time now because they are creative and amusing. They can be made much more entertaining by using different video effects.
The most mesmerizing effects can be added through the motion tracking function. It allows you to add objects and animations to your videos and make them extremely befuddling and stimulates one’s imagination.
Motion tracking not only adds objects but also helps stabilize the video. It also lets you add 3d objects in 2d footage and apply other effects and color grading techniques.
Apart from all that it will let you replace screens on different devices such as tablets, computers, and TV devices.
All of this can be achieved with just one top of the line video editing software that is Wondershare’s FilmoraX. So, start your challenges today with the tips and tricks provided and go viral, be famous.
Shanoon Cox
Shanoon Cox is a writer and a lover of all things video.
Follow @Shanoon Cox
Shanoon Cox
Oct 26, 2023• Proven solutions
TikTok is one of the most famous social media apps currently on social media. It has started to take the world by storm since the day it came out. With more than 1 billion downloads, around 700 million people use this app daily.
There are many things to do on Tiktok, such as imitating dialogues, viral videos, songs or you can even make your original video content. The famous forms of entertainment on this application are TikTok dances.
It started with Lil Nas X’s song Old Town Road, which introduced a dance challenge. The song didn’t gain much attention till it produced a dance routine on Tiktok. Since then, every now and then there is a new dance routine challenge on Tiktok which goes viral on almost all social media platforms.
You May Also Like: How to Make a Best Tiktok Intro Video on Mac?>>>
Special Effects That Can Make Your Tiktok Dance Routine Special
Tik Tok comes with various options of different effects on its own. Whenever you make a video on Tik Tok, you can easily add effects from the app after you are done recording. Nevertheless, there is always a limit to the number of effects offered by the app.
You can however add effects to your content via different applications. One of the best and most amazing video effects you can add to your videos is motion tracking. Motion tracking function allows any sticker or animation to follow your actions.
For that execution, you will need an external video editing app to edit your videos. Wondershare’s FilmoraX is recommended to be the best video editing software used for these purposes.
Motion Tracking Function With Wondershare FilmoraX
Using the motion tracking function is extremely easy. Here is how you do it:
1.First, you select and open the Tik Tok dance video you want to use on FilmoraX and drag it into the timeline.
2.Now you will want to check that the main body of the subject is in the entire frame. If it is not, then you will need to cut and trim the video accordingly.
3.The next step is to start the motion tracking. For this, you will need to make sure that your play head is at the point from where you want to start your motion tracking. The tracking will only start wherever your play head is.
4.Once that is done, you can open the tool used for motion tracking from the timeline toolbar. You can also do it by double-clicking your clip to find the motion tracking function in the editing menu.
5.When you have done that, the motion tracking box will appear in the preview. Move and resize it according to the subject that you wish to track. Then, select the “render-effect” option so that Filmora can analyze the video.
6.Now you can add the object you want to have to follow the track. You can choose that from the title menu or add a new image from your Mac.
7.Once you choose your object, you simply need to drag that object to the track above your footage.
8.Next, you will need to place the object where you want it to be concerning the subject in the preview box. Make sure that you drag the edge of it on the timeline to match it with the timeline of your subject.
9.When it has been set up, you will need to double-click the footage you have added the tracking function to and go to the motion tracking menu.
10.The drop-down menu will show all the texts and images or animations available. Select the one you want to see.
11.Adjust the size of your object and voila!! You are done.
With these easy steps, you have managed to make a normal Tik Tok Dance challenge into a unique and zestful piece of art.
Other Visual Effects For Your Tik Tok Dance
Other than motion tracking several other effects can make your Tik Tok dance alluring and special. Here are some of them.
Green Screen for TikTok Dance
This is also one of the most famous effects that are used for the Tik Tok dance challenge. Green Screen in a built-in app effect that allows you to add any background to your current video. Tik Tok provides some default backgrounds to its users but you can also choose from your camera roll.
Disco effects for TikTok Dance
This is another one of the extremely fun built-in effects that allow you to add disco lights to your amazing Tik Tok dance.
Double Screen Effect for TikTok Dance
This effect allows you to have two screens at once. The brilliant thing about this effect is that you can perform different actions on both screens and also create an illusion of moving from one screen to another. This effect can help make some creative Tik Tok dance videos depending on your imagination.
Trio Effect for TikTok Dance
This effect allows you to make two other clones of yourself. Now imagine three of you dancing together on some good choreography. Sounds sensational; doesn’t it? When using trio, both of your clones will be doing the same moves, you cannot assign different moves to your clones.
Conclusion
Tik Tok dance challenges have been going viral for a long time now because they are creative and amusing. They can be made much more entertaining by using different video effects.
The most mesmerizing effects can be added through the motion tracking function. It allows you to add objects and animations to your videos and make them extremely befuddling and stimulates one’s imagination.
Motion tracking not only adds objects but also helps stabilize the video. It also lets you add 3d objects in 2d footage and apply other effects and color grading techniques.
Apart from all that it will let you replace screens on different devices such as tablets, computers, and TV devices.
All of this can be achieved with just one top of the line video editing software that is Wondershare’s FilmoraX. So, start your challenges today with the tips and tricks provided and go viral, be famous.
Shanoon Cox
Shanoon Cox is a writer and a lover of all things video.
Follow @Shanoon Cox
Elevate Your TikTok Impact Through Masterful Cloning
How to Clone Yourself on TikTok
Shanoon Cox
Mar 27, 2024• Proven solutions
Every rising pop star needs music videos, but using professional video editing software may be too time-consuming if you want to quickly create a clone video you can share with your fans on TikTok.
Multiplying yourself in a video is a cool way of making sure that your video is going to get the kind of attention it deserves. The process of cloning yourself in a video is a simple one, but there are certain rules you have to follow while recording the footage that will help you avoid overlapping the figures you’re cloning. Here’s how you can make your first clone yourself video on TikTok.

Selecting the Song for your Clone Video
Before you start shooting the video you first need to select the song on TikTok you’re going to use in the video. Once you’ve found the perfect track simply record it and save it as a video to your camera roll. You can then import the video clip that contains the song into the Video Star app.
Here are 10 Popular TikTok Songs for you.

Using the Video Star App to Clone Yourself
1. Download Video Star App
Choosing a location, mounting your iPhone on a tripod, or picking the positions for each of your clones are all important steps you’ll need to take before you actually start recording. There are several apps that enable you to create clone videos easily, but in this article, we are going to show you how you can clone yourself with Video Star. The app can be downloaded from the App Store for free, but additional in-app purchases are necessary if you want to have access to all the power packs Video Star offers. You don’t have to record the video clips with this app since the iPhone’s native camera app is powerful enough to enable you to record high-quality footage.
2. Edit Multiple Video Clips
After you record all the positions for your next clone video with the iPhone’s native camera app, you should cut the video clips and keep only the parts where you are perfectly positioned, so your position in one clip doesn’t overlap with other positions. During the video recording process try to create as much separation between two positions in order to avoid any chance of overlapping. One of the best ways to achieve this is to shoot at a location that is spacious enough so you can make enough separation between two positions. Keep in mind that the maximum number of clips you can combine in the Video Star app is limited to just three, so if you want to have more than three clones in the shot you first have to piece together three clips, save them as a single file and then add more clips to the cloned video you created.
3. Level up Your Videos with Video Star
Video Star also enables you to shoot your videos from the app, and you can adjust the Countdown before the app starts recording or the Recording Speed. Make sure to enter the lowest Recording Speed value possible, because that way you’ll be recording like TikTok does on fast.
Tap the Record button, then select the Multiple options, and play the video that contains the song you previously selected. Once you reach the spot in the song where you want to introduce the clone simply tap Set, so the recording will stop at the designated point and you can move to another position. If at any point during recording you realize that your movements extend to your clone’s location, you can simply tap on the hamburger icon and select the Delete Last option.
To preview the video, you just have to tap on the Scissors icon, and the recorded video will automatically start playing. The Record New Clip in the Scissors menu lets you start from the beginning in case you’re not happy with the results or you can use this option to start recording the video with the second position of your clone.
When done, head back to the Scissors menu, and tap on the Multi-Layer Clip. This feature doesn’t come with the free version of the app, and you must purchase it in order to create a clone video. This action will enable you to select the back and front clips. After selecting the clips, the Mask Front menu will appear on the screen, choose the Shape option and use the hamburger icon on the right side of the screen to change the video’s shape to Rectangle. Drag the rectangle in the preview window so you can crop the first clip to match the demands of your video and press the Next icon to continue the video editing process.
Alternatively, you can use the Erase option to remove the unwanted parts of each video. You can find this option in the Mask Front or Mask Back menu, so just select it and use your finger to remove sections of the shot you don’t want to use.
The Add Effect menu will pop up on the screen so you can add different effects to your first video clip, and then repeat the entire process for the back clip. Once you’ve edited the second clip tap on the Create button to complete the process of making a multilayer clip. Tap Done to save the clip to your camera roll, and upload it to TikTok.
Conclusion
Cloning yourself in a video using the Video Star app is a simple process that can be mastered in a short period of time. The Video Star app lets you create as many clones of yourself as you want, so you just have to make sure that your video clips can be easily combined to feature two or more of your clones and have fun exploring the effects that can make your videos look even cooler. If you want to be a success on the TikTok platform, learning how to make clone videos is one of the best ways to do it, so choose your favorite songs and start producing clone yourself videos.
You can also use Wondershare Filmora to make a split-screen with ease. Check the tutorial below to figure out how to make a split-screen video to clone.
Shanoon Cox
Shanoon Cox is a writer and a lover of all things video.
Follow @Shanoon Cox
Shanoon Cox
Mar 27, 2024• Proven solutions
Every rising pop star needs music videos, but using professional video editing software may be too time-consuming if you want to quickly create a clone video you can share with your fans on TikTok.
Multiplying yourself in a video is a cool way of making sure that your video is going to get the kind of attention it deserves. The process of cloning yourself in a video is a simple one, but there are certain rules you have to follow while recording the footage that will help you avoid overlapping the figures you’re cloning. Here’s how you can make your first clone yourself video on TikTok.
Selecting the Song for your Clone Video
Before you start shooting the video you first need to select the song on TikTok you’re going to use in the video. Once you’ve found the perfect track simply record it and save it as a video to your camera roll. You can then import the video clip that contains the song into the Video Star app.
Here are 10 Popular TikTok Songs for you.
Using the Video Star App to Clone Yourself
1. Download Video Star App
Choosing a location, mounting your iPhone on a tripod, or picking the positions for each of your clones are all important steps you’ll need to take before you actually start recording. There are several apps that enable you to create clone videos easily, but in this article, we are going to show you how you can clone yourself with Video Star. The app can be downloaded from the App Store for free, but additional in-app purchases are necessary if you want to have access to all the power packs Video Star offers. You don’t have to record the video clips with this app since the iPhone’s native camera app is powerful enough to enable you to record high-quality footage.
2. Edit Multiple Video Clips
After you record all the positions for your next clone video with the iPhone’s native camera app, you should cut the video clips and keep only the parts where you are perfectly positioned, so your position in one clip doesn’t overlap with other positions. During the video recording process try to create as much separation between two positions in order to avoid any chance of overlapping. One of the best ways to achieve this is to shoot at a location that is spacious enough so you can make enough separation between two positions. Keep in mind that the maximum number of clips you can combine in the Video Star app is limited to just three, so if you want to have more than three clones in the shot you first have to piece together three clips, save them as a single file and then add more clips to the cloned video you created.
3. Level up Your Videos with Video Star
Video Star also enables you to shoot your videos from the app, and you can adjust the Countdown before the app starts recording or the Recording Speed. Make sure to enter the lowest Recording Speed value possible, because that way you’ll be recording like TikTok does on fast.
Tap the Record button, then select the Multiple options, and play the video that contains the song you previously selected. Once you reach the spot in the song where you want to introduce the clone simply tap Set, so the recording will stop at the designated point and you can move to another position. If at any point during recording you realize that your movements extend to your clone’s location, you can simply tap on the hamburger icon and select the Delete Last option.
To preview the video, you just have to tap on the Scissors icon, and the recorded video will automatically start playing. The Record New Clip in the Scissors menu lets you start from the beginning in case you’re not happy with the results or you can use this option to start recording the video with the second position of your clone.
When done, head back to the Scissors menu, and tap on the Multi-Layer Clip. This feature doesn’t come with the free version of the app, and you must purchase it in order to create a clone video. This action will enable you to select the back and front clips. After selecting the clips, the Mask Front menu will appear on the screen, choose the Shape option and use the hamburger icon on the right side of the screen to change the video’s shape to Rectangle. Drag the rectangle in the preview window so you can crop the first clip to match the demands of your video and press the Next icon to continue the video editing process.
Alternatively, you can use the Erase option to remove the unwanted parts of each video. You can find this option in the Mask Front or Mask Back menu, so just select it and use your finger to remove sections of the shot you don’t want to use.
The Add Effect menu will pop up on the screen so you can add different effects to your first video clip, and then repeat the entire process for the back clip. Once you’ve edited the second clip tap on the Create button to complete the process of making a multilayer clip. Tap Done to save the clip to your camera roll, and upload it to TikTok.
Conclusion
Cloning yourself in a video using the Video Star app is a simple process that can be mastered in a short period of time. The Video Star app lets you create as many clones of yourself as you want, so you just have to make sure that your video clips can be easily combined to feature two or more of your clones and have fun exploring the effects that can make your videos look even cooler. If you want to be a success on the TikTok platform, learning how to make clone videos is one of the best ways to do it, so choose your favorite songs and start producing clone yourself videos.
You can also use Wondershare Filmora to make a split-screen with ease. Check the tutorial below to figure out how to make a split-screen video to clone.
Shanoon Cox
Shanoon Cox is a writer and a lover of all things video.
Follow @Shanoon Cox
Also read:
- [New] In 2024, A Comprehensive Guide to Adding Text Overlays on TikTok
- [New] In 2024, Explore the Best 10 TikTok Video Editing Apps for Mac Users (FREE)
- [Updated] In 2024, Avoid Breaches The Pre-Upload Guide to Copyright on TikTok
- 2024 Approved The Definitive Guide to Captivating Podcast Covers
- 3 Solutions to Find Your Nokia 130 Music Current Location of a Mobile Number | Dr.fone
- Best Free Mac Apps for Professional TikTok Cuts for 2024
- Compatible With Windows: Download the Official Brother HL-L234e0 DW Laser Printer Software and Drivers Now
- Enhance Your Online Presence 4 Streaming Methods for Desktop Users
- Hidden Details You Need to Know About YouTube TV Service
- In 2024, Easy Guide to Motorola Moto G Stylus 5G (2023) FRP Bypass With Best Methods
- In 2024, How to Transfer Photos from Vivo S18 Pro to New Android? | Dr.fone
- In 2024, Innovating Your Ultimate TikTok Seal
- In 2024, ScreenCapture Made Easy & Effective on Your Laptop
- In 2024, Speedy TikTok Video Acquisition Guide
- In 2024, Top 10 Viral Eats on TikTok
- In 2024, Top 20 Hilarious TikTok Skits for Giggle Fests
- Simple Guide: Transforming Your Videos From MPEG4 to MP4 Format
- Title: [Updated] 2024 Approved Making Magic TikTok Dancing Masterclass for Mac Users
- Author: Brian
- Created at : 2024-10-17 18:13:16
- Updated at : 2024-10-23 18:02:29
- Link: https://tiktok-videos.techidaily.com/updated-2024-approved-making-magic-tiktok-dancing-masterclass-for-mac-users/
- License: This work is licensed under CC BY-NC-SA 4.0.