![[Updated] 3 Strategies for TikTok Livestreaming From Desktop](https://thmb.techidaily.com/d3a69700e0cb55adae67e72e210fb2f2a9d54f1a94f5e0b261b4ccf5f3207b46.jpg)
[Updated] 3 Strategies for TikTok Livestreaming From Desktop
3 Strategies for TikTok Livestreaming From Desktop
Content creators on TikTok adopt various creative ways to engage audiences. Many fashion influencers provide makeup tutorials by doing a live stream on TikTok. Moreover, game lovers like to live stream their gameplay on TikTok to attract a large number of people. Thus, live streams on TikTok are a new norm among content creators and game lovers to maximize their target audience.
If you don’t know how to go live on TikTok on PC, this article will guide you. Through this well-structured article, you can find four easy ways to go live on TikTok on your computer.
- Way 1: With OBS
- Way 2: With Streamlabs
- Way 3: With XSplit Broadcaster
- Way 4: With TikTok Live Studio Software
Part 1: Prerequisite for Live Stream on TikTok from PC
To start TikTok live streaming on your PC, there are some pre-requirements. These requirements are necessary to prevent the misuse of TikTok by any means. Once you have fulfilled these requirements, you can easily go for live streaming on TikTok without any restrictions.
- To enable the live stream feature on TikTok, you must have at least 1000 followers on your account.
- You should be above 16 years old to access this feature. Moreover, to increase your engagement during live streams by sending virtual gifts, you should be 18 years old or above.
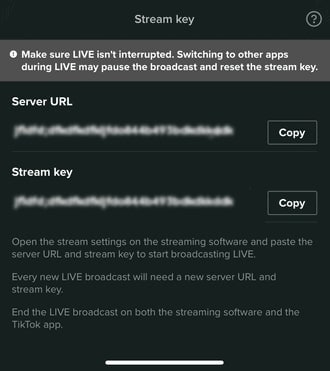
- To begin live streaming on a PC using streaming software, you must have a streaming key and server URL.
How to Get your Streaming Key on TikTok?
A streaming key is a random combination of alphanumeric characters. It helps you to connect your TikTok account with a streaming platform to enable high-quality results. To get your streaming key in the easiest way, check the following steps:
Step1 Open your TikTok app to begin the process. Select the “Plus” icon and choose the “Live” button from the right side. Afterward, choose the “Cast/Connect to PC/Mac” option to proceed.
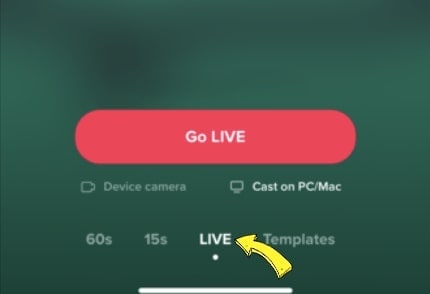
Step2 Now tap on the “Go Live” option that will open a new window. Now you can see your Stream Key and Server URL. Press the “Copy” option given next to these two options. Afterward, you can share your stream key and server URL with your PC, which will be used later.
Part 2: Benefits of Going Live on TikTok with Computer
There are various advantages of going live on TikTok with a PC. By doing so, you can ensure a better quality of your live streaming session. To learn more, let’s discuss the details.
1. Great Stability
Holding a mobile phone for live streams can be hectic and tiring. Moreover, it won’t offer camera stability, and the end result can be shaky. By using a computer, you don’t have to hold anything. With great stability and ease, you can conduct live streams for a longer run.
2. High Video/Audio Quality
iOS and Samsung devices provide high video quality. However, if you are using low-end smartphones, you won’t get high video and audio quality. In such a circumstance, you should use your computer to maintain better quality. By doing so, your audience can listen and view your live streams flawlessly.
3. Picture-in-Picture Display
Live streams on mobile phones restrict you from displaying a variety of content simultaneously. Through your PC, you can do live streaming on TikTok while playing your favorite games. You can easily open multiple windows on your PC during live streams. Moreover, you can have a picture-in-picture display to use a webcam while going for a live stream.
Part 3: 4 Ways to Go Live on TikTok On PC
Are you eager to know how to stream on TikTok on PC using different ways? Let’s shed light on some simple yet effective ways to go for live streaming on TikTok with a PC.
Way 1: With OBS
OBS is a highly compatible and free broadcasting software. It is available for mainstream platforms such as Windows, Mac, and Linux. It offers high-end results during streaming with an audio mixer. It also provides customized options to set hotkeys, choose sources, and adjust the properties. Besides being a great streaming software, OBS also functions as a screen recorder.
Therefore, OBS is a famous streaming tool that ensures great quality in live streaming on TikTok. To learn how to go live on TikTok on a computer using OBS, here are the easy steps:
Step1 Download and install OBS on your PC successfully. Once done, go to the “Controls” section and click on “Settings.” A new window will pop up from which click on the “Stream” option given on the left panel.
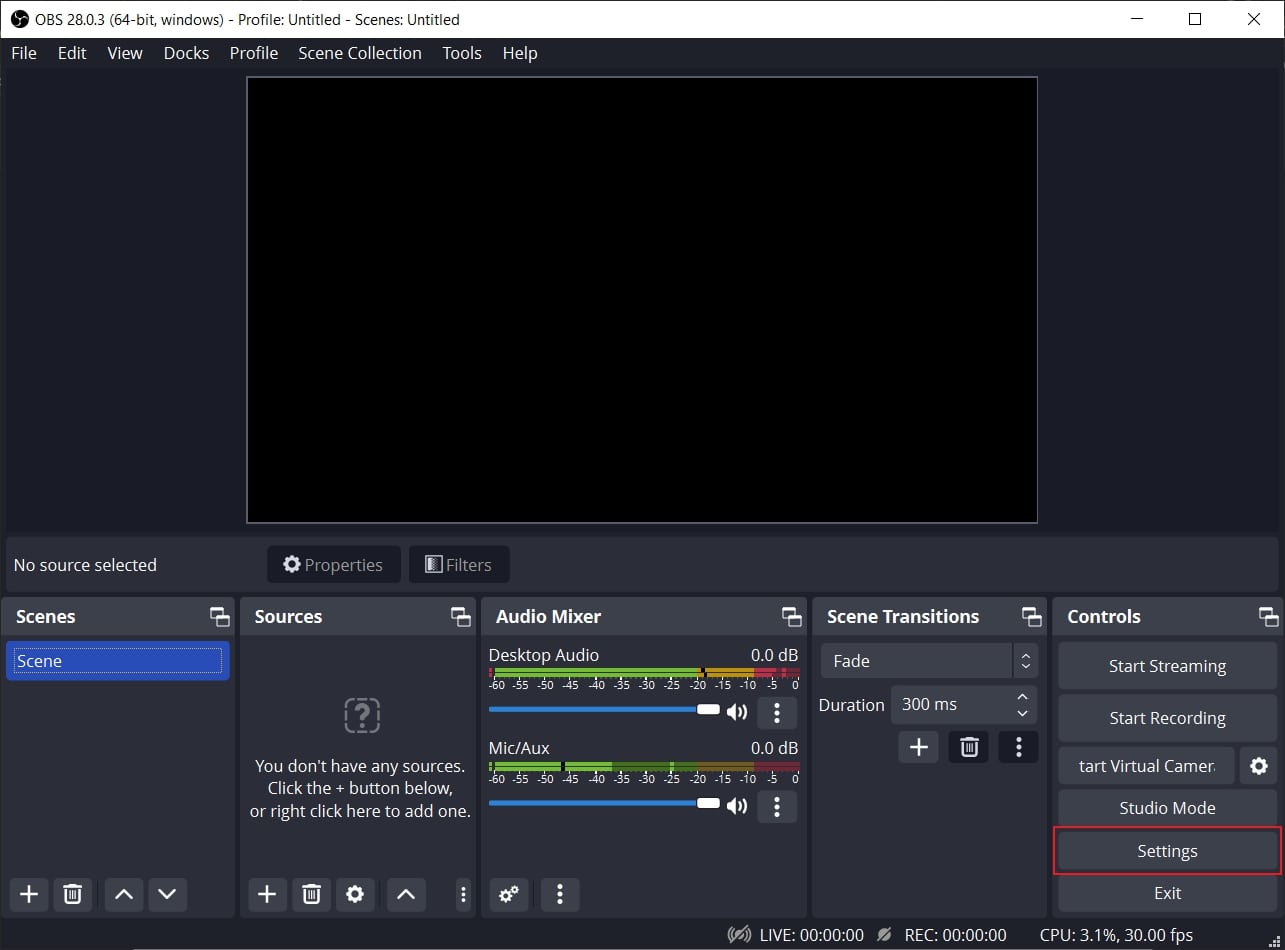
Step2 On the “Service” box, choose “Custom” to proceed. Now enter the stream key and server URL you have gotten before. Once done with all requirements, click on the “Apply” option.

Way 2: With Streamlabs
Streamlabs is a popular streaming tool comprising great capabilities for live streaming. Using this platform, you can broadcast your webcam, microphone’s audio, games, desktop screen, etc. If you want to invite a guest during your live stream, Streamlabs provide a collab camera. Furthermore, this software provides distinctive and attractive overlays. You can easily choose from hundreds of overlays and apply them to your live stream.
You can also set important alerts on this tool, preferably. In order to begin your live stream on TikTok using Streamlabs, check the below steps:
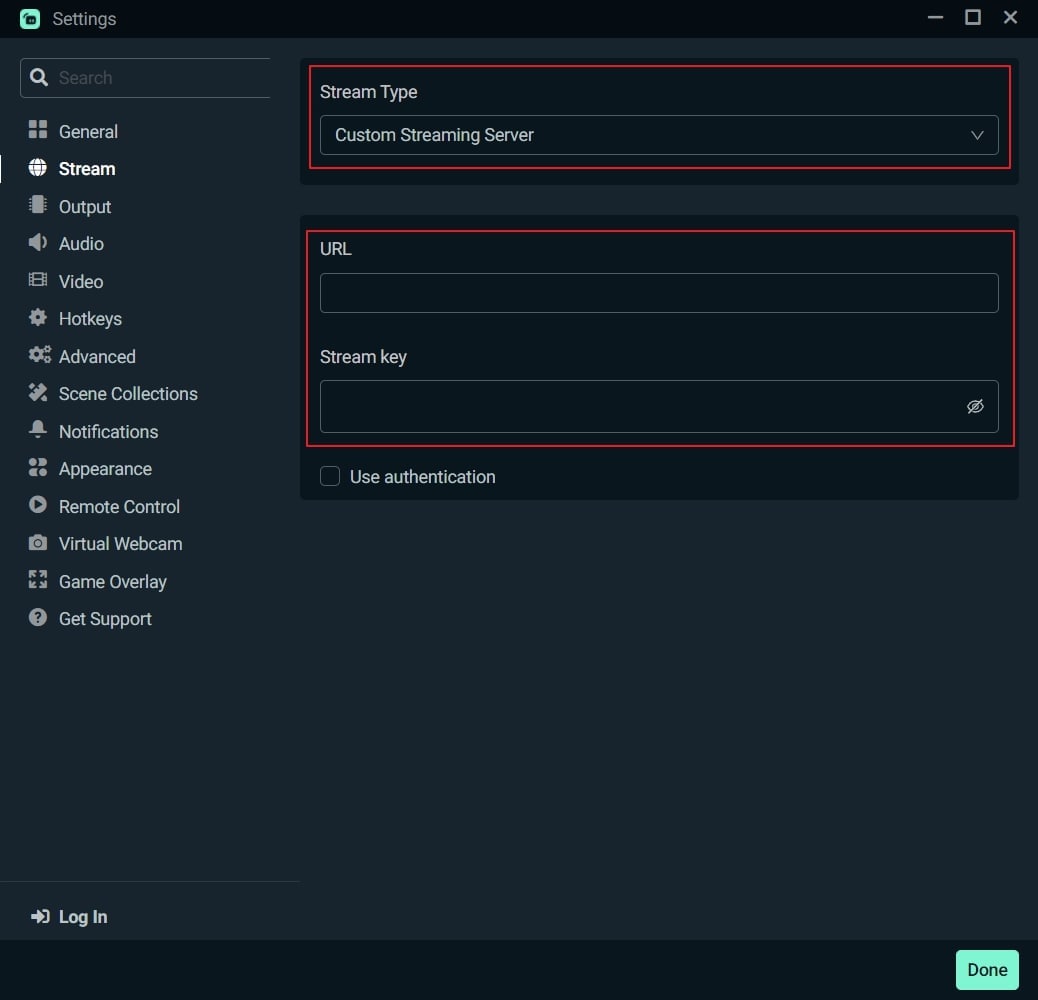
Step1 Once done with installing Streamlabs on your PC, open its main interface. Click on the “Gear” icon displayed in the left section. From the settings menu, click on the “Stream” option.
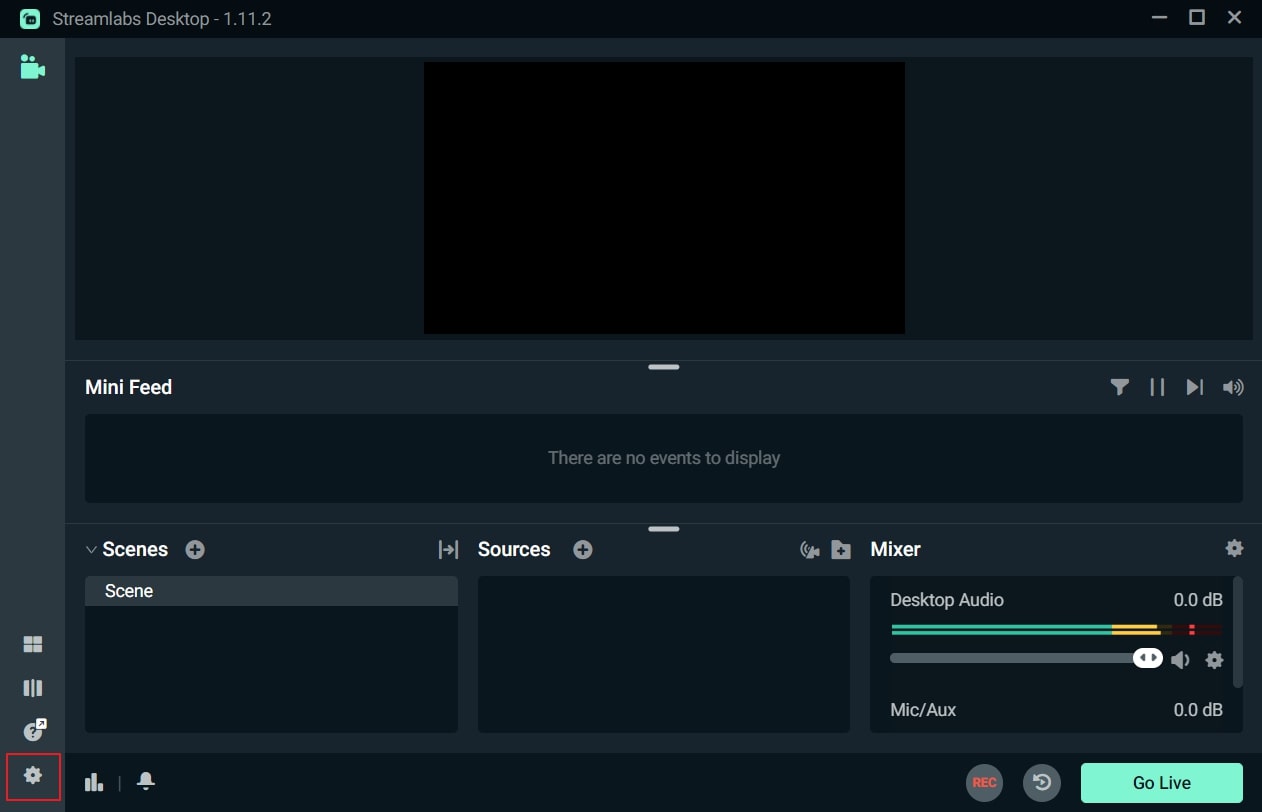
Step2 On the new menu, choose “Custom Streaming Service” as your Stream Type. Now add the required Stream Key and Server URL on the given boxes. Afterward, hit the “Done” button.
Way 3: With XSplit Broadcaster
Want to know how to stream on TikTok on PC efficiently? XSplit Broadcaster is a powerful streaming tool used by many professionals. It can be used to live stream gameplays, e-sports, and other videos in high resolution. This streaming software provides different layout wizards to display your live streaming screen efficiently.
Moreover, it also supports multi-streaming, through which you can go live on various platforms at the same time. To use XSplit Broadcaster to live stream on TikTok, here are the instructions:
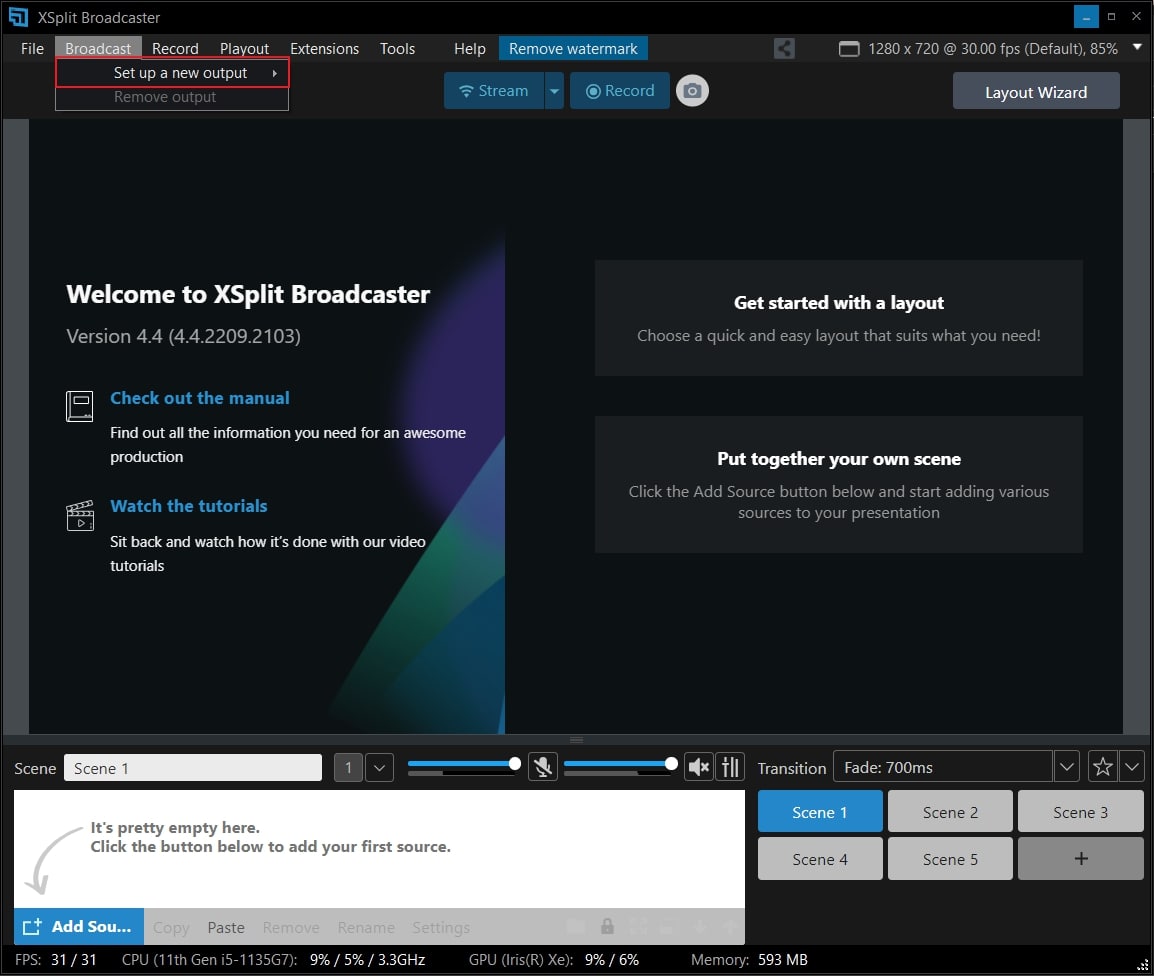
Step1 Launch XSplit Broadcaster on your PC and navigate to the “Broadcast” button displayed on top. Afterward, click on “Set up a new output” to proceed with the TikTok live stream process.
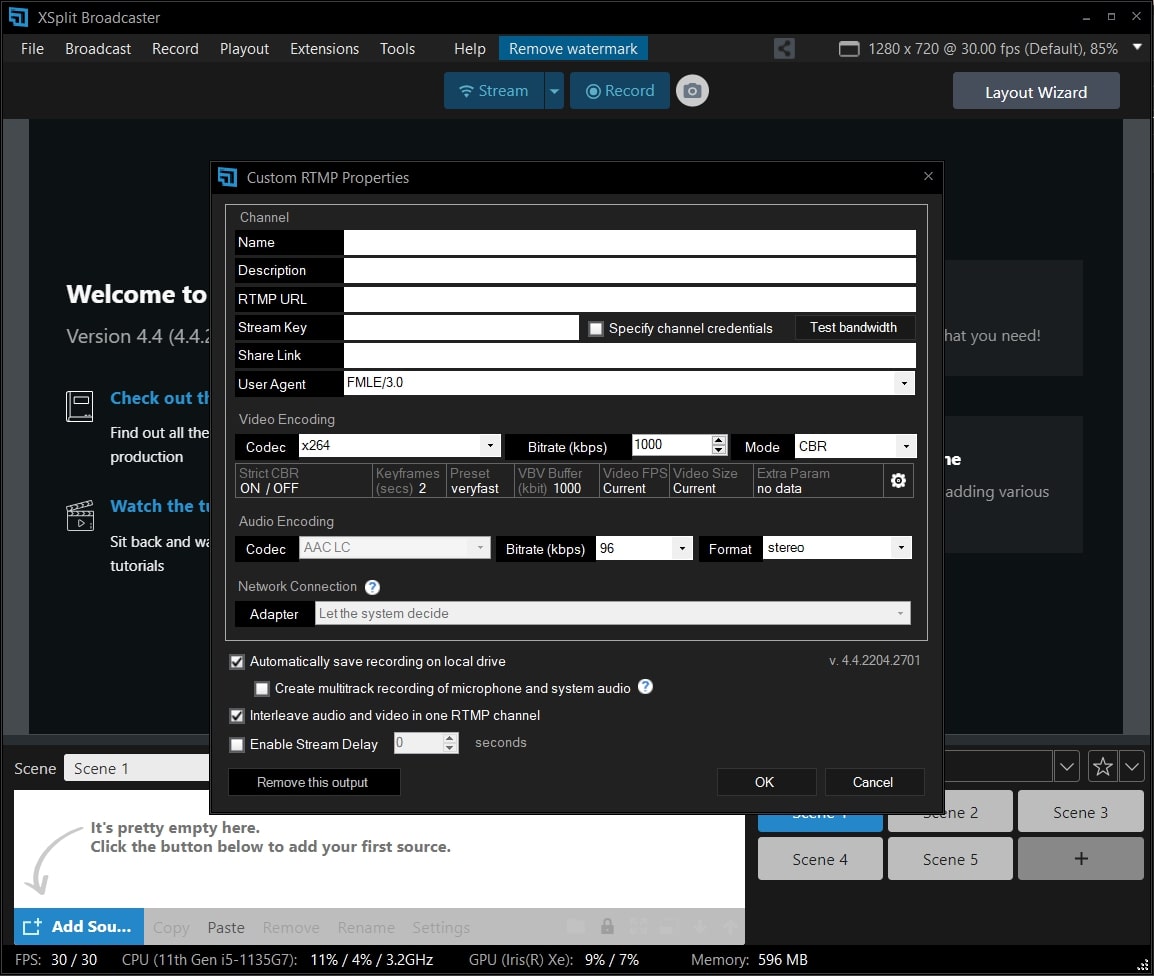
Step2 Now tap on “Custom RTMP,” which will redirect you to a new window. Here, you can add your streaming key and server URL to continue. You can also add information, such as name, channel, etc., to this window. Once done, press the “OK” button.
Way 4: With TikTok Live Studio Software
TikTok Live Studio software is the official software of TikTok for live streaming. This app is currently only available for Windows users. This software provides various customizable options that enable you to adjust your camera and microphone properties easily. It has an easy-to-use interface that allows beginners to conduct live streaming on TikTok in high quality.
As this software is directly linked to your TikTok account, you don’t have to add the stream key and server URL to initiate live streaming. Do you want to learn how to go live on TikTok on a PC using the TikTok software? You can check the following steps:
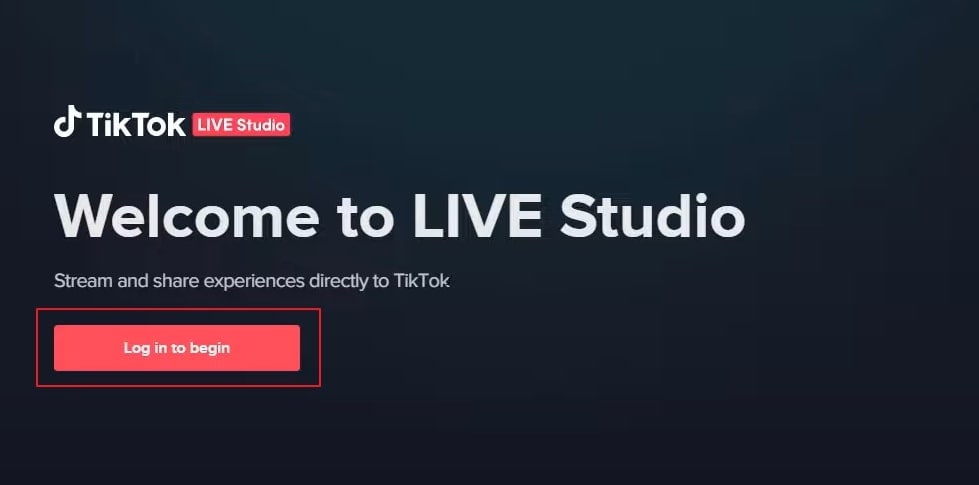
Step1 Launch TikTok Live Studio software on your PC and click on “Log in to begin.” Go to the login page and follow the on-screen instructions to set up this software successfully. On the Microphone window, choose your preferred microphone as your default device.
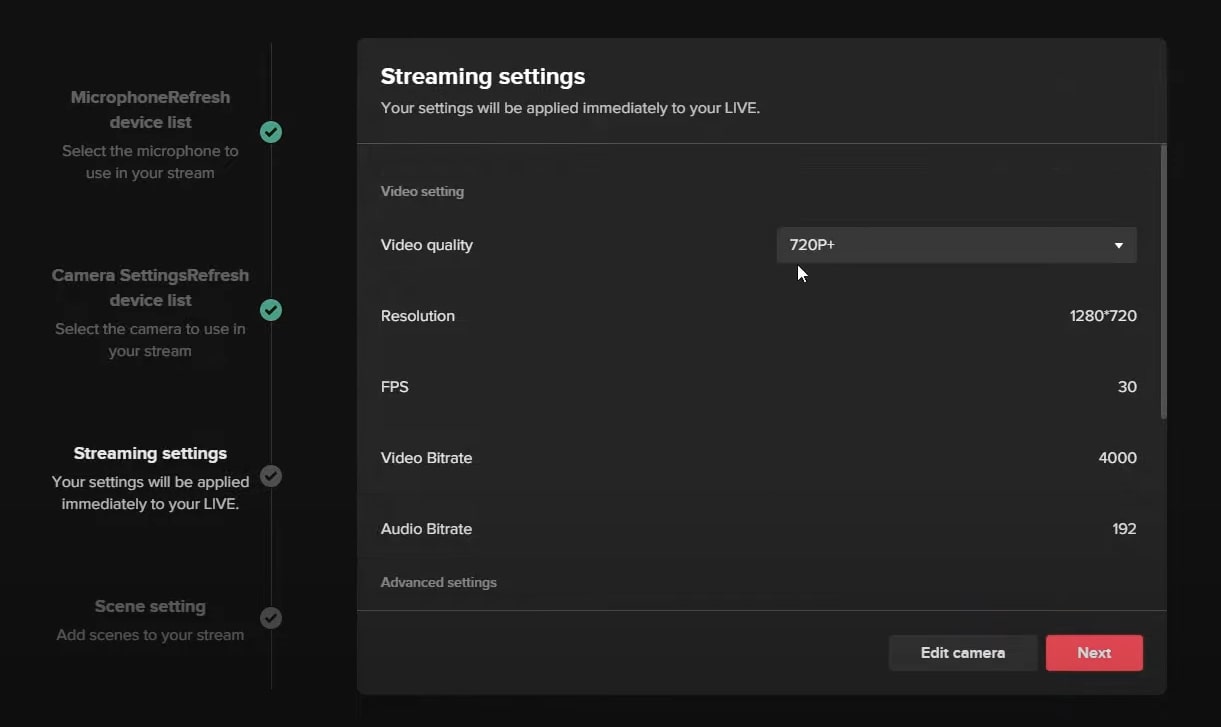
Step2 Afterward, adjust the camera settings and press the “Next” button. It will redirect you to streaming settings. You can choose the video and audio quality from this window. Click on the “Next” button to continue. Also, make sure to adjust the scene settings as well.
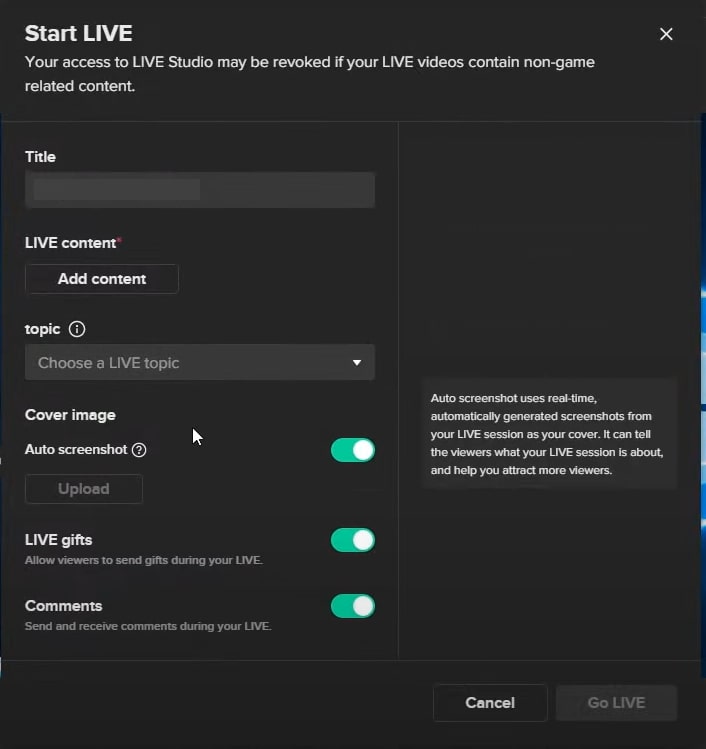
Step3 Now, you can see your PC screen along with your webcam. You can modify the screen size manually. You can also change the camera background and remove background noise from the settings. Once done with settings, press the “Start” button. Now give a title to your live streaming and choose your Live content. Next, click on the “Confirm” button and hit the “Go Live” button.
Bonus Tips: Easily Record and Edit Your Stream with Filmora
Have you ever used a screen recorder to capture your live streaming? Wondershare Filmora is the most compatible tool that offers a premium screen recorder and editor. The screen recorder in this platform can record a selected area with high audio and video quality. Along with capturing your live streaming session, you can use Pen to demonstrate in an enhanced way.
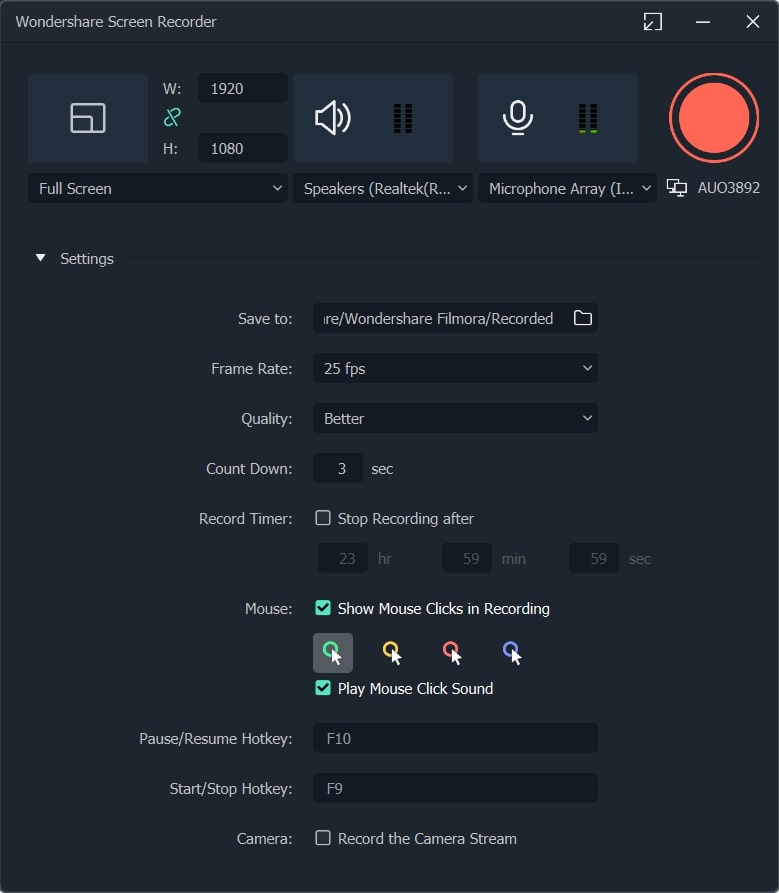
The video editor of Filmora offers professional visual effects and transitions. It supports high-quality video formats such as 4K and HD and enables intuitive editing. Moreover, you can also utilize its advanced features such as Auto Reframe, AI Portrait, Split Screen, Green Screen, etc. By availing of these features, you can execute professional editing on your recorded live streams. To understand more about Filmora’s new features, watch the video below.
Conclusion
Live streaming on TikTok is a new technique to target audiences effortlessly. There are various ways through which you can go for live streaming on TikTok. If you don’t know how to go live on TikTok PC properly, you can take help from this article. Also, to screen record and edit a live stream, you can use our recommended tool known as Wondershare Filmora.
Free Download For Win 7 or later(64-bit)
Free Download For macOS 10.14 or later
Part 1: Prerequisite for Live Stream on TikTok from PC
To start TikTok live streaming on your PC, there are some pre-requirements. These requirements are necessary to prevent the misuse of TikTok by any means. Once you have fulfilled these requirements, you can easily go for live streaming on TikTok without any restrictions.
- To enable the live stream feature on TikTok, you must have at least 1000 followers on your account.
- You should be above 16 years old to access this feature. Moreover, to increase your engagement during live streams by sending virtual gifts, you should be 18 years old or above.
- To begin live streaming on a PC using streaming software, you must have a streaming key and server URL.
How to Get your Streaming Key on TikTok?
A streaming key is a random combination of alphanumeric characters. It helps you to connect your TikTok account with a streaming platform to enable high-quality results. To get your streaming key in the easiest way, check the following steps:
Step1 Open your TikTok app to begin the process. Select the “Plus” icon and choose the “Live” button from the right side. Afterward, choose the “Cast/Connect to PC/Mac” option to proceed.
Step2 Now tap on the “Go Live” option that will open a new window. Now you can see your Stream Key and Server URL. Press the “Copy” option given next to these two options. Afterward, you can share your stream key and server URL with your PC, which will be used later.
Part 2: Benefits of Going Live on TikTok with Computer
There are various advantages of going live on TikTok with a PC. By doing so, you can ensure a better quality of your live streaming session. To learn more, let’s discuss the details.
1. Great Stability
Holding a mobile phone for live streams can be hectic and tiring. Moreover, it won’t offer camera stability, and the end result can be shaky. By using a computer, you don’t have to hold anything. With great stability and ease, you can conduct live streams for a longer run.
2. High Video/Audio Quality
iOS and Samsung devices provide high video quality. However, if you are using low-end smartphones, you won’t get high video and audio quality. In such a circumstance, you should use your computer to maintain better quality. By doing so, your audience can listen and view your live streams flawlessly.
3. Picture-in-Picture Display
Live streams on mobile phones restrict you from displaying a variety of content simultaneously. Through your PC, you can do live streaming on TikTok while playing your favorite games. You can easily open multiple windows on your PC during live streams. Moreover, you can have a picture-in-picture display to use a webcam while going for a live stream.
Part 3: 4 Ways to Go Live on TikTok On PC
Are you eager to know how to stream on TikTok on PC using different ways? Let’s shed light on some simple yet effective ways to go for live streaming on TikTok with a PC.
Way 1: With OBS
OBS is a highly compatible and free broadcasting software. It is available for mainstream platforms such as Windows, Mac, and Linux. It offers high-end results during streaming with an audio mixer. It also provides customized options to set hotkeys, choose sources, and adjust the properties. Besides being a great streaming software, OBS also functions as a screen recorder.
Therefore, OBS is a famous streaming tool that ensures great quality in live streaming on TikTok. To learn how to go live on TikTok on a computer using OBS, here are the easy steps:
Step1 Download and install OBS on your PC successfully. Once done, go to the “Controls” section and click on “Settings.” A new window will pop up from which click on the “Stream” option given on the left panel.
Step2 On the “Service” box, choose “Custom” to proceed. Now enter the stream key and server URL you have gotten before. Once done with all requirements, click on the “Apply” option.
Way 2: With Streamlabs
Streamlabs is a popular streaming tool comprising great capabilities for live streaming. Using this platform, you can broadcast your webcam, microphone’s audio, games, desktop screen, etc. If you want to invite a guest during your live stream, Streamlabs provide a collab camera. Furthermore, this software provides distinctive and attractive overlays. You can easily choose from hundreds of overlays and apply them to your live stream.
You can also set important alerts on this tool, preferably. In order to begin your live stream on TikTok using Streamlabs, check the below steps:
Step1 Once done with installing Streamlabs on your PC, open its main interface. Click on the “Gear” icon displayed in the left section. From the settings menu, click on the “Stream” option.
Step2 On the new menu, choose “Custom Streaming Service” as your Stream Type. Now add the required Stream Key and Server URL on the given boxes. Afterward, hit the “Done” button.
Way 3: With XSplit Broadcaster
Want to know how to stream on TikTok on PC efficiently? XSplit Broadcaster is a powerful streaming tool used by many professionals. It can be used to live stream gameplays, e-sports, and other videos in high resolution. This streaming software provides different layout wizards to display your live streaming screen efficiently.
Moreover, it also supports multi-streaming, through which you can go live on various platforms at the same time. To use XSplit Broadcaster to live stream on TikTok, here are the instructions:
Step1 Launch XSplit Broadcaster on your PC and navigate to the “Broadcast” button displayed on top. Afterward, click on “Set up a new output” to proceed with the TikTok live stream process.
Step2 Now tap on “Custom RTMP,” which will redirect you to a new window. Here, you can add your streaming key and server URL to continue. You can also add information, such as name, channel, etc., to this window. Once done, press the “OK” button.
Way 4: With TikTok Live Studio Software
TikTok Live Studio software is the official software of TikTok for live streaming. This app is currently only available for Windows users. This software provides various customizable options that enable you to adjust your camera and microphone properties easily. It has an easy-to-use interface that allows beginners to conduct live streaming on TikTok in high quality.
As this software is directly linked to your TikTok account, you don’t have to add the stream key and server URL to initiate live streaming. Do you want to learn how to go live on TikTok on a PC using the TikTok software? You can check the following steps:
Step1 Launch TikTok Live Studio software on your PC and click on “Log in to begin.” Go to the login page and follow the on-screen instructions to set up this software successfully. On the Microphone window, choose your preferred microphone as your default device.
Step2 Afterward, adjust the camera settings and press the “Next” button. It will redirect you to streaming settings. You can choose the video and audio quality from this window. Click on the “Next” button to continue. Also, make sure to adjust the scene settings as well.
Step3 Now, you can see your PC screen along with your webcam. You can modify the screen size manually. You can also change the camera background and remove background noise from the settings. Once done with settings, press the “Start” button. Now give a title to your live streaming and choose your Live content. Next, click on the “Confirm” button and hit the “Go Live” button.
Bonus Tips: Easily Record and Edit Your Stream with Filmora
Have you ever used a screen recorder to capture your live streaming? Wondershare Filmora is the most compatible tool that offers a premium screen recorder and editor. The screen recorder in this platform can record a selected area with high audio and video quality. Along with capturing your live streaming session, you can use Pen to demonstrate in an enhanced way.
The video editor of Filmora offers professional visual effects and transitions. It supports high-quality video formats such as 4K and HD and enables intuitive editing. Moreover, you can also utilize its advanced features such as Auto Reframe, AI Portrait, Split Screen, Green Screen, etc. By availing of these features, you can execute professional editing on your recorded live streams. To understand more about Filmora’s new features, watch the video below.
Conclusion
Live streaming on TikTok is a new technique to target audiences effortlessly. There are various ways through which you can go for live streaming on TikTok. If you don’t know how to go live on TikTok PC properly, you can take help from this article. Also, to screen record and edit a live stream, you can use our recommended tool known as Wondershare Filmora.
Free Download For Win 7 or later(64-bit)
Free Download For macOS 10.14 or later
Step-by-Step Guide to Crafting TikTok Videos
Best Video Editor for Beginners on Windows and Mac
Wondershare Filmora is one of the most popular video editing software among TikTokers , download and have a try.
TikTok’s collaborative nature is one of its most appealing features. Your video is not finished the moment you publish it. They can be responded to, remixed, and re-shared by anybody. TikTok is meant to allow users to construct on other’s films shared on the network, whether you’re utilizing audio from some other video or making a duet.
Thanks to the stitch tool, creators may remix, remake, and reply to videos with a couple of taps. This article will tell you what you need to know about stitching videos on TikTok. Continue reading to learn more about Stitching and how to stitch on TikTok. Let’s get started!
In this article
02 How to Turn Stitch On or Off?
04 How to Stitch Any TikTok Video withFilmora Video Editor ?
05 FAQs About TikTok Video Stitch
Part 1: What is Stitch on TikTok?
TikTok’s latest video editing tool ‘Stitch,’ lets people incorporate video snippets from other people into their own. Creators may use Stitch to provide a five-second snippet from a TikTok video out of their own. Unlike duets that play videos together, stitched videos play in the sequence they were stitched. Videos containing open-ended questions have gained in popularity with the advent of the stitch.
Whenever you Stitch a clip-on TikTok, you are essentially inserting your video after yet another video that has already been submitted. People frequently utilize this to remark on or reply to other videos. And, when done well, it can add a lot more context to your movies.
The one limitation of the Stitch tool is that you may only publish up to five seconds from some other video. So, if you’re focusing on a Stitch, you must select the five seconds which are most critical to highlight your message.
Part 2: How to Turn Stitch On or Off?
By enabling the Stitch feature, you make your material available to millions of prospective collaborators. Consider the possibilities – it might be a fantastic approach to enhance reach and virility.
If you aren’t comfortable exposing your films to the whole TikTok community, users can opt out of allowing others to Stitch their work. You may modify them under the Privacy Controls. Here’s how to do a Stitch on TikTok:
Step 1: Launch the TikTok app and then head to your profile by clicking on the Profile option at the bottom right. After that, select the three dots to open the settings.
Step 2: After entering the settings, select Privacy to proceed, and then tap on the Stitch option to open the Stitch settings.
Step 3: Now, you will see three options that are No-one, Everyone, and Friends. If you want to allow the Stitching, select either Everyone or Friends. However, to restrict the people from stitching your videos, choose No-one. After you are done selecting, click on the back arrow to save the applied changes.
Part 3: How to Stitch on TikTok?
TikTok keeps giving creators more reasons to continue producing, and fans like us are more committed to continuing to open it. Stitch, a new app functionality from the famous social networking platform, makes things more straightforward than ever for artists to interact with each other.
But, you might be wondering, how to do a stitch on TikTok? Don’t worry; you’ve come to the right place. Here’s how:
Step 1: Launch TikTok and then go to the video that you want to stitch. Select the Share icon, which resembles an arrow. Select the Stitch symbol from the menu that displays, and then wait a few seconds for the video to complete. The lengthier the video is, the more the loading time.

Step 2: When it’s finished, you’ll be sent to a screen where you may take five seconds of the film and use it on your own. To navigate through the movie, use the sliders and the red bars to choose the portion you want. When you’re finished, tap Next.

Step 3: You’ll be sent to TikTok’s normal recording screen. Record the remainder of your TikTok video with all of the features you’re accustomed to utilizing. You may use whatever effects, stickers, texts, voiceovers, or captions you desire. After that, press the Next button.

Step 4: Make a title and hashtags for your TikTok video. You could also choose whether or not these users may Stitch your movie here – hit the toggle switch beside Allow Stitch to turn it off. Following that, hit the Post option, and your stitched video will be uploaded.

Part 4: How to Stitch Any TikTok Video with Filmora Video Editor ?
Before getting started, understand why people opt for Filmora video editor for stitching videos on TikTok when this can be done through the official TikTok application. TikTok app only allows you to stitch a video for up to five seconds which is quite frustrating if you wish to stitch an entire video.
One more reason is that, with TikTok, you cannot stitch the already existing video from the camera roll, which restricts creators from adding the already edited content to the existing video. So, to avoid the above problems, Filmora is used for stitching TikTok videos.
For Win 7 or later (64-bit)
For macOS 10.12 or later
To begin, download the video that you wish to stitch with from TikTok. After, follow the below stepwise guide:
Step 1: Launch the Filmora software on your PC and import the video files by clicking on the File and then Import/Export Media. You can simply drag and drop the videos as well.
Step 2: Drag the clips from the media library to the Timeline’s video track. All video files will be stitched into a single video with no transitions.

Note: To add a transition to the video , go to the Transition tab and drop the desired transition to the junction of two clips.

Step 3: Now, preview the stitched video and, when finished, click the Export option to save numerous video segments to a single file. Choose any format from the Format tab’s list.
Part 5: FAQs About TikTok Video Stitch
1. Can you do a Stitch on TikTok with a video from your Camera Roll?
Unfortunately, you cannot utilize a video from your Camera Roll in a Stitch at the time of this writing. So, whatever your reaction to a Stitch is, you must record 100% unique footage shot with the TikTok camera. However, you may download the video first and then stitch it with some third-party software such as Filmora.
2. Can you stitch longer than 5 seconds?
No, it is not possible to stitch a video for longer than five seconds using the built-in Stitching feature of the TikTok app. But this can be done by stitching the videos using third-party applications and software.
3. How do I see TikTok stitches?
Users who want to view as many stitches as possible can do it by browsing for them on the app. You must first browse to Discover, and from there to the search box. Then type #Stitch @username, where the username is the name of the account from which you wish to view stitches.
4. TikTok Stitch option not showing. How to fix it?
Users may choose whether or not someone else can Stitch their work in their settings. The option may be found under the Settings and Privacy tab, where users can activate or uncheck Stitch for all videos. So, if the Stitch option is not showing, the user may have disabled the Stitch option.
Conclusion
The Stitch feature is an excellent way to continue the discussion with your videos. You may leave comments on popular content on the site. Most importantly, it may be a fun method to generate material different from what you usually publish. And since you know How to Stitch on TikTok after reading this article, stitch the videos today and create unique content!
TikTok’s collaborative nature is one of its most appealing features. Your video is not finished the moment you publish it. They can be responded to, remixed, and re-shared by anybody. TikTok is meant to allow users to construct on other’s films shared on the network, whether you’re utilizing audio from some other video or making a duet.
Thanks to the stitch tool, creators may remix, remake, and reply to videos with a couple of taps. This article will tell you what you need to know about stitching videos on TikTok. Continue reading to learn more about Stitching and how to stitch on TikTok. Let’s get started!
In this article
02 How to Turn Stitch On or Off?
04 How to Stitch Any TikTok Video withFilmora Video Editor ?
05 FAQs About TikTok Video Stitch
Part 1: What is Stitch on TikTok?
TikTok’s latest video editing tool ‘Stitch,’ lets people incorporate video snippets from other people into their own. Creators may use Stitch to provide a five-second snippet from a TikTok video out of their own. Unlike duets that play videos together, stitched videos play in the sequence they were stitched. Videos containing open-ended questions have gained in popularity with the advent of the stitch.
Whenever you Stitch a clip-on TikTok, you are essentially inserting your video after yet another video that has already been submitted. People frequently utilize this to remark on or reply to other videos. And, when done well, it can add a lot more context to your movies.
The one limitation of the Stitch tool is that you may only publish up to five seconds from some other video. So, if you’re focusing on a Stitch, you must select the five seconds which are most critical to highlight your message.
Part 2: How to Turn Stitch On or Off?
By enabling the Stitch feature, you make your material available to millions of prospective collaborators. Consider the possibilities – it might be a fantastic approach to enhance reach and virility.
If you aren’t comfortable exposing your films to the whole TikTok community, users can opt out of allowing others to Stitch their work. You may modify them under the Privacy Controls. Here’s how to do a Stitch on TikTok:
Step 1: Launch the TikTok app and then head to your profile by clicking on the Profile option at the bottom right. After that, select the three dots to open the settings.
Step 2: After entering the settings, select Privacy to proceed, and then tap on the Stitch option to open the Stitch settings.
Step 3: Now, you will see three options that are No-one, Everyone, and Friends. If you want to allow the Stitching, select either Everyone or Friends. However, to restrict the people from stitching your videos, choose No-one. After you are done selecting, click on the back arrow to save the applied changes.
Part 3: How to Stitch on TikTok?
TikTok keeps giving creators more reasons to continue producing, and fans like us are more committed to continuing to open it. Stitch, a new app functionality from the famous social networking platform, makes things more straightforward than ever for artists to interact with each other.
But, you might be wondering, how to do a stitch on TikTok? Don’t worry; you’ve come to the right place. Here’s how:
Step 1: Launch TikTok and then go to the video that you want to stitch. Select the Share icon, which resembles an arrow. Select the Stitch symbol from the menu that displays, and then wait a few seconds for the video to complete. The lengthier the video is, the more the loading time.
Step 2: When it’s finished, you’ll be sent to a screen where you may take five seconds of the film and use it on your own. To navigate through the movie, use the sliders and the red bars to choose the portion you want. When you’re finished, tap Next.
Step 3: You’ll be sent to TikTok’s normal recording screen. Record the remainder of your TikTok video with all of the features you’re accustomed to utilizing. You may use whatever effects, stickers, texts, voiceovers, or captions you desire. After that, press the Next button.
Step 4: Make a title and hashtags for your TikTok video. You could also choose whether or not these users may Stitch your movie here – hit the toggle switch beside Allow Stitch to turn it off. Following that, hit the Post option, and your stitched video will be uploaded.
Part 4: How to Stitch Any TikTok Video with Filmora Video Editor ?
Before getting started, understand why people opt for Filmora video editor for stitching videos on TikTok when this can be done through the official TikTok application. TikTok app only allows you to stitch a video for up to five seconds which is quite frustrating if you wish to stitch an entire video.
One more reason is that, with TikTok, you cannot stitch the already existing video from the camera roll, which restricts creators from adding the already edited content to the existing video. So, to avoid the above problems, Filmora is used for stitching TikTok videos.
For Win 7 or later (64-bit)
For macOS 10.12 or later
To begin, download the video that you wish to stitch with from TikTok. After, follow the below stepwise guide:
Step 1: Launch the Filmora software on your PC and import the video files by clicking on the File and then Import/Export Media. You can simply drag and drop the videos as well.
Step 2: Drag the clips from the media library to the Timeline’s video track. All video files will be stitched into a single video with no transitions.
Note: To add a transition to the video , go to the Transition tab and drop the desired transition to the junction of two clips.
Step 3: Now, preview the stitched video and, when finished, click the Export option to save numerous video segments to a single file. Choose any format from the Format tab’s list.
Part 5: FAQs About TikTok Video Stitch
1. Can you do a Stitch on TikTok with a video from your Camera Roll?
Unfortunately, you cannot utilize a video from your Camera Roll in a Stitch at the time of this writing. So, whatever your reaction to a Stitch is, you must record 100% unique footage shot with the TikTok camera. However, you may download the video first and then stitch it with some third-party software such as Filmora.
2. Can you stitch longer than 5 seconds?
No, it is not possible to stitch a video for longer than five seconds using the built-in Stitching feature of the TikTok app. But this can be done by stitching the videos using third-party applications and software.
3. How do I see TikTok stitches?
Users who want to view as many stitches as possible can do it by browsing for them on the app. You must first browse to Discover, and from there to the search box. Then type #Stitch @username, where the username is the name of the account from which you wish to view stitches.
4. TikTok Stitch option not showing. How to fix it?
Users may choose whether or not someone else can Stitch their work in their settings. The option may be found under the Settings and Privacy tab, where users can activate or uncheck Stitch for all videos. So, if the Stitch option is not showing, the user may have disabled the Stitch option.
Conclusion
The Stitch feature is an excellent way to continue the discussion with your videos. You may leave comments on popular content on the site. Most importantly, it may be a fun method to generate material different from what you usually publish. And since you know How to Stitch on TikTok after reading this article, stitch the videos today and create unique content!
Also read:
- [New] 10 Most Popular Beauty Gurus on YouTube
- [New] 2024 Approved A Comprehensive Guide to the Best Makeup Tutorials on YouTube
- [New] 2024 Approved Sharing Is Caring - But Not Without Copyright Checks (TikTok)
- [New] In 2024, Average Income for YouTubers per Ad Displayed?
- [New] Nikon D500 Review Breaking Boundaries in 4K
- [Updated] 2024 Approved Mastering the Art of Animation in Viral Online Videos
- [Updated] Becoming a Master of Instagram's Video Dialogue Dynamics
- [Updated] Unleash Creativity A Guide to Adding Texts in TikToks for 2024
- 2024 Approved The Top 5 Must-Know for macOS TikTok Users
- Best No-Cost Typing Courses: 12 Picks for Users of Any Age
- Complete guide for recovering call logs on Motorola Moto G04
- Crafting Captivating TikTok Content From Anime Stories
- Discreet Snaps The Secret of Silent Photo-Taking on Snapchat
- Easy Steps to Audit Your Favorite TikTok Sessions for 2024
- In 2024, A Detailed Guide on Faking Your Location in Mozilla Firefox On Infinix Hot 40i | Dr.fone
- In 2024, Top 10 Fingerprint Lock Apps to Lock Your Tecno Camon 20 Phone
- Perfect the Art of Posting on Snapchat (15 Tips)
- Resolving 'Another App Uses Device' Audio Glitch on PC
- Snap, Edit & Enchant The Ultimate Guide to Stellar TikTok Videos
- Title: [Updated] 3 Strategies for TikTok Livestreaming From Desktop
- Author: Brian
- Created at : 2024-12-11 19:10:34
- Updated at : 2024-12-16 02:31:03
- Link: https://tiktok-videos.techidaily.com/updated-3-strategies-for-tiktok-livestreaming-from-desktop/
- License: This work is licensed under CC BY-NC-SA 4.0.