
!["[Updated] Best of the Best Ultimate TikTok Video Savers for 2024"](https://www.lifewire.com/thmb/jU4B8oA_UfiJeCU8cLXdnDK6sCU=/400x300/filters:no_upscale():max_bytes(150000):strip_icc():format(webp)/how-to-choose-a-wireless-charger-5191283-cb27ceee3fea4547b5720b4934713a93.jpg)
"[Updated] Best of the Best Ultimate TikTok Video Savers for 2024"
Best of the Best: Ultimate TikTok Video Savers
Empower your TikTok video creation
Wondershare Filmora is one of the best tools to edit TikTok videos on the desktop . Download and have a try.
You might find yourself in a scenario where you need to erase all watermark information from TikTok video footage. Happily, there seems to be a variety of watermark-removing tools available to help you do so.
We’ve included some resources to help you remove obtrusive TikTok watermarks that detract from your films’ aesthetic attractiveness. This article will show you how to download TikTok videos without watermark using some online Video Downloaders . We will also discover how to use TikTok online and remove the watermark on Windows and Mac. Without further ado, let’s get started!
In this article
01 10 Best Online TikTok Video Downloaders [No Watermark]
02 Download and Remove TikTok Watermark on Windows and Mac [3 Methods]
03 Notice About Removing TikTok Video Logo
04 FAQs about Downloading TikTok Online [No Watermark]
Wondershare AniEraser Seamless, Effortless, Intuitive.
AniEraser makes it easy to perfect any photo or video; no matter the device or platform - experience a smooth, effortless transformation of your image and maximize its potential with just one click.
Make your moment perfect.
Free Download Free Download Edit online

![]()
Part 1: How to Download TikTok Videos Without Watermarks Online with TikTok Video Downloaders
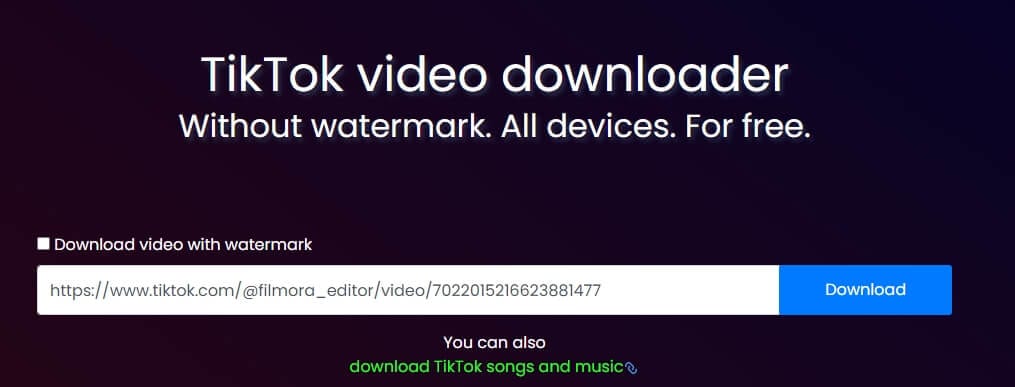
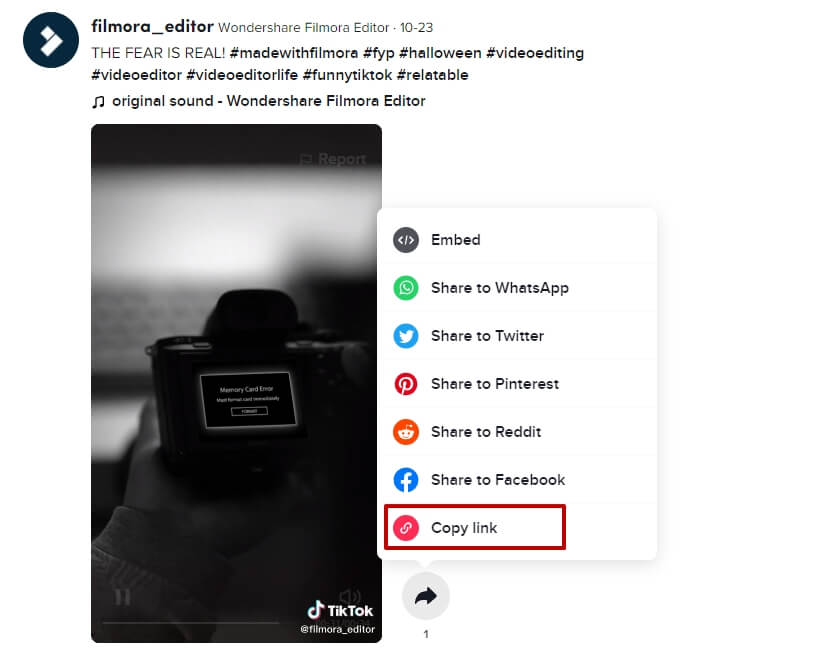
Besides removing the watermark from the downloaded TikTok videos, you can also use some TikTok video downloaders online to download it without watermark directly. In case that some of the websites are not available on your country, I have picked up 10 online TikTok video downloader without watermark for you. I will show you some of the best online TikTok video downloaders without watermark. But first, let’s get the video URL. Click the Share icon, and then choose the Copy Link option.
1. Tikmate Online
This online video downloader with no watermark for people like you who are on the hunt for TikTok video downloaders. The video downloaded on this platform is of HD quality which ensures a seamless experience. Here’s how you can download TikTok videos without a watermark online with this tool:
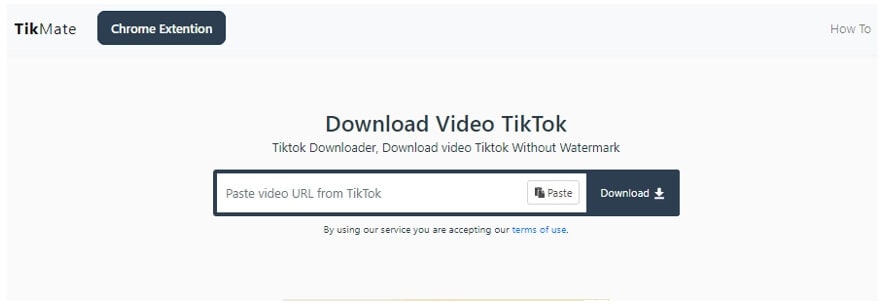
Step 1: Click this link to open this online TikTok video downloader directly: https://tikmate.online/ .
Step 2: Now, Paste the TikTok video URL in the search bar of the TikMake.Online and click on the Download button.
Step 3: Then click the Download Server 01 button to download the video in Mp4 format without a watermark. You can click the Download another video to download a new TikTok video.

2. AllinoneDownloader
The second on our list is the AllioneDownloader that allows you to download TikTok videos without watermark online and in Mp4 format. The website guarantees you won’t lose the video quality. The process of downloading a TikTok video is relatively straightforward.
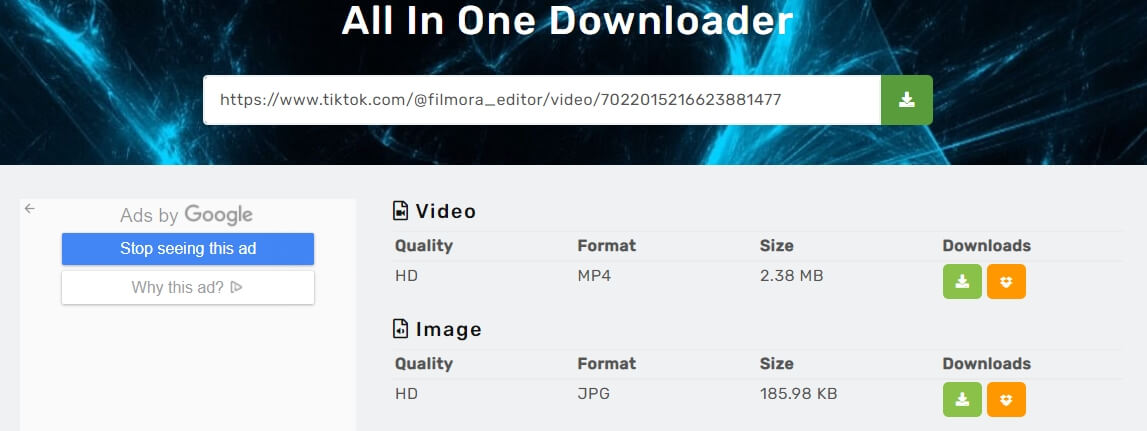
Step 1: Navigate to the website directly: https://allinonedownloader.com/
Step 2: Now, paste the copied TikTok video URL into the website, and click the Download button to start downloading.
Step 3: You can download the TikTok video to your computer directly or save it to your Dropbox. You can also download the thumbnail image with this online downloader in JPG format. What’s more, you will see the video quality, format, and size information before downloading.
3. Snaptik
SnapTik.The app is among the finest TikTok Downloaders accessible online for removing watermarks from video TikTok. You don’t need to install any software on your computer or smartphone; all you need is a TikTok video link, and we’ll handle the rest. You’ll be able to download HD-quality videos to your devices with just one click.
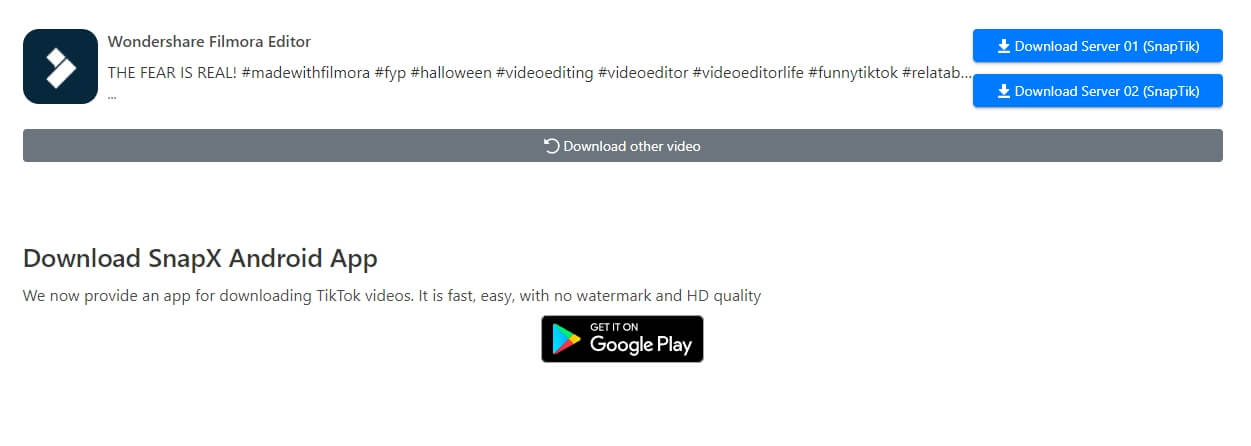
Step 1: Navigate to the official website of SnapTik: https://snaptik.app/en
Step 2: All you have to do now is paste the copied URL of the video and click the Download button.
Step 3: You may save the TikTok video to your Dropbox or immediately download it to your PC. You can also save the thumbnail picture in JPG format using this online downloader. Furthermore, before downloading, you would be able to examine the image quality, genre, and size information.
4. Musicaldown
MusicallyDown is among the top online tools for downloading Tik Tok videos without the watermark and free Tik Tok MP3 music. For outstanding quality, the website provides rapid downloading and HD resolution videos.

Step 1: Visit MusicallyDown: https://musicaldown.com/download and then paste the copied URL.
Step 2: Click on the Download button and you will see options like Download MP4 and Download MP3, click the one based on your need to save the video.
5. Savett
Savetiktok is a free online platform to download TikTok videos with no watermark. It’s available on desktop computers, smartphones (Android and iPhone), iPads, and tablets. It can save a video as the highest-quality high-definition MP4 or MP3.
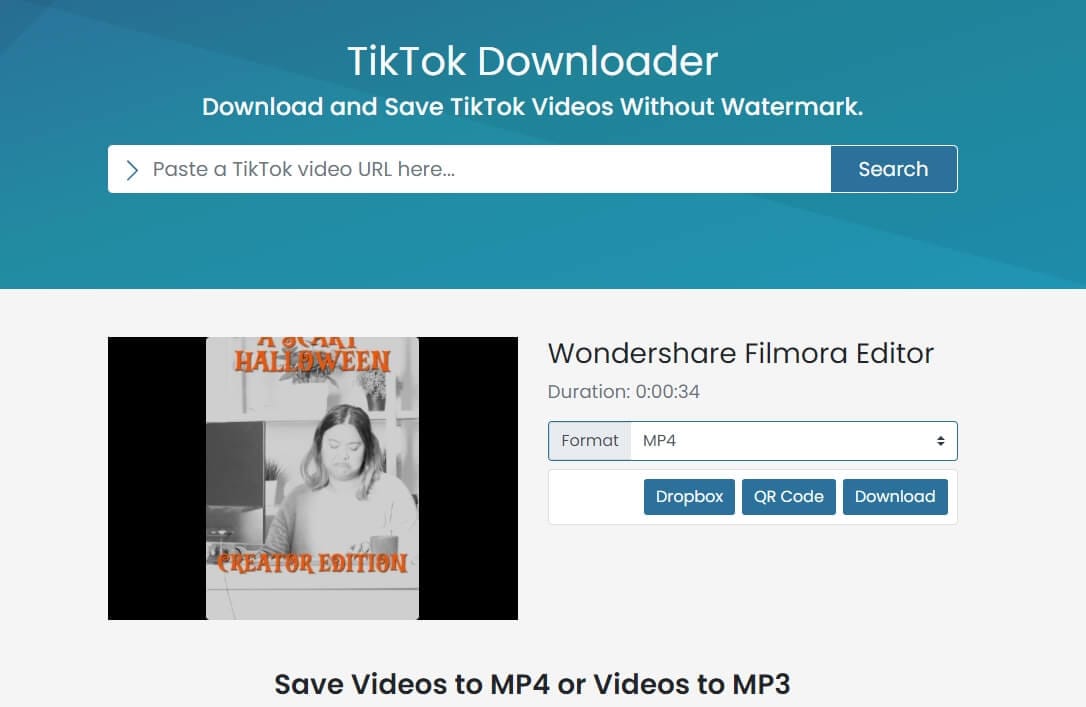
Step 1: Visit this online TikTok video downloader: https://savett.cc/en/ , paste the URL of the TikTok video, and then click on Search.
Step 2: This online tool allows you to download TikTok videos with or without a watermark, you can choose to save the video or audio directly by clicking the Download button. You can also save to Dropbox or get a QR code to save it later.
6. Ssstik
sssTikTok is a web-based video downloader that allows you to download TikTok clips without a watermark. sssTikTok is among the most successful online TikTok video download platforms, allowing you to save TikTok videos in high-quality MP4 files with HD resolution. You can also get this app on Google Play.
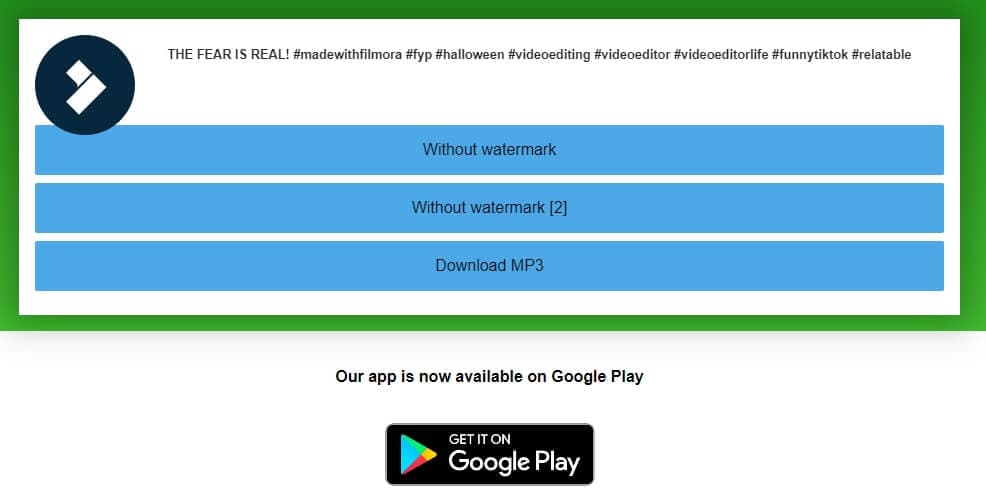
Step 1: Visit the sssTikTok online TikTok video downloader here: https://ssstik.io/en and then paste the URL into the page’s text box
Step 2: Click the Without watermark button to download the TikTok video without watermark, or save it in MP3 format.
7. Tiktokfull
Tiktokfull is among the fastest TikTok Downloaders accessible online for removing the watermark from TikTok videos. You don’t need to install the application on your computer or smartphone; all you need is a TikTok link to the video, and it’ll handle the rest. You’ll be able to download videos to your devices with just one click in Mp4 format.
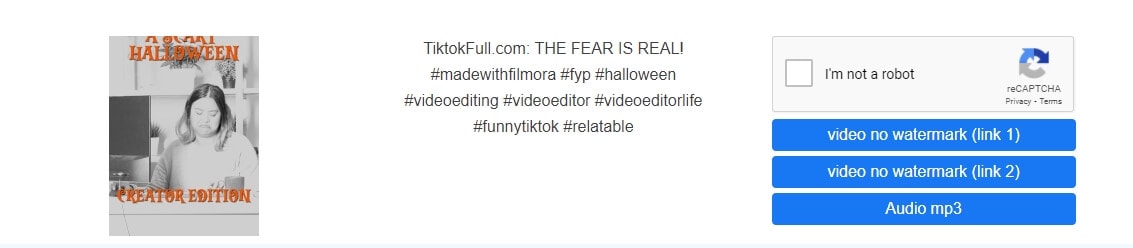
Step 1: Go to Tiktokfull online here: https://tiktokfull.com/ and then paste the URL into the page’s box.
Step 2: This online video downloader will detect the TikTok video and shows the Download buttons, you can click Video no watermark button to save it. You can save the TikTok video without a watermark or save it as an MP3 audio file.
8. SaveFrom
SaveFrom’s free TikTok video downloader allows you to watch clips anywhere and save them in Full HD, HD, and SQ formats quickly and efficiently. Once you download, our Tik Tok download software will display all of the various file types. You can save a lot of video clips all at once through batch download.
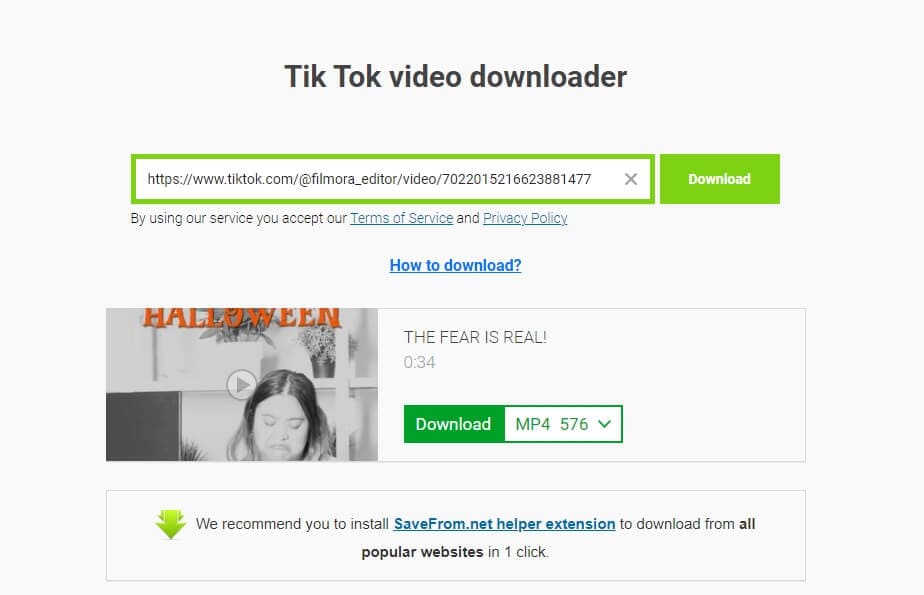
You may effortlessly download TikTok videos without a watermark or songs in MP3 format at the highest quality and with the fastest download speed with the TikTok downloader.
Step 1: Go to https://en.savefrom.net/21/download-from-tiktok to open this TikTok video downloader online, and then paste the TikTok video URL in the search bar of the Savefrom.
Step 2: When the video is loaded, you can see the Download button. You can choose to save the TikTok video without watermark in MP4 or in MP3 format. Click on the Download feature. Then click Download without Watermark to download video Mp4 without watermark.
9. TikTok Download
Like the other free online tools mentioned in this article already, Tiktokfull is another TikTok video downloader that offers free services and delivers high-quality content in Mp4 videos. This online video downloader also provides the app on Google Play, so you can use it on the Android devices. You can follow the steps below to learn how to use it:
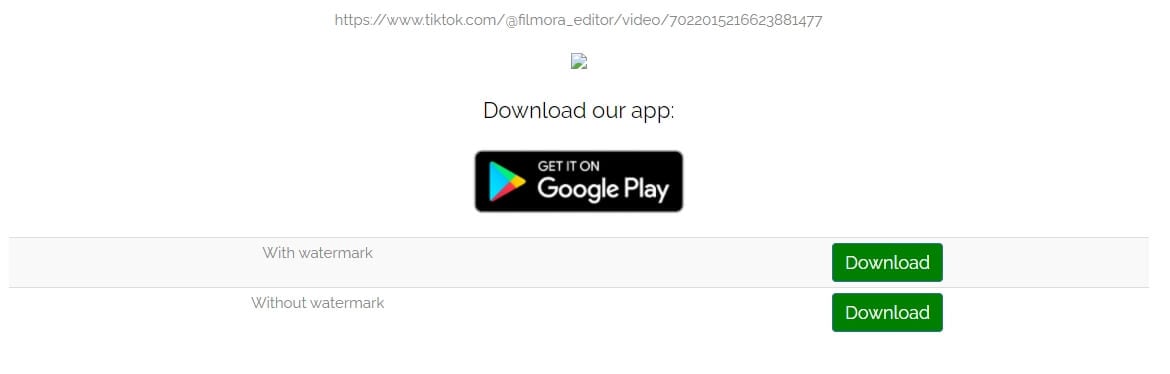
Step 1: Go to this online TikTok video Downloader: https://tiktokdownload.online/ , and paste the TikTok video URL in the box.
Step 2: At the top of the page, there is a form. Copy and paste the URL into that box.
Step 2: You will see 2 options: with watermark, and without watermark. Hit the Download button accordingly based on your need.
10. Qload
Qload.info is a free online TikTok Downloader that allows you to save Tik Tok videos with no watermarks. You no longer have to download or install any additional software on your computer or mobile device. All you need now is an URL from a Tik Tok video, and everything else will fall into place! As a result, you may download TikTok video online in only two clicks.
Step 1: Visit this online TikTok video downloader: https://qload.info/ and then paste the link of the TikTok video you wish to download.
Step 2: Check the Download button to save the TikTok video without a watermark. Check Download video with watermark will save the TikTok with the watermark left. You can also download TikTok songs and music from video with this tool.
Part 2: Download and Remove TikTok Watermark on Windows and Mac
TikTok has finally created a PC website to let its customers use the app online, as it is simply accessible straight from the browser. The features of this online version are primarily the same as the mobile app version. However, you will need to adjust yourself to the Platforms PC interface, which may be a bit difficult at first, but you’ll eventually wrap your head around it. The only downside is that some app features are blocked online, but it’s an excellent starting point for Windows users.
Follow the simple steps below to know how to use TikTok online:
Step 1: Access TikTok online on PC by simply visiting TikTok.com, and then press the Login button on the top right corner to enter your TikTok account.
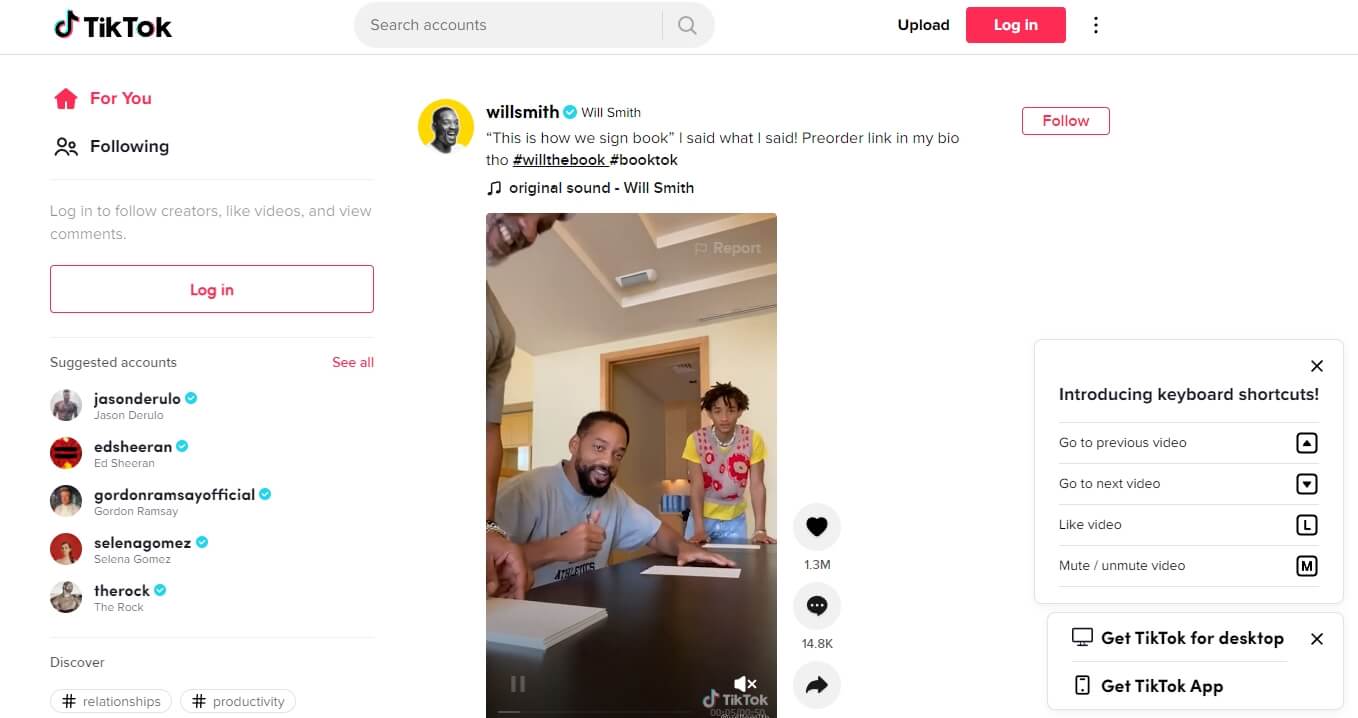
Step 2: After logging in, you will be redirected to the homepage. From the For You tab, you can scroll through recommended videos and see the people you are following by clicking on the Following tab. Scroll to the video and right click on it. Then select Save video as option.

In this way, I have downloaded a TikTok video with a watermark on the left corner. To remove the watermark, I will use Wondershare Filmora video editor. Keep reading and find out how.
For readers who have installed Wondershare Filmora video editor on Windows and Mac computers, you can use it to remove watermarks from the downloaded TikTok videos in several ways. To execute these easy modifying tasks, you don’t need to be an accomplished editor. All you have to do is pick a technique that best meets your needs and follow an essential, easy-to-learn step. Let’s take a look at several Filmora editing procedures for removing TikTok watermarks from videos on Windows and Mac.
Method 1: Replace the Watermark
Step 1: Drag and drop the downloaded TikTok video to Filmora timeline, and then upload your own logo to hide the TikTok video.
Step 2: Adjust the size and position of the logo and then set the logo duration as long as the original file so that the watermark stays covered throughout.
![]()
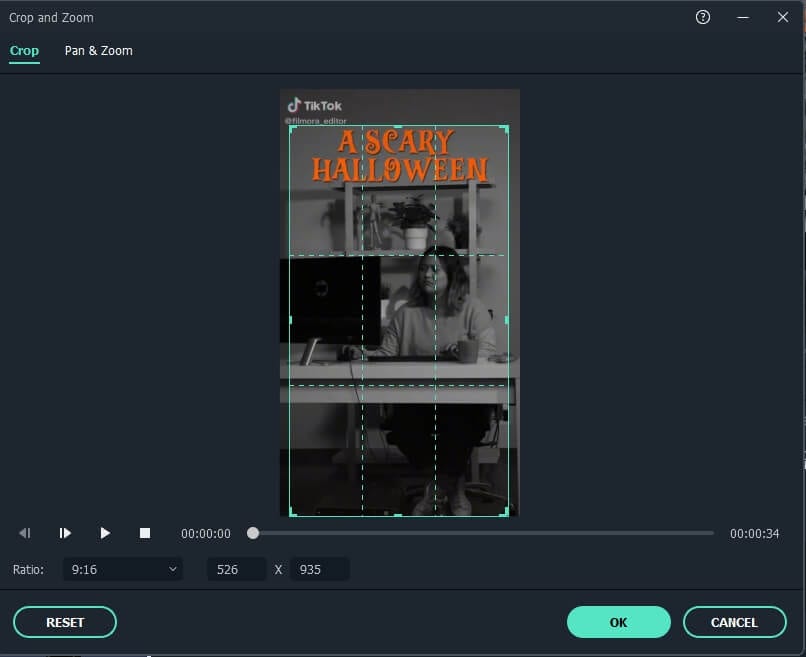
Method 2: Crop the Video
Step 1: right-click the video in the timeline and then choose Crop and Zoom.
Step 2: To erase the watermark from the framework, rearrange the edges of the cropping rectangle by dragging it as far as desired.
Step 3: You’ve successfully erased a watermark from your movie by clicking OK to perform the cropping effect.
Method 3: Blurring the Watermark
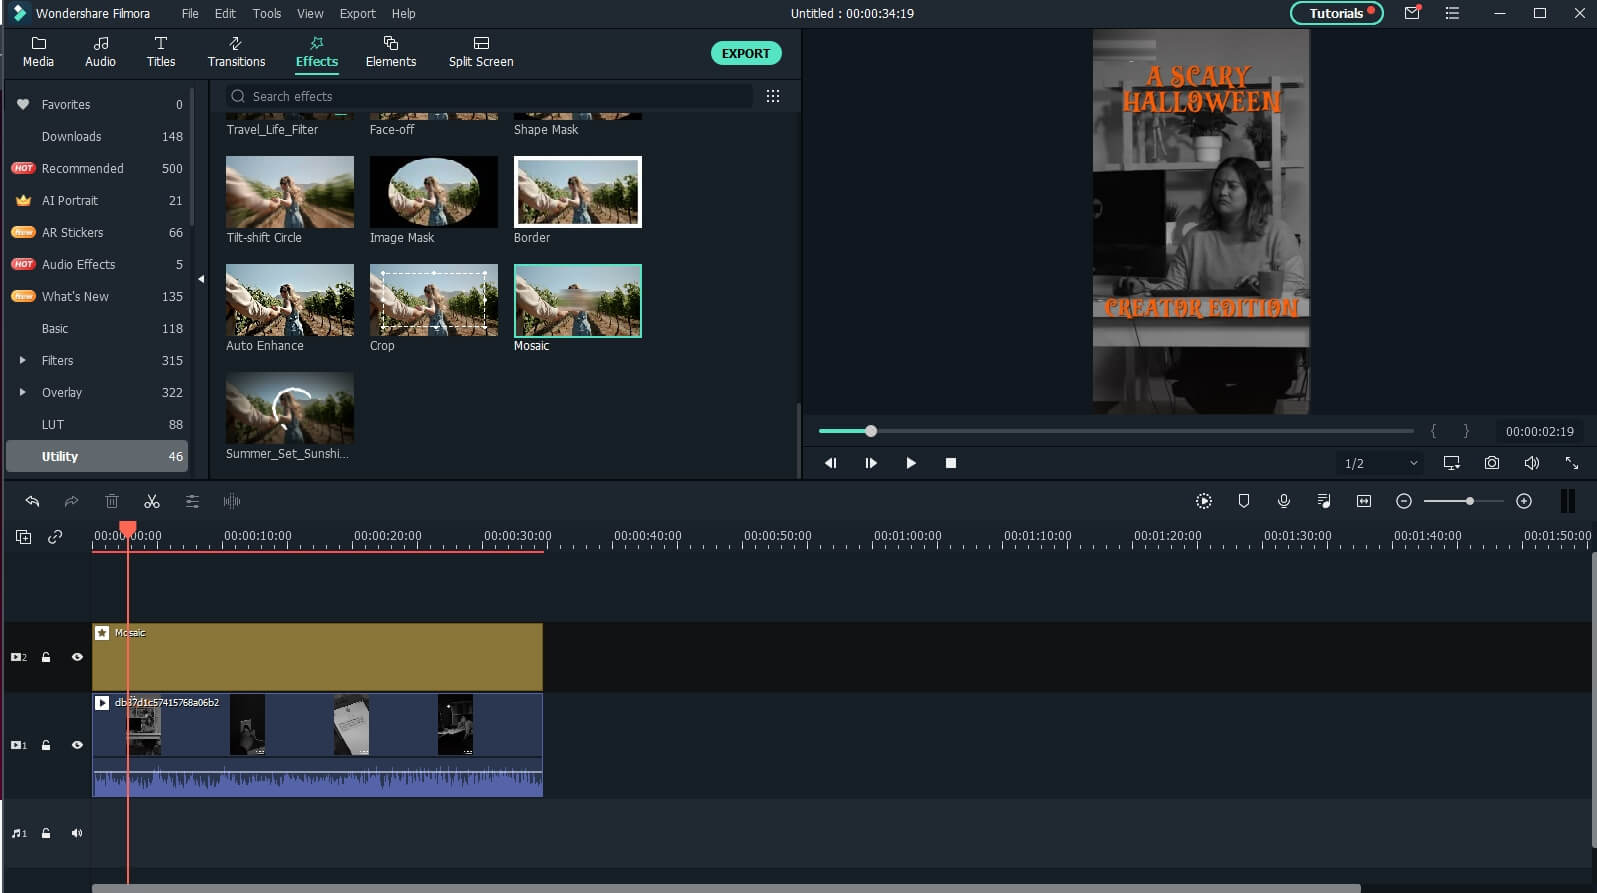
Step 1: To get a preview of the effect, go to the top of the page and select Effects, then Utility, then Mosaic, drag - and - drop it into the track above the clip. Adjust its size and position accordingly.
You can find out more ways to remove a watermark in the video here.
Part 3: Why You Shouldn’t Remove the Watermark from TikTok Videos?
People have divided opinions when it comes to keeping the watermark logo or getting rid of it entirely. Understandably, the TikTok emblem can be bothersome to specific users because it seems an “extra” item on the screen rather than a part of the content.
Yet, this does not imply that we support or urge its removal. If you’re seeking to promote your content across many channels, you must retain the watermark since it allows the creator of the content to be correctly recognized.
Part 4: FAQs About Downloading TikTok Video
1. Why Can’t I Download Some TikTok Videos?
There could be a few reasons for you not being able to download some TikTok videos. One of the foremost is that the video creator has disabled video downloads. Other causes include insufficient memory, account problems, internet connectivity issues, and an old version of TikTok on your smartphone.
2. How Many Videos Can I Download from TikTok?
In most cases, there is no restriction to how many videos you can download on TikTok. You are free to download an unlimited number of TikTok videos.
3. How to Get the TikTok Video Link on iPhone and Android?
First, you need to head over to your profile section and click on the three-dot option present in the top right corner. Tap on Manage Account and then select Switch to My Pro Account. Now you will see two options: Creator and Business. Use the Business option to choose one category and press on Next to advance. Now you will see a link in your profile bio. You can further add the link to the Website section of the profile according to your liking.
Conclusion
Well, there you have it – your best Video Downloader TikTok No Watermark software, to make downloading TikTok videos a breeze for you. It’s completely normal to like a video and want to download it but not be a fan of those watermarks. Therefore, it’s best to have applications that support your narrative. We suggest using Wondershare Filmora to get the best insights into removing watermarks when downloading TikTok videos. The software has many excellent features that help you with the video editing in the best way possible!
You might find yourself in a scenario where you need to erase all watermark information from TikTok video footage. Happily, there seems to be a variety of watermark-removing tools available to help you do so.
We’ve included some resources to help you remove obtrusive TikTok watermarks that detract from your films’ aesthetic attractiveness. This article will show you how to download TikTok videos without watermark using some online Video Downloaders . We will also discover how to use TikTok online and remove the watermark on Windows and Mac. Without further ado, let’s get started!
In this article
01 10 Best Online TikTok Video Downloaders [No Watermark]
02 Download and Remove TikTok Watermark on Windows and Mac [3 Methods]
03 Notice About Removing TikTok Video Logo
04 FAQs about Downloading TikTok Online [No Watermark]
Wondershare AniEraser Seamless, Effortless, Intuitive.
AniEraser makes it easy to perfect any photo or video; no matter the device or platform - experience a smooth, effortless transformation of your image and maximize its potential with just one click.
Make your moment perfect.
Free Download Free Download Edit online
![]()
Part 1: How to Download TikTok Videos Without Watermarks Online with TikTok Video Downloaders
Besides removing the watermark from the downloaded TikTok videos, you can also use some TikTok video downloaders online to download it without watermark directly. In case that some of the websites are not available on your country, I have picked up 10 online TikTok video downloader without watermark for you. I will show you some of the best online TikTok video downloaders without watermark. But first, let’s get the video URL. Click the Share icon, and then choose the Copy Link option.
1. Tikmate Online
This online video downloader with no watermark for people like you who are on the hunt for TikTok video downloaders. The video downloaded on this platform is of HD quality which ensures a seamless experience. Here’s how you can download TikTok videos without a watermark online with this tool:
Step 1: Click this link to open this online TikTok video downloader directly: https://tikmate.online/ .
Step 2: Now, Paste the TikTok video URL in the search bar of the TikMake.Online and click on the Download button.
Step 3: Then click the Download Server 01 button to download the video in Mp4 format without a watermark. You can click the Download another video to download a new TikTok video.
2. AllinoneDownloader
The second on our list is the AllioneDownloader that allows you to download TikTok videos without watermark online and in Mp4 format. The website guarantees you won’t lose the video quality. The process of downloading a TikTok video is relatively straightforward.
Step 1: Navigate to the website directly: https://allinonedownloader.com/
Step 2: Now, paste the copied TikTok video URL into the website, and click the Download button to start downloading.
Step 3: You can download the TikTok video to your computer directly or save it to your Dropbox. You can also download the thumbnail image with this online downloader in JPG format. What’s more, you will see the video quality, format, and size information before downloading.
3. Snaptik
SnapTik.The app is among the finest TikTok Downloaders accessible online for removing watermarks from video TikTok. You don’t need to install any software on your computer or smartphone; all you need is a TikTok video link, and we’ll handle the rest. You’ll be able to download HD-quality videos to your devices with just one click.
Step 1: Navigate to the official website of SnapTik: https://snaptik.app/en
Step 2: All you have to do now is paste the copied URL of the video and click the Download button.
Step 3: You may save the TikTok video to your Dropbox or immediately download it to your PC. You can also save the thumbnail picture in JPG format using this online downloader. Furthermore, before downloading, you would be able to examine the image quality, genre, and size information.
4. Musicaldown
MusicallyDown is among the top online tools for downloading Tik Tok videos without the watermark and free Tik Tok MP3 music. For outstanding quality, the website provides rapid downloading and HD resolution videos.
Step 1: Visit MusicallyDown: https://musicaldown.com/download and then paste the copied URL.
Step 2: Click on the Download button and you will see options like Download MP4 and Download MP3, click the one based on your need to save the video.
5. Savett
Savetiktok is a free online platform to download TikTok videos with no watermark. It’s available on desktop computers, smartphones (Android and iPhone), iPads, and tablets. It can save a video as the highest-quality high-definition MP4 or MP3.
Step 1: Visit this online TikTok video downloader: https://savett.cc/en/ , paste the URL of the TikTok video, and then click on Search.
Step 2: This online tool allows you to download TikTok videos with or without a watermark, you can choose to save the video or audio directly by clicking the Download button. You can also save to Dropbox or get a QR code to save it later.
6. Ssstik
sssTikTok is a web-based video downloader that allows you to download TikTok clips without a watermark. sssTikTok is among the most successful online TikTok video download platforms, allowing you to save TikTok videos in high-quality MP4 files with HD resolution. You can also get this app on Google Play.
Step 1: Visit the sssTikTok online TikTok video downloader here: https://ssstik.io/en and then paste the URL into the page’s text box
Step 2: Click the Without watermark button to download the TikTok video without watermark, or save it in MP3 format.
7. Tiktokfull
Tiktokfull is among the fastest TikTok Downloaders accessible online for removing the watermark from TikTok videos. You don’t need to install the application on your computer or smartphone; all you need is a TikTok link to the video, and it’ll handle the rest. You’ll be able to download videos to your devices with just one click in Mp4 format.
Step 1: Go to Tiktokfull online here: https://tiktokfull.com/ and then paste the URL into the page’s box.
Step 2: This online video downloader will detect the TikTok video and shows the Download buttons, you can click Video no watermark button to save it. You can save the TikTok video without a watermark or save it as an MP3 audio file.
8. SaveFrom
SaveFrom’s free TikTok video downloader allows you to watch clips anywhere and save them in Full HD, HD, and SQ formats quickly and efficiently. Once you download, our Tik Tok download software will display all of the various file types. You can save a lot of video clips all at once through batch download.
You may effortlessly download TikTok videos without a watermark or songs in MP3 format at the highest quality and with the fastest download speed with the TikTok downloader.
Step 1: Go to https://en.savefrom.net/21/download-from-tiktok to open this TikTok video downloader online, and then paste the TikTok video URL in the search bar of the Savefrom.
Step 2: When the video is loaded, you can see the Download button. You can choose to save the TikTok video without watermark in MP4 or in MP3 format. Click on the Download feature. Then click Download without Watermark to download video Mp4 without watermark.
9. TikTok Download
Like the other free online tools mentioned in this article already, Tiktokfull is another TikTok video downloader that offers free services and delivers high-quality content in Mp4 videos. This online video downloader also provides the app on Google Play, so you can use it on the Android devices. You can follow the steps below to learn how to use it:
Step 1: Go to this online TikTok video Downloader: https://tiktokdownload.online/ , and paste the TikTok video URL in the box.
Step 2: At the top of the page, there is a form. Copy and paste the URL into that box.
Step 2: You will see 2 options: with watermark, and without watermark. Hit the Download button accordingly based on your need.
10. Qload
Qload.info is a free online TikTok Downloader that allows you to save Tik Tok videos with no watermarks. You no longer have to download or install any additional software on your computer or mobile device. All you need now is an URL from a Tik Tok video, and everything else will fall into place! As a result, you may download TikTok video online in only two clicks.
Step 1: Visit this online TikTok video downloader: https://qload.info/ and then paste the link of the TikTok video you wish to download.
Step 2: Check the Download button to save the TikTok video without a watermark. Check Download video with watermark will save the TikTok with the watermark left. You can also download TikTok songs and music from video with this tool.
Part 2: Download and Remove TikTok Watermark on Windows and Mac
TikTok has finally created a PC website to let its customers use the app online, as it is simply accessible straight from the browser. The features of this online version are primarily the same as the mobile app version. However, you will need to adjust yourself to the Platforms PC interface, which may be a bit difficult at first, but you’ll eventually wrap your head around it. The only downside is that some app features are blocked online, but it’s an excellent starting point for Windows users.
Follow the simple steps below to know how to use TikTok online:
Step 1: Access TikTok online on PC by simply visiting TikTok.com, and then press the Login button on the top right corner to enter your TikTok account.
Step 2: After logging in, you will be redirected to the homepage. From the For You tab, you can scroll through recommended videos and see the people you are following by clicking on the Following tab. Scroll to the video and right click on it. Then select Save video as option.
In this way, I have downloaded a TikTok video with a watermark on the left corner. To remove the watermark, I will use Wondershare Filmora video editor. Keep reading and find out how.
For readers who have installed Wondershare Filmora video editor on Windows and Mac computers, you can use it to remove watermarks from the downloaded TikTok videos in several ways. To execute these easy modifying tasks, you don’t need to be an accomplished editor. All you have to do is pick a technique that best meets your needs and follow an essential, easy-to-learn step. Let’s take a look at several Filmora editing procedures for removing TikTok watermarks from videos on Windows and Mac.
Method 1: Replace the Watermark
Step 1: Drag and drop the downloaded TikTok video to Filmora timeline, and then upload your own logo to hide the TikTok video.
Step 2: Adjust the size and position of the logo and then set the logo duration as long as the original file so that the watermark stays covered throughout.
![]()
Method 2: Crop the Video
Step 1: right-click the video in the timeline and then choose Crop and Zoom.
Step 2: To erase the watermark from the framework, rearrange the edges of the cropping rectangle by dragging it as far as desired.
Step 3: You’ve successfully erased a watermark from your movie by clicking OK to perform the cropping effect.
Method 3: Blurring the Watermark
Step 1: To get a preview of the effect, go to the top of the page and select Effects, then Utility, then Mosaic, drag - and - drop it into the track above the clip. Adjust its size and position accordingly.
You can find out more ways to remove a watermark in the video here.
Part 3: Why You Shouldn’t Remove the Watermark from TikTok Videos?
People have divided opinions when it comes to keeping the watermark logo or getting rid of it entirely. Understandably, the TikTok emblem can be bothersome to specific users because it seems an “extra” item on the screen rather than a part of the content.
Yet, this does not imply that we support or urge its removal. If you’re seeking to promote your content across many channels, you must retain the watermark since it allows the creator of the content to be correctly recognized.
Part 4: FAQs About Downloading TikTok Video
1. Why Can’t I Download Some TikTok Videos?
There could be a few reasons for you not being able to download some TikTok videos. One of the foremost is that the video creator has disabled video downloads. Other causes include insufficient memory, account problems, internet connectivity issues, and an old version of TikTok on your smartphone.
2. How Many Videos Can I Download from TikTok?
In most cases, there is no restriction to how many videos you can download on TikTok. You are free to download an unlimited number of TikTok videos.
3. How to Get the TikTok Video Link on iPhone and Android?
First, you need to head over to your profile section and click on the three-dot option present in the top right corner. Tap on Manage Account and then select Switch to My Pro Account. Now you will see two options: Creator and Business. Use the Business option to choose one category and press on Next to advance. Now you will see a link in your profile bio. You can further add the link to the Website section of the profile according to your liking.
Conclusion
Well, there you have it – your best Video Downloader TikTok No Watermark software, to make downloading TikTok videos a breeze for you. It’s completely normal to like a video and want to download it but not be a fan of those watermarks. Therefore, it’s best to have applications that support your narrative. We suggest using Wondershare Filmora to get the best insights into removing watermarks when downloading TikTok videos. The software has many excellent features that help you with the video editing in the best way possible!
Acoustic Archiving: Deducting Unwanted Soundtracks
The most frequent request you’ll get from video makers is to eliminate irritating noises like rumbling or humming from an original clip. Almost all of the time, capturing high-quality audio during filming is challenging since the conversation is often hard to hear or is made unclear due to surrounding noises, such as the dreadful air conditioners or fans.
To get rid of all these awful noises, this Audacity Noise Reduction feature will serve you a significant purpose in removing unwanted background noise for your future videos. Without further ado, let’s get started!
In this article
01 Things You Need to Prepare for Background Noise Reduction
02 How to Remove Background Noise in Audacity?
03 Why is Audacity Noise Reduction Not Working?
04 How to Prevent Background Noise in Audio Recording?
05 How to Remove Background Noise in Filmora?
Part 1: Things You Need to Prepare for Background Noise Reduction
Here are few things that you need to consider before you apply the noise reduction to your clips:
1. Noise Sample
A decent sample of the noise you wish to eliminate is perhaps the most crucial aspect of the Audacity remove noise procedure.
This will be used by Audacity to understand the noise and build a noise profile. The noise recording should last for a fair amount of time and be devoid of any other noises.
2. Avoid Copy Pasting Tiny Noise Section in Your Spoken Phrases
When you have a tiny part of noise between your stated words on your audio, please don’t copy/paste it to make a more significant piece of sound for Audacity to examine.
You would not be supplying Audacity with any more information that will help it generate a decent noise profile. The noise profile is what enables Audacity to tell the difference between speech and noise.
3. Minimum 2048 Data Samples Required
To build a noise profile, the Noise Reduction function requires a minimum of 2048 sample data. An audio file with a sampling frequency of 44.1kHz is roughly five hundredths of a second.
Note that this is the minor sound level that Audacity needs to generate a noise profile; however, should you supply a larger sample of the noise, Audacity can typically perform a great job of producing a suitable noise profile. As a result, attempt to capture a few seconds of background noises wherever possible.
4. Establish Recording Level and Record “Silence”
Setting your audio volume and capturing some “quiet” prior to speaking is the best way to achieve this. Instead, when you’ve finished talking, keep your camera/recorder going for a few moments.
Don’t move or create any sounds while capturing the background noises, and keep an ear open for any other noises. You only need to capture the ambient noise for a few moments; two to five seconds will suffice.
Part 2: How to Remove Background Noise in Audacity on Windows and Mac?
Whether you are using Windows or macOS, we will show you a step-by-step process to achieve your results using both software in this part of Audacity remove background music guide.
Remove background noise in Audacity on Windows
Step 1: On your recording, select a few moments of sound. Any segment of noise that incorporates other noises should be avoided.

Step 2: From the Effect menu, select Noise Reduction.

Step 3: Select the Get Noise Profile option whenever the Noise Reduction effect screen appears.

Note: Choose whether to implement the noise removal to the entire waveforms or only a portion of it.
Step 4: To access the Noise Reduction effects window, go to Effects > Noise Reduction. Raise the level of noise reduction progressively while previewing the result.

Step 5: Head over to the File section to Export and Save the result. Audacity does not save sound clips when you select Save Project; instead, you must choose Export. Select the file type you want to store and the place wherever you can save it. Select Save after giving the File Name.

Remove background noise in Audacity on Mac
Step 1: Create a room tone-containing audio file. When you don’t have a separate track for room tone, use a recording with a few moments of quiet in it. Click-and-drag to select a segment with a few minutes of silence using the Selection Tool.

Step 2: Select Noise Reduction from the Effects tab. Select the Get Noise Profile tab in the new tab under Step 1. The screen will shut, and Audacity will take noise profile samples of the indicated area.

Step 3: Click-and-drag to select the whole file, which requires noise reduction with the Selection Tool. To re-open the function, go to the Effect tab and pick Noise Reduction. Make modifications to the following parameters under Step 2:
- Reduce and Residue
- Frequency Smoothing (bands)
- Sensitivity
- Noise Reduction

Step 4: To listen to how the chosen file will look with the selected parameters, select Preview. Re-adjust until you have a sound noise reduction with no interference. When you’re finished, select Reduce and click OK.
Part 3: Why is Audacity Noise Reduction Not Working?
It’s possible that the Noise Reduction function isn’t letting you mop up your recording since your audio isn’t appropriate for it. The disturbance must be continuous, not random or fluctuating, to work for Audacity’s Noise Reduction function.
For example, the Noise Reduction function will not assist if your audio was made in a busy environment with unique noises such as background chatter, random traffic noises, or in an exhibition space or museum. The Noise Reduction feature in Audacity isn’t meant to cope with that kind of distortion. You’ll need to alter your recording approach if you’re capturing voice in either of those situations.
Under the following situations, the Audacity Noise Reduction function might underperform.
- Particular noise in the background, including traffic or people.
- When the harmonics of the sound and voice are comparable.
- There is sound variance where there is fluctuation in the noise.
- The volume of the voice is comparable to or lower than that of the background noise.
- When the noise is irregular or changeable rather than continuous.
- The loudness is deafening.
- The sound is a single click or pop.
Part 4: How to Prevent Background Noise in Audio Recording?
Although Audacity allows eliminating noise very simply, it is still an additional level that takes time to refine your podcast production. These pointers can help you avoid the necessity for noise reduction and cut down on the amount of time you spend processing.
1. Reduce the Computer Fan Noise
Whenever computers become too heated, they can produce a lot of noise. You may limit the amount of software that runs and position your mic away from the keyboard to help lessen this impact and avoid the fan from coming on.
However, even if you observe all of these guidelines, undesired recording sounds may still appear in your program. Fortunately, contemporary software makes this problem quite simple to resolve.
2. Reduce the Gain and Get Close to the Mic
Reduce the gain (sensitivity of the microphone) and go nearer to it. Talking straight into the microphone won’t distort your audio if you reduce the gain, and that would assist your microphone in concentrating on scooping up your voice’s tone.
Bonus Tip: Set your recorder’s (or DAW’s) sensitivity such that your speech peaks between -12 and -10db.
3. Utilize a Versatile Microphone
Condenser and dynamic microphones are the two most common types of podcast microphones. Condenser microphones are significantly more sensitive instruments meant to take up average atmospheric noise, whereas dynamic microphones have a narrower frequency range, picking up fewer ambient noises.
4. Optimize Your Recording Environment
The most significant and most crucial aspect of your podcasts’ sound quality is where you capture it. To optimize your personal podcasting space, we recommend choosing a peaceful, compact area away from HVAC systems, vehicles, external hard drives, background sound, motors, and other distractions. You may also increase the tone of your room by using natural sound absorbents such as curtains, rugs, carpets, and sofas.
Part 5: How to Remove Background Noise in Filmora?
Although there is a lot of software available to eliminate ambient noise, we highly suggest Wondershare Filmora Video Editor to edit audio and video in one place.
In addition to the standard audio editing capabilities, the recently redesigned Filmora currently includes enhanced waveforms, volume Keyframing , peak metering, and audio transitions, giving you a better audio editing interface.
For Win 7 or later (64-bit)
For macOS 10.12 or later
Filmora Video Editor will quickly remove ambient sound from both sound/video. You may also remove the sound from the video with this simple video editor, use the Audio Equalizer or Audio Mixer functions to modify the audio further, and then Export and save the audio in an Mp3 file. Here are the detailed steps:
Step 1: In the Wondershare Filmora Timeline menu, Import your footage. Trim the footage after previewing it and deleting the sections you don’t want to retain.

Step 2: To eliminate the ambient noise immediately, double-click on the video file, and go to the Audio panel to select the Remove Background Noise option. You will find that the background noise is removed automatically.

Step 3: After checking the results, select Export to download the noise-reduced clip to your desktop or upload it immediately to YouTube or Vimeo.

Conclusion
Well, there you have it. In this Audacity Remove Background Noise guide, we have reviewed every possible method you can adopt to get rid of the unnecessary background noise in the Audacity. And if the desired results are still not achieved, we highly recommend using the Wondershare Filmora editing software. Not only will it help you remove the unwanted ambient noise, but it will also allow you to customize your audio or video file further.
02 How to Remove Background Noise in Audacity?
03 Why is Audacity Noise Reduction Not Working?
04 How to Prevent Background Noise in Audio Recording?
05 How to Remove Background Noise in Filmora?
Part 1: Things You Need to Prepare for Background Noise Reduction
Here are few things that you need to consider before you apply the noise reduction to your clips:
1. Noise Sample
A decent sample of the noise you wish to eliminate is perhaps the most crucial aspect of the Audacity remove noise procedure.
This will be used by Audacity to understand the noise and build a noise profile. The noise recording should last for a fair amount of time and be devoid of any other noises.
2. Avoid Copy Pasting Tiny Noise Section in Your Spoken Phrases
When you have a tiny part of noise between your stated words on your audio, please don’t copy/paste it to make a more significant piece of sound for Audacity to examine.
You would not be supplying Audacity with any more information that will help it generate a decent noise profile. The noise profile is what enables Audacity to tell the difference between speech and noise.
3. Minimum 2048 Data Samples Required
To build a noise profile, the Noise Reduction function requires a minimum of 2048 sample data. An audio file with a sampling frequency of 44.1kHz is roughly five hundredths of a second.
Note that this is the minor sound level that Audacity needs to generate a noise profile; however, should you supply a larger sample of the noise, Audacity can typically perform a great job of producing a suitable noise profile. As a result, attempt to capture a few seconds of background noises wherever possible.
4. Establish Recording Level and Record “Silence”
Setting your audio volume and capturing some “quiet” prior to speaking is the best way to achieve this. Instead, when you’ve finished talking, keep your camera/recorder going for a few moments.
Don’t move or create any sounds while capturing the background noises, and keep an ear open for any other noises. You only need to capture the ambient noise for a few moments; two to five seconds will suffice.
Part 2: How to Remove Background Noise in Audacity on Windows and Mac?
Whether you are using Windows or macOS, we will show you a step-by-step process to achieve your results using both software in this part of Audacity remove background music guide.
Remove background noise in Audacity on Windows
Step 1: On your recording, select a few moments of sound. Any segment of noise that incorporates other noises should be avoided.
Step 2: From the Effect menu, select Noise Reduction.
Step 3: Select the Get Noise Profile option whenever the Noise Reduction effect screen appears.
Note: Choose whether to implement the noise removal to the entire waveforms or only a portion of it.
Step 4: To access the Noise Reduction effects window, go to Effects > Noise Reduction. Raise the level of noise reduction progressively while previewing the result.
Step 5: Head over to the File section to Export and Save the result. Audacity does not save sound clips when you select Save Project; instead, you must choose Export. Select the file type you want to store and the place wherever you can save it. Select Save after giving the File Name.
Remove background noise in Audacity on Mac
Step 1: Create a room tone-containing audio file. When you don’t have a separate track for room tone, use a recording with a few moments of quiet in it. Click-and-drag to select a segment with a few minutes of silence using the Selection Tool.
Step 2: Select Noise Reduction from the Effects tab. Select the Get Noise Profile tab in the new tab under Step 1. The screen will shut, and Audacity will take noise profile samples of the indicated area.
Step 3: Click-and-drag to select the whole file, which requires noise reduction with the Selection Tool. To re-open the function, go to the Effect tab and pick Noise Reduction. Make modifications to the following parameters under Step 2:
- Reduce and Residue
- Frequency Smoothing (bands)
- Sensitivity
- Noise Reduction
Step 4: To listen to how the chosen file will look with the selected parameters, select Preview. Re-adjust until you have a sound noise reduction with no interference. When you’re finished, select Reduce and click OK.
Part 3: Why is Audacity Noise Reduction Not Working?
It’s possible that the Noise Reduction function isn’t letting you mop up your recording since your audio isn’t appropriate for it. The disturbance must be continuous, not random or fluctuating, to work for Audacity’s Noise Reduction function.
For example, the Noise Reduction function will not assist if your audio was made in a busy environment with unique noises such as background chatter, random traffic noises, or in an exhibition space or museum. The Noise Reduction feature in Audacity isn’t meant to cope with that kind of distortion. You’ll need to alter your recording approach if you’re capturing voice in either of those situations.
Under the following situations, the Audacity Noise Reduction function might underperform.
- Particular noise in the background, including traffic or people.
- When the harmonics of the sound and voice are comparable.
- There is sound variance where there is fluctuation in the noise.
- The volume of the voice is comparable to or lower than that of the background noise.
- When the noise is irregular or changeable rather than continuous.
- The loudness is deafening.
- The sound is a single click or pop.
Part 4: How to Prevent Background Noise in Audio Recording?
Although Audacity allows eliminating noise very simply, it is still an additional level that takes time to refine your podcast production. These pointers can help you avoid the necessity for noise reduction and cut down on the amount of time you spend processing.
1. Reduce the Computer Fan Noise
Whenever computers become too heated, they can produce a lot of noise. You may limit the amount of software that runs and position your mic away from the keyboard to help lessen this impact and avoid the fan from coming on.
However, even if you observe all of these guidelines, undesired recording sounds may still appear in your program. Fortunately, contemporary software makes this problem quite simple to resolve.
2. Reduce the Gain and Get Close to the Mic
Reduce the gain (sensitivity of the microphone) and go nearer to it. Talking straight into the microphone won’t distort your audio if you reduce the gain, and that would assist your microphone in concentrating on scooping up your voice’s tone.
Bonus Tip: Set your recorder’s (or DAW’s) sensitivity such that your speech peaks between -12 and -10db.
3. Utilize a Versatile Microphone
Condenser and dynamic microphones are the two most common types of podcast microphones. Condenser microphones are significantly more sensitive instruments meant to take up average atmospheric noise, whereas dynamic microphones have a narrower frequency range, picking up fewer ambient noises.
4. Optimize Your Recording Environment
The most significant and most crucial aspect of your podcasts’ sound quality is where you capture it. To optimize your personal podcasting space, we recommend choosing a peaceful, compact area away from HVAC systems, vehicles, external hard drives, background sound, motors, and other distractions. You may also increase the tone of your room by using natural sound absorbents such as curtains, rugs, carpets, and sofas.
Part 5: How to Remove Background Noise in Filmora?
Although there is a lot of software available to eliminate ambient noise, we highly suggest Wondershare Filmora Video Editor to edit audio and video in one place.
In addition to the standard audio editing capabilities, the recently redesigned Filmora currently includes enhanced waveforms, volume Keyframing , peak metering, and audio transitions, giving you a better audio editing interface.
For Win 7 or later (64-bit)
For macOS 10.12 or later
Filmora Video Editor will quickly remove ambient sound from both sound/video. You may also remove the sound from the video with this simple video editor, use the Audio Equalizer or Audio Mixer functions to modify the audio further, and then Export and save the audio in an Mp3 file. Here are the detailed steps:
Step 1: In the Wondershare Filmora Timeline menu, Import your footage. Trim the footage after previewing it and deleting the sections you don’t want to retain.
Step 2: To eliminate the ambient noise immediately, double-click on the video file, and go to the Audio panel to select the Remove Background Noise option. You will find that the background noise is removed automatically.
Step 3: After checking the results, select Export to download the noise-reduced clip to your desktop or upload it immediately to YouTube or Vimeo.
Conclusion
Well, there you have it. In this Audacity Remove Background Noise guide, we have reviewed every possible method you can adopt to get rid of the unnecessary background noise in the Audacity. And if the desired results are still not achieved, we highly recommend using the Wondershare Filmora editing software. Not only will it help you remove the unwanted ambient noise, but it will also allow you to customize your audio or video file further.
Also read:
- [New] Culinary Waves Top 10 Flavorful TikTok Recipes
- Exclusive MP4 Extraction Software for TikTok Content for 2024
- [New] Hot TikTok Shopping 30 Essential Products From Amazon
- [Updated] 2024 Approved Mastery of TikTok Perfecting Videos From Your PC/Tablet
- Unlock TikTok Magic - Ditch the Watermark
- [Updated] In 2024, Extraordinary Escapades The Ultimate List of Strange TikTok Titles
- [New] In 2024, Mastering TikTok The Ultimate List of 20 Caption Ideas
- [New] Amplify Your Video Impact Hottest TikTok Filters Guide for 2024
- Crafting a New Digital Persona Comprehensible Steps for Changing TikTok Handle
- [New] In 2024, Respectful Approach to Enhancing Your TikTok Presence
- [New] Avoid Infringement Checking Your TikTok Content for Rights
- [New] 2024 Approved The Power of Virality Enhancing Brand Presence on TikTok
- Enhance Chat Dynamics with Snapchat's GIF Sending Steps
- [New] Unexpected TikTok Rewind – Recover Lost Posts Easily, In 2024
- A Step-by-Step Guide to Dominating TikTok Markets for 2024
- 2024 Approved An In-Depth Guide for Comparing Triller with TikTok Features (Max 156 Chars)
- [Updated] Majority of Top TikTok Money-Predicting Apps for 2024
- 2024 Approved Screwball Skirmishes Uncovering the Funniest TikTok Game Battles
- In 2024, The Ultimate List of Popular TikTok Reactions
- [Updated] 2024 Approved Breaking Barriers in Social Media The Top 20 Innovative TikTok Captions
- In 2024, Drafting an Emotional TikTok Conclusion
- [Updated] Sync Your Creativity Across Chrome, Android & iOS for TikTok for 2024
- 2024 Approved Flip Your Feed! Hot TikTok Challenges You Should Master (Top 10)
- Gear Up For Speedy TikTok Production with This Guide for 2024
- [Updated] From Challenges to Characters Best GIF Converters for TikToks for 2024
- In 2024, Unlock Creative Potential The Ultimate List of 10 Free TikTok Edits on MacOS
- [Updated] 2024 Approved Safely Escalate Your Presence on the TikTok Platform
- [Updated] 2024 Approved Unleashing Potential Top 10 TikTok Data Analysis Tools
- Dodging the Invisible Block Unshade Your TikTok Presence for 2024
- [New] Unlocking TikTok Potential Desktop Video Guide
- [Updated] Becoming a Viral Visionary with These 10 TikTok Insights for 2024
- [New] Pinpointing Your Own Signature TikTok Tag for 2024
- [Updated] Audience Captivation at Its Peak Top 20 TikTok Caption Ideas
- [Updated] In 2024, Most Popular TikTok Filters Enhancing Video Quality
- In 2024, Unexpected TikTok Refresh How to Restore Lost Content?
- 2024 Approved Global Gourmet World's Favorite Culinary Creations
- [Updated] Cut Out Clutter in Audio Audacity’s Noise Suppression Tips
- 6 Best Snapchat Video Editors on Android and iPhone
- Top 15 Viral Phenomena on Today's TikTok Stage
- [New] The 2023 Roadmap for Dominant Desktop TikTok Videos
- [Updated] In 2024, Advanced Techniques in Removing TikTok Brand Images
- In 2024, Finest TikTok Creation Software for Windows Desktop
- [New] Boost Your Brand on TikTok Successful Advertising Examples for 2024
- [New] 2024 Approved 15 Newest TikTok Trends You Need to Pay Attention To
- 2024 Approved The Definitive Reference to TikTok Icons and Emojis
- [Updated] Elevate Your TikTok Content with Voice Overlay for 2024
- 2024 Approved Discover 50+ Creative Words That Make TikToks Go Viral
- [New] 36 Epic TikTok Comedy Moments for 2024
- 2024 Approved How to Regain Visibility on a TikTok Ban List
- [New] 2024 Approved Crafting a Story Unique to You Amongst TikTok Titans
- In 2024, A Step-by-Step Guide on Using ADB and Fastboot to Remove FRP Lock from your Honor Play 40C
- 2024 Approved Trending Titles Navigating Through Facebook's Hot Takes
- Additional Tips About Sinnoh Stone For OnePlus Ace 3 | Dr.fone
- Use Device Manager to identify malfunctioning your drivers with Windows Device Manager on Windows 7
- In 2024, How I Transferred Messages from Realme Narzo N53 to iPhone 12/XS (Max) in Seconds | Dr.fone
- [Updated] In 2024, Unlock IGTV Master Video Submission
- Updated 2024 Approved Then Is There Any Good Program Similar to MKVtoolnix but Comes More Intuitive Interface? Absolutely
- 5 Easy Ways to Change Location on YouTube TV On Vivo Y27 5G | Dr.fone
- [New] 2024 Approved Achieve Unstoppable Viral Traction with These FB Tricks
- [Updated] In 2024, Guide to Crafting Twitter Video-Inspired Animated GIFs
- Top 10 Tools for Extracting Audio Separately From Videos
- Updated Best Free AVI Video Rotators for Windows, MAC, Android, and iPhone Users for 2024
- In 2024, How to Spy on Text Messages from Computer & Vivo S18e | Dr.fone
- Updated Maximizing Your Facebook Video Reach The Power of Aspect Ratios
- If You Want to Color Grading Your Video, Final Cut Pro Can Be One of the Best Choices. However, Its Not Easy for Everyone to Use Color Grading Feature, and in This Guide Well Show You How to Do That
- In 2024, Quick Tips Screen Record & Camera Integration on Android
- Top 4 SIM Location Trackers To Easily Find Your Lost Oppo Reno 11 5G Device
- How To Unlock A Found iPhone 13 Pro? | Dr.fone
- In 2024, What is the best Pokemon for pokemon pvp ranking On Sony Xperia 10 V? | Dr.fone
- [New] Future of FB Ads Predictions
- In 2024, 5 Quick Methods to Bypass OnePlus 12 FRP
- [New] Step-by-Step Screen Shot on Android Devices
- [New] 2024 Approved Uncomplicated Techniques for Adding IGTV to Your Story
- New From Silence to Sound Two Ways to Fade In and Out of Audio in Final Cut Pro
- Updated 2024 Approved Free Green Screen Apps That Will Take Your Videos to the Next Level
- New 3D LUT Mobile App Review - A Composite Application for Editing Media
- Repair Video Tool - Repair all your damaged video files of Motorola Moto G Stylus (2023) on Windows
- [New] 2024 Approved Top 10 Invisible Observers of Instagram Stories
- [New] In 2024, Essential Gaming Gear Keyboards for Less Than $100
- [New] Seamlessly Share Videos on MStream Services
- 2024 Approved Mastering the Art of Friend-Finding - Topest 15 Secure Apps on iDevices & Android
- How to Bypass Google FRP Lock on Google Pixel 8 Pro Devices
- 2024 Approved Revolutionize Your Listening Habits The Best Voice Recording Tools to Download Now
- New In 2024, Crafting Immersive Podcast Episodes A Comprehensive Directory of Sound FX Providers
- New In 2024, Audio Adaptation Techniques From MP3 Files to Compatible MP4s in Modern Times
- Title: "[Updated] Best of the Best Ultimate TikTok Video Savers for 2024"
- Author: Brian
- Created at : 2024-05-23 14:34:53
- Updated at : 2024-05-24 14:34:53
- Link: https://tiktok-videos.techidaily.com/updated-best-of-the-best-ultimate-tiktok-video-savers-for-2024/
- License: This work is licensed under CC BY-NC-SA 4.0.
