![[Updated] In 2024, Innovative Text Additions 5 Advanced Caption Methods for TikTok](https://www.lifewire.com/thmb/5uOSiEES2M2TQcFnoRKJPmKs58Y=/400x300/filters:no_upscale():max_bytes(150000):strip_icc()/GettyImages-1015140178-5a72a9493db1459aa7f98e94a1dfaae2.jpg)
"[Updated] In 2024, Innovative Text Additions 5 Advanced Caption Methods for TikTok"
Innovative Text Additions: 5 Advanced Caption Methods for TikTok
TikTok is one of the most famous social media apps as it creates various trends frequently that engage users continuously. Every week, you can explore various TikTok trends, such as dance videos, pranks, challenges, or quick hacks. These trends are a great entertainment source for people and motivate them to create engaging content.
However, adding captions is mandatory if you want to make TikTok trend videos for a diverse audience. This article will guide you if you are unaware of how to add captions on TikTok. We will provide 5 different ways to create TikTok captions effectively.
- Way 1: Auto-Generate Captions with TikTok’s Built-in Feature
- Way 2: Use Auto Captions in CapCut
- Way 3: Add Captions to TikTok Videos Manually
- Way 4: Automatically Add Subtitles to TikTok Videos with Online Editor
Part 1: Why Should You Add Captions to TikTok Videos?
Adding captions on TikTok videos can bring you multiple advantages. To learn more about the benefits of adding captions on TikTok, read this section:
1. Increases Comprehension
It may be possible that viewers won’t be able to understand a particular dialogue in your TikTok video. To make your TikTok content more understandable, adding captions can prove to be a great option. Moreover, if some viewers can’t turn on the sound of TikTok videos, they can easily read the captions to understand the content.
2. Enhances Focus
Captions have the ability to grasp the attention of a viewer automatically. Adding captions to your TikTok video lets your viewers focus more properly. Thus, you can engage your audience throughout the TikTok video effortlessly.
3. Helps During Audio Problems
Audio problems may arise unexpectedly. In such situations, added captions on TikTok videos can offer great convenience. Moreover, people who have auditory disabilities can also enjoy your TikTok videos.
4. Attracts Diverse Audience
If some foreigners can’t understand or speak your native language, TikTok captions are necessary for them. By doing so, a broad and diverse audience can watch your TikTok videos easily.
Part 2: How to Add Captions on TikTok?
There are various ways through which you can generate TikTok captions effortlessly. Read this section to discover multiple and convenient ways to create TikTok captions easily.
Way 1: Auto-Generate Captions with TikTok’s Built-in Feature
If you don’t want to download video editing software, you can utilize the built-in feature of TikTok to create auto-captions. This will save you from the hassle of launching or accessing a professional subtitle editor. Moreover, it will also save you time and effort from creating subtitles manually. To use the built-in feature of TikTok automatic captions, check the following instructions:
Step1 Once you have captured a video on TikTok, tap the “Tick” icon from the bottom right side. This will redirect you to the editing mode.
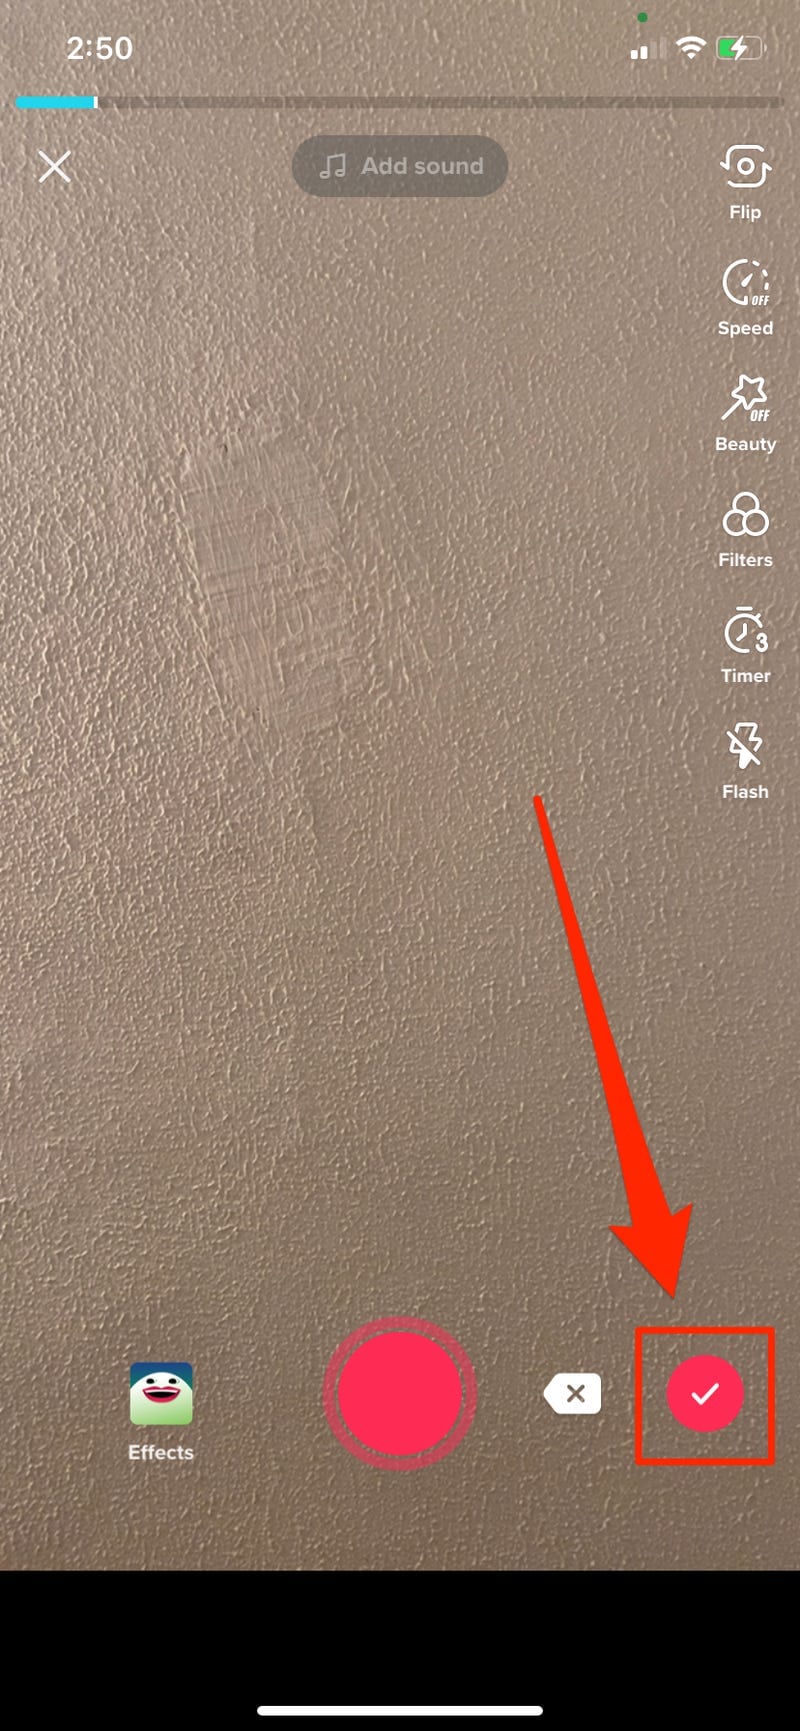
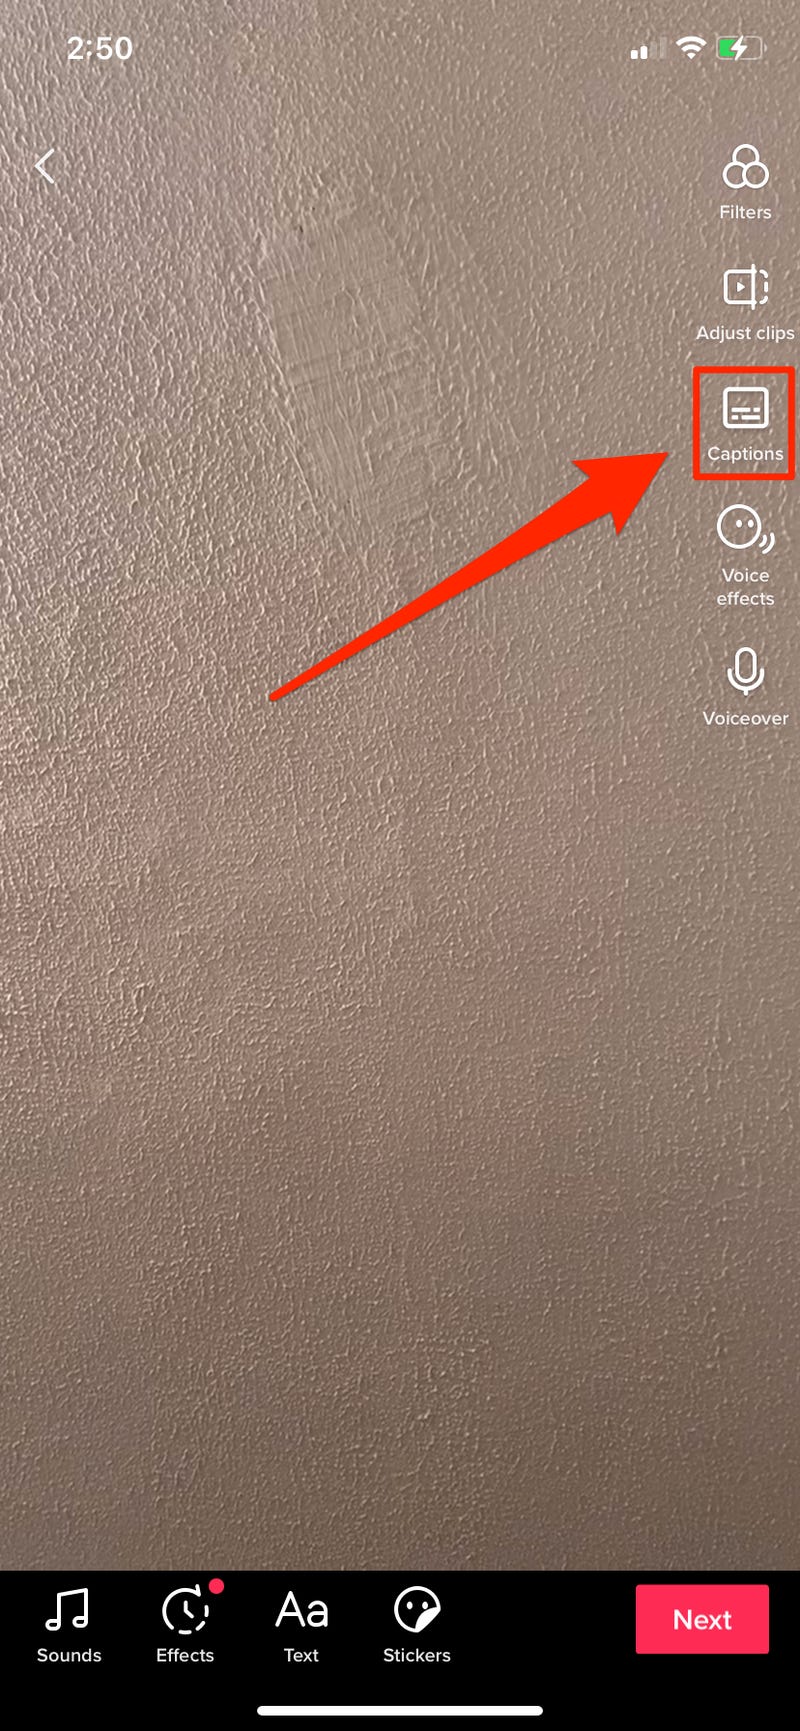
Step2 On the editing mode, locate the “Captions” option from the right side. After tapping on it, TikTok will instantly generate the subtitles automatically. Make sure that all the captions are correctly created. Once you are done, hit the “Save” button displayed at the top right side. Afterward, you can quickly post your TikTok video with captions.
Way 2: Use Auto Captions in CapCut
CapCut and TikTok are closely related to each other as they both have the same parent company called ByteDance. Thus, using CapCut to create captions for your TikTok videos can bring high-quality results. You can easily download CapCut on Android and iOS devices without any complications. The interface of this tool is clean that allows you to generate subtitles efficiently.
The auto caption feature in CapCut enables you to produce subtitles instantly. It uses advanced algorithms that ensure high accuracy while creating subtitles. To use this advanced feature of CapCut, read the below steps:
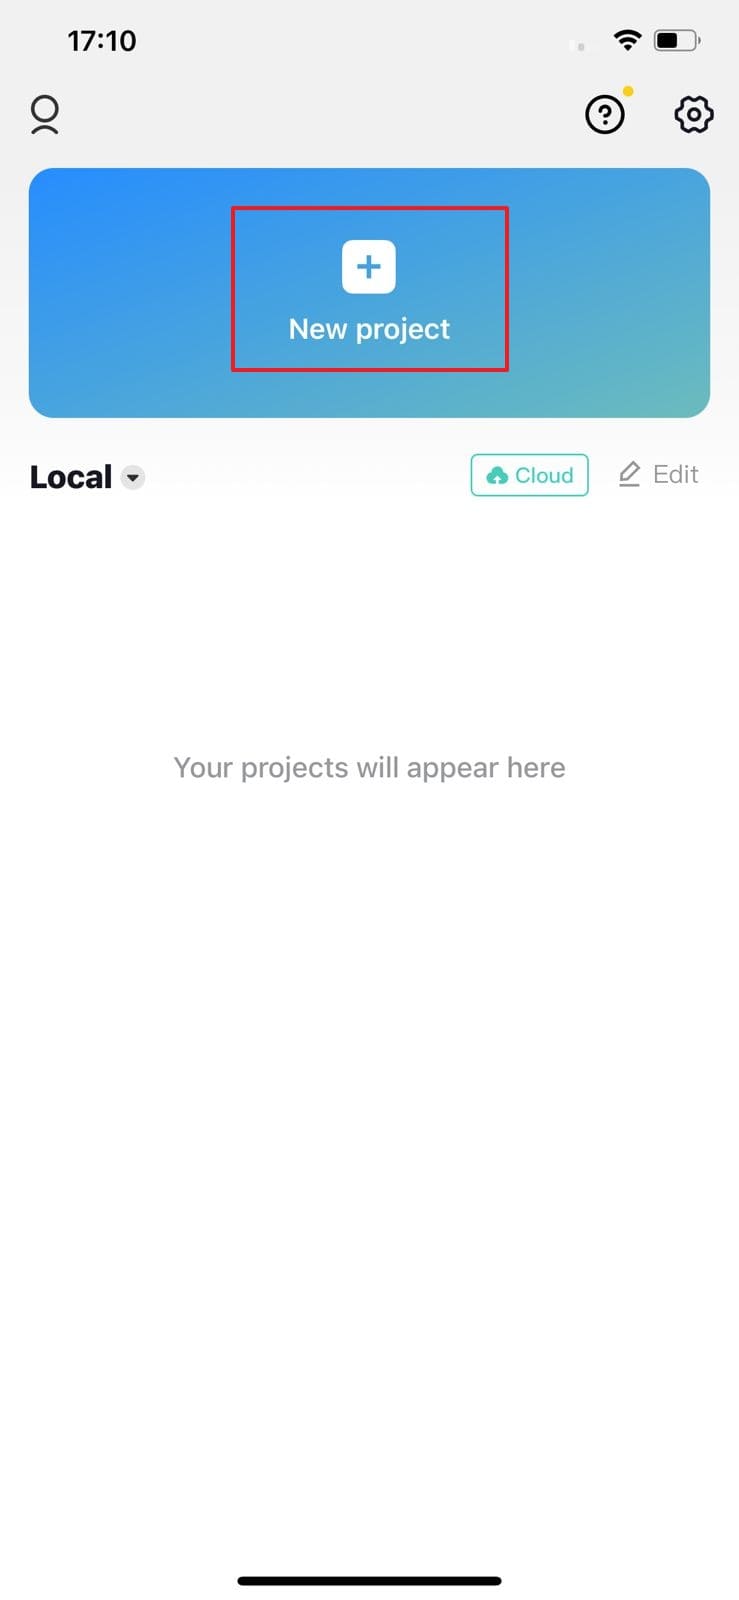
Step1 Download and launch CapCut on your phone. To import, tap on “New Project” and select the video from your phone’s gallery. Tap on “Add” to head to the editing mode of CapCut.
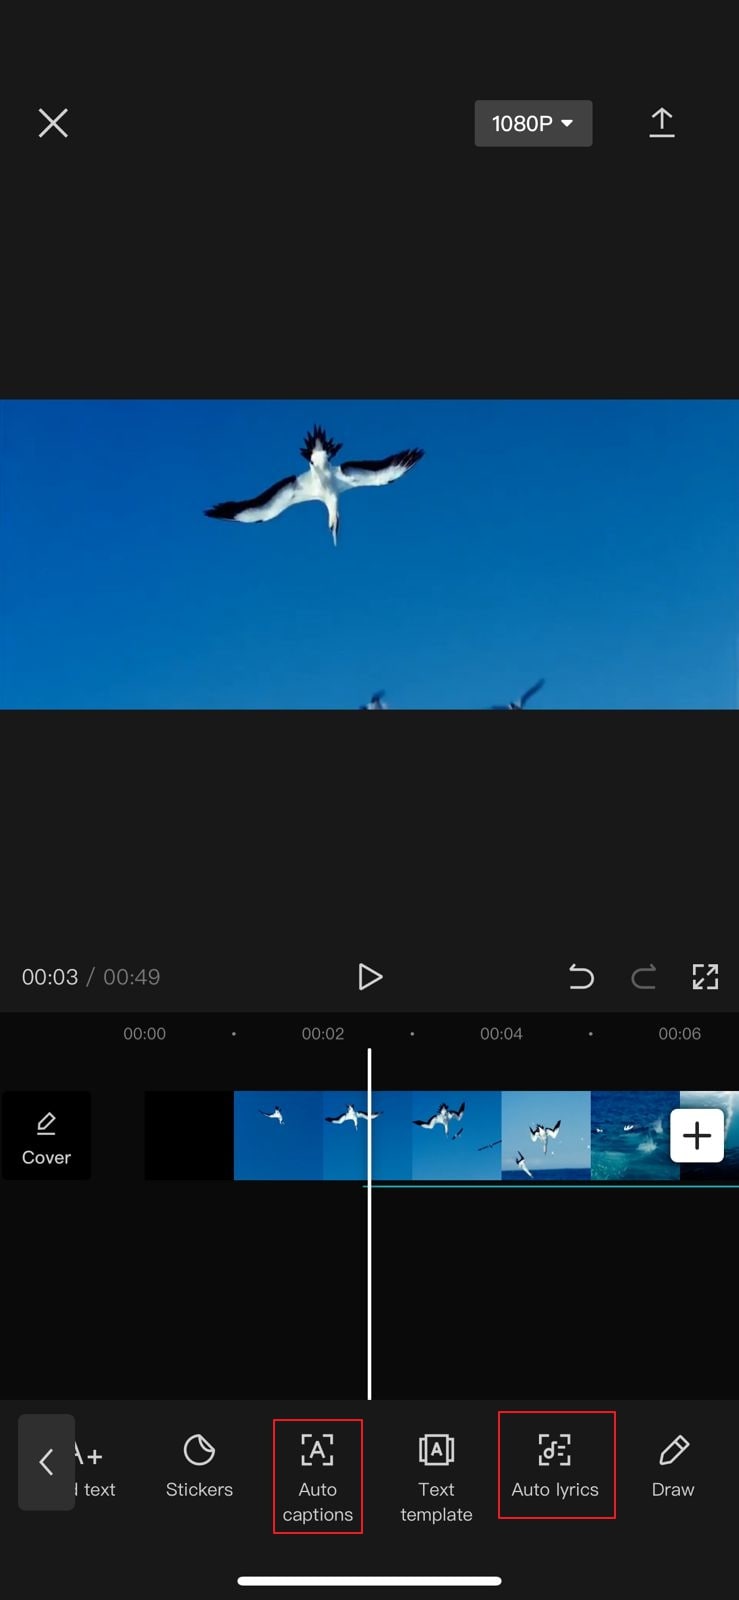
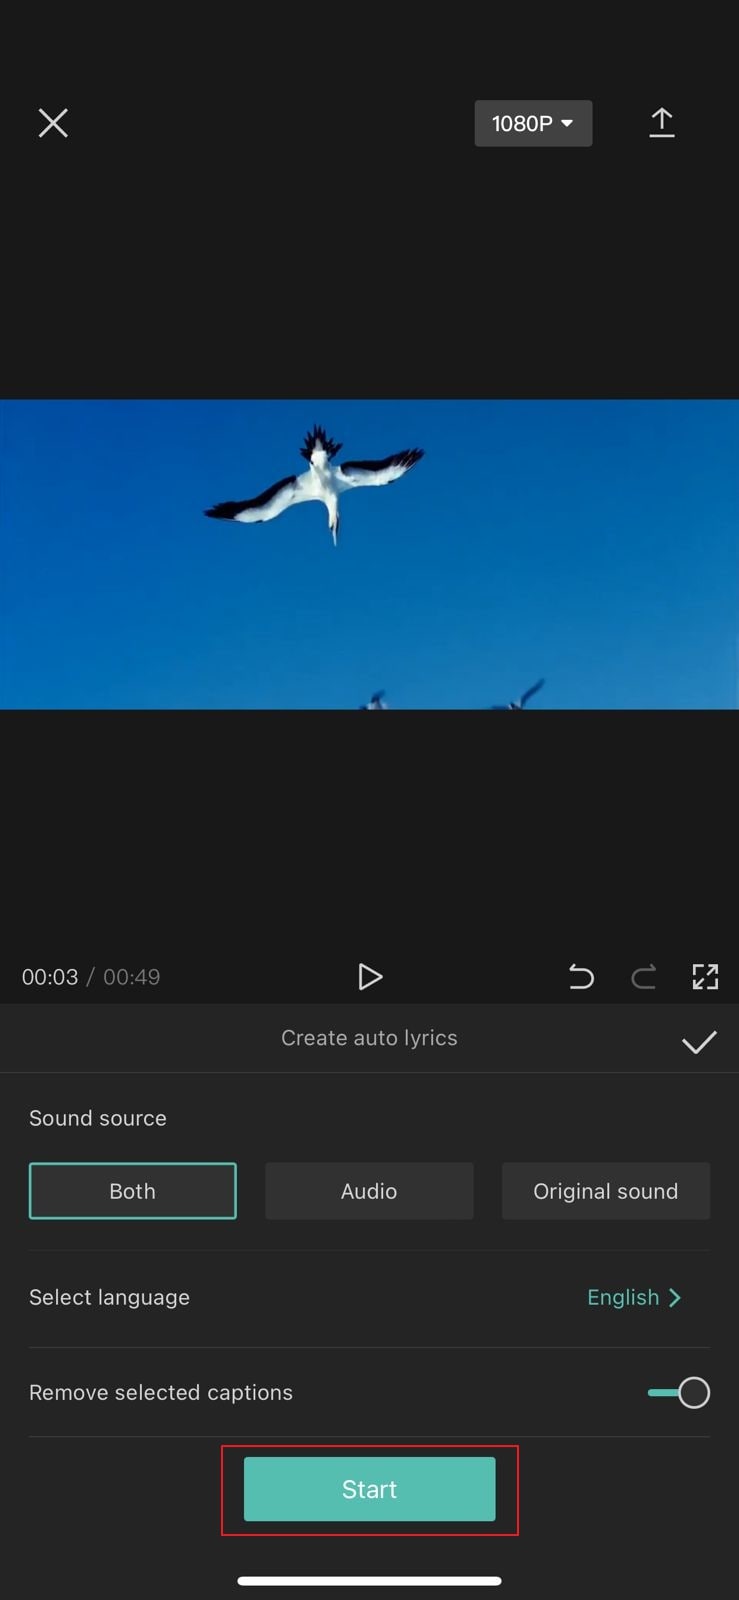
Step2 Afterward, select “Text” options from which you can either choose “Auto Lyrics” or “Auto Captions.” Using the Auto Lyrics option, you can generate captions for a song automatically. On the other hand, by using the Auto Captions option, you can transcribe the voice in your video to create subtitles. From the pop-up menus, choose the sound source and language to proceed.
Step3 Once you are done adjusting the settings, hit the “Start” button. After some seconds, CapCut will create captions for your TikTok video efficiently. Afterward, you can choose video resolution and hit the “Arrow” icon to export the video.

Way 3: Add Captions to TikTok Videos Manually
If you want to create captions for TikTok briefly, you can manually add them using the instructions given below. This method is extremely simple and helpful if you want to create small captions for your TikTok videos. Moreover, you can efficiently choose the font, color, and style of your captions in this manual method:
Step1 Open your TikTok app and create a video to begin. Tap on the “Tick” icon to enter the editing mode. Select “Text” given on the bottom toolbar of your screen.
Step2 Now, choose the style for your captions from the available options. Select the color and start writing your captions carefully. Once you are done, you can save and publish your created TikTok video.
Way 4: Automatically Add Subtitles to TikTok Videos with Online Editor
There are various online editors that can create captions for TikTok videos automatically. They use the Auto Transcription feature, through which the tool can create subtitles by recognizing the voice used in a TikTok video. One of the reliable online tools that can produce auto-subtitles is Veed.io.
Veed.io is an online tool that is capable of creating TikTok automatic captions efficiently. You can easily access this online tool from your web browsers. Moreover, it supports more than 100 languages and accents that you can choose to create auto-captions. Also, you can translate your captions into different languages using this tool. To use this tool flawlessly, check the below steps:
Step1 Begin by reaching the official website of Veed.io. Go to its Tools and locate the “Auto Subtitle Generator” option. It will redirect you to another page that consists of the tool information.

Step2 Click “Get Started” and upload a video from your system. Once you are done, tap on “Subtitles” and select “Auto Subtitle” from the given options. Choose your preferred language and tap on “Create Subtitles.”
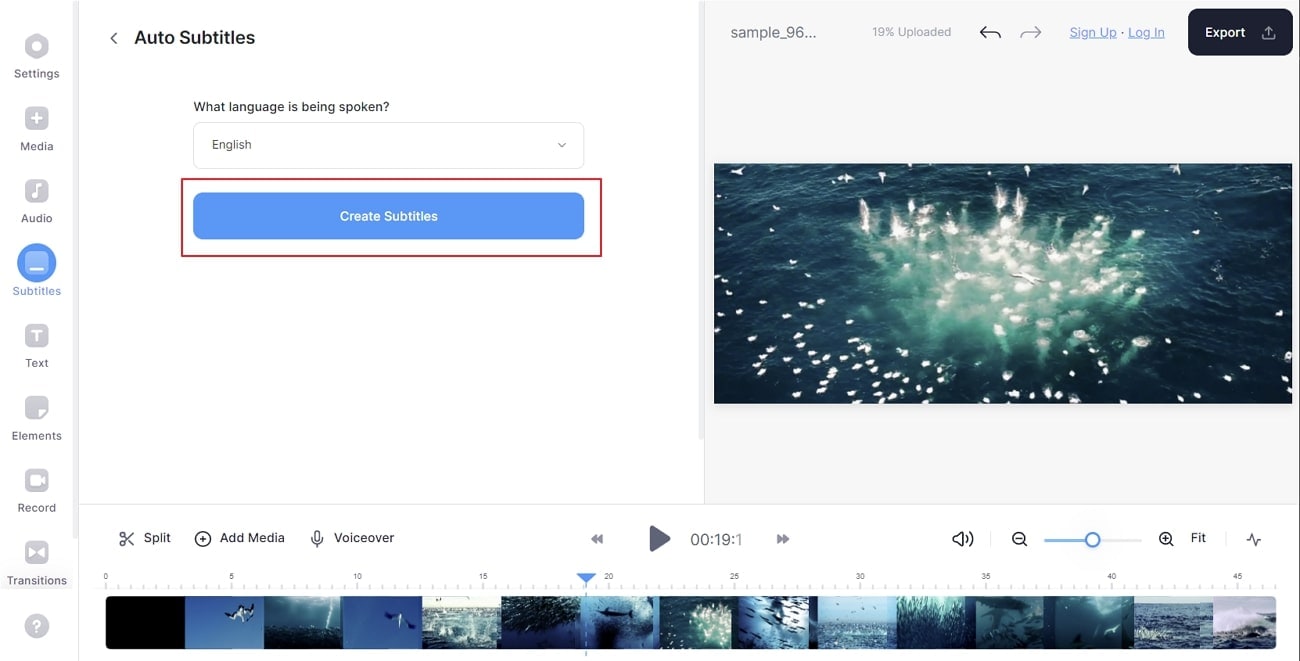
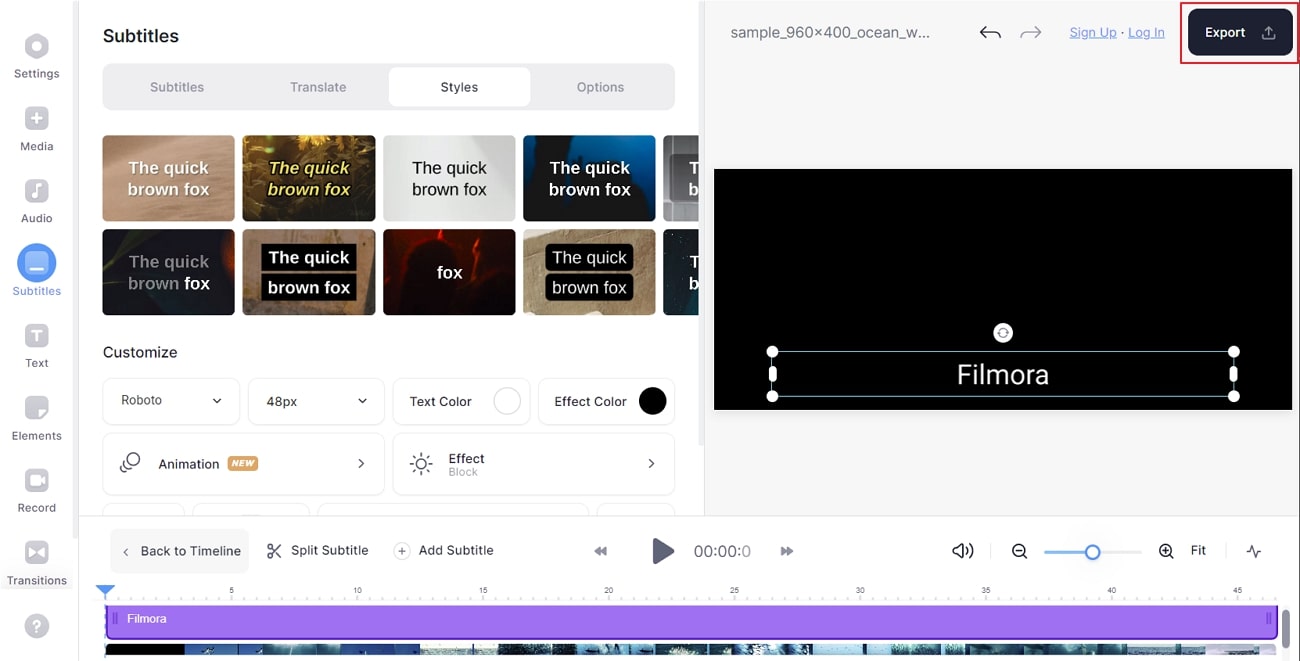
Step3 After waiting some time, you can see your auto-captions. You can choose the text color, effect, size, and alignment from the given options. Once you are satisfied with the TikTok captions, hit the “Export” button.
Part 3: How to Add Captions to Your TikTok Videos with Filmora
If you want to add further enhancements to your TikTok captions, you can use an offline tool like Wondershare Filmora . Using this platform, you can manually add captions by choosing the suitable style from the presets. Moreover, you can also add customizations to the captions through Filomora easily. You can also upload SRT files on this tool to produce TikTok captions.
Free Download For Win 7 or later(64-bit)
Free Download For macOS 10.14 or later
TikTok automatic captions can be easily generated from Filmora as it offers excellent results through its Speech-to-Text feature. Using this unique feature, you can transcribe the voice in your TikTok videos in up to 16 different languages. To use this feature conveniently, follow the below steps:
Step 1 Import the TikTok Video
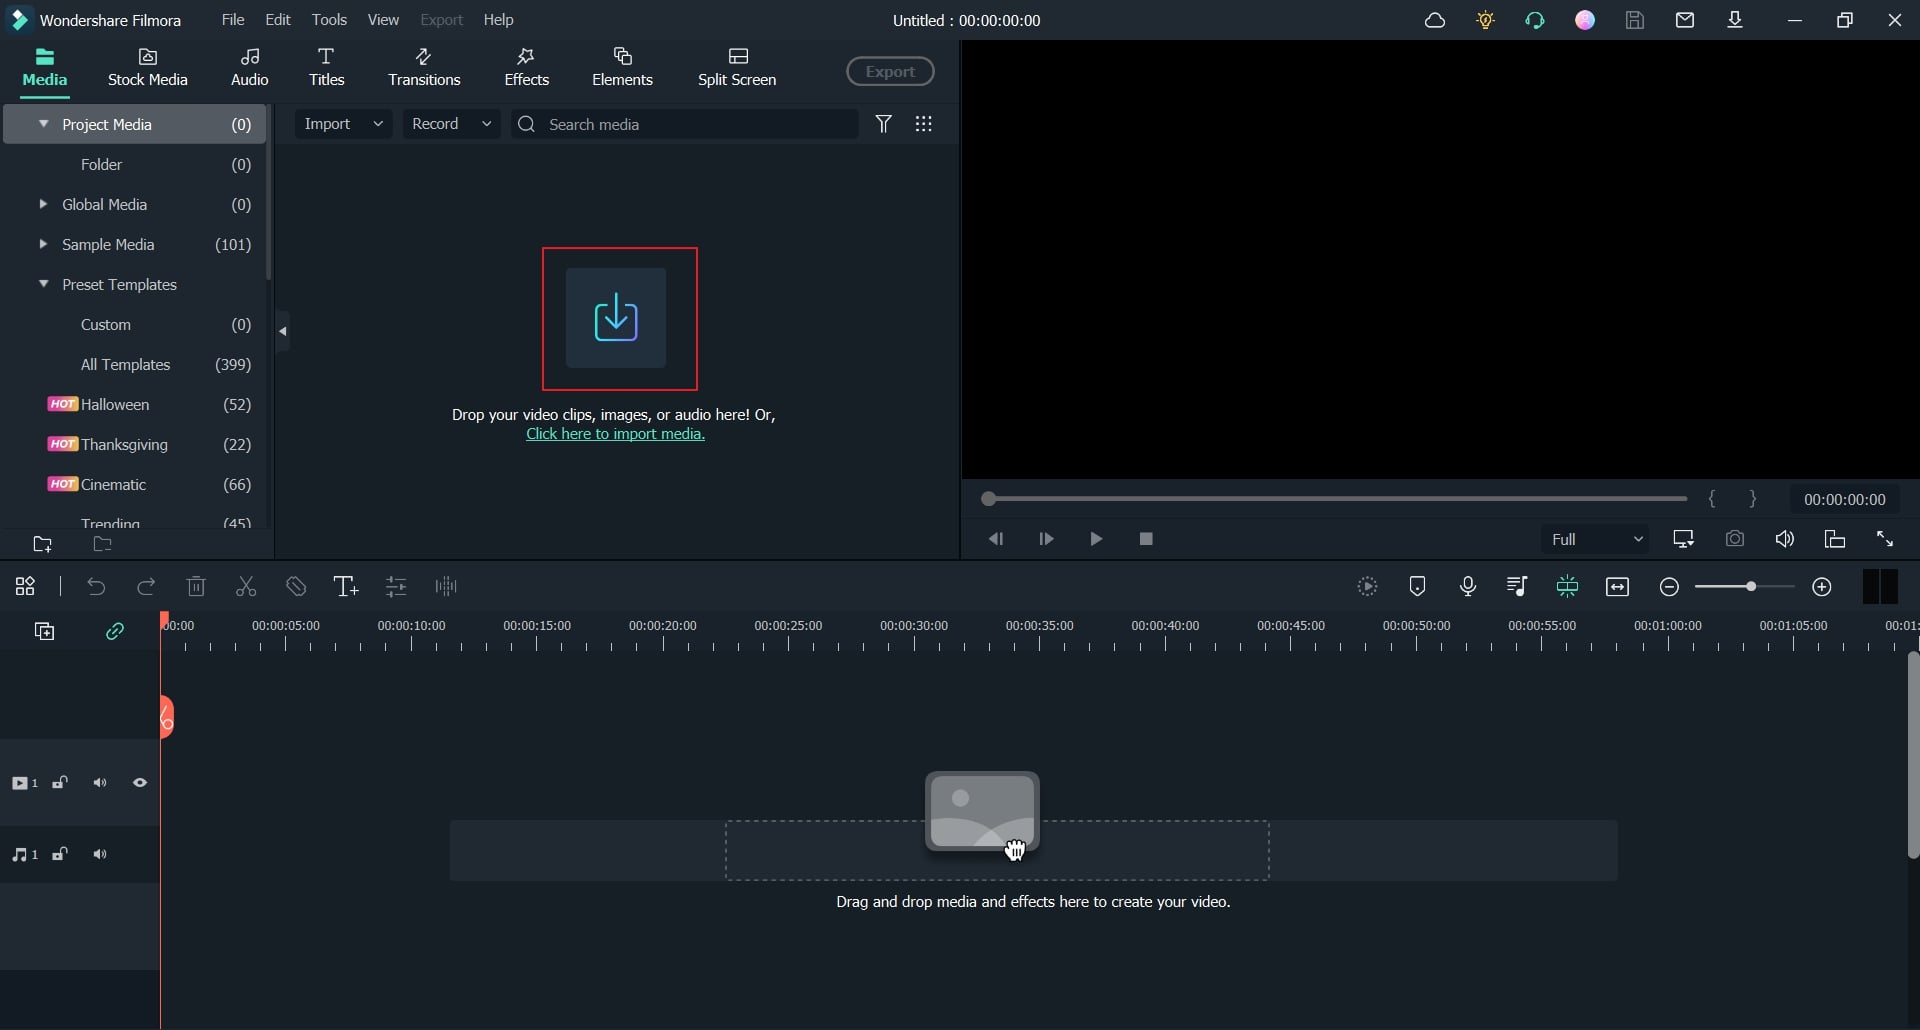
Once done with launching and creating the Filmora project on your PC, hit the “Arrow” icon to import your video file on this tool. Now drag and drop the video file to the timeline in order to proceed.
Step 2 Initiate the Automatic Subtitle Feature
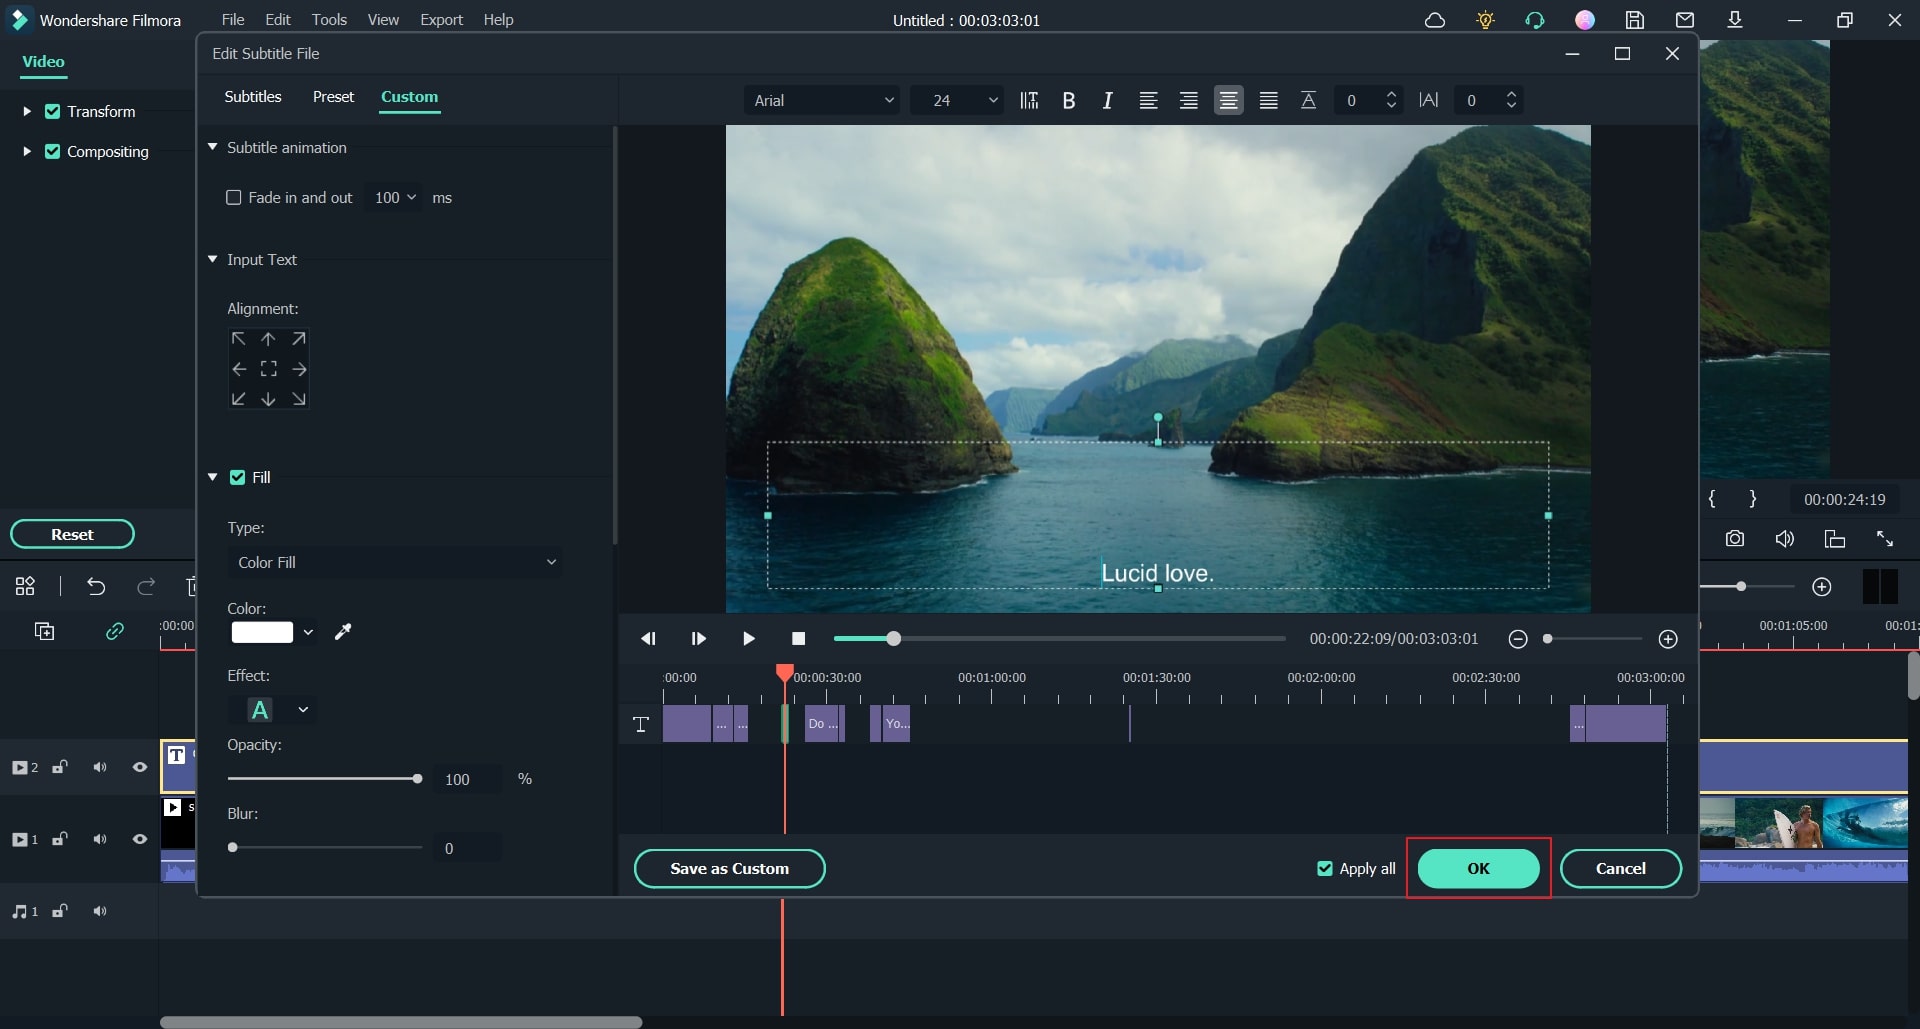
On your timeline, tap on the “Speech-to-Text” feature. Choose your language and video clip from the pop-up menu. Wait for some seconds, and the subtitles will be generated automatically. Double-click on the created TikTok automatic captions to open the editing settings. Here, you can select subtitles style and respective time duration. You can also add customizations efficiently.
Step 3 Export the TikTok Video
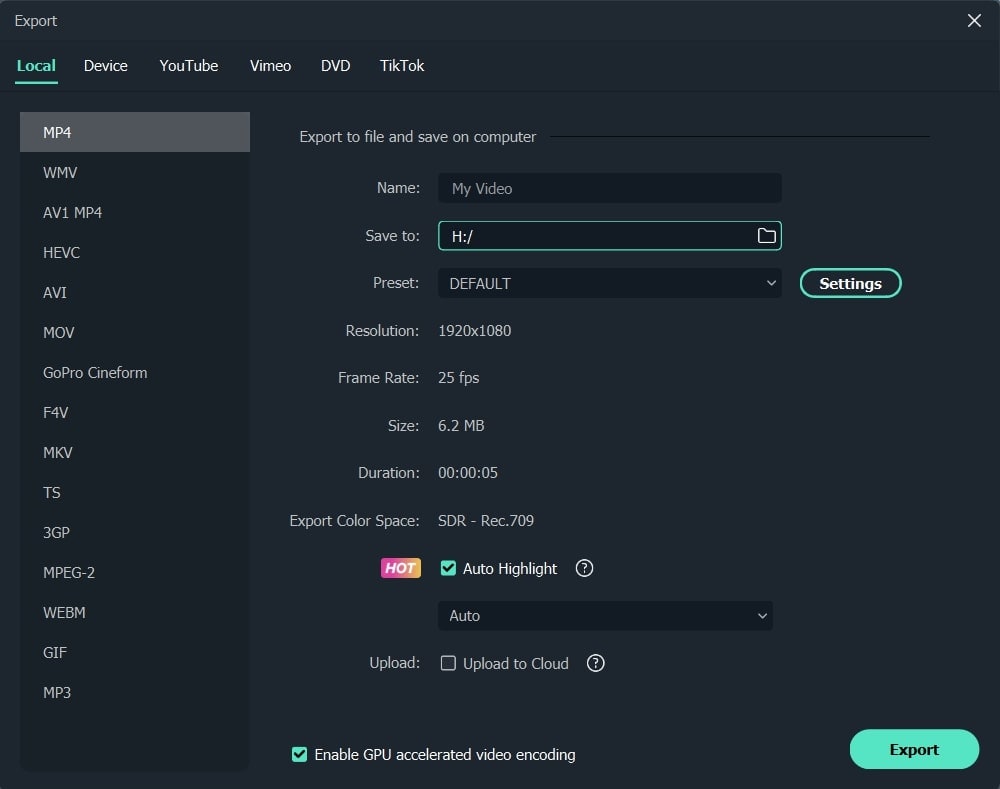
After completing all the settings, you can click on the “Export” button. Before exporting, you can choose the video resolution and file formats easily. Also, this tool gives you the facility to export the video file directly to your TikTok account.
Part 4: People Also Want to Know
1. How to add captions to TikTok?
To add TikTok captions, you can choose the manual or automatic way. TikTok has a built-in auto-generator through which you can add captions automatically. Moreover, there are different offline and online tools, such as Filmora, CapCut, and Veed.io, through which you can add captions on TikTok flawlessly.
2. How to add captions to TikTok after posting?
If you want to add TikTok captions after posting, you have to download the video on your phone first. Afterward, hit the Plus icon to re-upload the video from your gallery. Choose that particular video again and tap on the Post button. Now you can write the captions on the given space easily. Afterward, tap on the “Post” button.
Last Words
This article has shed light on various ways how to add captions on TikTok efficiently. You can add TikTok captions manually or use the auto-generator for ease. Moreover, we have also highlighted an online tool to create subtitles that can be accessed from any web browser. However, if you want a professional caption editor for a longer run, Wondershare Filmora is the best choice among other tools. It has an easy-to-use interface and achieves accurate results comfortably.
Part 1: Why Should You Add Captions to TikTok Videos?
Adding captions on TikTok videos can bring you multiple advantages. To learn more about the benefits of adding captions on TikTok, read this section:
1. Increases Comprehension
It may be possible that viewers won’t be able to understand a particular dialogue in your TikTok video. To make your TikTok content more understandable, adding captions can prove to be a great option. Moreover, if some viewers can’t turn on the sound of TikTok videos, they can easily read the captions to understand the content.
2. Enhances Focus
Captions have the ability to grasp the attention of a viewer automatically. Adding captions to your TikTok video lets your viewers focus more properly. Thus, you can engage your audience throughout the TikTok video effortlessly.
3. Helps During Audio Problems
Audio problems may arise unexpectedly. In such situations, added captions on TikTok videos can offer great convenience. Moreover, people who have auditory disabilities can also enjoy your TikTok videos.
4. Attracts Diverse Audience
If some foreigners can’t understand or speak your native language, TikTok captions are necessary for them. By doing so, a broad and diverse audience can watch your TikTok videos easily.
Part 2: How to Add Captions on TikTok?
There are various ways through which you can generate TikTok captions effortlessly. Read this section to discover multiple and convenient ways to create TikTok captions easily.
Way 1: Auto-Generate Captions with TikTok’s Built-in Feature
If you don’t want to download video editing software, you can utilize the built-in feature of TikTok to create auto-captions. This will save you from the hassle of launching or accessing a professional subtitle editor. Moreover, it will also save you time and effort from creating subtitles manually. To use the built-in feature of TikTok automatic captions, check the following instructions:
Step1 Once you have captured a video on TikTok, tap the “Tick” icon from the bottom right side. This will redirect you to the editing mode.
Step2 On the editing mode, locate the “Captions” option from the right side. After tapping on it, TikTok will instantly generate the subtitles automatically. Make sure that all the captions are correctly created. Once you are done, hit the “Save” button displayed at the top right side. Afterward, you can quickly post your TikTok video with captions.
Way 2: Use Auto Captions in CapCut
CapCut and TikTok are closely related to each other as they both have the same parent company called ByteDance. Thus, using CapCut to create captions for your TikTok videos can bring high-quality results. You can easily download CapCut on Android and iOS devices without any complications. The interface of this tool is clean that allows you to generate subtitles efficiently.
The auto caption feature in CapCut enables you to produce subtitles instantly. It uses advanced algorithms that ensure high accuracy while creating subtitles. To use this advanced feature of CapCut, read the below steps:
Step1 Download and launch CapCut on your phone. To import, tap on “New Project” and select the video from your phone’s gallery. Tap on “Add” to head to the editing mode of CapCut.
Step2 Afterward, select “Text” options from which you can either choose “Auto Lyrics” or “Auto Captions.” Using the Auto Lyrics option, you can generate captions for a song automatically. On the other hand, by using the Auto Captions option, you can transcribe the voice in your video to create subtitles. From the pop-up menus, choose the sound source and language to proceed.
Step3 Once you are done adjusting the settings, hit the “Start” button. After some seconds, CapCut will create captions for your TikTok video efficiently. Afterward, you can choose video resolution and hit the “Arrow” icon to export the video.
Way 3: Add Captions to TikTok Videos Manually
If you want to create captions for TikTok briefly, you can manually add them using the instructions given below. This method is extremely simple and helpful if you want to create small captions for your TikTok videos. Moreover, you can efficiently choose the font, color, and style of your captions in this manual method:
Step1 Open your TikTok app and create a video to begin. Tap on the “Tick” icon to enter the editing mode. Select “Text” given on the bottom toolbar of your screen.
Step2 Now, choose the style for your captions from the available options. Select the color and start writing your captions carefully. Once you are done, you can save and publish your created TikTok video.
Way 4: Automatically Add Subtitles to TikTok Videos with Online Editor
There are various online editors that can create captions for TikTok videos automatically. They use the Auto Transcription feature, through which the tool can create subtitles by recognizing the voice used in a TikTok video. One of the reliable online tools that can produce auto-subtitles is Veed.io.
Veed.io is an online tool that is capable of creating TikTok automatic captions efficiently. You can easily access this online tool from your web browsers. Moreover, it supports more than 100 languages and accents that you can choose to create auto-captions. Also, you can translate your captions into different languages using this tool. To use this tool flawlessly, check the below steps:
Step1 Begin by reaching the official website of Veed.io. Go to its Tools and locate the “Auto Subtitle Generator” option. It will redirect you to another page that consists of the tool information.
Step2 Click “Get Started” and upload a video from your system. Once you are done, tap on “Subtitles” and select “Auto Subtitle” from the given options. Choose your preferred language and tap on “Create Subtitles.”
Step3 After waiting some time, you can see your auto-captions. You can choose the text color, effect, size, and alignment from the given options. Once you are satisfied with the TikTok captions, hit the “Export” button.
Part 3: How to Add Captions to Your TikTok Videos with Filmora
If you want to add further enhancements to your TikTok captions, you can use an offline tool like Wondershare Filmora . Using this platform, you can manually add captions by choosing the suitable style from the presets. Moreover, you can also add customizations to the captions through Filomora easily. You can also upload SRT files on this tool to produce TikTok captions.
Free Download For Win 7 or later(64-bit)
Free Download For macOS 10.14 or later
TikTok automatic captions can be easily generated from Filmora as it offers excellent results through its Speech-to-Text feature. Using this unique feature, you can transcribe the voice in your TikTok videos in up to 16 different languages. To use this feature conveniently, follow the below steps:
Step 1 Import the TikTok Video
Once done with launching and creating the Filmora project on your PC, hit the “Arrow” icon to import your video file on this tool. Now drag and drop the video file to the timeline in order to proceed.
Step 2 Initiate the Automatic Subtitle Feature
On your timeline, tap on the “Speech-to-Text” feature. Choose your language and video clip from the pop-up menu. Wait for some seconds, and the subtitles will be generated automatically. Double-click on the created TikTok automatic captions to open the editing settings. Here, you can select subtitles style and respective time duration. You can also add customizations efficiently.
Step 3 Export the TikTok Video
After completing all the settings, you can click on the “Export” button. Before exporting, you can choose the video resolution and file formats easily. Also, this tool gives you the facility to export the video file directly to your TikTok account.
Part 4: People Also Want to Know
1. How to add captions to TikTok?
To add TikTok captions, you can choose the manual or automatic way. TikTok has a built-in auto-generator through which you can add captions automatically. Moreover, there are different offline and online tools, such as Filmora, CapCut, and Veed.io, through which you can add captions on TikTok flawlessly.
2. How to add captions to TikTok after posting?
If you want to add TikTok captions after posting, you have to download the video on your phone first. Afterward, hit the Plus icon to re-upload the video from your gallery. Choose that particular video again and tap on the Post button. Now you can write the captions on the given space easily. Afterward, tap on the “Post” button.
Last Words
This article has shed light on various ways how to add captions on TikTok efficiently. You can add TikTok captions manually or use the auto-generator for ease. Moreover, we have also highlighted an online tool to create subtitles that can be accessed from any web browser. However, if you want a professional caption editor for a longer run, Wondershare Filmora is the best choice among other tools. It has an easy-to-use interface and achieves accurate results comfortably.
Craftsmanship Chronicles: Sewing Skills Shared with Teens and Tweens
Best Video Editor for Beginners on Windows and Mac
Wondershare Filmora is one of the most popular video editing software among TikTokers , download and have a try.
TikTok’s collaborative nature is one of its most appealing features. Your video is not finished the moment you publish it. They can be responded to, remixed, and re-shared by anybody. TikTok is meant to allow users to construct on other’s films shared on the network, whether you’re utilizing audio from some other video or making a duet.
Thanks to the stitch tool, creators may remix, remake, and reply to videos with a couple of taps. This article will tell you what you need to know about stitching videos on TikTok. Continue reading to learn more about Stitching and how to stitch on TikTok. Let’s get started!
In this article
02 How to Turn Stitch On or Off?
04 How to Stitch Any TikTok Video withFilmora Video Editor ?
05 FAQs About TikTok Video Stitch
Part 1: What is Stitch on TikTok?
TikTok’s latest video editing tool ‘Stitch,’ lets people incorporate video snippets from other people into their own. Creators may use Stitch to provide a five-second snippet from a TikTok video out of their own. Unlike duets that play videos together, stitched videos play in the sequence they were stitched. Videos containing open-ended questions have gained in popularity with the advent of the stitch.
Whenever you Stitch a clip-on TikTok, you are essentially inserting your video after yet another video that has already been submitted. People frequently utilize this to remark on or reply to other videos. And, when done well, it can add a lot more context to your movies.
The one limitation of the Stitch tool is that you may only publish up to five seconds from some other video. So, if you’re focusing on a Stitch, you must select the five seconds which are most critical to highlight your message.
Part 2: How to Turn Stitch On or Off?
By enabling the Stitch feature, you make your material available to millions of prospective collaborators. Consider the possibilities – it might be a fantastic approach to enhance reach and virility.
If you aren’t comfortable exposing your films to the whole TikTok community, users can opt out of allowing others to Stitch their work. You may modify them under the Privacy Controls. Here’s how to do a Stitch on TikTok:
Step 1: Launch the TikTok app and then head to your profile by clicking on the Profile option at the bottom right. After that, select the three dots to open the settings.
Step 2: After entering the settings, select Privacy to proceed, and then tap on the Stitch option to open the Stitch settings.
Step 3: Now, you will see three options that are No-one, Everyone, and Friends. If you want to allow the Stitching, select either Everyone or Friends. However, to restrict the people from stitching your videos, choose No-one. After you are done selecting, click on the back arrow to save the applied changes.
Part 3: How to Stitch on TikTok?
TikTok keeps giving creators more reasons to continue producing, and fans like us are more committed to continuing to open it. Stitch, a new app functionality from the famous social networking platform, makes things more straightforward than ever for artists to interact with each other.
But, you might be wondering, how to do a stitch on TikTok? Don’t worry; you’ve come to the right place. Here’s how:
Step 1: Launch TikTok and then go to the video that you want to stitch. Select the Share icon, which resembles an arrow. Select the Stitch symbol from the menu that displays, and then wait a few seconds for the video to complete. The lengthier the video is, the more the loading time.

Step 2: When it’s finished, you’ll be sent to a screen where you may take five seconds of the film and use it on your own. To navigate through the movie, use the sliders and the red bars to choose the portion you want. When you’re finished, tap Next.

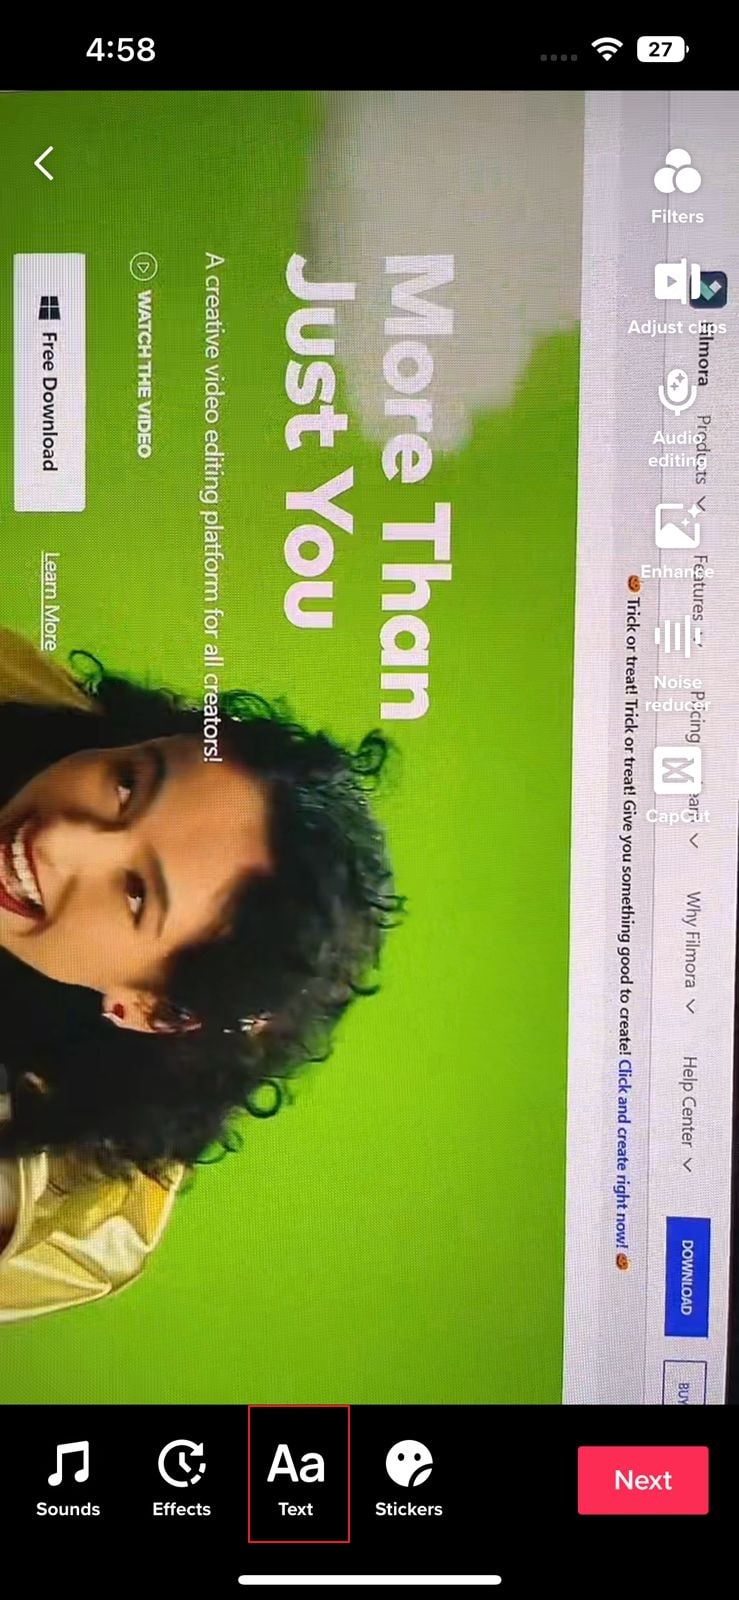
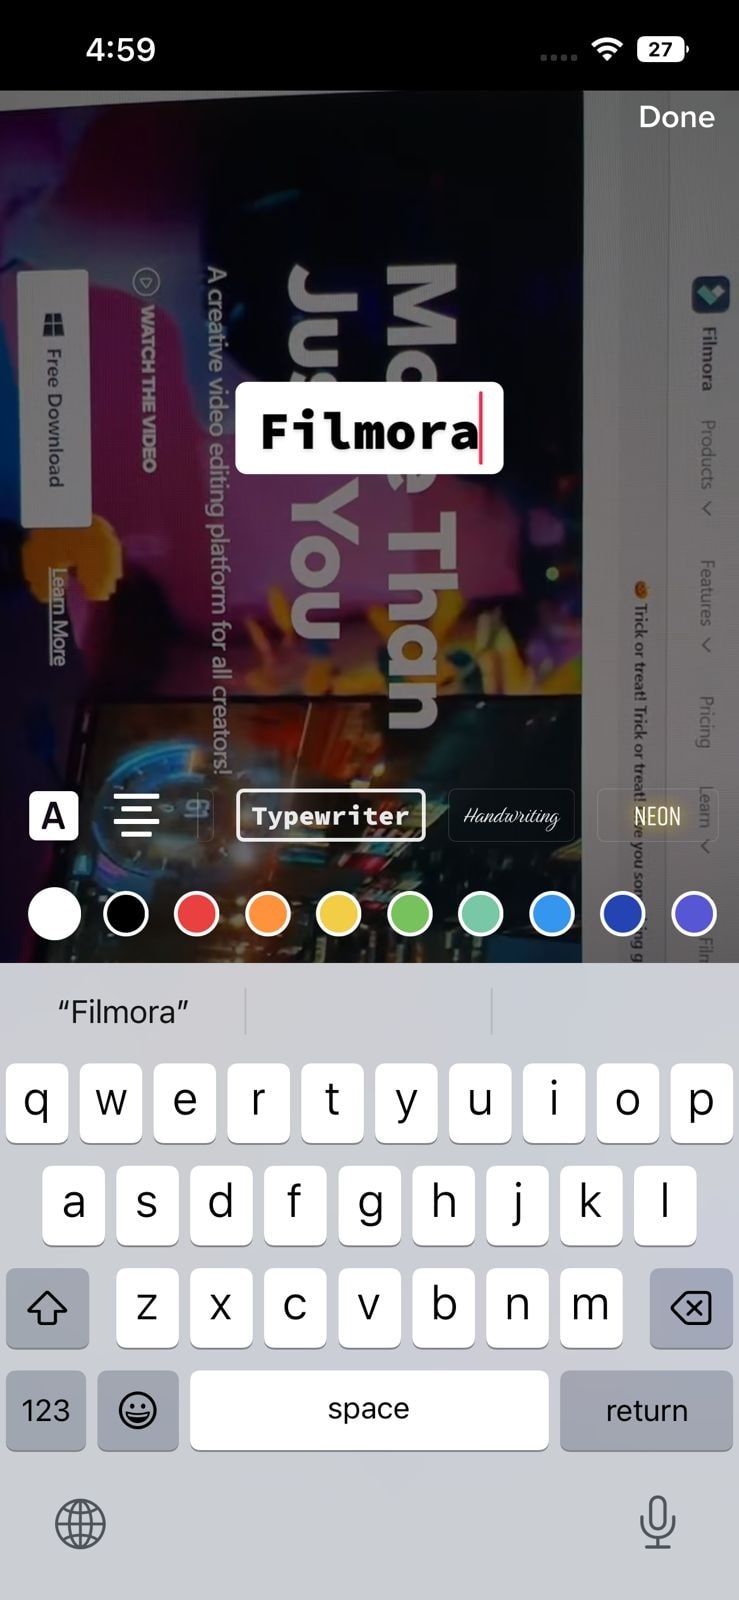
Step 3: You’ll be sent to TikTok’s normal recording screen. Record the remainder of your TikTok video with all of the features you’re accustomed to utilizing. You may use whatever effects, stickers, texts, voiceovers, or captions you desire. After that, press the Next button.

Step 4: Make a title and hashtags for your TikTok video. You could also choose whether or not these users may Stitch your movie here – hit the toggle switch beside Allow Stitch to turn it off. Following that, hit the Post option, and your stitched video will be uploaded.

Part 4: How to Stitch Any TikTok Video with Filmora Video Editor ?
Before getting started, understand why people opt for Filmora video editor for stitching videos on TikTok when this can be done through the official TikTok application. TikTok app only allows you to stitch a video for up to five seconds which is quite frustrating if you wish to stitch an entire video.
One more reason is that, with TikTok, you cannot stitch the already existing video from the camera roll, which restricts creators from adding the already edited content to the existing video. So, to avoid the above problems, Filmora is used for stitching TikTok videos.
For Win 7 or later (64-bit)
For macOS 10.12 or later
To begin, download the video that you wish to stitch with from TikTok. After, follow the below stepwise guide:
Step 1: Launch the Filmora software on your PC and import the video files by clicking on the File and then Import/Export Media. You can simply drag and drop the videos as well.
Step 2: Drag the clips from the media library to the Timeline’s video track. All video files will be stitched into a single video with no transitions.

Note: To add a transition to the video , go to the Transition tab and drop the desired transition to the junction of two clips.

Step 3: Now, preview the stitched video and, when finished, click the Export option to save numerous video segments to a single file. Choose any format from the Format tab’s list.
Part 5: FAQs About TikTok Video Stitch
1. Can you do a Stitch on TikTok with a video from your Camera Roll?
Unfortunately, you cannot utilize a video from your Camera Roll in a Stitch at the time of this writing. So, whatever your reaction to a Stitch is, you must record 100% unique footage shot with the TikTok camera. However, you may download the video first and then stitch it with some third-party software such as Filmora.
2. Can you stitch longer than 5 seconds?
No, it is not possible to stitch a video for longer than five seconds using the built-in Stitching feature of the TikTok app. But this can be done by stitching the videos using third-party applications and software.
3. How do I see TikTok stitches?
Users who want to view as many stitches as possible can do it by browsing for them on the app. You must first browse to Discover, and from there to the search box. Then type #Stitch @username, where the username is the name of the account from which you wish to view stitches.
4. TikTok Stitch option not showing. How to fix it?
Users may choose whether or not someone else can Stitch their work in their settings. The option may be found under the Settings and Privacy tab, where users can activate or uncheck Stitch for all videos. So, if the Stitch option is not showing, the user may have disabled the Stitch option.
Conclusion
The Stitch feature is an excellent way to continue the discussion with your videos. You may leave comments on popular content on the site. Most importantly, it may be a fun method to generate material different from what you usually publish. And since you know How to Stitch on TikTok after reading this article, stitch the videos today and create unique content!
TikTok’s collaborative nature is one of its most appealing features. Your video is not finished the moment you publish it. They can be responded to, remixed, and re-shared by anybody. TikTok is meant to allow users to construct on other’s films shared on the network, whether you’re utilizing audio from some other video or making a duet.
Thanks to the stitch tool, creators may remix, remake, and reply to videos with a couple of taps. This article will tell you what you need to know about stitching videos on TikTok. Continue reading to learn more about Stitching and how to stitch on TikTok. Let’s get started!
In this article
02 How to Turn Stitch On or Off?
04 How to Stitch Any TikTok Video withFilmora Video Editor ?
05 FAQs About TikTok Video Stitch
Part 1: What is Stitch on TikTok?
TikTok’s latest video editing tool ‘Stitch,’ lets people incorporate video snippets from other people into their own. Creators may use Stitch to provide a five-second snippet from a TikTok video out of their own. Unlike duets that play videos together, stitched videos play in the sequence they were stitched. Videos containing open-ended questions have gained in popularity with the advent of the stitch.
Whenever you Stitch a clip-on TikTok, you are essentially inserting your video after yet another video that has already been submitted. People frequently utilize this to remark on or reply to other videos. And, when done well, it can add a lot more context to your movies.
The one limitation of the Stitch tool is that you may only publish up to five seconds from some other video. So, if you’re focusing on a Stitch, you must select the five seconds which are most critical to highlight your message.
Part 2: How to Turn Stitch On or Off?
By enabling the Stitch feature, you make your material available to millions of prospective collaborators. Consider the possibilities – it might be a fantastic approach to enhance reach and virility.
If you aren’t comfortable exposing your films to the whole TikTok community, users can opt out of allowing others to Stitch their work. You may modify them under the Privacy Controls. Here’s how to do a Stitch on TikTok:
Step 1: Launch the TikTok app and then head to your profile by clicking on the Profile option at the bottom right. After that, select the three dots to open the settings.
Step 2: After entering the settings, select Privacy to proceed, and then tap on the Stitch option to open the Stitch settings.
Step 3: Now, you will see three options that are No-one, Everyone, and Friends. If you want to allow the Stitching, select either Everyone or Friends. However, to restrict the people from stitching your videos, choose No-one. After you are done selecting, click on the back arrow to save the applied changes.
Part 3: How to Stitch on TikTok?
TikTok keeps giving creators more reasons to continue producing, and fans like us are more committed to continuing to open it. Stitch, a new app functionality from the famous social networking platform, makes things more straightforward than ever for artists to interact with each other.
But, you might be wondering, how to do a stitch on TikTok? Don’t worry; you’ve come to the right place. Here’s how:
Step 1: Launch TikTok and then go to the video that you want to stitch. Select the Share icon, which resembles an arrow. Select the Stitch symbol from the menu that displays, and then wait a few seconds for the video to complete. The lengthier the video is, the more the loading time.
Step 2: When it’s finished, you’ll be sent to a screen where you may take five seconds of the film and use it on your own. To navigate through the movie, use the sliders and the red bars to choose the portion you want. When you’re finished, tap Next.
Step 3: You’ll be sent to TikTok’s normal recording screen. Record the remainder of your TikTok video with all of the features you’re accustomed to utilizing. You may use whatever effects, stickers, texts, voiceovers, or captions you desire. After that, press the Next button.
Step 4: Make a title and hashtags for your TikTok video. You could also choose whether or not these users may Stitch your movie here – hit the toggle switch beside Allow Stitch to turn it off. Following that, hit the Post option, and your stitched video will be uploaded.
Part 4: How to Stitch Any TikTok Video with Filmora Video Editor ?
Before getting started, understand why people opt for Filmora video editor for stitching videos on TikTok when this can be done through the official TikTok application. TikTok app only allows you to stitch a video for up to five seconds which is quite frustrating if you wish to stitch an entire video.
One more reason is that, with TikTok, you cannot stitch the already existing video from the camera roll, which restricts creators from adding the already edited content to the existing video. So, to avoid the above problems, Filmora is used for stitching TikTok videos.
For Win 7 or later (64-bit)
For macOS 10.12 or later
To begin, download the video that you wish to stitch with from TikTok. After, follow the below stepwise guide:
Step 1: Launch the Filmora software on your PC and import the video files by clicking on the File and then Import/Export Media. You can simply drag and drop the videos as well.
Step 2: Drag the clips from the media library to the Timeline’s video track. All video files will be stitched into a single video with no transitions.
Note: To add a transition to the video , go to the Transition tab and drop the desired transition to the junction of two clips.
Step 3: Now, preview the stitched video and, when finished, click the Export option to save numerous video segments to a single file. Choose any format from the Format tab’s list.
Part 5: FAQs About TikTok Video Stitch
1. Can you do a Stitch on TikTok with a video from your Camera Roll?
Unfortunately, you cannot utilize a video from your Camera Roll in a Stitch at the time of this writing. So, whatever your reaction to a Stitch is, you must record 100% unique footage shot with the TikTok camera. However, you may download the video first and then stitch it with some third-party software such as Filmora.
2. Can you stitch longer than 5 seconds?
No, it is not possible to stitch a video for longer than five seconds using the built-in Stitching feature of the TikTok app. But this can be done by stitching the videos using third-party applications and software.
3. How do I see TikTok stitches?
Users who want to view as many stitches as possible can do it by browsing for them on the app. You must first browse to Discover, and from there to the search box. Then type #Stitch @username, where the username is the name of the account from which you wish to view stitches.
4. TikTok Stitch option not showing. How to fix it?
Users may choose whether or not someone else can Stitch their work in their settings. The option may be found under the Settings and Privacy tab, where users can activate or uncheck Stitch for all videos. So, if the Stitch option is not showing, the user may have disabled the Stitch option.
Conclusion
The Stitch feature is an excellent way to continue the discussion with your videos. You may leave comments on popular content on the site. Most importantly, it may be a fun method to generate material different from what you usually publish. And since you know How to Stitch on TikTok after reading this article, stitch the videos today and create unique content!
Also read:
- [New] In 2024, Step-by-Step Process for iPhone Voice Memo Creation
- [Updated] 2024 Approved The Ultimate Hits for TikTok Stardom
- [Updated] 2024 Approved Twist & Turn the Screen Unleashing Your Inner Dancer with TikTok and MacOS
- [Updated] Crafting a Profitable Channel in Your First Youtube Steps
- [Updated] Instant Guide to a One-Time Exit TikTok's Goodbye for 2024
- [Updated] Mastering the Art of Powerful TikTok Campaigns
- [Updated] Top 30 Trending TikTok Deals for Amazon for 2024
- Effettua La Registrazione Di Contenuti Audio per Il Tuo Podcast Direttamente Da Mac Con Movavi Software
- How to Reset Xiaomi 13 Ultra Without the Home Button | Dr.fone
- In 2024, Iconic Meme Blueprints of the Year
- Mastering the Art of Restarting Windows Updates
- Scaling Up the Ordinary Giant Effects for TikToks
- The Most Useful Tips for Pokemon Go Ultra League On Motorola Razr 40 Ultra | Dr.fone
- Top Virtual Recording Tools Online
- Title: [Updated] In 2024, Innovative Text Additions 5 Advanced Caption Methods for TikTok
- Author: Brian
- Created at : 2024-10-19 00:23:13
- Updated at : 2024-10-24 09:14:06
- Link: https://tiktok-videos.techidaily.com/updated-in-2024-innovative-text-additions-5-advanced-caption-methods-for-tiktok/
- License: This work is licensed under CC BY-NC-SA 4.0.