![[Updated] In 2024, Mastering Live Participation Guesting on TikToks](https://thmb.techidaily.com/3d4f10ff7575c64862599f681c5c76c2a7860b5686d5a4ad72e83eea7dc08de2.jpg)
"[Updated] In 2024, Mastering Live Participation Guesting on TikToks"
Mastering Live Participation: Guesting on TikToks
With the immense growth of TikTok, many people like to use this social app for various purposes. For example, content creators can build their personal community on TikTok to interact with their followers. You can also conduct a question-answer session with your followers on TikTok through a live stream.
Moreover, TikTok also allows you to join someone’s live stream as a guest. Through this feature, you can join the live streaming of your friend instantly. Through this article, you can learn how to join someone’s live on TikTok quickly.
Part 1: How to Join Someone’s Live on TikTok
Is your favorite celebrity live on TikTok? If your favorite celebrity is doing a live stream on TikTok, you may want to interact with him directly. TikTok allows you to join someone’s live on TikTok quickly by sending a guest request. To learn how to join live on TikTok, follow the below steps:
Step1 Select the Live Option
Open your TikTok app on your phone to access the “Discover” page, and type “Live” on the search bar. By doing so, you can find all the live streaming easily. Now select the live stream you want to join in order to proceed.

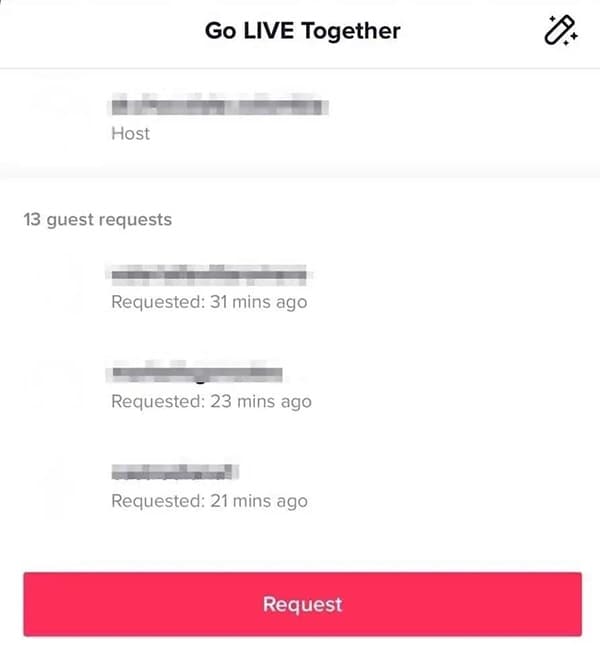
Step2 Send a Guest Request
Once you have found your desired live stream, tap on the “Pink Blue Circles” to send a guest request. Now tap on “Request” to give confirmation. By selecting this option, your guest request will be sent. After sending the guest request, wait for the host to accept it.
Part 2: How to Invite Others to Join Your Live on TikTok
Have you ever invited someone to join your live streaming on TikTok? Being a content creator or an influencer on TikTok, it’s essential to connect with your fans frequently. To communicate with your TikTok audience better, you should know how to invite others on your live stream. By inviting others, you can communicate with your fans directly.
Prerequisites of Going Live on TikTok
Before learning how to invite others on TikTok, let’s shed light on the requirements of going live on this social app. The reason is that not everyone can go for live streaming on TikTok, as there are certain restrictions you need to keep in your mind.
- To start live streaming on your TikTok, you should have at least 1000 followers.
- You should be 16 years old or above to access the live stream feature.
- To use virtual gifts during a live stream on TikTok, you should be 18 years old or above.
Steps to Invite Others to Join Your Live on TikTok Easily
Are you excited to invite your fan to your live stream on TikTok? Check the below steps to invite others to join your TikTok live:
Step1 Go to the Live Option
Open your TikTok app on your mobile phone. After opening it, tap on the “Live” option from the right side. Now you can add a title to your TikTok Live.
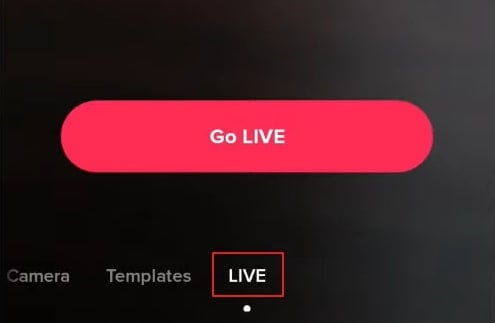
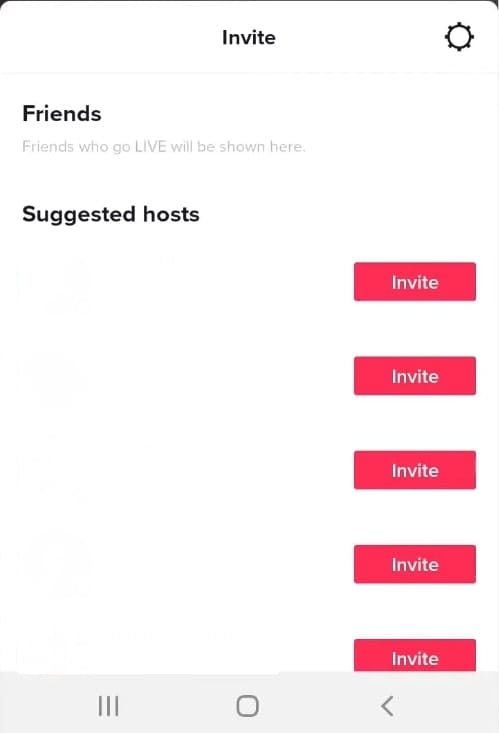
Step2 Invite your Desired User
After adding the title, tap on the “Go Live” button. Once the live streaming initiates, you have to press the “Pink Blue Circle” icon from the bottom left corner. It will open a list of the suggested users. Select the preferred user you want to invite and tap on the “Invite” button. Your selected user will have 20 seconds to accept or reject your request.

Bonus Tip: Easily Record and Edit Someone’s Stream with Filmora
Are you willing to record and edit a live stream on TikTok? If you want to efficiently screen record any live streaming session on TikTok, we highly recommend using Wondershare Filmora . This software provides a professional screen recorder that allows you to capture your desired window or screen. You can customize the settings to record a live stream in your preferred resolution. Thus, by using the screen recorder of Filmora, you can record any live streaming to access it anytime.
Free Download For Win 7 or later(64-bit)
Free Download For macOS 10.14 or later
Along with a screen recorder, Filmora also provides a video editor. If you find flaws in your recorded live stream, the editor of Filmora can help you. By using a video editor, you can enhance your recorded video by adding effects or modifying its speed. There are some advanced editing features that you can explore and use on Filmora. To learn about them, check the below points:
Key Editing Features of Wondershare Filmora
- Speech-to-Text : To increase your editing efficiency, Filmora offers a Speech-to-Text feature. This feature automatically converts your speech to subtitles. Through advanced speech recognition capabilities in this tool, you can generate subtitles in your video automatically and without any hassle. Also, this feature supports up to 16 different languages.
- Keyframing : Do you want to add a dynamic effect to your video? The keyframing feature allows you to add smooth and professional animated effects instantly. It provides 80 preset animation templates you can quickly apply to your video. Moreover, you can also modify the parameters by setting the transparency and view in every keyframe view.
- AI Portrait : Are you annoyed by the dull backgrounds in your video? Through the AI portrait feature, you can remove backgrounds from your video with great precision. This feature also offers more than 70 stickers and AI effects that you can apply. Furthermore, it also recognizes the faces in your video through AI technology. With face recognition, you can apply AI stickers easily.
Conclusion
TikTok has made a significant impact on the social media industry. Due to its high influencing power, many celebrities and famous personalities are now joining TikTok to increase their reach. If you want to invite someone to your TikTok live, this article will help you. We have also provided detailed instructions on how to join someone’s live on TikTok quickly. Also, in order to edit and screen record live streaming on TikTok, Wondershare Filmora is a highly compatible and functional tool.
The 2-Step Strategy for Stunning TikTok Reaction Videos Using Filmora
How to Make TikTok Reaction Videos Easily in 2 Ways

Shanoon Cox
Mar 27, 2024• Proven solutions
With all the videos of different moods and categories available on the platform, TikTok’s reaction is something that makes the footage more engaging. Available for both iOS and Android platforms, TikTok allows you to record, edit , and compile a video of up to 60 seconds, and apply a plethora of filters and animation effects to them along with adding relevant music to awe your audience.
Considering this, here you will learn how to make TikTok reaction videos with ease from within the app itself, and if that’s not enough, using one of the best and most efficient programs available in the market that can even allow you to add unique effects to the reactions you create.
- Part 1: How to Make React Videos on TikTok
- Part 2: How to Use Snap Filmora to Make TikTok Reaction Videos
Bonus: Create A More Attractive Video with Human Segmentation Effect
The human segmentation effect under AI Portrait allows you to isolate people from video background even without a green screen, and then you can composite it to make a reaction video easily. Watch the video tutorial below to find out more details.


Want to read the texts instead of watching videos? Check the complete guide to making a reaction video in 3 ways .
Part 1: How to React to a TikTok Video
After being equipped with all the worldly knowledge about TikTok reaction videos, you can follow the steps given below to learn how to react to the footage created by other people:
1. Tap Share and Record Your Reaction
Start TikTok, play the video you want to react on, tap the Share icon from the lower-right area, and tap the React option from the Share to menu. Tap Flip from the top-right corner of the Camera screen to switch between the front and rear camera as needed, optionally tap the Mic icon to disable or enable voice and system audio capture, drag and reposition React window according to the source footage, and tap the Record button from the bottom to start shooting your TikTok reaction. Wait while the source clip and your recording process are complete successfully before moving forward to the next step.

2. Apply Filters
Tap the Filters icon from the top-right corner, tap to pick a filter from those available at the bottom, and tap anywhere on the screen to accept the one you selected and to get back to the previous window.

3. Manage Audio
Tap the Mixer icon from the upper-right corner of the screen, drag the My Voice and Soundtrack Volume sliders to manage your voice recording and the internal audio respectively, and tap Done to save the changes once you’re through with the modifications. Back on the previous window, tap Next from the bottom-right corner.

4. Publish the Video
Tap the Who can view this video option to manage your reaction’s visibility settings (optional). Tap the Save to device toggle switch to prevent TikTok reaction from being stored on your mobile’s storage (optional). Next, tap the Post button from the bottom-right corner to publish the video to TikTok.

More creative tricks about TikTok video: Clone Yourself in TikTok
Part 2: How to Make Reaction Videos with Filmora
Even though you can make TikTok reaction videos using its own filters and audio mixing tools that work pretty well under ideal conditions, if you are a perfectionist and like precision in anything you do or create, you need a dedicated program that has been designed specifically for the purpose.
Although several such tools are available in the market and can be easily downloaded and used, the best among them is Filmora by Wondershare. Wondershare Filmora is an industry-standard production and post-production tool for both Mac and Windows PCs that the majority of users prefer over its competitors such as Adobe Premiere Pro, Final Cut Pro X, etc. This is because Filmora offers simple UI, is less resource-intensive, and is able to render the outputs significantly faster.
You can learn how to make TikTok reaction videos using Wondershare Filmora by following the steps given below:
Note: Before proceeding, make sure that you have already copied the source (and the reaction) video(s) from your smartphone to your computer.
1. Create New Project and Set Preferences
Start Wondershare Filmora on your Windows or Mac PC, go to File > New Project and click 9:16 (Portrait) from the submenu that appears.
Click Split Screen from the standard toolbar at the top, hover mouse to the screen type preset you want to use, click the + ( Add to Project ) icon that appears at the bottom-right corner of the thumbnail, and click OK from the bottom-right corner once the preset is added to the Timeline.

2. Import and Add Video(s) Preview/Timeline
Click the Media button from the standard toolbar, click anywhere inside the Media window at the upper-left corner, and when the Open box comes up, select and import the video file(s) you want to participate in the TikTok reaction. Alternatively, you can also click Record from below the standard toolbar, and choose any of the options to record your own video or voice right from within Wondershare Filmora itself.
Next, click and drag each of the imported videos to their corresponding screen sections in the Preview window in the upper-right area. Notice how the files are automatically added to the Timeline at the bottom.
3. Add Elements and Titles
Click Elements from the standard toolbar, hover mouse to the element you want to add to the reaction, click the + icon that appears at the center of the thumbnail, and reposition the element in the Timeline to match the duration with that of the reaction you are creating.

4. Export the Reaction

Click EXPORT from the top-middle section of the interface, go to the Local tab from the top of the Export box that appears next, select your preferred format from the left bar, optionally choose a destination folder from the right window, optionally click SETTINGS to fine-tune the output preferences as needed, and click EXPORT from the bottom-right corner to export the TikTok reaction. Or, you can save it in the settings perfect for iPhone or another device.
Below is a sample reaction video made with Filmora, you can do much better than that for your TikTok account:
Besides using Filmora to edit reaction videos with the split-screen presets, you can also use some other video editing software to create a reaction video . Filmora can empower your video creation with more creativity, watch the video below and download Filmora to try.
Conclusion
A TikTok reaction enables you to make the source videos more fun and entertaining. Luckily the app itself has a “React” button that helps you create TikTok reaction videos with merely a few simple taps. However, if you feel that the built-in options are not as robust as they should be, a third-party program like Wondershare Filmora is something you would definitely love to try your hands on as the software is not only easy to use, it is also lightweight, and doesn’t put any overhead on your computer hardware.
Shanoon Cox
Shanoon Cox is a writer and a lover of all things video.
Follow @Shanoon Cox
Shanoon Cox
Mar 27, 2024• Proven solutions
With all the videos of different moods and categories available on the platform, TikTok’s reaction is something that makes the footage more engaging. Available for both iOS and Android platforms, TikTok allows you to record, edit , and compile a video of up to 60 seconds, and apply a plethora of filters and animation effects to them along with adding relevant music to awe your audience.
Considering this, here you will learn how to make TikTok reaction videos with ease from within the app itself, and if that’s not enough, using one of the best and most efficient programs available in the market that can even allow you to add unique effects to the reactions you create.
- Part 1: How to Make React Videos on TikTok
- Part 2: How to Use Snap Filmora to Make TikTok Reaction Videos
Bonus: Create A More Attractive Video with Human Segmentation Effect
The human segmentation effect under AI Portrait allows you to isolate people from video background even without a green screen, and then you can composite it to make a reaction video easily. Watch the video tutorial below to find out more details.
Want to read the texts instead of watching videos? Check the complete guide to making a reaction video in 3 ways .
Part 1: How to React to a TikTok Video
After being equipped with all the worldly knowledge about TikTok reaction videos, you can follow the steps given below to learn how to react to the footage created by other people:
1. Tap Share and Record Your Reaction
Start TikTok, play the video you want to react on, tap the Share icon from the lower-right area, and tap the React option from the Share to menu. Tap Flip from the top-right corner of the Camera screen to switch between the front and rear camera as needed, optionally tap the Mic icon to disable or enable voice and system audio capture, drag and reposition React window according to the source footage, and tap the Record button from the bottom to start shooting your TikTok reaction. Wait while the source clip and your recording process are complete successfully before moving forward to the next step.
2. Apply Filters
Tap the Filters icon from the top-right corner, tap to pick a filter from those available at the bottom, and tap anywhere on the screen to accept the one you selected and to get back to the previous window.
3. Manage Audio
Tap the Mixer icon from the upper-right corner of the screen, drag the My Voice and Soundtrack Volume sliders to manage your voice recording and the internal audio respectively, and tap Done to save the changes once you’re through with the modifications. Back on the previous window, tap Next from the bottom-right corner.
4. Publish the Video
Tap the Who can view this video option to manage your reaction’s visibility settings (optional). Tap the Save to device toggle switch to prevent TikTok reaction from being stored on your mobile’s storage (optional). Next, tap the Post button from the bottom-right corner to publish the video to TikTok.
More creative tricks about TikTok video: Clone Yourself in TikTok
Part 2: How to Make Reaction Videos with Filmora
Even though you can make TikTok reaction videos using its own filters and audio mixing tools that work pretty well under ideal conditions, if you are a perfectionist and like precision in anything you do or create, you need a dedicated program that has been designed specifically for the purpose.
Although several such tools are available in the market and can be easily downloaded and used, the best among them is Filmora by Wondershare. Wondershare Filmora is an industry-standard production and post-production tool for both Mac and Windows PCs that the majority of users prefer over its competitors such as Adobe Premiere Pro, Final Cut Pro X, etc. This is because Filmora offers simple UI, is less resource-intensive, and is able to render the outputs significantly faster.
You can learn how to make TikTok reaction videos using Wondershare Filmora by following the steps given below:
Note: Before proceeding, make sure that you have already copied the source (and the reaction) video(s) from your smartphone to your computer.
1. Create New Project and Set Preferences
Start Wondershare Filmora on your Windows or Mac PC, go to File > New Project and click 9:16 (Portrait) from the submenu that appears.
Click Split Screen from the standard toolbar at the top, hover mouse to the screen type preset you want to use, click the + ( Add to Project ) icon that appears at the bottom-right corner of the thumbnail, and click OK from the bottom-right corner once the preset is added to the Timeline.
2. Import and Add Video(s) Preview/Timeline
Click the Media button from the standard toolbar, click anywhere inside the Media window at the upper-left corner, and when the Open box comes up, select and import the video file(s) you want to participate in the TikTok reaction. Alternatively, you can also click Record from below the standard toolbar, and choose any of the options to record your own video or voice right from within Wondershare Filmora itself.
Next, click and drag each of the imported videos to their corresponding screen sections in the Preview window in the upper-right area. Notice how the files are automatically added to the Timeline at the bottom.
3. Add Elements and Titles
Click Elements from the standard toolbar, hover mouse to the element you want to add to the reaction, click the + icon that appears at the center of the thumbnail, and reposition the element in the Timeline to match the duration with that of the reaction you are creating.
4. Export the Reaction
Click EXPORT from the top-middle section of the interface, go to the Local tab from the top of the Export box that appears next, select your preferred format from the left bar, optionally choose a destination folder from the right window, optionally click SETTINGS to fine-tune the output preferences as needed, and click EXPORT from the bottom-right corner to export the TikTok reaction. Or, you can save it in the settings perfect for iPhone or another device.
Below is a sample reaction video made with Filmora, you can do much better than that for your TikTok account:
Besides using Filmora to edit reaction videos with the split-screen presets, you can also use some other video editing software to create a reaction video . Filmora can empower your video creation with more creativity, watch the video below and download Filmora to try.
Conclusion
A TikTok reaction enables you to make the source videos more fun and entertaining. Luckily the app itself has a “React” button that helps you create TikTok reaction videos with merely a few simple taps. However, if you feel that the built-in options are not as robust as they should be, a third-party program like Wondershare Filmora is something you would definitely love to try your hands on as the software is not only easy to use, it is also lightweight, and doesn’t put any overhead on your computer hardware.
Shanoon Cox
Shanoon Cox is a writer and a lover of all things video.
Follow @Shanoon Cox
Also read:
- [New] 2024 Approved Celebrating TikTok Raps with Cultural Impact
- [New] Download Facebook Videos Swiftly Discover the Top 10 Android Downloader Tools for 2024
- [New] Revolutionize Your Content A Step-by-Step Guide to TikTok's Audio Amplification for 2024
- [Updated] In 2024, 20 Best TikTok Caption Ideas to Engage Your Next Audience
- [Updated] In 2024, Master the Art of Influence with Trending TikTok Hashes
- 3 Things You Must Know about Fake Snapchat Location On Gionee F3 Pro | Dr.fone
- Achieve Ultimate Latency Control: Troubleshoot & Enhance Valheim FPS on Windows Machines
- Effortless AAC Audio Conversion From OGG Online at No Cost - Movavi's Expert Solution
- From Zero to Hero Mastering Memes in KineMaster for 2024
- GPT Clashes with HuggingChat: The Outcome
- In 2024, A Perfect Guide To Remove or Disable Google Smart Lock On Samsung Galaxy S23
- Stuck at Android System Recovery Of Infinix Hot 40i ? Fix It Easily | Dr.fone
- Updated DVR Showdown TiVo Takes on Comcast for 2024
- Title: [Updated] In 2024, Mastering Live Participation Guesting on TikToks
- Author: Brian
- Created at : 2024-10-11 17:04:24
- Updated at : 2024-10-18 16:34:28
- Link: https://tiktok-videos.techidaily.com/updated-in-2024-mastering-live-participation-guesting-on-tiktoks/
- License: This work is licensed under CC BY-NC-SA 4.0.