
!["[Updated] In 2024, Precision Production Isolating Essence in Recording"](https://www.lifewire.com/thmb/is_QRfsRnBQKZynxD2-d55bno7Q=/400x300/filters:no_upscale():max_bytes(150000):strip_icc()/Home-Theater-Receiver-vs-Stereo-Receiver-96bcb20d215048b9b6725209d36d5112.jpg)
"[Updated] In 2024, Precision Production Isolating Essence in Recording"
Precision Production: Isolating Essence in Recording
The most frequent request you’ll get from video makers is to eliminate irritating noises like rumbling or humming from an original clip. Almost all of the time, capturing high-quality audio during filming is challenging since the conversation is often hard to hear or is made unclear due to surrounding noises, such as the dreadful air conditioners or fans.
To get rid of all these awful noises, this Audacity Noise Reduction feature will serve you a significant purpose in removing unwanted background noise for your future videos. Without further ado, let’s get started!
In this article
01 Things You Need to Prepare for Background Noise Reduction
02 How to Remove Background Noise in Audacity?
03 Why is Audacity Noise Reduction Not Working?
04 How to Prevent Background Noise in Audio Recording?
05 How to Remove Background Noise in Filmora?
Part 1: Things You Need to Prepare for Background Noise Reduction
Here are few things that you need to consider before you apply the noise reduction to your clips:
1. Noise Sample
A decent sample of the noise you wish to eliminate is perhaps the most crucial aspect of the Audacity remove noise procedure.
This will be used by Audacity to understand the noise and build a noise profile. The noise recording should last for a fair amount of time and be devoid of any other noises.
2. Avoid Copy Pasting Tiny Noise Section in Your Spoken Phrases
When you have a tiny part of noise between your stated words on your audio, please don’t copy/paste it to make a more significant piece of sound for Audacity to examine.
You would not be supplying Audacity with any more information that will help it generate a decent noise profile. The noise profile is what enables Audacity to tell the difference between speech and noise.
3. Minimum 2048 Data Samples Required
To build a noise profile, the Noise Reduction function requires a minimum of 2048 sample data. An audio file with a sampling frequency of 44.1kHz is roughly five hundredths of a second.
Note that this is the minor sound level that Audacity needs to generate a noise profile; however, should you supply a larger sample of the noise, Audacity can typically perform a great job of producing a suitable noise profile. As a result, attempt to capture a few seconds of background noises wherever possible.
4. Establish Recording Level and Record “Silence”
Setting your audio volume and capturing some “quiet” prior to speaking is the best way to achieve this. Instead, when you’ve finished talking, keep your camera/recorder going for a few moments.
Don’t move or create any sounds while capturing the background noises, and keep an ear open for any other noises. You only need to capture the ambient noise for a few moments; two to five seconds will suffice.
Part 2: How to Remove Background Noise in Audacity on Windows and Mac?
Whether you are using Windows or macOS, we will show you a step-by-step process to achieve your results using both software in this part of Audacity remove background music guide.
Remove background noise in Audacity on Windows
Step 1: On your recording, select a few moments of sound. Any segment of noise that incorporates other noises should be avoided.

Step 2: From the Effect menu, select Noise Reduction.

Step 3: Select the Get Noise Profile option whenever the Noise Reduction effect screen appears.

Note: Choose whether to implement the noise removal to the entire waveforms or only a portion of it.
Step 4: To access the Noise Reduction effects window, go to Effects > Noise Reduction. Raise the level of noise reduction progressively while previewing the result.

Step 5: Head over to the File section to Export and Save the result. Audacity does not save sound clips when you select Save Project; instead, you must choose Export. Select the file type you want to store and the place wherever you can save it. Select Save after giving the File Name.

Remove background noise in Audacity on Mac
Step 1: Create a room tone-containing audio file. When you don’t have a separate track for room tone, use a recording with a few moments of quiet in it. Click-and-drag to select a segment with a few minutes of silence using the Selection Tool.

Step 2: Select Noise Reduction from the Effects tab. Select the Get Noise Profile tab in the new tab under Step 1. The screen will shut, and Audacity will take noise profile samples of the indicated area.

Step 3: Click-and-drag to select the whole file, which requires noise reduction with the Selection Tool. To re-open the function, go to the Effect tab and pick Noise Reduction. Make modifications to the following parameters under Step 2:
- Reduce and Residue
- Frequency Smoothing (bands)
- Sensitivity
- Noise Reduction

Step 4: To listen to how the chosen file will look with the selected parameters, select Preview. Re-adjust until you have a sound noise reduction with no interference. When you’re finished, select Reduce and click OK.
Part 3: Why is Audacity Noise Reduction Not Working?
It’s possible that the Noise Reduction function isn’t letting you mop up your recording since your audio isn’t appropriate for it. The disturbance must be continuous, not random or fluctuating, to work for Audacity’s Noise Reduction function.
For example, the Noise Reduction function will not assist if your audio was made in a busy environment with unique noises such as background chatter, random traffic noises, or in an exhibition space or museum. The Noise Reduction feature in Audacity isn’t meant to cope with that kind of distortion. You’ll need to alter your recording approach if you’re capturing voice in either of those situations.
Under the following situations, the Audacity Noise Reduction function might underperform.
- Particular noise in the background, including traffic or people.
- When the harmonics of the sound and voice are comparable.
- There is sound variance where there is fluctuation in the noise.
- The volume of the voice is comparable to or lower than that of the background noise.
- When the noise is irregular or changeable rather than continuous.
- The loudness is deafening.
- The sound is a single click or pop.
Part 4: How to Prevent Background Noise in Audio Recording?
Although Audacity allows eliminating noise very simply, it is still an additional level that takes time to refine your podcast production. These pointers can help you avoid the necessity for noise reduction and cut down on the amount of time you spend processing.
1. Reduce the Computer Fan Noise
Whenever computers become too heated, they can produce a lot of noise. You may limit the amount of software that runs and position your mic away from the keyboard to help lessen this impact and avoid the fan from coming on.
However, even if you observe all of these guidelines, undesired recording sounds may still appear in your program. Fortunately, contemporary software makes this problem quite simple to resolve.
2. Reduce the Gain and Get Close to the Mic
Reduce the gain (sensitivity of the microphone) and go nearer to it. Talking straight into the microphone won’t distort your audio if you reduce the gain, and that would assist your microphone in concentrating on scooping up your voice’s tone.
Bonus Tip: Set your recorder’s (or DAW’s) sensitivity such that your speech peaks between -12 and -10db.
3. Utilize a Versatile Microphone
Condenser and dynamic microphones are the two most common types of podcast microphones. Condenser microphones are significantly more sensitive instruments meant to take up average atmospheric noise, whereas dynamic microphones have a narrower frequency range, picking up fewer ambient noises.
4. Optimize Your Recording Environment
The most significant and most crucial aspect of your podcasts’ sound quality is where you capture it. To optimize your personal podcasting space, we recommend choosing a peaceful, compact area away from HVAC systems, vehicles, external hard drives, background sound, motors, and other distractions. You may also increase the tone of your room by using natural sound absorbents such as curtains, rugs, carpets, and sofas.
Part 5: How to Remove Background Noise in Filmora?
Although there is a lot of software available to eliminate ambient noise, we highly suggest Wondershare Filmora Video Editor to edit audio and video in one place.
In addition to the standard audio editing capabilities, the recently redesigned Filmora currently includes enhanced waveforms, volume Keyframing , peak metering, and audio transitions, giving you a better audio editing interface.
For Win 7 or later (64-bit)
For macOS 10.12 or later
Filmora Video Editor will quickly remove ambient sound from both sound/video. You may also remove the sound from the video with this simple video editor, use the Audio Equalizer or Audio Mixer functions to modify the audio further, and then Export and save the audio in an Mp3 file. Here are the detailed steps:
Step 1: In the Wondershare Filmora Timeline menu, Import your footage. Trim the footage after previewing it and deleting the sections you don’t want to retain.

Step 2: To eliminate the ambient noise immediately, double-click on the video file, and go to the Audio panel to select the Remove Background Noise option. You will find that the background noise is removed automatically.

Step 3: After checking the results, select Export to download the noise-reduced clip to your desktop or upload it immediately to YouTube or Vimeo.

Conclusion
Well, there you have it. In this Audacity Remove Background Noise guide, we have reviewed every possible method you can adopt to get rid of the unnecessary background noise in the Audacity. And if the desired results are still not achieved, we highly recommend using the Wondershare Filmora editing software. Not only will it help you remove the unwanted ambient noise, but it will also allow you to customize your audio or video file further.
02 How to Remove Background Noise in Audacity?
03 Why is Audacity Noise Reduction Not Working?
04 How to Prevent Background Noise in Audio Recording?
05 How to Remove Background Noise in Filmora?
Part 1: Things You Need to Prepare for Background Noise Reduction
Here are few things that you need to consider before you apply the noise reduction to your clips:
1. Noise Sample
A decent sample of the noise you wish to eliminate is perhaps the most crucial aspect of the Audacity remove noise procedure.
This will be used by Audacity to understand the noise and build a noise profile. The noise recording should last for a fair amount of time and be devoid of any other noises.
2. Avoid Copy Pasting Tiny Noise Section in Your Spoken Phrases
When you have a tiny part of noise between your stated words on your audio, please don’t copy/paste it to make a more significant piece of sound for Audacity to examine.
You would not be supplying Audacity with any more information that will help it generate a decent noise profile. The noise profile is what enables Audacity to tell the difference between speech and noise.
3. Minimum 2048 Data Samples Required
To build a noise profile, the Noise Reduction function requires a minimum of 2048 sample data. An audio file with a sampling frequency of 44.1kHz is roughly five hundredths of a second.
Note that this is the minor sound level that Audacity needs to generate a noise profile; however, should you supply a larger sample of the noise, Audacity can typically perform a great job of producing a suitable noise profile. As a result, attempt to capture a few seconds of background noises wherever possible.
4. Establish Recording Level and Record “Silence”
Setting your audio volume and capturing some “quiet” prior to speaking is the best way to achieve this. Instead, when you’ve finished talking, keep your camera/recorder going for a few moments.
Don’t move or create any sounds while capturing the background noises, and keep an ear open for any other noises. You only need to capture the ambient noise for a few moments; two to five seconds will suffice.
Part 2: How to Remove Background Noise in Audacity on Windows and Mac?
Whether you are using Windows or macOS, we will show you a step-by-step process to achieve your results using both software in this part of Audacity remove background music guide.
Remove background noise in Audacity on Windows
Step 1: On your recording, select a few moments of sound. Any segment of noise that incorporates other noises should be avoided.
Step 2: From the Effect menu, select Noise Reduction.
Step 3: Select the Get Noise Profile option whenever the Noise Reduction effect screen appears.
Note: Choose whether to implement the noise removal to the entire waveforms or only a portion of it.
Step 4: To access the Noise Reduction effects window, go to Effects > Noise Reduction. Raise the level of noise reduction progressively while previewing the result.
Step 5: Head over to the File section to Export and Save the result. Audacity does not save sound clips when you select Save Project; instead, you must choose Export. Select the file type you want to store and the place wherever you can save it. Select Save after giving the File Name.
Remove background noise in Audacity on Mac
Step 1: Create a room tone-containing audio file. When you don’t have a separate track for room tone, use a recording with a few moments of quiet in it. Click-and-drag to select a segment with a few minutes of silence using the Selection Tool.
Step 2: Select Noise Reduction from the Effects tab. Select the Get Noise Profile tab in the new tab under Step 1. The screen will shut, and Audacity will take noise profile samples of the indicated area.
Step 3: Click-and-drag to select the whole file, which requires noise reduction with the Selection Tool. To re-open the function, go to the Effect tab and pick Noise Reduction. Make modifications to the following parameters under Step 2:
- Reduce and Residue
- Frequency Smoothing (bands)
- Sensitivity
- Noise Reduction
Step 4: To listen to how the chosen file will look with the selected parameters, select Preview. Re-adjust until you have a sound noise reduction with no interference. When you’re finished, select Reduce and click OK.
Part 3: Why is Audacity Noise Reduction Not Working?
It’s possible that the Noise Reduction function isn’t letting you mop up your recording since your audio isn’t appropriate for it. The disturbance must be continuous, not random or fluctuating, to work for Audacity’s Noise Reduction function.
For example, the Noise Reduction function will not assist if your audio was made in a busy environment with unique noises such as background chatter, random traffic noises, or in an exhibition space or museum. The Noise Reduction feature in Audacity isn’t meant to cope with that kind of distortion. You’ll need to alter your recording approach if you’re capturing voice in either of those situations.
Under the following situations, the Audacity Noise Reduction function might underperform.
- Particular noise in the background, including traffic or people.
- When the harmonics of the sound and voice are comparable.
- There is sound variance where there is fluctuation in the noise.
- The volume of the voice is comparable to or lower than that of the background noise.
- When the noise is irregular or changeable rather than continuous.
- The loudness is deafening.
- The sound is a single click or pop.
Part 4: How to Prevent Background Noise in Audio Recording?
Although Audacity allows eliminating noise very simply, it is still an additional level that takes time to refine your podcast production. These pointers can help you avoid the necessity for noise reduction and cut down on the amount of time you spend processing.
1. Reduce the Computer Fan Noise
Whenever computers become too heated, they can produce a lot of noise. You may limit the amount of software that runs and position your mic away from the keyboard to help lessen this impact and avoid the fan from coming on.
However, even if you observe all of these guidelines, undesired recording sounds may still appear in your program. Fortunately, contemporary software makes this problem quite simple to resolve.
2. Reduce the Gain and Get Close to the Mic
Reduce the gain (sensitivity of the microphone) and go nearer to it. Talking straight into the microphone won’t distort your audio if you reduce the gain, and that would assist your microphone in concentrating on scooping up your voice’s tone.
Bonus Tip: Set your recorder’s (or DAW’s) sensitivity such that your speech peaks between -12 and -10db.
3. Utilize a Versatile Microphone
Condenser and dynamic microphones are the two most common types of podcast microphones. Condenser microphones are significantly more sensitive instruments meant to take up average atmospheric noise, whereas dynamic microphones have a narrower frequency range, picking up fewer ambient noises.
4. Optimize Your Recording Environment
The most significant and most crucial aspect of your podcasts’ sound quality is where you capture it. To optimize your personal podcasting space, we recommend choosing a peaceful, compact area away from HVAC systems, vehicles, external hard drives, background sound, motors, and other distractions. You may also increase the tone of your room by using natural sound absorbents such as curtains, rugs, carpets, and sofas.
Part 5: How to Remove Background Noise in Filmora?
Although there is a lot of software available to eliminate ambient noise, we highly suggest Wondershare Filmora Video Editor to edit audio and video in one place.
In addition to the standard audio editing capabilities, the recently redesigned Filmora currently includes enhanced waveforms, volume Keyframing , peak metering, and audio transitions, giving you a better audio editing interface.
For Win 7 or later (64-bit)
For macOS 10.12 or later
Filmora Video Editor will quickly remove ambient sound from both sound/video. You may also remove the sound from the video with this simple video editor, use the Audio Equalizer or Audio Mixer functions to modify the audio further, and then Export and save the audio in an Mp3 file. Here are the detailed steps:
Step 1: In the Wondershare Filmora Timeline menu, Import your footage. Trim the footage after previewing it and deleting the sections you don’t want to retain.
Step 2: To eliminate the ambient noise immediately, double-click on the video file, and go to the Audio panel to select the Remove Background Noise option. You will find that the background noise is removed automatically.
Step 3: After checking the results, select Export to download the noise-reduced clip to your desktop or upload it immediately to YouTube or Vimeo.
Conclusion
Well, there you have it. In this Audacity Remove Background Noise guide, we have reviewed every possible method you can adopt to get rid of the unnecessary background noise in the Audacity. And if the desired results are still not achieved, we highly recommend using the Wondershare Filmora editing software. Not only will it help you remove the unwanted ambient noise, but it will also allow you to customize your audio or video file further.
The Prime Selection of Tools for TikTok GIF Creation
Versatile Video Editor - Wondershare Filmora
An easy yet powerful editor
Numerous effects to choose from
Detailed tutorials provided by official channel
There are lots of creativity required in maximizing existing content from TikTok videos. However, if you want to convert TikTok videos to funny memes, you can convert short videos into GIFs. Converting TikTok to GIF allows users to capture funny video moments.
In other words, Brands can quickly gain colossal gain and popularity while converting TikTok videos to GIFs and creating digital assets while saving time in creating content. Thus, this article will provide you with an ultimate guide in converting TikTok videos to GIFs within the TikTok app and using the best TikTok GIF makers.
In this article
02 How to Use TikTok Default GIF Converter
03 Top 5 TikTok to GIF Converters! [Include How-to Guides]
04 How to Turn TikTok Videos into GIFs with Ease?
Part 1: What does TikTok GIF Mean?
GIF means “Graphics Interchange Format” For TikTok and other social media platforms and is referred to as a short animated picture without any sound and is typically used as memes to portray a reaction or an emotion. TikTok allows you to share videos with other users outside of the application as GIFs instead of a video clip, and most times, these GIFs can be helpful in memes. And can be effective by using the TikTok GIF maker either through the default TikTok GIF maker or a GIF third-party application.
Part 2: How to Use TikTok Default GIF Converter
The default method of converting TikTok to GIF is an in-built application that is very quick and simple and does not require any additional program or tool, but quickly with the use of your smartphone. Let’s try to understand the process through the following steps guidelines:
Step 1: Launch TikTok App
Open the TikTok app on your phone and the video you want to use to create the GIF.
Step 2: Select Video to Share
On the chosen video, click on the Share button located at the top right corner, and a pop-up window will open from where you can select the application symbol to which you want to share the animation.
Step 3: Share as GIF
Click on the other symbol and choose the ‘Share as GIF’ option to select the more sharing options. Your video will get automatically shared as GIF to your desired application.
There are certain limitations while using the default GIF converter, such as:
- Text adding option not provided
- Inability to add stickers, transition, and effects to create TikTok funny GIF
- No chance to select the quality of the file and other file parameters
- No option to choose the part of the video you want to create a GIF
Part 3: Top 5 TikTok to GIF Converters! [Include How-to Guides]
You can also use other browser-based or application tools for converting TikTok to GIF. This tool is available for users looking for a free and simple method to do this quickly. Below is a list of five (5) popular tools in the category:
1.TTDownloader
TTDownloader is a simple to use online browser-based tool that allows you to create a GIF between 1 to 10 seconds long using your videos on TikTok. It has a simple-to-use interface to enter the video URL, and the program automatically processes your file. The GIF created will be available for local download. The downside of this online tool is that there is no option for editing or customization. Follow the steps to learn the process.
Step 1: Copy the link to the video on TikTok that you want to convert and paste it into the input box on the GIF converter page.
Step 2: Tap on the get video button, and the conversion process starts automatically.
Step 3: Lastly, when the process stops, tap on the download button to save the GIF on your library or device.
3.GifRun

GifRun is a simple browser-based online tool used to create GIFs from TikTok and several other websites’ videos. Using this program, you can create GIFs between 1 to 10 seconds, and there is an option to add to the text and choose the resolution. This program also allows you to preview the created heads before processing them. So, move ahead to know how to change the Tiktok video to GIF:
Step 1: Copy and paste the TikTok video link that you want to convert in the input box on the gif converter page
Step 2: Click on the get video button, and the conversion process restarts automatically, then customize the GiF according to your need.
Step 3: Click on the download button to save the GIF on your device.
4.MiniToolMovieMaker
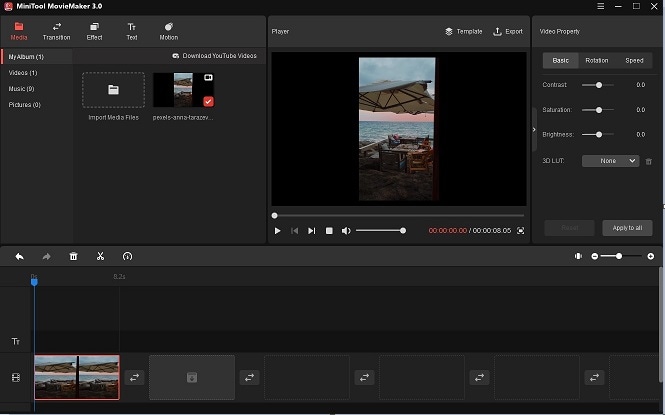
With this tool, you can convert tiptoe to GIF on a desktop. This tool also allows you to create gifs from a group of photos or videos with editing tools like trim GIF, cut GIF, rotate gif, and even reverse GIF. You can also add text and apply filters using these tools. There is a step-by-step guide on how to use Minitool moviemaker.
Step 1: Download, install and launch the application
Step 2: Import the TikTok video downloaded to make the GIF and add it to the timeline
Step 3: Edit the clip and add the text over it
Step 4: Export the clip and select gif as the output format. The clip starts converting the TikTok video to GIF.
5.FlexClip
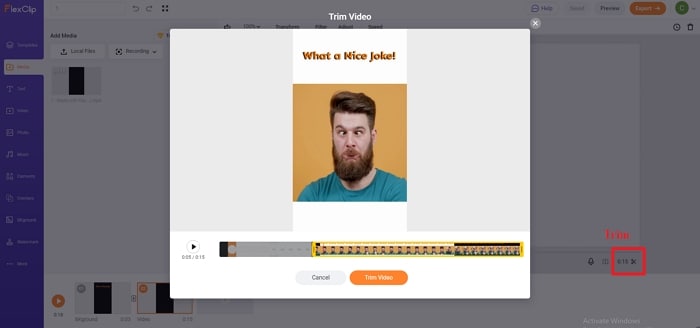
This is perfect for converting some part of the TikTok video. Here is a step-by-step guide on how you can use this tool:
Step 1: Download the TikTok video that you want to convert to GIF.
Step 2: On the timeline, click on the edit a video button to make necessary changes such as trim, etc.
Step 3: When you are satisfied with the results, you can download the video as a GIF and save it on your device.
Part 4: How to Turn TikTok Video into GIF with Ease?
With Filmora Meme Maker, you can convert TikTok videos to GIFs online without registration and watermark. All you need to do is to copy the URL of the TikTok video and paste it on the input panel in the Filmora timeline, then click on upload.
You can convert TikTok videos into GIF images easily and quickly using Filmora software. Filmora has a built-in online video trimmer in the editing interface, making it convenient for those who want to cut out on the desired frame when creating your GIF from TikTok video. Below is a step-by-step guide on how to convert TikTok to GIF using the Wondershare Filmora Meme maker:
Step 1: Open Filmora Meme Maker online
Visit the online Filmora meme maker and either drag and drop the TikTok video or paste the TikTok URL link on the Filmora timeline.
Step 2: Customize video/meme
From the editor page, customize or edit the video.

Step 3: Create and Export
Once done with all the editing parts, press the Create button, and then you can download the meme/GIF to share at your desired platform with ease.
Conclusion
Above, we have discussed the TikTok GIF’s meaning and explained five ways of converting TikTok to GIF. Each of these methods has its advantages and disadvantages, and the default method is simple to use but has no customization options. Other online options may be free and straightforward, but they may lack customization or limited customization options. The Filmora meme maker supports a wide range of functions. The Filmora meme maker will assist you in creating high-quality GIFs animations that you can download to your device library.
There are lots of creativity required in maximizing existing content from TikTok videos. However, if you want to convert TikTok videos to funny memes, you can convert short videos into GIFs. Converting TikTok to GIF allows users to capture funny video moments.
In other words, Brands can quickly gain colossal gain and popularity while converting TikTok videos to GIFs and creating digital assets while saving time in creating content. Thus, this article will provide you with an ultimate guide in converting TikTok videos to GIFs within the TikTok app and using the best TikTok GIF makers.
In this article
02 How to Use TikTok Default GIF Converter
03 Top 5 TikTok to GIF Converters! [Include How-to Guides]
04 How to Turn TikTok Videos into GIFs with Ease?
Part 1: What does TikTok GIF Mean?
GIF means “Graphics Interchange Format” For TikTok and other social media platforms and is referred to as a short animated picture without any sound and is typically used as memes to portray a reaction or an emotion. TikTok allows you to share videos with other users outside of the application as GIFs instead of a video clip, and most times, these GIFs can be helpful in memes. And can be effective by using the TikTok GIF maker either through the default TikTok GIF maker or a GIF third-party application.
Part 2: How to Use TikTok Default GIF Converter
The default method of converting TikTok to GIF is an in-built application that is very quick and simple and does not require any additional program or tool, but quickly with the use of your smartphone. Let’s try to understand the process through the following steps guidelines:
Step 1: Launch TikTok App
Open the TikTok app on your phone and the video you want to use to create the GIF.
Step 2: Select Video to Share
On the chosen video, click on the Share button located at the top right corner, and a pop-up window will open from where you can select the application symbol to which you want to share the animation.
Step 3: Share as GIF
Click on the other symbol and choose the ‘Share as GIF’ option to select the more sharing options. Your video will get automatically shared as GIF to your desired application.
There are certain limitations while using the default GIF converter, such as:
- Text adding option not provided
- Inability to add stickers, transition, and effects to create TikTok funny GIF
- No chance to select the quality of the file and other file parameters
- No option to choose the part of the video you want to create a GIF
Part 3: Top 5 TikTok to GIF Converters! [Include How-to Guides]
You can also use other browser-based or application tools for converting TikTok to GIF. This tool is available for users looking for a free and simple method to do this quickly. Below is a list of five (5) popular tools in the category:
1.TTDownloader
TTDownloader is a simple to use online browser-based tool that allows you to create a GIF between 1 to 10 seconds long using your videos on TikTok. It has a simple-to-use interface to enter the video URL, and the program automatically processes your file. The GIF created will be available for local download. The downside of this online tool is that there is no option for editing or customization. Follow the steps to learn the process.
Step 1: Copy the link to the video on TikTok that you want to convert and paste it into the input box on the GIF converter page.
Step 2: Tap on the get video button, and the conversion process starts automatically.
Step 3: Lastly, when the process stops, tap on the download button to save the GIF on your library or device.
3.GifRun
GifRun is a simple browser-based online tool used to create GIFs from TikTok and several other websites’ videos. Using this program, you can create GIFs between 1 to 10 seconds, and there is an option to add to the text and choose the resolution. This program also allows you to preview the created heads before processing them. So, move ahead to know how to change the Tiktok video to GIF:
Step 1: Copy and paste the TikTok video link that you want to convert in the input box on the gif converter page
Step 2: Click on the get video button, and the conversion process restarts automatically, then customize the GiF according to your need.
Step 3: Click on the download button to save the GIF on your device.
4.MiniToolMovieMaker
With this tool, you can convert tiptoe to GIF on a desktop. This tool also allows you to create gifs from a group of photos or videos with editing tools like trim GIF, cut GIF, rotate gif, and even reverse GIF. You can also add text and apply filters using these tools. There is a step-by-step guide on how to use Minitool moviemaker.
Step 1: Download, install and launch the application
Step 2: Import the TikTok video downloaded to make the GIF and add it to the timeline
Step 3: Edit the clip and add the text over it
Step 4: Export the clip and select gif as the output format. The clip starts converting the TikTok video to GIF.
5.FlexClip
This is perfect for converting some part of the TikTok video. Here is a step-by-step guide on how you can use this tool:
Step 1: Download the TikTok video that you want to convert to GIF.
Step 2: On the timeline, click on the edit a video button to make necessary changes such as trim, etc.
Step 3: When you are satisfied with the results, you can download the video as a GIF and save it on your device.
Part 4: How to Turn TikTok Video into GIF with Ease?
With Filmora Meme Maker, you can convert TikTok videos to GIFs online without registration and watermark. All you need to do is to copy the URL of the TikTok video and paste it on the input panel in the Filmora timeline, then click on upload.
You can convert TikTok videos into GIF images easily and quickly using Filmora software. Filmora has a built-in online video trimmer in the editing interface, making it convenient for those who want to cut out on the desired frame when creating your GIF from TikTok video. Below is a step-by-step guide on how to convert TikTok to GIF using the Wondershare Filmora Meme maker:
Step 1: Open Filmora Meme Maker online
Visit the online Filmora meme maker and either drag and drop the TikTok video or paste the TikTok URL link on the Filmora timeline.
Step 2: Customize video/meme
From the editor page, customize or edit the video.
Step 3: Create and Export
Once done with all the editing parts, press the Create button, and then you can download the meme/GIF to share at your desired platform with ease.
Conclusion
Above, we have discussed the TikTok GIF’s meaning and explained five ways of converting TikTok to GIF. Each of these methods has its advantages and disadvantages, and the default method is simple to use but has no customization options. Other online options may be free and straightforward, but they may lack customization or limited customization options. The Filmora meme maker supports a wide range of functions. The Filmora meme maker will assist you in creating high-quality GIFs animations that you can download to your device library.
Also read:
- [New] TikTok Refresh Mishap Immediate Solutions Needed for 2024
- [Updated] In 2024, The Ultimate TikTok Voice Alteration Steps
- [New] In 2024, Indulge in These 15 Influencer-Led TikTok Recipes That Are a Hit Online
- [New] Tiktok Comedy | Top Tiktok Comedy Trends and Stars for 2024
- In 2024, Mastering the Meaning of PFP in TikTok World
- [New] Beat the Heat Learn Trending, Easy TikTok Moves for 2024
- [Updated] Mastering TikTok's Siri Speech Functionality for 2024
- [Updated] In 2024, How to Download TikTok Videos Without Watermark on iPhone
- 15 Sensational TikTok Cooking Challenges for Your Plate
- [Updated] In 2024, The Insider's Guide to TikTok on Apple and Windows Systems
- Big Deals in TikTok Videos Oversized Character Techniques for 2024
- [Updated] Tips & Tricks Producing Viral TikTok Reactions
- [New] Mastering Mac The Guide to Dancing TikTok Videos for 2024
- [Updated] Culinary Challenges & Cheerful Plates #Tiktok Feast Trends for 2024
- [Updated] In 2024, Exclusive Look at Top 10 Gamers on TikTok
- [Updated] In 2024, Proven Strategies Safe and Effective TikTok Following
- Enhancing Snap Memories with Android and Mac Apps
- 2024 Approved Epic Prank Ideas with a Twist of Anime on TikTok
- [Updated] In 2024, Vibrant Visibility 30+ Biographical Concepts for Increased Viewers on the Filmora TikTok Platform
- All About TikTok Anime Dances, Songs, Memes, and Filters
- [Updated] Crafty Creators The Top 15 of TikTok's Viral Visionaries
- [New] 2024 Approved From Silence to Sound A Guide to TikTok Voiceover
- [New] 2024 Approved The Leading Analytics Solutions for a Thriving TikTok Presence
- [Updated] In 2024, Elevate Your TikTok Experience Instant Download Savvy
- [Updated] 2024 Approved The Blueprint of Individuality in the Crowded TikTok Space
- [Updated] Understanding TikTok’s Creative Outpourings Animations, Music & Memes
- The Hot New TikTok Moves to Watch
- Dual App Review Analyzing Triller and TikTok's Features (Max 156 Chars)
- [Updated] The Great Video App Race Will LikeEclipses TikTok’s Dominance?
- Mastering the Nuances of Sound in TikTok Media Voice Manipulation Techniques for 2024
- In 2024, Essential Steps to Create Engaging TikTok Response Videos
- [Updated] In 2024, Secure & Ethical Paths to Increasing Your TikTok Following
- [Updated] Reach the Top 30+ Original Biography Concepts to Skyrocket Your TikTok Popularity on Filmora for 2024
- [Updated] Propel Your Passion Profits Joining the Elite of TikTok Creators
- [New] Unlocking Success Top-Notch Strategies for Winning with TikTok Campaigns for 2024
- [New] 2024 Approved Mastering the Art of Siri Voice on TikTok Platform
- [New] 2024 Approved Epic Eats TikTok’s Culinary Stars
- [Updated] Gain Traction The Definitive Guide to Top Trending TikTok Hashes for 2024
- Comprehensive Guide to Discord Nitro - What It Is + How You Can Get It
- [New] In 2024, Revolutionary TikTok Profits Estimator Guide
- [Updated] In 2024, Crafting Impactful Narratives for Your Brand on TikTok
- [New] In 2024, Mastering the Art of Growth with Top 7 TikTok Strategies
- [Updated] Innovating with Ideas Constructing Your Unique TikTok Sequence for 2024
- [Updated] Voiceover Fundamentals for Aspiring TikTok Creators for 2024
- [Updated] Scripting a Powerful TikTok Outro Statement for 2024
- [New] In 2024, Crucial Info for Navigating TikTok on Mac
- Navigating TikTok's Money-Making Path in 8 Key Steps
- A New Era for Content Creators Non-TikTok Alternatives Unveiled
- Redefine Your TikTok Story Creative Strategies for Background Enhancement for 2024
- 2024 Approved Mastering Storytelling Anime Influencers on TikTok
- How to recover lost data from Galaxy F34 5G?
- 2024 Approved Creating Seamless PS4 Streams Using OBS Studio Tools
- Fixes for Apps Keep Crashing on Xiaomi Redmi K70E | Dr.fone
- In 2024, 3 Effective Ways to Bypass Activation Lock on iPhone 13
- Best Free Video Editors for WebM Files 2023 Edition for 2024
- Top Pick Prodigious Insta HLV Pages Creators
- In 2024, How to Change Lock Screen Wallpaper on Samsung Galaxy A34 5G
- In 2024, Unlock Oppo Find X7 Phone Password Without Factory Reset Full Guide Here
- [New] In 2024, Instagram Influence Without Compromise
- In 2024, A Working Guide For Pachirisu Pokemon Go Map On Samsung Galaxy A54 5G | Dr.fone
- [Updated] 2024 Approved Step-by-Step Guide to Changing Photo Genders From Theory to Practice
- A Comprehensive Walkthrough to Record Audio on PowerPoint Dual Platform Approach for PCs & Macs for 2024
- [Updated] In 2024, FaceSaveDownloader Suite (Mobile, PC)
- Updated Get High-Quality Images for Free Commercial Use Allowed for 2024
- In 2024, 3 Ways to Track Samsung Galaxy M14 5G without Them Knowing | Dr.fone
- In 2024, How to fix iCloud lock on your iPhone 13 Pro Max and iPad
- Updated In 2024, Online Video Flipper Top Tools for the Job
- How to Fix Itel P55+ Find My Friends No Location Found? | Dr.fone
- 2024 Approved Edit Videos Like a Pro Download Splice for Mac
- 10 Reliable Aspect Ratio Conversion Applications for 2024
- In 2024, AI Portrait Generator Getting Closer to the Artistic Marvels
- New 2024 Approved Which 10 Best Video Editing Online Makers Is Worth Your Attention?
- How to Send and Fake Live Location on Facebook Messenger Of your Vivo X Fold 2 | Dr.fone
- New 2024 Approved Convert with Ease The Top 12 Audio Converters You Need
- Updated 2024 Approved Video Joining Made Simple Top Alternatives to Software
- Title: "[Updated] In 2024, Precision Production Isolating Essence in Recording"
- Author: Brian
- Created at : 2024-05-23 15:13:42
- Updated at : 2024-05-24 15:13:42
- Link: https://tiktok-videos.techidaily.com/updated-in-2024-precision-production-isolating-essence-in-recording/
- License: This work is licensed under CC BY-NC-SA 4.0.
