![[Updated] Pioneer Your Personal Brand in TikTok with Dynamic Backgrounds for 2024](https://thmb.techidaily.com/cd3d2360a2d4ccd17e303566ba964ef54de4b2742b9a5d3bf951667fe61ff2f5.jpg)
[Updated] Pioneer Your Personal Brand in TikTok with Dynamic Backgrounds for 2024
Pioneer Your Personal Brand in TikTok with Dynamic Backgrounds
TikTok has dramatically changed the world for digital content creators. It has provided millions of content creators a platform to design and deliver content to influence their followers. TikTok offers state-of-the-art features, such as filters, overlays, and effects to its worldwide customer base. One such feature is the green screen filter that allows changing the background of the TikTok video. Do you want to know more about the green screen in-built feature? If yes, we have got you professionally covered in the guide that will tell you everything about how to change the TikTok video background. Let’s get started.
In this article
01 Change Video Background with Green Screen Effect in TikTok
02 Get a Green Screen Background from Someone’s TikTok
03 Change TikTok Video Background in Filmora [No Green Screen]
Part 1: How to Change TikTok Video Background with Green Screen Effect?
TikTok has a lot to fascinate its users. You will find loads of features that can help you make your video content engaging. Plus, it also facilitates users to polish their content. Hiding or replacing is one of the techniques to enhance the content’s quality. TikTok comes with an in-built filter that lets you change the video background. This is likely to make your video more compelling. Here’s how you can do it by following the simple steps below.
Step 1: Create a new TikTok video
Launch the TikTok application, log in to your account and tap the + button to capture a new video.
Step 2: Open effects and choose the Green Screen option
Select rear or front camera when directed to video recording window. Choose effects at the bottom-right of the screen. From the available options, look for the green screen option and select it.
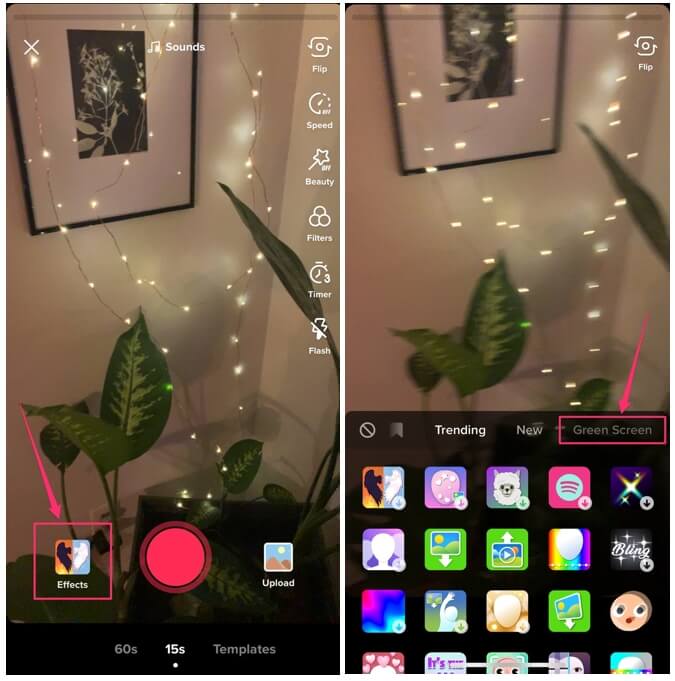
Step 3:: Select the Image to change video background
You can choose any image from your phone’s gallery to utilize it as your background. Once done, hit the Record button to capture video with your customized background.
Note: Apart from selecting your own picture, you can choose from different effects available, including the titled background or AR (augmented reality) features.
Part 2: How to Get a Green Screen Background from Someone’s TikTok?
TikTok recently introduced a fantastic feature to customize or alter your video’s background without even looking for the green screen filter on your own. The “Green Screen Duet Feature.” This feature also lets users apply another person’s video as the background.
Green screens were once only available to those who had access to, well, a green screen. Now the case is different. You can utilize this “Green Screen” feature from the various applications now, allowing you to add a customizable background to your video, and TikTok is one of them. s Various content creators customize their background with effects, a still image, or even a video from their camera roll using the TikTok app.
Imagine scrolling down the TikTok app and finding an eye-catching customized background. Yes! You can utilize it to spice up your videos as well. We have already demonstrated how you can add a green screen effect in TikTok in your videos. But did you also know you can add green screen background from someone else’s video to your TikTok? Even if you didn’t, we have compiled a step-by-step guide that will give you a perfect depiction of how you can pull it off.
Step 1: Search the Video with Green Screen Effects on TikTok
First and foremost, launch the TikTok app on your phone. Either navigate the video with a green screen effect or type Green Screen in the Search Box to find a video. Open the video and click on the Green Screen Effect in the bottom left of the screen.
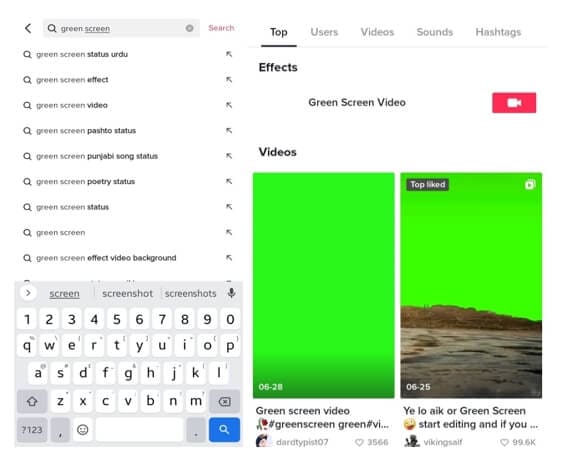

Step 2: Make Your Video with the Green Screen Effect
Now, you can record your TikTok video with the green-screen effect used.
Part 3: How to Change TikTok Video Background without Green Screen in Filmora?
For Win 7 or later (64-bit)
For macOS 10.12 or later
Wondershare Filmora is one of the most popular video editing software among YouTubers. With the latest Auto-Reframe feature, you can create social media videos easier and faster. With Filmora, you can change backgrounds in your videos in various ways, with or without a green screen.
The Human Segmentation effect in Filmora’s AI Portrait lets you eliminate people from a movie’s background instead of using a green screen. It needs a very few mouse clicks, and it works the best when there are people next to the camera.
After you’ve eliminated the background, you’ll be able to see the primary foreground of your video in live time. You can then supplement your actual video with a picture or a background. You can also use the video without the background as an intermediate layer on top of another video. Follow the below steps to change the video background using this feature:
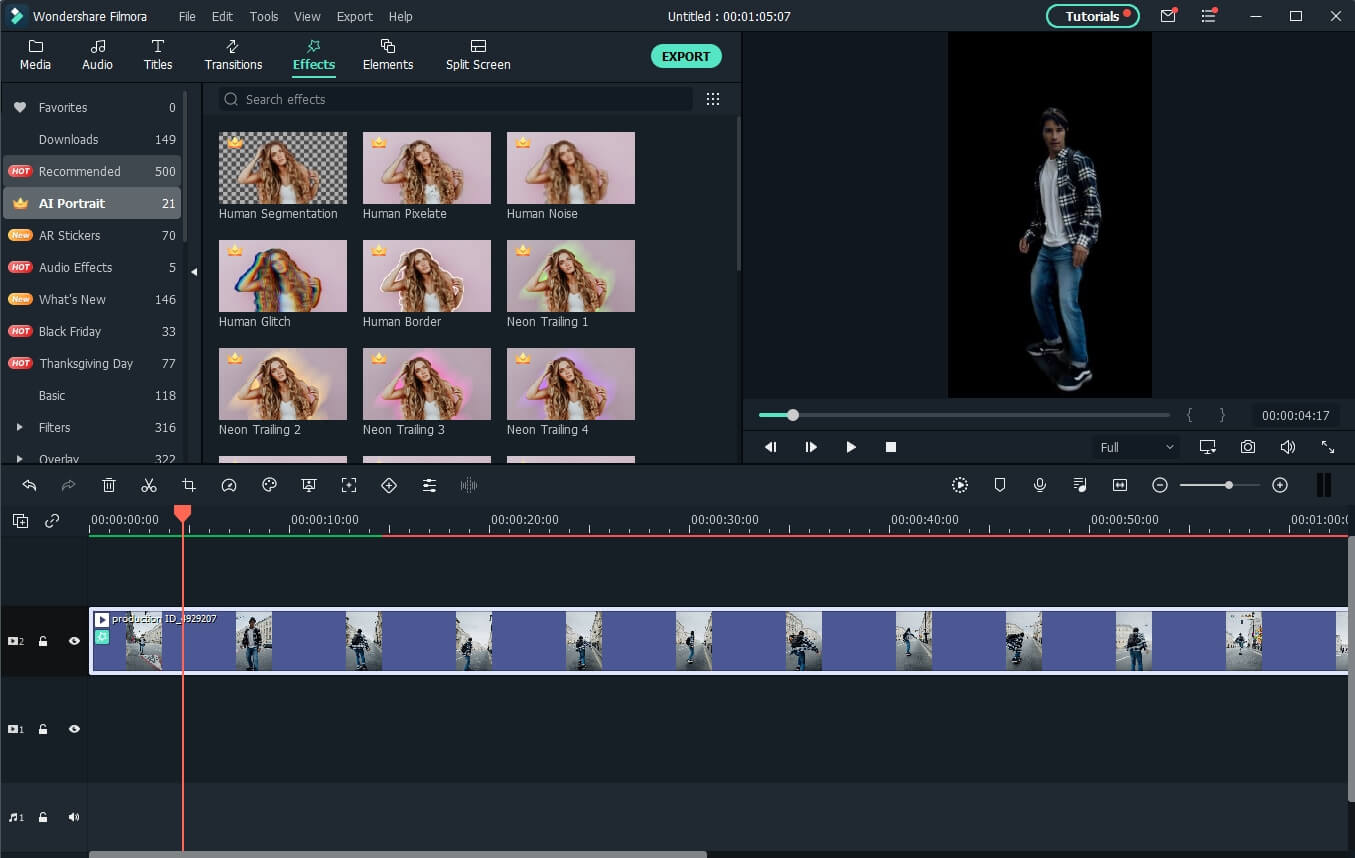
Step 1: Import Video to Timeline
Launch Filmora on your Windows PC or Mac, and then import the video to the timeline by clicking on the File and then Import Media.
Step 2: Apply Human Segmentation
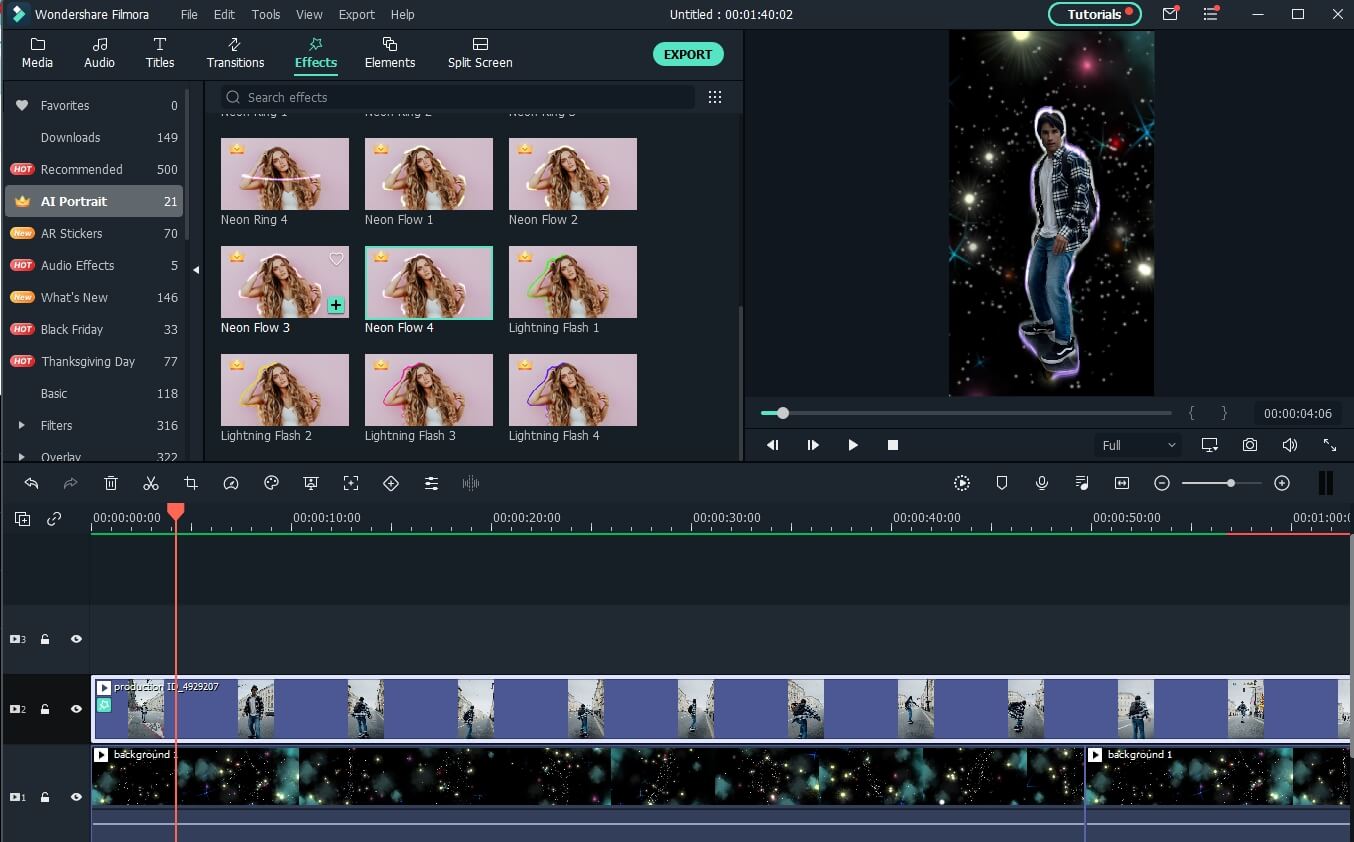
Go to Effects and then select the AI Portrait to see all of the AI Portrait effects. Move the human segmentation effect to the video timeline.
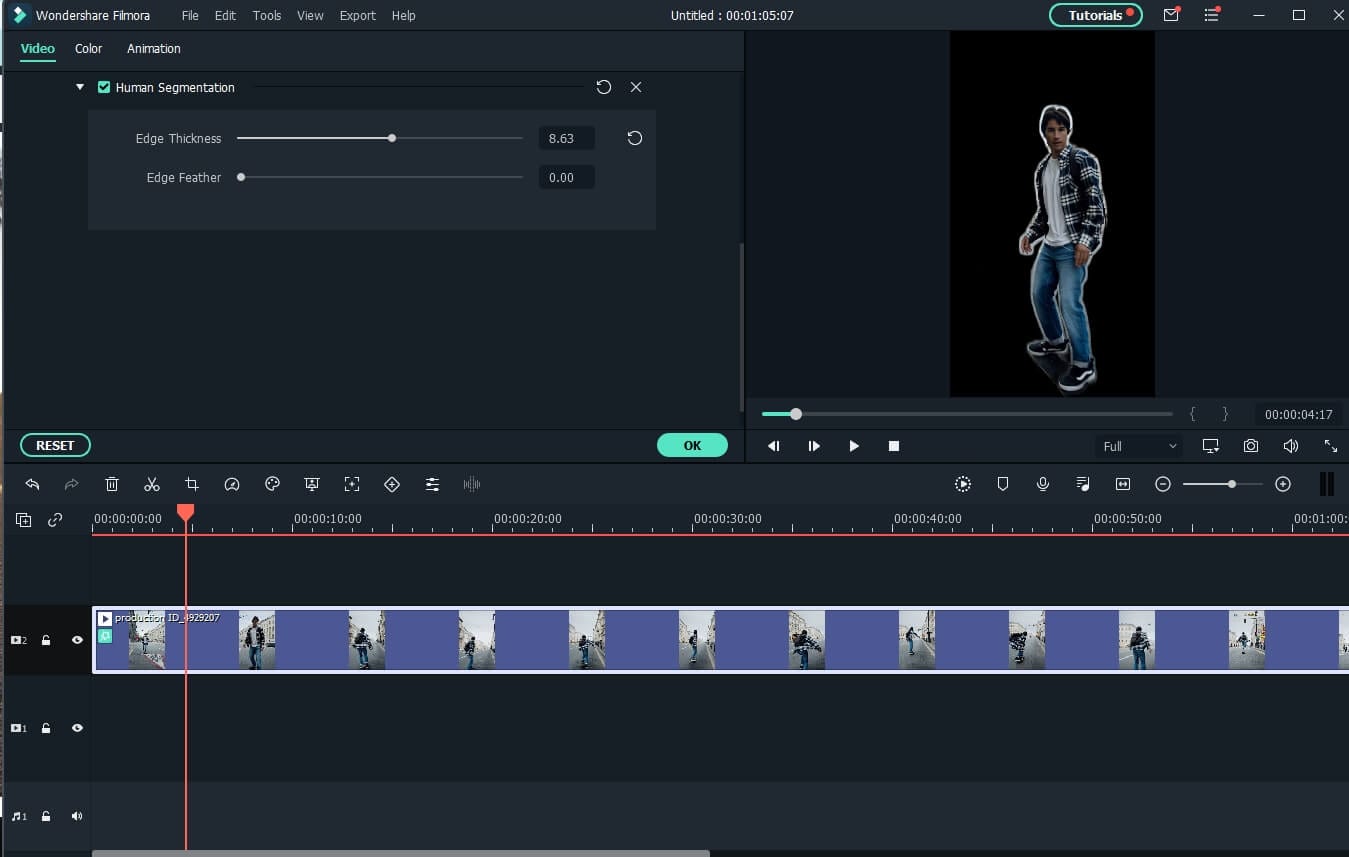
Step 3: Adjust the Effect Setting (Optional)
In the preview window, you’ll notice that the subject has been separated from the video background. If necessary, double-click the video in the timeline and find the video effect field to modify the edge, thickness, and feather. You can also try the neon borders and glowing flow effects under the AI Portrait category to have some fun.
Step 4: Change the Background
Now, drop the background video to the track below the video clip to change the video background.
Step 5: Export the video with new background
Preview the final result and then click the Export button to save the video on your computer.
Note: Check this guide to find out how to upload TikTok videos on your desktop
Conclusion
To lure the viewer’s attention, there is always a necessity to create visual and audio effects in a TikTok video. A TikTok video maker may not always have the privilege of the ideal location and surroundings to make a video stand out in the vast online market. A simple way out is to use software-based simulation, which means replacing the video background with the required one rather than the original. After reading the article, we hope that you don’t have any concerns about how to change the TikTok video background.
02 Get a Green Screen Background from Someone’s TikTok
03 Change TikTok Video Background in Filmora [No Green Screen]
Part 1: How to Change TikTok Video Background with Green Screen Effect?
TikTok has a lot to fascinate its users. You will find loads of features that can help you make your video content engaging. Plus, it also facilitates users to polish their content. Hiding or replacing is one of the techniques to enhance the content’s quality. TikTok comes with an in-built filter that lets you change the video background. This is likely to make your video more compelling. Here’s how you can do it by following the simple steps below.
Step 1: Create a new TikTok video
Launch the TikTok application, log in to your account and tap the + button to capture a new video.
Step 2: Open effects and choose the Green Screen option
Select rear or front camera when directed to video recording window. Choose effects at the bottom-right of the screen. From the available options, look for the green screen option and select it.
Step 3:: Select the Image to change video background
You can choose any image from your phone’s gallery to utilize it as your background. Once done, hit the Record button to capture video with your customized background.
Note: Apart from selecting your own picture, you can choose from different effects available, including the titled background or AR (augmented reality) features.
Part 2: How to Get a Green Screen Background from Someone’s TikTok?
TikTok recently introduced a fantastic feature to customize or alter your video’s background without even looking for the green screen filter on your own. The “Green Screen Duet Feature.” This feature also lets users apply another person’s video as the background.
Green screens were once only available to those who had access to, well, a green screen. Now the case is different. You can utilize this “Green Screen” feature from the various applications now, allowing you to add a customizable background to your video, and TikTok is one of them. s Various content creators customize their background with effects, a still image, or even a video from their camera roll using the TikTok app.
Imagine scrolling down the TikTok app and finding an eye-catching customized background. Yes! You can utilize it to spice up your videos as well. We have already demonstrated how you can add a green screen effect in TikTok in your videos. But did you also know you can add green screen background from someone else’s video to your TikTok? Even if you didn’t, we have compiled a step-by-step guide that will give you a perfect depiction of how you can pull it off.
Step 1: Search the Video with Green Screen Effects on TikTok
First and foremost, launch the TikTok app on your phone. Either navigate the video with a green screen effect or type Green Screen in the Search Box to find a video. Open the video and click on the Green Screen Effect in the bottom left of the screen.
Step 2: Make Your Video with the Green Screen Effect
Now, you can record your TikTok video with the green-screen effect used.
Part 3: How to Change TikTok Video Background without Green Screen in Filmora?
For Win 7 or later (64-bit)
For macOS 10.12 or later
Wondershare Filmora is one of the most popular video editing software among YouTubers. With the latest Auto-Reframe feature, you can create social media videos easier and faster. With Filmora, you can change backgrounds in your videos in various ways, with or without a green screen.
The Human Segmentation effect in Filmora’s AI Portrait lets you eliminate people from a movie’s background instead of using a green screen. It needs a very few mouse clicks, and it works the best when there are people next to the camera.
After you’ve eliminated the background, you’ll be able to see the primary foreground of your video in live time. You can then supplement your actual video with a picture or a background. You can also use the video without the background as an intermediate layer on top of another video. Follow the below steps to change the video background using this feature:
Step 1: Import Video to Timeline
Launch Filmora on your Windows PC or Mac, and then import the video to the timeline by clicking on the File and then Import Media.
Step 2: Apply Human Segmentation
Go to Effects and then select the AI Portrait to see all of the AI Portrait effects. Move the human segmentation effect to the video timeline.
Step 3: Adjust the Effect Setting (Optional)
In the preview window, you’ll notice that the subject has been separated from the video background. If necessary, double-click the video in the timeline and find the video effect field to modify the edge, thickness, and feather. You can also try the neon borders and glowing flow effects under the AI Portrait category to have some fun.
Step 4: Change the Background
Now, drop the background video to the track below the video clip to change the video background.
Step 5: Export the video with new background
Preview the final result and then click the Export button to save the video on your computer.
Note: Check this guide to find out how to upload TikTok videos on your desktop
Conclusion
To lure the viewer’s attention, there is always a necessity to create visual and audio effects in a TikTok video. A TikTok video maker may not always have the privilege of the ideal location and surroundings to make a video stand out in the vast online market. A simple way out is to use software-based simulation, which means replacing the video background with the required one rather than the original. After reading the article, we hope that you don’t have any concerns about how to change the TikTok video background.
The Artisan’s Guide to TikTok Captions: Top 5 Craftsmanship Strategies
TikTok is one of the most famous social media apps as it creates various trends frequently that engage users continuously. Every week, you can explore various TikTok trends, such as dance videos, pranks, challenges, or quick hacks. These trends are a great entertainment source for people and motivate them to create engaging content.
However, adding captions is mandatory if you want to make TikTok trend videos for a diverse audience. This article will guide you if you are unaware of how to add captions on TikTok. We will provide 5 different ways to create TikTok captions effectively.
- Way 1: Auto-Generate Captions with TikTok’s Built-in Feature
- Way 2: Use Auto Captions in CapCut
- Way 3: Add Captions to TikTok Videos Manually
- Way 4: Automatically Add Subtitles to TikTok Videos with Online Editor
Part 1: Why Should You Add Captions to TikTok Videos?
Adding captions on TikTok videos can bring you multiple advantages. To learn more about the benefits of adding captions on TikTok, read this section:
1. Increases Comprehension
It may be possible that viewers won’t be able to understand a particular dialogue in your TikTok video. To make your TikTok content more understandable, adding captions can prove to be a great option. Moreover, if some viewers can’t turn on the sound of TikTok videos, they can easily read the captions to understand the content.
2. Enhances Focus
Captions have the ability to grasp the attention of a viewer automatically. Adding captions to your TikTok video lets your viewers focus more properly. Thus, you can engage your audience throughout the TikTok video effortlessly.
3. Helps During Audio Problems
Audio problems may arise unexpectedly. In such situations, added captions on TikTok videos can offer great convenience. Moreover, people who have auditory disabilities can also enjoy your TikTok videos.
4. Attracts Diverse Audience
If some foreigners can’t understand or speak your native language, TikTok captions are necessary for them. By doing so, a broad and diverse audience can watch your TikTok videos easily.
Part 2: How to Add Captions on TikTok?
There are various ways through which you can generate TikTok captions effortlessly. Read this section to discover multiple and convenient ways to create TikTok captions easily.
Way 1: Auto-Generate Captions with TikTok’s Built-in Feature
If you don’t want to download video editing software, you can utilize the built-in feature of TikTok to create auto-captions. This will save you from the hassle of launching or accessing a professional subtitle editor. Moreover, it will also save you time and effort from creating subtitles manually. To use the built-in feature of TikTok automatic captions, check the following instructions:
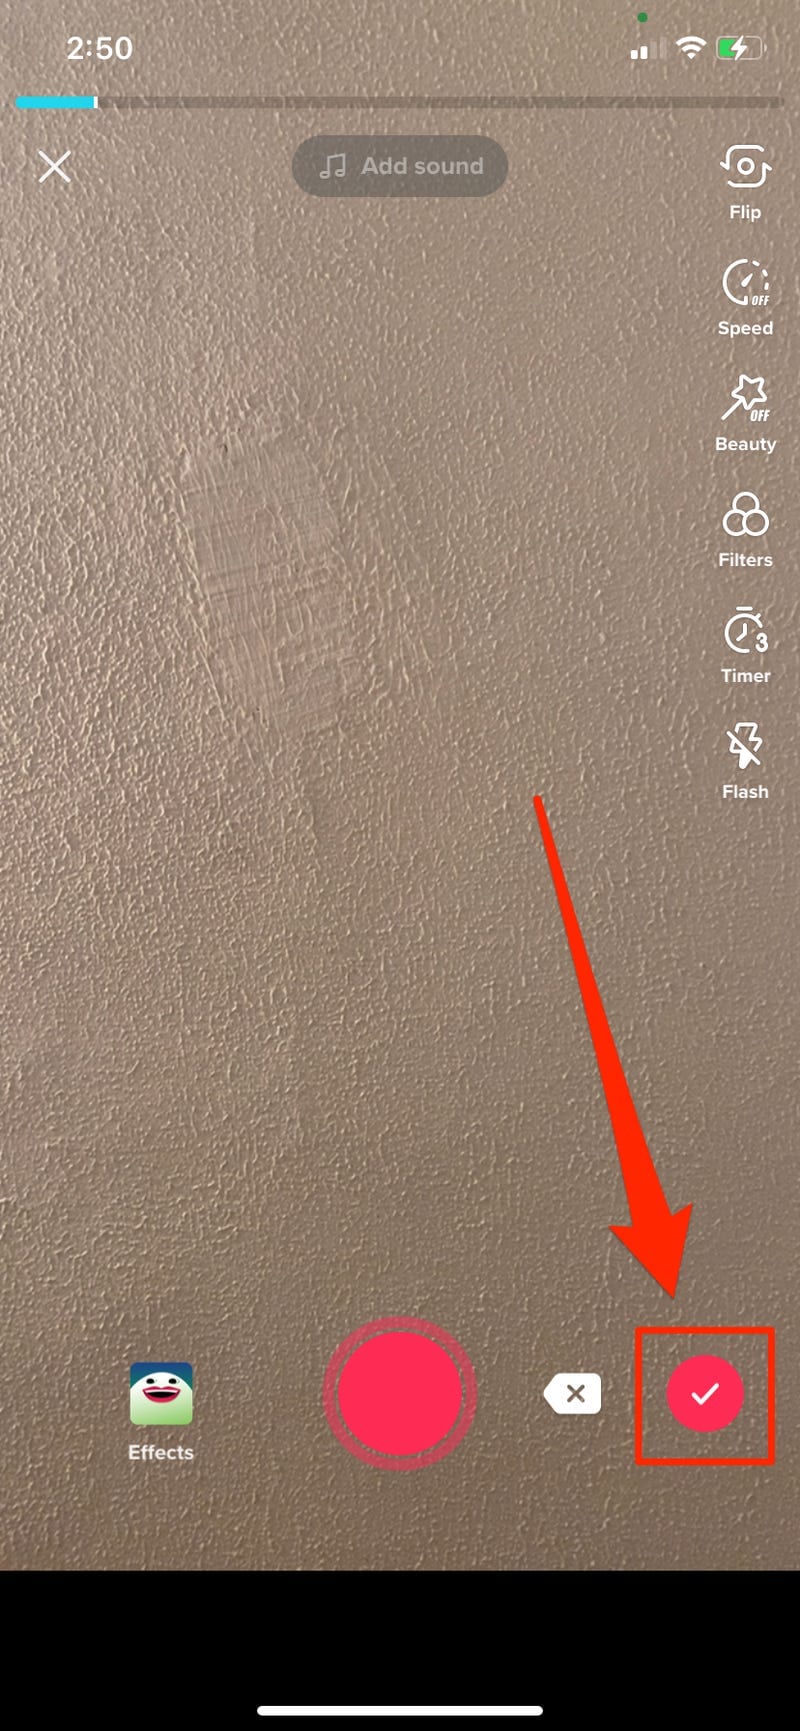
Step1 Once you have captured a video on TikTok, tap the “Tick” icon from the bottom right side. This will redirect you to the editing mode.
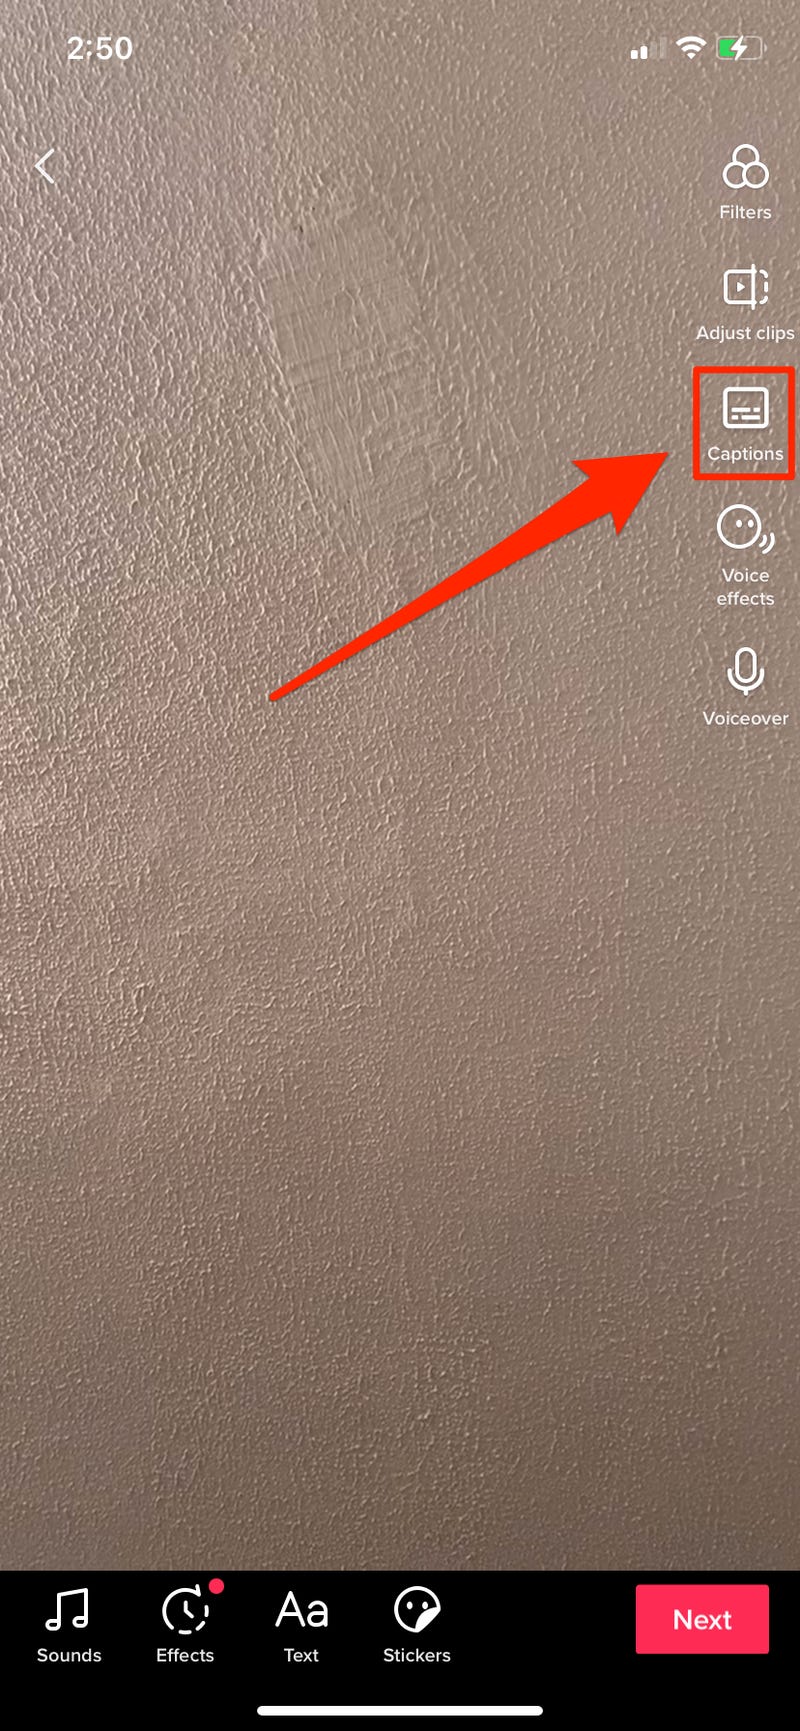
Step2 On the editing mode, locate the “Captions” option from the right side. After tapping on it, TikTok will instantly generate the subtitles automatically. Make sure that all the captions are correctly created. Once you are done, hit the “Save” button displayed at the top right side. Afterward, you can quickly post your TikTok video with captions.
Way 2: Use Auto Captions in CapCut
CapCut and TikTok are closely related to each other as they both have the same parent company called ByteDance. Thus, using CapCut to create captions for your TikTok videos can bring high-quality results. You can easily download CapCut on Android and iOS devices without any complications. The interface of this tool is clean that allows you to generate subtitles efficiently.
The auto caption feature in CapCut enables you to produce subtitles instantly. It uses advanced algorithms that ensure high accuracy while creating subtitles. To use this advanced feature of CapCut, read the below steps:
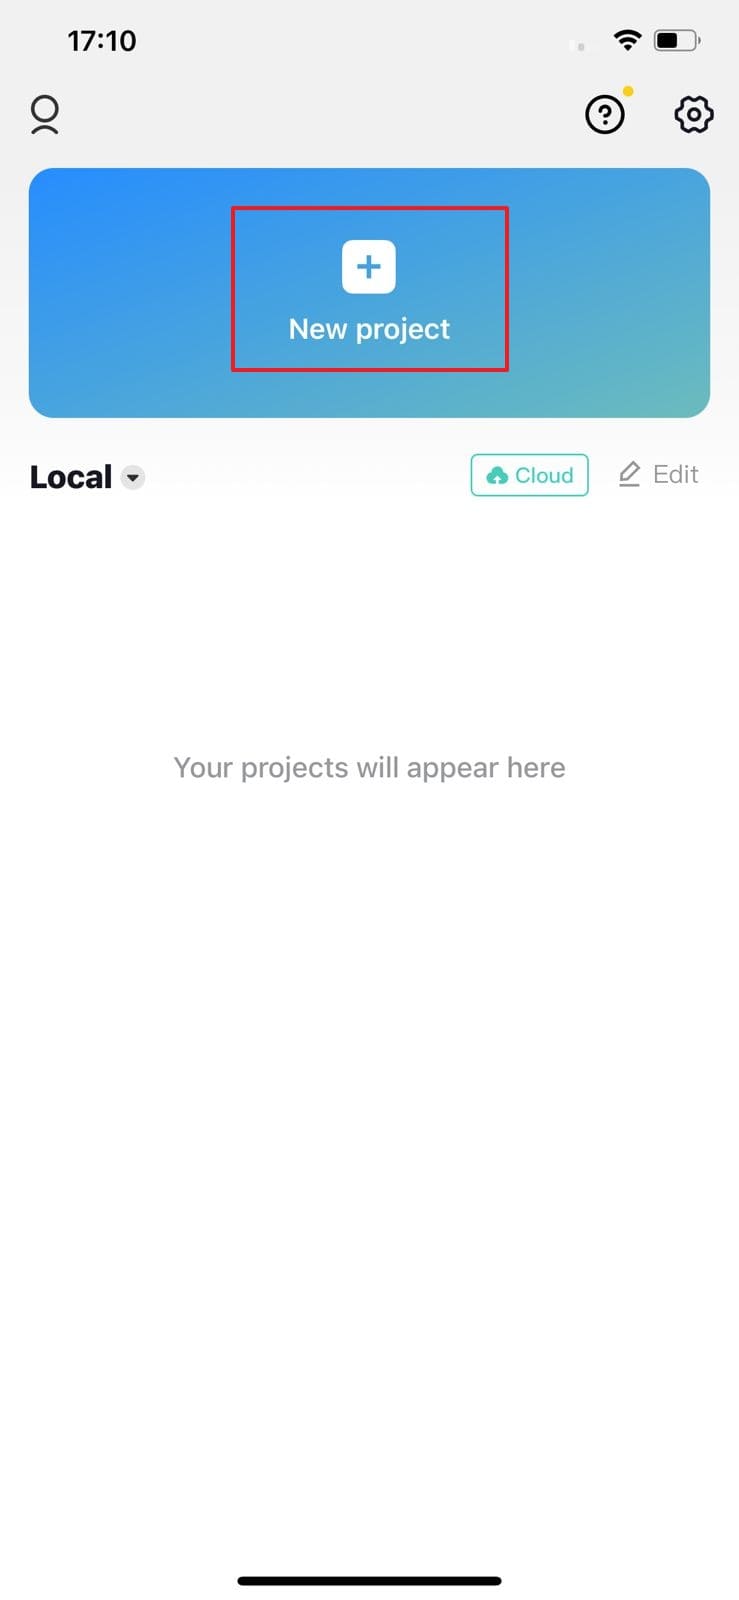
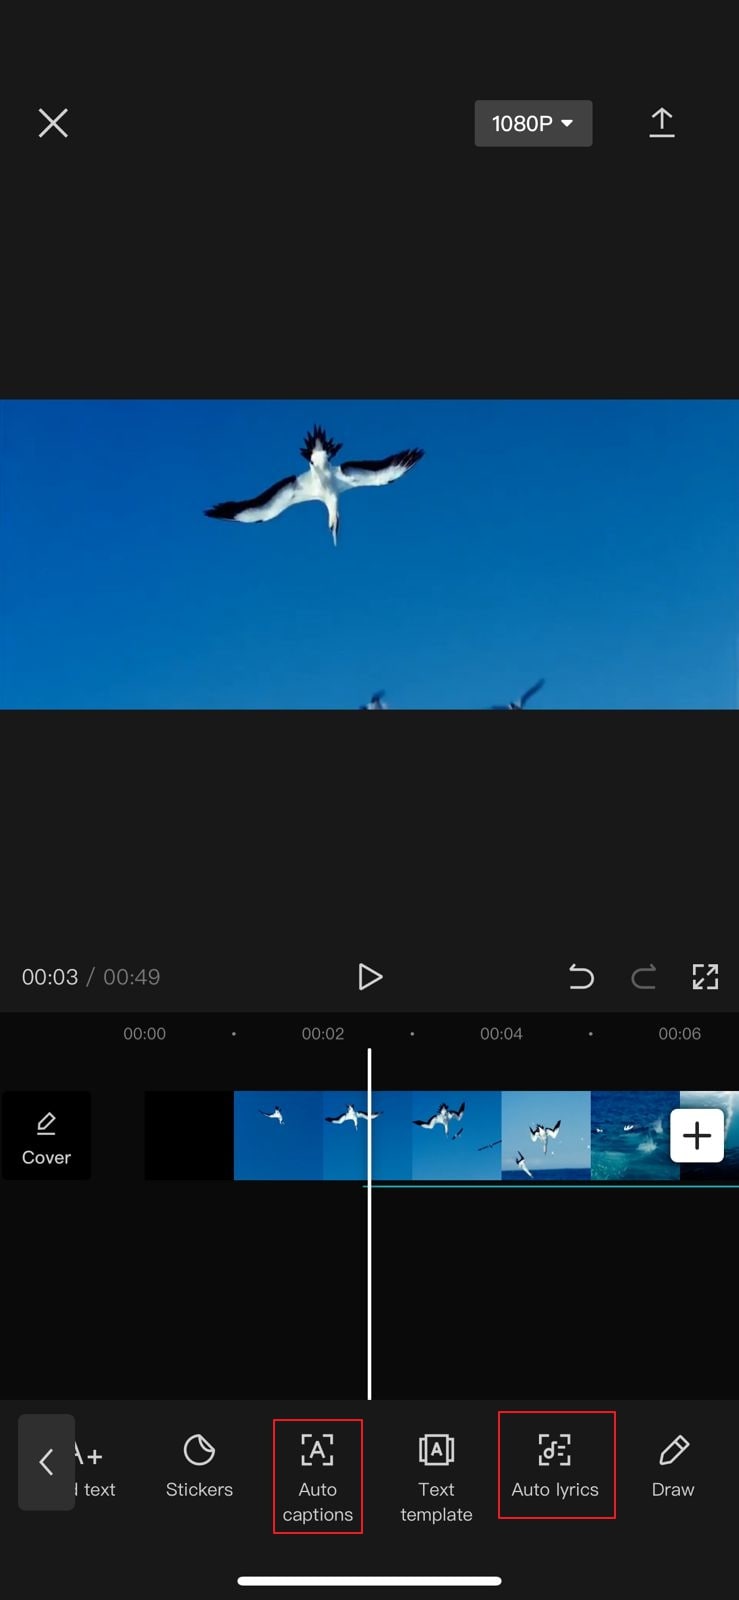
Step1 Download and launch CapCut on your phone. To import, tap on “New Project” and select the video from your phone’s gallery. Tap on “Add” to head to the editing mode of CapCut.
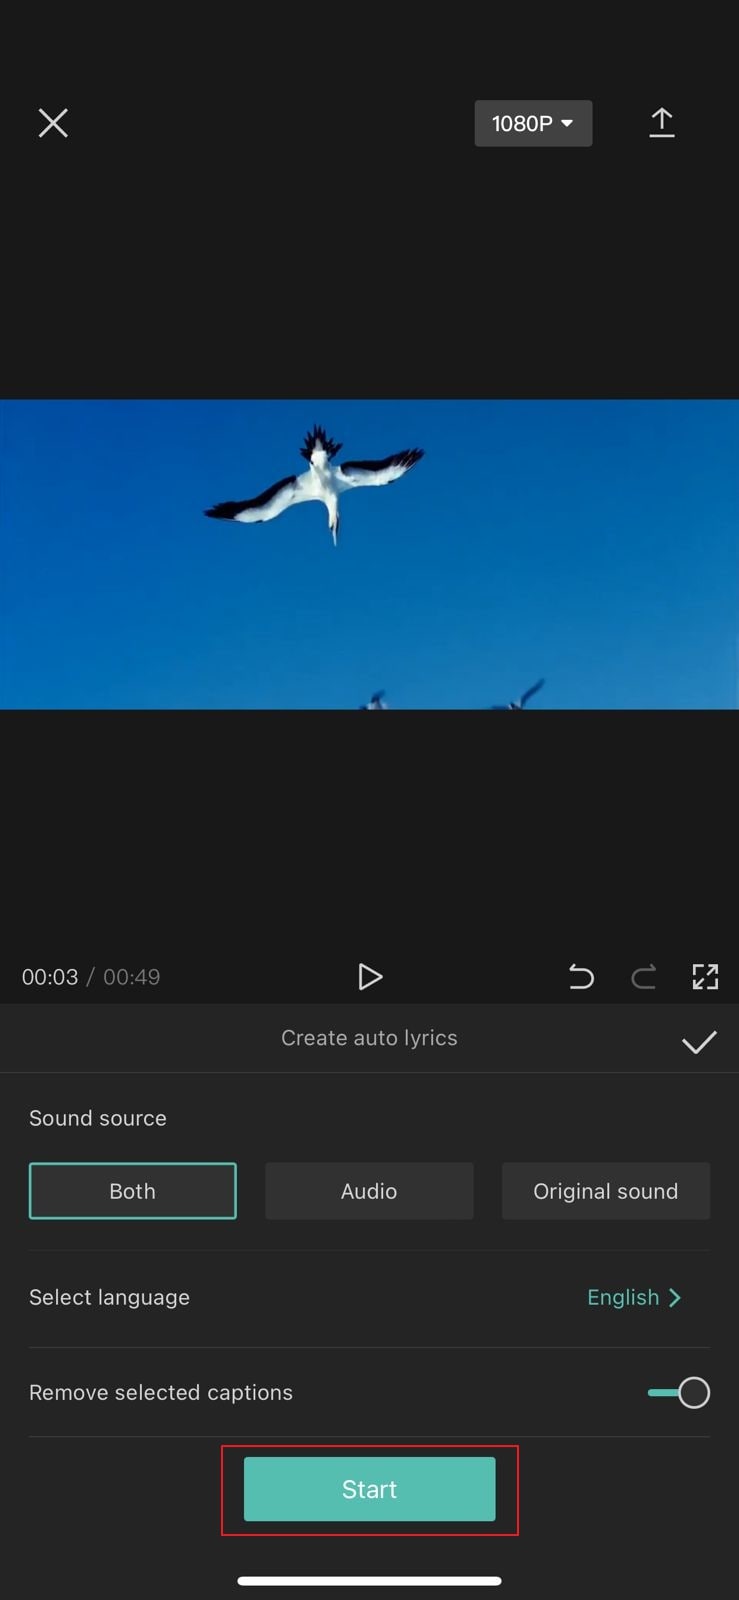
Step2 Afterward, select “Text” options from which you can either choose “Auto Lyrics” or “Auto Captions.” Using the Auto Lyrics option, you can generate captions for a song automatically. On the other hand, by using the Auto Captions option, you can transcribe the voice in your video to create subtitles. From the pop-up menus, choose the sound source and language to proceed.
Step3 Once you are done adjusting the settings, hit the “Start” button. After some seconds, CapCut will create captions for your TikTok video efficiently. Afterward, you can choose video resolution and hit the “Arrow” icon to export the video.
Way 3: Add Captions to TikTok Videos Manually
If you want to create captions for TikTok briefly, you can manually add them using the instructions given below. This method is extremely simple and helpful if you want to create small captions for your TikTok videos. Moreover, you can efficiently choose the font, color, and style of your captions in this manual method:
Step1 Open your TikTok app and create a video to begin. Tap on the “Tick” icon to enter the editing mode. Select “Text” given on the bottom toolbar of your screen.
Step2 Now, choose the style for your captions from the available options. Select the color and start writing your captions carefully. Once you are done, you can save and publish your created TikTok video.
Way 4: Automatically Add Subtitles to TikTok Videos with Online Editor
There are various online editors that can create captions for TikTok videos automatically. They use the Auto Transcription feature, through which the tool can create subtitles by recognizing the voice used in a TikTok video. One of the reliable online tools that can produce auto-subtitles is Veed.io.
Veed.io is an online tool that is capable of creating TikTok automatic captions efficiently. You can easily access this online tool from your web browsers. Moreover, it supports more than 100 languages and accents that you can choose to create auto-captions. Also, you can translate your captions into different languages using this tool. To use this tool flawlessly, check the below steps:
Step1 Begin by reaching the official website of Veed.io. Go to its Tools and locate the “Auto Subtitle Generator” option. It will redirect you to another page that consists of the tool information.
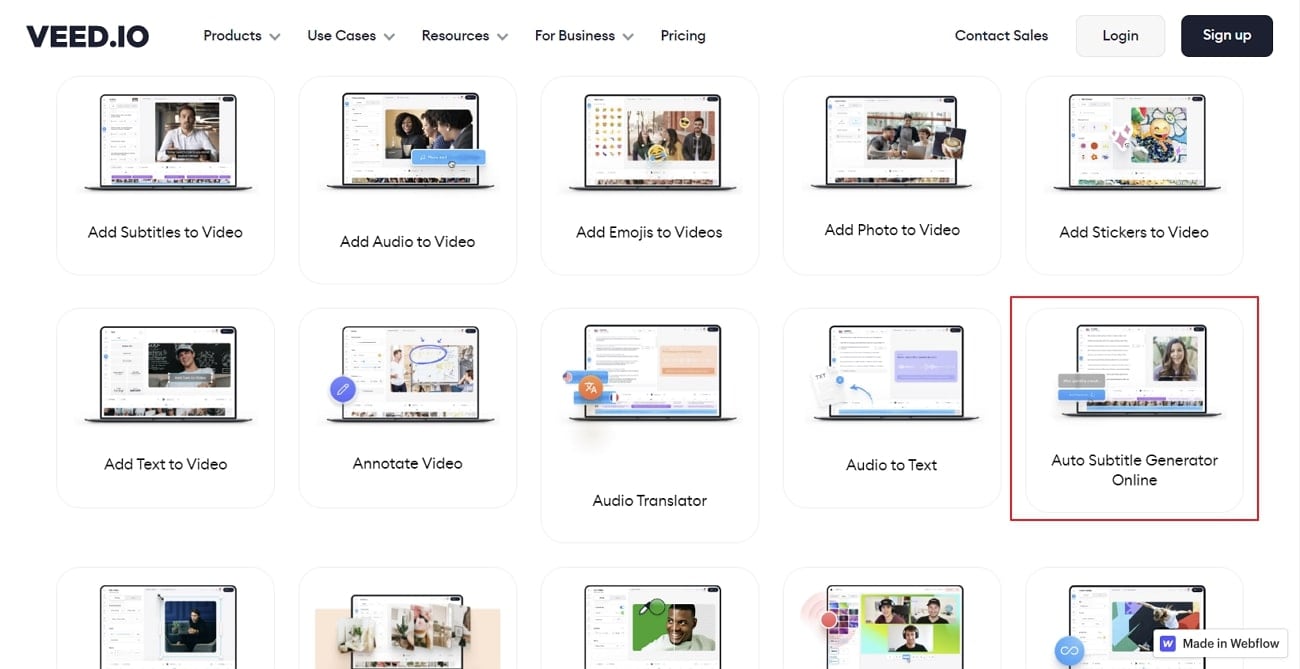
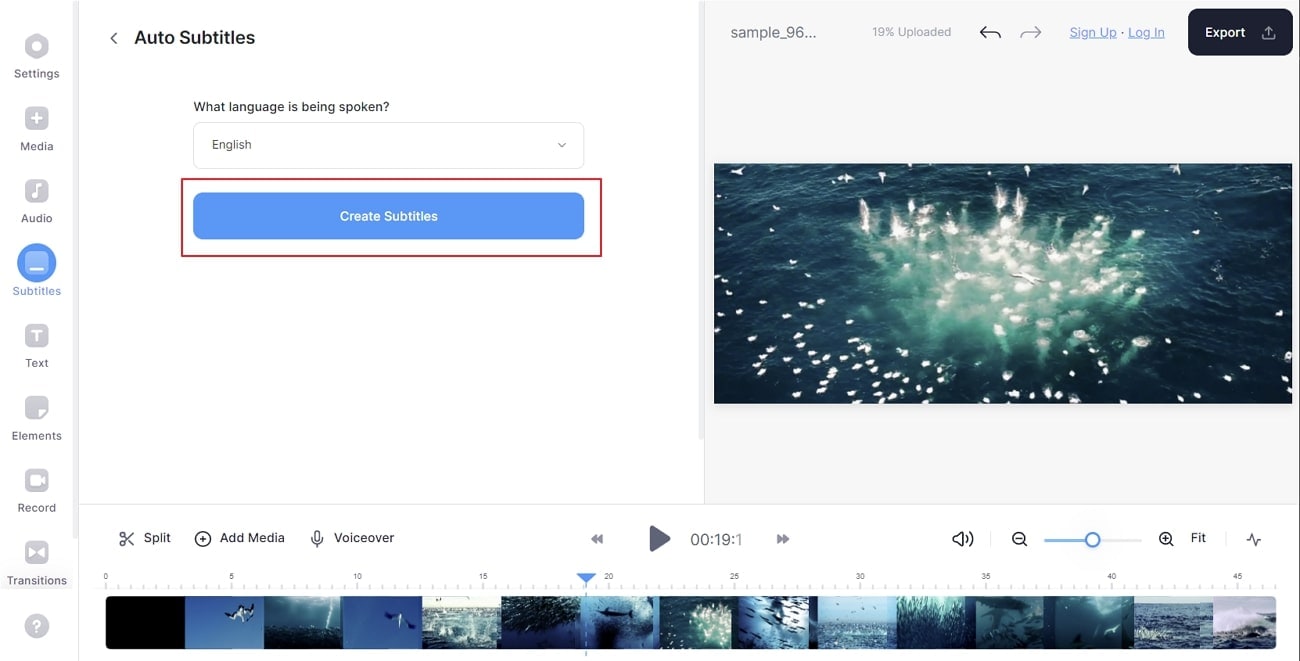
Step2 Click “Get Started” and upload a video from your system. Once you are done, tap on “Subtitles” and select “Auto Subtitle” from the given options. Choose your preferred language and tap on “Create Subtitles.”
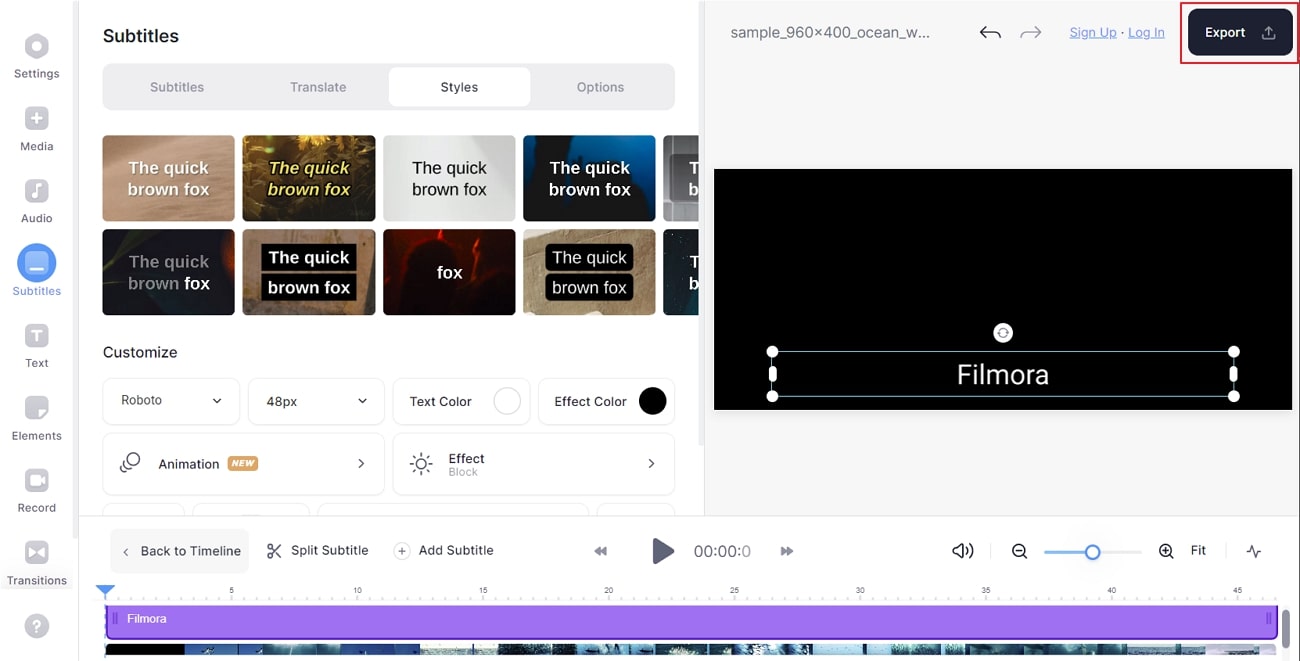
Step3 After waiting some time, you can see your auto-captions. You can choose the text color, effect, size, and alignment from the given options. Once you are satisfied with the TikTok captions, hit the “Export” button.
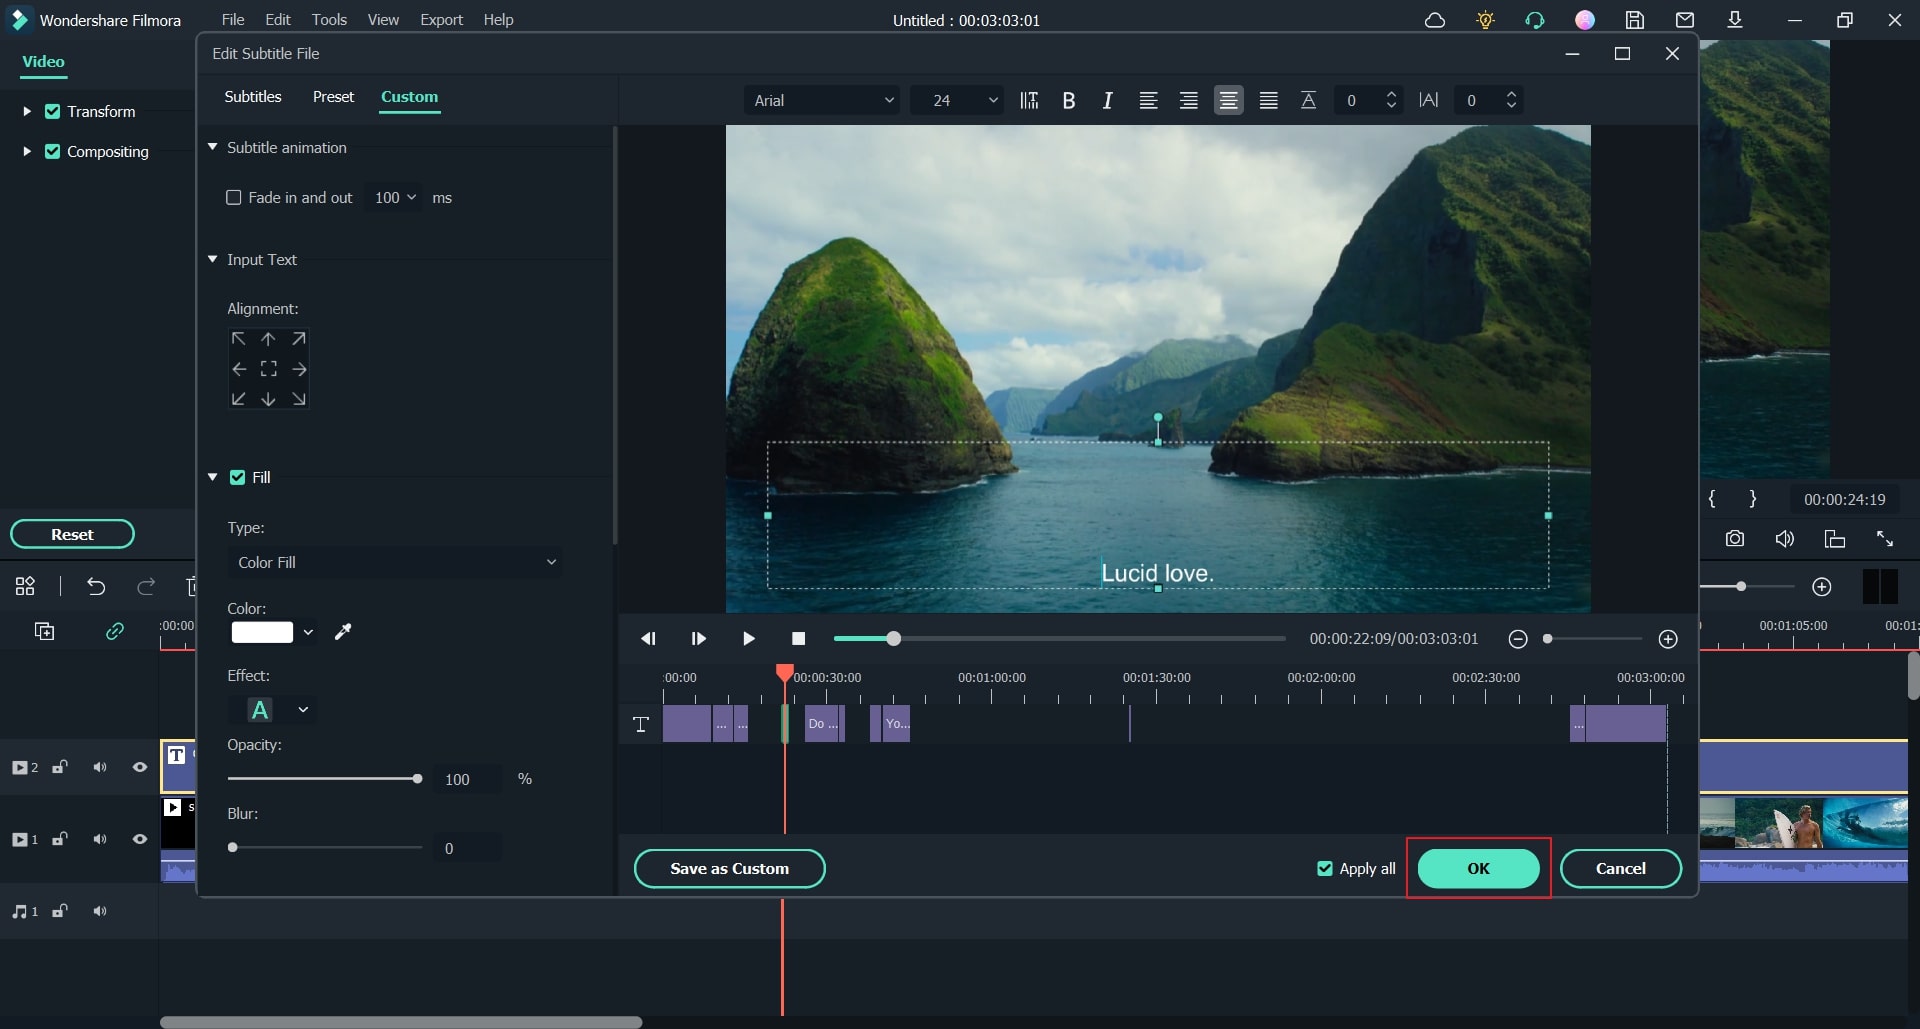
Part 3: How to Add Captions to Your TikTok Videos with Filmora
If you want to add further enhancements to your TikTok captions, you can use an offline tool like Wondershare Filmora . Using this platform, you can manually add captions by choosing the suitable style from the presets. Moreover, you can also add customizations to the captions through Filomora easily. You can also upload SRT files on this tool to produce TikTok captions.
Free Download For Win 7 or later(64-bit)
Free Download For macOS 10.14 or later
TikTok automatic captions can be easily generated from Filmora as it offers excellent results through its Speech-to-Text feature. Using this unique feature, you can transcribe the voice in your TikTok videos in up to 16 different languages. To use this feature conveniently, follow the below steps:
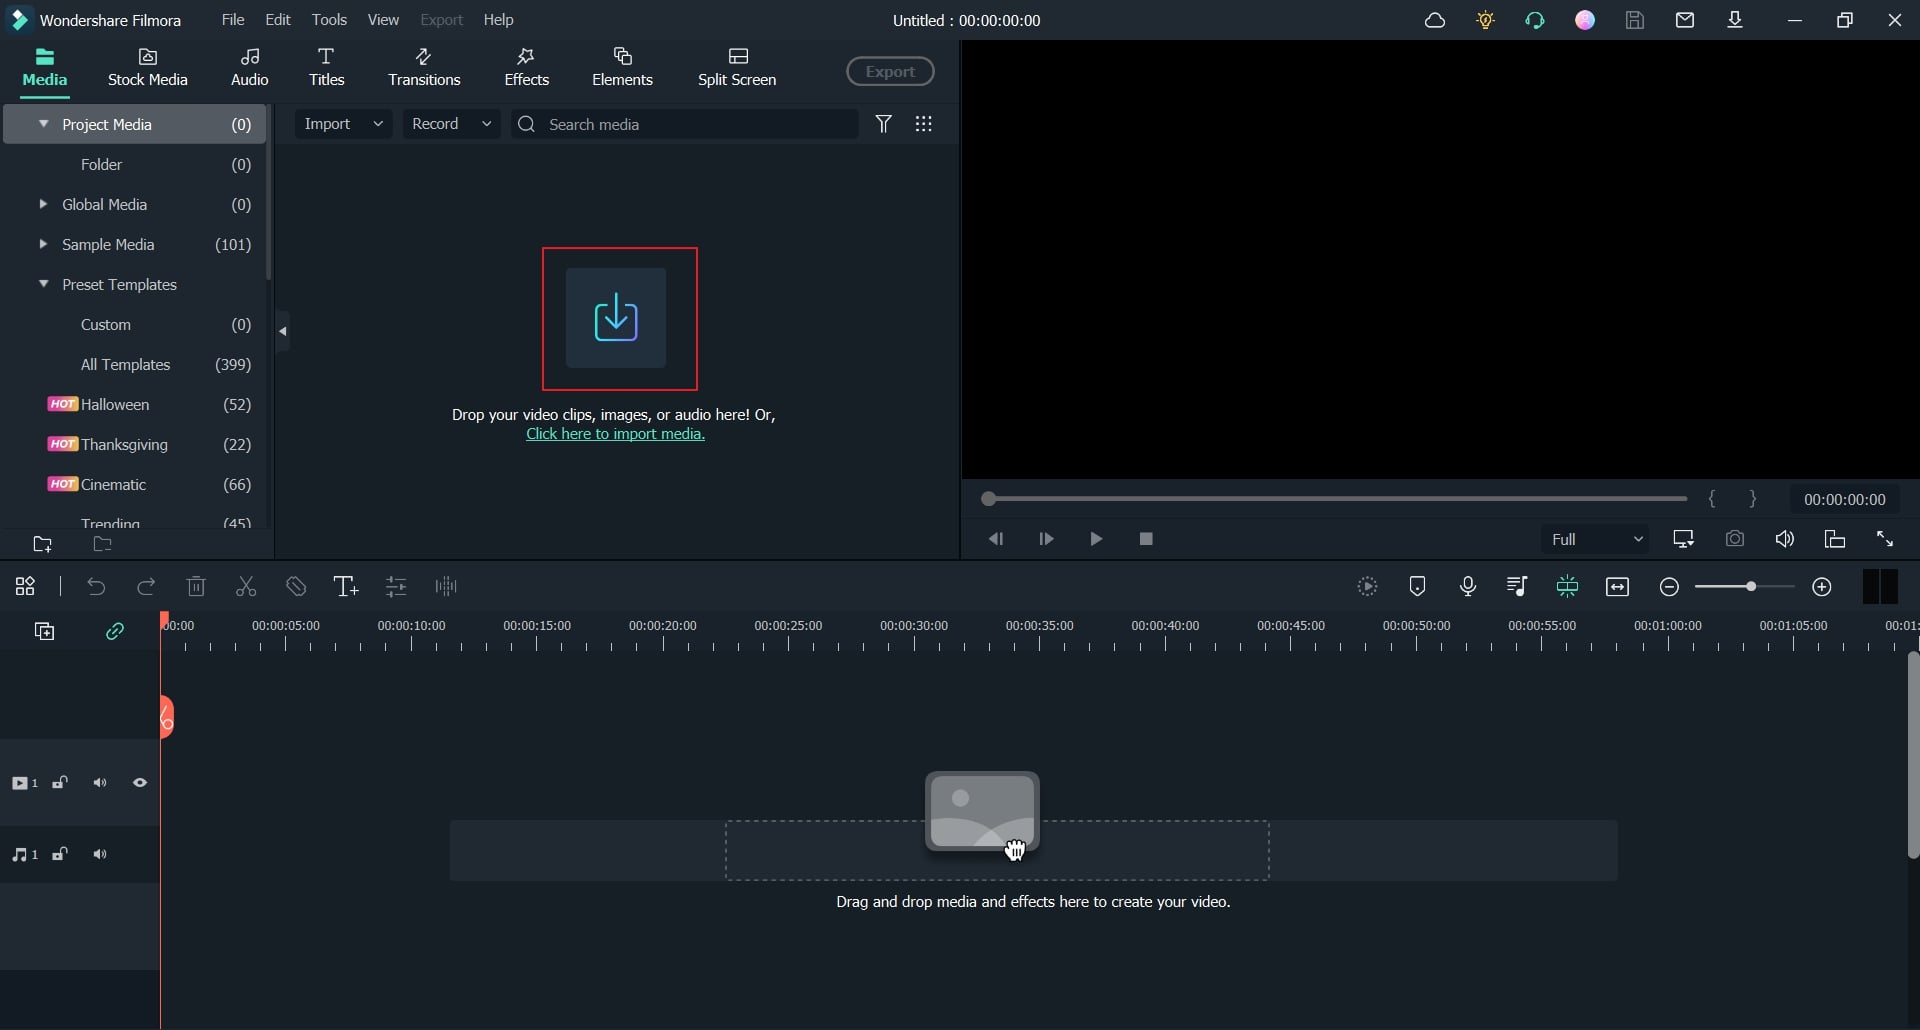
Step 1 Import the TikTok Video
Once done with launching and creating the Filmora project on your PC, hit the “Arrow” icon to import your video file on this tool. Now drag and drop the video file to the timeline in order to proceed.
Step 2 Initiate the Automatic Subtitle Feature
On your timeline, tap on the “Speech-to-Text” feature. Choose your language and video clip from the pop-up menu. Wait for some seconds, and the subtitles will be generated automatically. Double-click on the created TikTok automatic captions to open the editing settings. Here, you can select subtitles style and respective time duration. You can also add customizations efficiently.
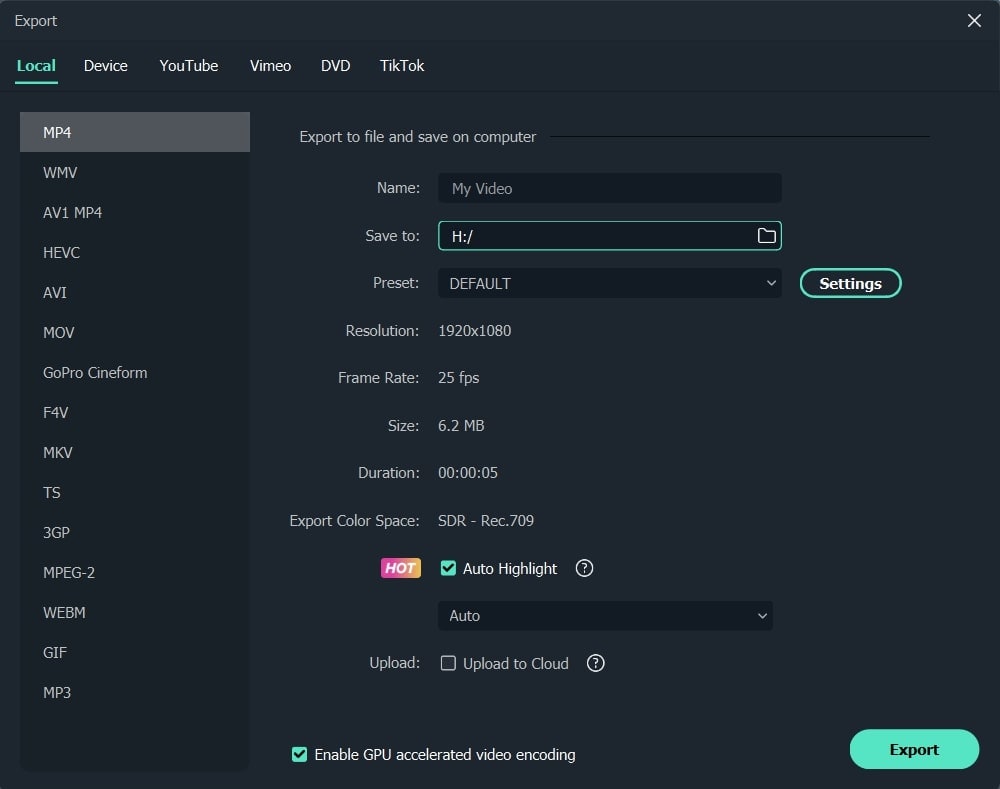
Step 3 Export the TikTok Video
After completing all the settings, you can click on the “Export” button. Before exporting, you can choose the video resolution and file formats easily. Also, this tool gives you the facility to export the video file directly to your TikTok account.
Part 4: People Also Want to Know
1. How to add captions to TikTok?
To add TikTok captions, you can choose the manual or automatic way. TikTok has a built-in auto-generator through which you can add captions automatically. Moreover, there are different offline and online tools, such as Filmora, CapCut, and Veed.io, through which you can add captions on TikTok flawlessly.
2. How to add captions to TikTok after posting?
If you want to add TikTok captions after posting, you have to download the video on your phone first. Afterward, hit the Plus icon to re-upload the video from your gallery. Choose that particular video again and tap on the Post button. Now you can write the captions on the given space easily. Afterward, tap on the “Post” button.
Last Words
This article has shed light on various ways how to add captions on TikTok efficiently. You can add TikTok captions manually or use the auto-generator for ease. Moreover, we have also highlighted an online tool to create subtitles that can be accessed from any web browser. However, if you want a professional caption editor for a longer run, Wondershare Filmora is the best choice among other tools. It has an easy-to-use interface and achieves accurate results comfortably.
Part 1: Why Should You Add Captions to TikTok Videos?
Adding captions on TikTok videos can bring you multiple advantages. To learn more about the benefits of adding captions on TikTok, read this section:
1. Increases Comprehension
It may be possible that viewers won’t be able to understand a particular dialogue in your TikTok video. To make your TikTok content more understandable, adding captions can prove to be a great option. Moreover, if some viewers can’t turn on the sound of TikTok videos, they can easily read the captions to understand the content.
2. Enhances Focus
Captions have the ability to grasp the attention of a viewer automatically. Adding captions to your TikTok video lets your viewers focus more properly. Thus, you can engage your audience throughout the TikTok video effortlessly.
3. Helps During Audio Problems
Audio problems may arise unexpectedly. In such situations, added captions on TikTok videos can offer great convenience. Moreover, people who have auditory disabilities can also enjoy your TikTok videos.
4. Attracts Diverse Audience
If some foreigners can’t understand or speak your native language, TikTok captions are necessary for them. By doing so, a broad and diverse audience can watch your TikTok videos easily.
Part 2: How to Add Captions on TikTok?
There are various ways through which you can generate TikTok captions effortlessly. Read this section to discover multiple and convenient ways to create TikTok captions easily.
Way 1: Auto-Generate Captions with TikTok’s Built-in Feature
If you don’t want to download video editing software, you can utilize the built-in feature of TikTok to create auto-captions. This will save you from the hassle of launching or accessing a professional subtitle editor. Moreover, it will also save you time and effort from creating subtitles manually. To use the built-in feature of TikTok automatic captions, check the following instructions:
Step1 Once you have captured a video on TikTok, tap the “Tick” icon from the bottom right side. This will redirect you to the editing mode.
Step2 On the editing mode, locate the “Captions” option from the right side. After tapping on it, TikTok will instantly generate the subtitles automatically. Make sure that all the captions are correctly created. Once you are done, hit the “Save” button displayed at the top right side. Afterward, you can quickly post your TikTok video with captions.
Way 2: Use Auto Captions in CapCut
CapCut and TikTok are closely related to each other as they both have the same parent company called ByteDance. Thus, using CapCut to create captions for your TikTok videos can bring high-quality results. You can easily download CapCut on Android and iOS devices without any complications. The interface of this tool is clean that allows you to generate subtitles efficiently.
The auto caption feature in CapCut enables you to produce subtitles instantly. It uses advanced algorithms that ensure high accuracy while creating subtitles. To use this advanced feature of CapCut, read the below steps:
Step1 Download and launch CapCut on your phone. To import, tap on “New Project” and select the video from your phone’s gallery. Tap on “Add” to head to the editing mode of CapCut.
Step2 Afterward, select “Text” options from which you can either choose “Auto Lyrics” or “Auto Captions.” Using the Auto Lyrics option, you can generate captions for a song automatically. On the other hand, by using the Auto Captions option, you can transcribe the voice in your video to create subtitles. From the pop-up menus, choose the sound source and language to proceed.
Step3 Once you are done adjusting the settings, hit the “Start” button. After some seconds, CapCut will create captions for your TikTok video efficiently. Afterward, you can choose video resolution and hit the “Arrow” icon to export the video.
Way 3: Add Captions to TikTok Videos Manually
If you want to create captions for TikTok briefly, you can manually add them using the instructions given below. This method is extremely simple and helpful if you want to create small captions for your TikTok videos. Moreover, you can efficiently choose the font, color, and style of your captions in this manual method:
Step1 Open your TikTok app and create a video to begin. Tap on the “Tick” icon to enter the editing mode. Select “Text” given on the bottom toolbar of your screen.
Step2 Now, choose the style for your captions from the available options. Select the color and start writing your captions carefully. Once you are done, you can save and publish your created TikTok video.
Way 4: Automatically Add Subtitles to TikTok Videos with Online Editor
There are various online editors that can create captions for TikTok videos automatically. They use the Auto Transcription feature, through which the tool can create subtitles by recognizing the voice used in a TikTok video. One of the reliable online tools that can produce auto-subtitles is Veed.io.
Veed.io is an online tool that is capable of creating TikTok automatic captions efficiently. You can easily access this online tool from your web browsers. Moreover, it supports more than 100 languages and accents that you can choose to create auto-captions. Also, you can translate your captions into different languages using this tool. To use this tool flawlessly, check the below steps:
Step1 Begin by reaching the official website of Veed.io. Go to its Tools and locate the “Auto Subtitle Generator” option. It will redirect you to another page that consists of the tool information.
Step2 Click “Get Started” and upload a video from your system. Once you are done, tap on “Subtitles” and select “Auto Subtitle” from the given options. Choose your preferred language and tap on “Create Subtitles.”
Step3 After waiting some time, you can see your auto-captions. You can choose the text color, effect, size, and alignment from the given options. Once you are satisfied with the TikTok captions, hit the “Export” button.
Part 3: How to Add Captions to Your TikTok Videos with Filmora
If you want to add further enhancements to your TikTok captions, you can use an offline tool like Wondershare Filmora . Using this platform, you can manually add captions by choosing the suitable style from the presets. Moreover, you can also add customizations to the captions through Filomora easily. You can also upload SRT files on this tool to produce TikTok captions.
Free Download For Win 7 or later(64-bit)
Free Download For macOS 10.14 or later
TikTok automatic captions can be easily generated from Filmora as it offers excellent results through its Speech-to-Text feature. Using this unique feature, you can transcribe the voice in your TikTok videos in up to 16 different languages. To use this feature conveniently, follow the below steps:
Step 1 Import the TikTok Video
Once done with launching and creating the Filmora project on your PC, hit the “Arrow” icon to import your video file on this tool. Now drag and drop the video file to the timeline in order to proceed.
Step 2 Initiate the Automatic Subtitle Feature
On your timeline, tap on the “Speech-to-Text” feature. Choose your language and video clip from the pop-up menu. Wait for some seconds, and the subtitles will be generated automatically. Double-click on the created TikTok automatic captions to open the editing settings. Here, you can select subtitles style and respective time duration. You can also add customizations efficiently.
Step 3 Export the TikTok Video
After completing all the settings, you can click on the “Export” button. Before exporting, you can choose the video resolution and file formats easily. Also, this tool gives you the facility to export the video file directly to your TikTok account.
Part 4: People Also Want to Know
1. How to add captions to TikTok?
To add TikTok captions, you can choose the manual or automatic way. TikTok has a built-in auto-generator through which you can add captions automatically. Moreover, there are different offline and online tools, such as Filmora, CapCut, and Veed.io, through which you can add captions on TikTok flawlessly.
2. How to add captions to TikTok after posting?
If you want to add TikTok captions after posting, you have to download the video on your phone first. Afterward, hit the Plus icon to re-upload the video from your gallery. Choose that particular video again and tap on the Post button. Now you can write the captions on the given space easily. Afterward, tap on the “Post” button.
Last Words
This article has shed light on various ways how to add captions on TikTok efficiently. You can add TikTok captions manually or use the auto-generator for ease. Moreover, we have also highlighted an online tool to create subtitles that can be accessed from any web browser. However, if you want a professional caption editor for a longer run, Wondershare Filmora is the best choice among other tools. It has an easy-to-use interface and achieves accurate results comfortably.
Also read:
- [New] 2023 | How to Check Tiktok Video Copyright Before Uploading for 2024
- [New] In 2024, Navigating Mobile Recorders to Capture Snapchat Moments
- [Updated] 2024 Approved Illuminating iPhones Nighttime Photo Secrets Revealed
- [Updated] 2024 Approved Peeking Beyond One-Camera Limitations
- [Updated] Discovering and Demystifying TikTok's PFP Symbol
- [Updated] In 2024, Viral Beats Top TikTok Hits for a Dance Off
- 2024 Approved Achieving Seamless Group Discussions in Google Chat
- 2024 Approved Gastronomy Goals Viral Eats and Culinary Creations
- The Small Business Video Marketing Playbook
- Title: [Updated] Pioneer Your Personal Brand in TikTok with Dynamic Backgrounds for 2024
- Author: Brian
- Created at : 2024-10-17 17:29:19
- Updated at : 2024-10-18 16:42:21
- Link: https://tiktok-videos.techidaily.com/updated-pioneer-your-personal-brand-in-tiktok-with-dynamic-backgrounds-for-2024/
- License: This work is licensed under CC BY-NC-SA 4.0.