![[Updated] Pioneering Editing Techniques for Immediate Background Transformations in TikTok](https://thmb.techidaily.com/f29016c0fce2f518937f68251a2431a5f707a01cf190eb7eb7552fa0f6fd65d9.jpg)
[Updated] Pioneering Editing Techniques for Immediate Background Transformations in TikTok
Pioneering Editing Techniques for Immediate Background Transformations in TikTok
TikTok has dramatically changed the world for digital content creators. It has provided millions of content creators a platform to design and deliver content to influence their followers. TikTok offers state-of-the-art features, such as filters, overlays, and effects to its worldwide customer base. One such feature is the green screen filter that allows changing the background of the TikTok video. Do you want to know more about the green screen in-built feature? If yes, we have got you professionally covered in the guide that will tell you everything about how to change the TikTok video background. Let’s get started.
In this article
01 Change Video Background with Green Screen Effect in TikTok
02 Get a Green Screen Background from Someone’s TikTok
03 Change TikTok Video Background in Filmora [No Green Screen]
Part 1: How to Change TikTok Video Background with Green Screen Effect?
TikTok has a lot to fascinate its users. You will find loads of features that can help you make your video content engaging. Plus, it also facilitates users to polish their content. Hiding or replacing is one of the techniques to enhance the content’s quality. TikTok comes with an in-built filter that lets you change the video background. This is likely to make your video more compelling. Here’s how you can do it by following the simple steps below.
Step 1: Create a new TikTok video
Launch the TikTok application, log in to your account and tap the + button to capture a new video.
Step 2: Open effects and choose the Green Screen option
Select rear or front camera when directed to video recording window. Choose effects at the bottom-right of the screen. From the available options, look for the green screen option and select it.
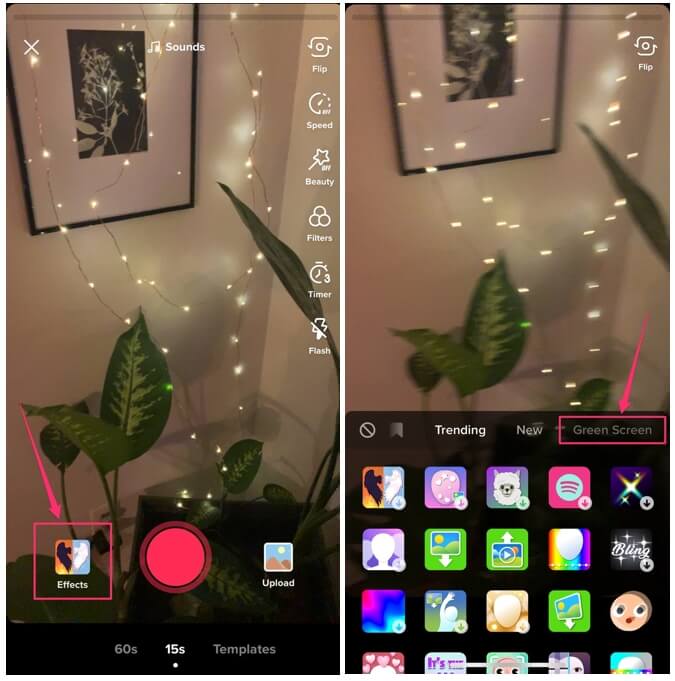
Step 3:: Select the Image to change video background
You can choose any image from your phone’s gallery to utilize it as your background. Once done, hit the Record button to capture video with your customized background.
Note: Apart from selecting your own picture, you can choose from different effects available, including the titled background or AR (augmented reality) features.
Part 2: How to Get a Green Screen Background from Someone’s TikTok?
TikTok recently introduced a fantastic feature to customize or alter your video’s background without even looking for the green screen filter on your own. The “Green Screen Duet Feature.” This feature also lets users apply another person’s video as the background.
Green screens were once only available to those who had access to, well, a green screen. Now the case is different. You can utilize this “Green Screen” feature from the various applications now, allowing you to add a customizable background to your video, and TikTok is one of them. s Various content creators customize their background with effects, a still image, or even a video from their camera roll using the TikTok app.
Imagine scrolling down the TikTok app and finding an eye-catching customized background. Yes! You can utilize it to spice up your videos as well. We have already demonstrated how you can add a green screen effect in TikTok in your videos. But did you also know you can add green screen background from someone else’s video to your TikTok? Even if you didn’t, we have compiled a step-by-step guide that will give you a perfect depiction of how you can pull it off.
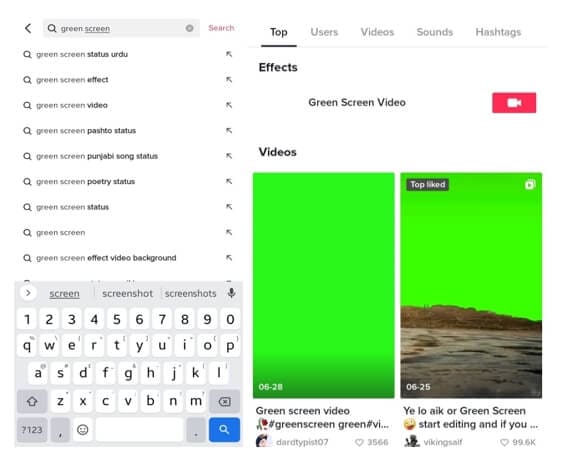
Step 1: Search the Video with Green Screen Effects on TikTok
First and foremost, launch the TikTok app on your phone. Either navigate the video with a green screen effect or type Green Screen in the Search Box to find a video. Open the video and click on the Green Screen Effect in the bottom left of the screen.
Step 2: Make Your Video with the Green Screen Effect
Now, you can record your TikTok video with the green-screen effect used.
Part 3: How to Change TikTok Video Background without Green Screen in Filmora?
For Win 7 or later (64-bit)
For macOS 10.12 or later
Wondershare Filmora is one of the most popular video editing software among YouTubers. With the latest Auto-Reframe feature, you can create social media videos easier and faster. With Filmora, you can change backgrounds in your videos in various ways, with or without a green screen.
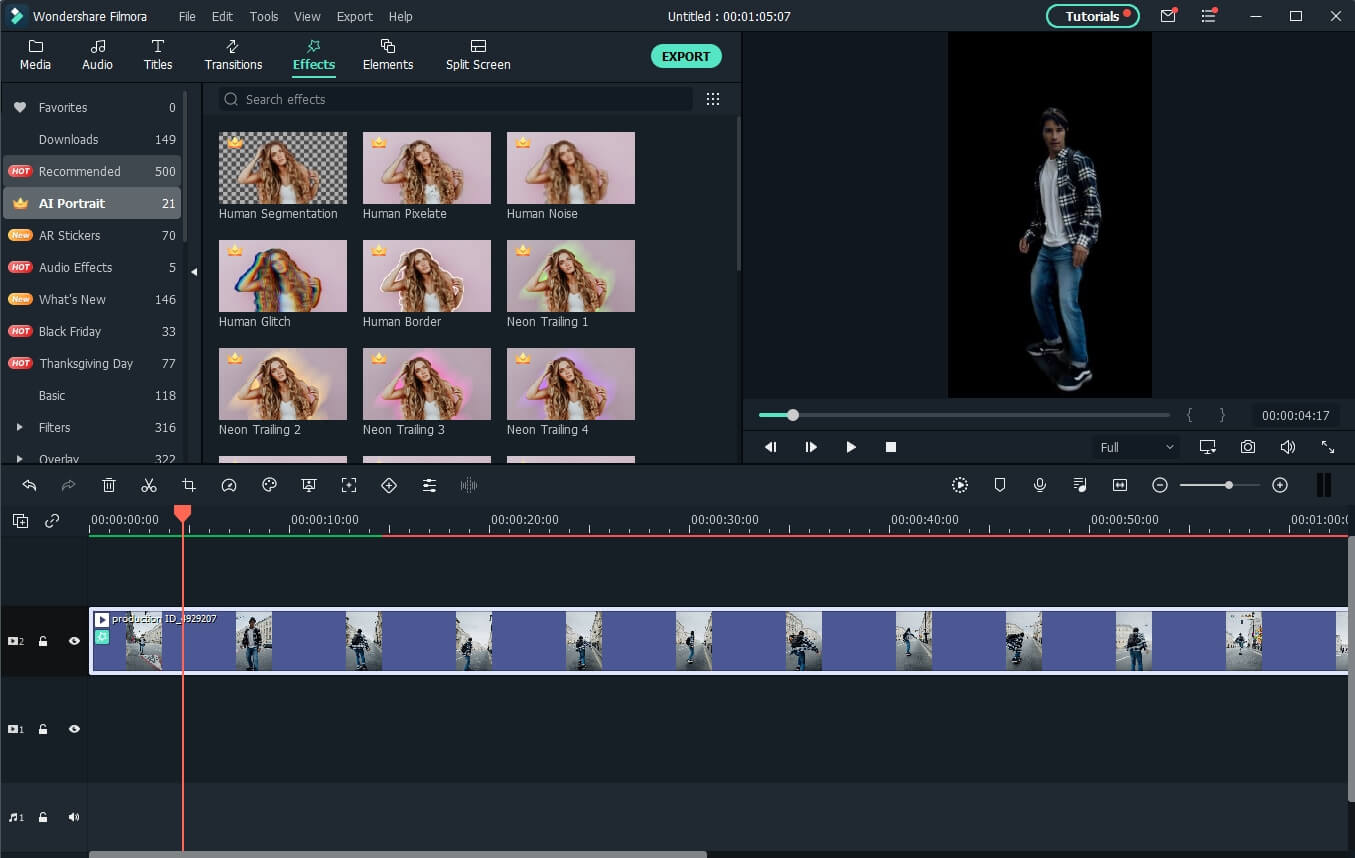
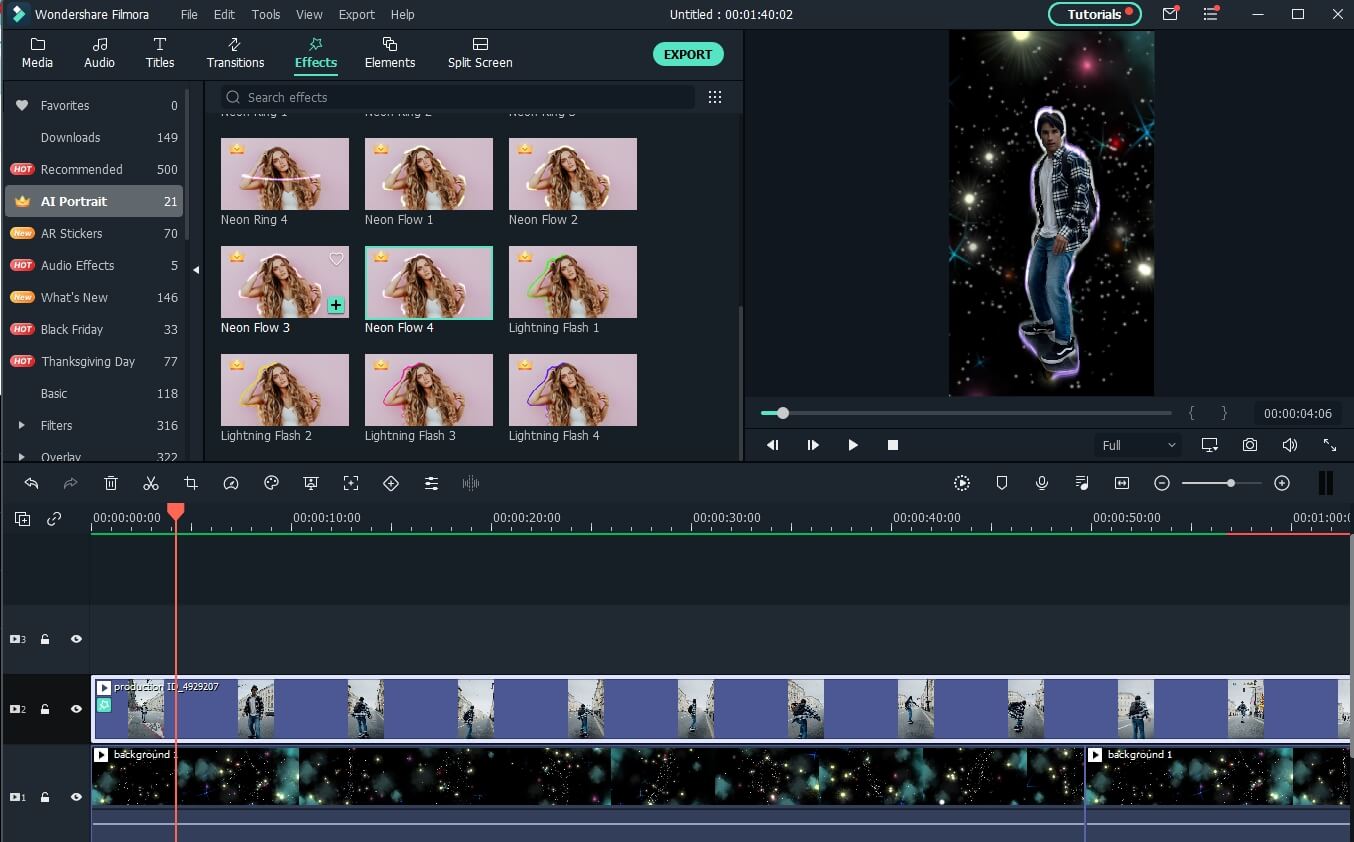
The Human Segmentation effect in Filmora’s AI Portrait lets you eliminate people from a movie’s background instead of using a green screen. It needs a very few mouse clicks, and it works the best when there are people next to the camera.
After you’ve eliminated the background, you’ll be able to see the primary foreground of your video in live time. You can then supplement your actual video with a picture or a background. You can also use the video without the background as an intermediate layer on top of another video. Follow the below steps to change the video background using this feature:
Step 1: Import Video to Timeline
Launch Filmora on your Windows PC or Mac, and then import the video to the timeline by clicking on the File and then Import Media.
Step 2: Apply Human Segmentation
Go to Effects and then select the AI Portrait to see all of the AI Portrait effects. Move the human segmentation effect to the video timeline.
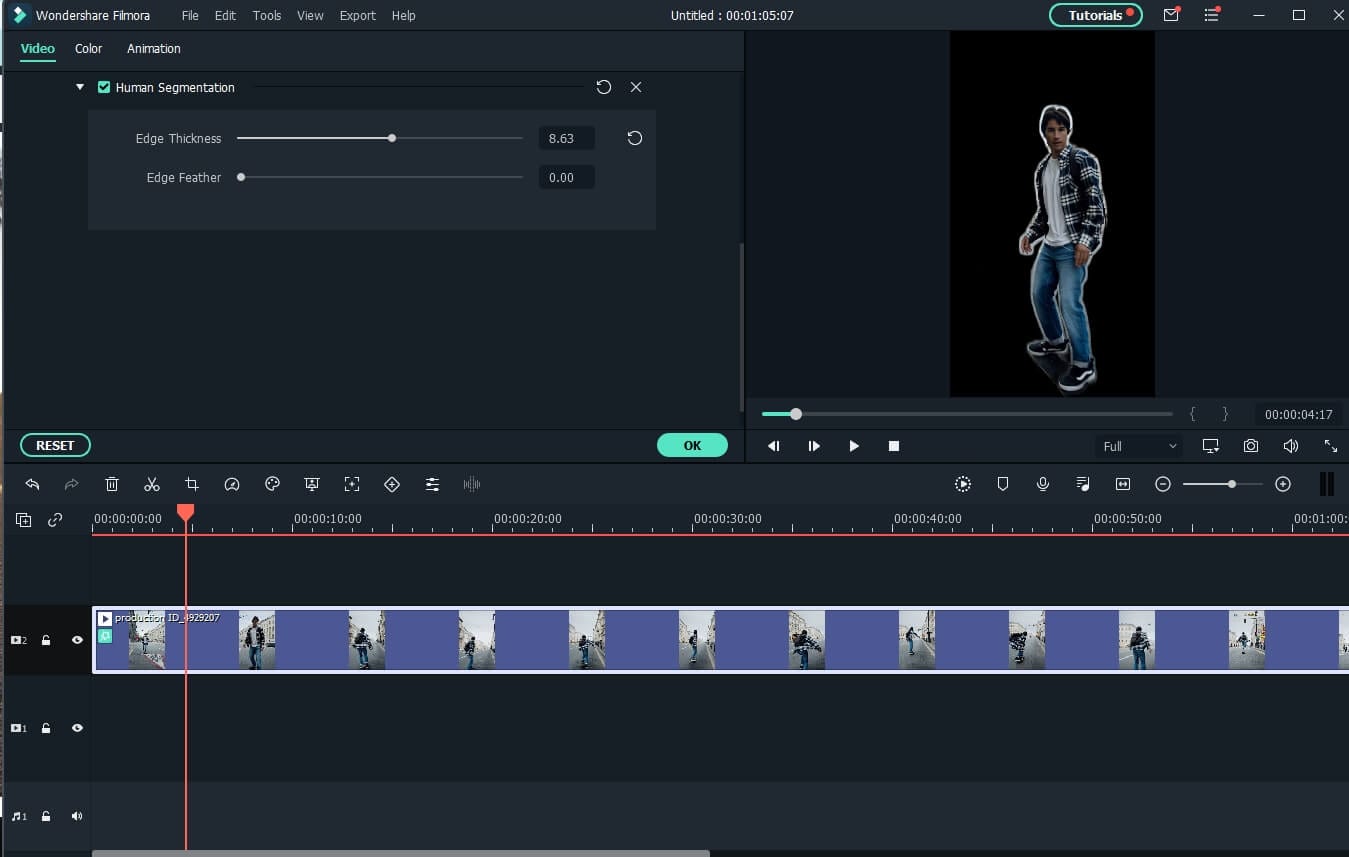
Step 3: Adjust the Effect Setting (Optional)
In the preview window, you’ll notice that the subject has been separated from the video background. If necessary, double-click the video in the timeline and find the video effect field to modify the edge, thickness, and feather. You can also try the neon borders and glowing flow effects under the AI Portrait category to have some fun.
Step 4: Change the Background
Now, drop the background video to the track below the video clip to change the video background.
Step 5: Export the video with new background
Preview the final result and then click the Export button to save the video on your computer.
Note: Check this guide to find out how to upload TikTok videos on your desktop
Conclusion
To lure the viewer’s attention, there is always a necessity to create visual and audio effects in a TikTok video. A TikTok video maker may not always have the privilege of the ideal location and surroundings to make a video stand out in the vast online market. A simple way out is to use software-based simulation, which means replacing the video background with the required one rather than the original. After reading the article, we hope that you don’t have any concerns about how to change the TikTok video background.
02 Get a Green Screen Background from Someone’s TikTok
03 Change TikTok Video Background in Filmora [No Green Screen]
Part 1: How to Change TikTok Video Background with Green Screen Effect?
TikTok has a lot to fascinate its users. You will find loads of features that can help you make your video content engaging. Plus, it also facilitates users to polish their content. Hiding or replacing is one of the techniques to enhance the content’s quality. TikTok comes with an in-built filter that lets you change the video background. This is likely to make your video more compelling. Here’s how you can do it by following the simple steps below.
Step 1: Create a new TikTok video
Launch the TikTok application, log in to your account and tap the + button to capture a new video.
Step 2: Open effects and choose the Green Screen option
Select rear or front camera when directed to video recording window. Choose effects at the bottom-right of the screen. From the available options, look for the green screen option and select it.
Step 3:: Select the Image to change video background
You can choose any image from your phone’s gallery to utilize it as your background. Once done, hit the Record button to capture video with your customized background.
Note: Apart from selecting your own picture, you can choose from different effects available, including the titled background or AR (augmented reality) features.
Part 2: How to Get a Green Screen Background from Someone’s TikTok?
TikTok recently introduced a fantastic feature to customize or alter your video’s background without even looking for the green screen filter on your own. The “Green Screen Duet Feature.” This feature also lets users apply another person’s video as the background.
Green screens were once only available to those who had access to, well, a green screen. Now the case is different. You can utilize this “Green Screen” feature from the various applications now, allowing you to add a customizable background to your video, and TikTok is one of them. s Various content creators customize their background with effects, a still image, or even a video from their camera roll using the TikTok app.
Imagine scrolling down the TikTok app and finding an eye-catching customized background. Yes! You can utilize it to spice up your videos as well. We have already demonstrated how you can add a green screen effect in TikTok in your videos. But did you also know you can add green screen background from someone else’s video to your TikTok? Even if you didn’t, we have compiled a step-by-step guide that will give you a perfect depiction of how you can pull it off.
Step 1: Search the Video with Green Screen Effects on TikTok
First and foremost, launch the TikTok app on your phone. Either navigate the video with a green screen effect or type Green Screen in the Search Box to find a video. Open the video and click on the Green Screen Effect in the bottom left of the screen.
Step 2: Make Your Video with the Green Screen Effect
Now, you can record your TikTok video with the green-screen effect used.
Part 3: How to Change TikTok Video Background without Green Screen in Filmora?
For Win 7 or later (64-bit)
For macOS 10.12 or later
Wondershare Filmora is one of the most popular video editing software among YouTubers. With the latest Auto-Reframe feature, you can create social media videos easier and faster. With Filmora, you can change backgrounds in your videos in various ways, with or without a green screen.
The Human Segmentation effect in Filmora’s AI Portrait lets you eliminate people from a movie’s background instead of using a green screen. It needs a very few mouse clicks, and it works the best when there are people next to the camera.
After you’ve eliminated the background, you’ll be able to see the primary foreground of your video in live time. You can then supplement your actual video with a picture or a background. You can also use the video without the background as an intermediate layer on top of another video. Follow the below steps to change the video background using this feature:
Step 1: Import Video to Timeline
Launch Filmora on your Windows PC or Mac, and then import the video to the timeline by clicking on the File and then Import Media.
Step 2: Apply Human Segmentation
Go to Effects and then select the AI Portrait to see all of the AI Portrait effects. Move the human segmentation effect to the video timeline.
Step 3: Adjust the Effect Setting (Optional)
In the preview window, you’ll notice that the subject has been separated from the video background. If necessary, double-click the video in the timeline and find the video effect field to modify the edge, thickness, and feather. You can also try the neon borders and glowing flow effects under the AI Portrait category to have some fun.
Step 4: Change the Background
Now, drop the background video to the track below the video clip to change the video background.
Step 5: Export the video with new background
Preview the final result and then click the Export button to save the video on your computer.
Note: Check this guide to find out how to upload TikTok videos on your desktop
Conclusion
To lure the viewer’s attention, there is always a necessity to create visual and audio effects in a TikTok video. A TikTok video maker may not always have the privilege of the ideal location and surroundings to make a video stand out in the vast online market. A simple way out is to use software-based simulation, which means replacing the video background with the required one rather than the original. After reading the article, we hope that you don’t have any concerns about how to change the TikTok video background.
Becoming an Instagrammable Replica: A Comprehensive Guide to Duplicating Oneself on TikTok
How to Clone Yourself on TikTok

Shanoon Cox
Mar 27, 2024• Proven solutions
Every rising pop star needs music videos, but using professional video editing software may be too time-consuming if you want to quickly create a clone video you can share with your fans on TikTok.
Multiplying yourself in a video is a cool way of making sure that your video is going to get the kind of attention it deserves. The process of cloning yourself in a video is a simple one, but there are certain rules you have to follow while recording the footage that will help you avoid overlapping the figures you’re cloning. Here’s how you can make your first clone yourself video on TikTok.

Selecting the Song for your Clone Video
Before you start shooting the video you first need to select the song on TikTok you’re going to use in the video. Once you’ve found the perfect track simply record it and save it as a video to your camera roll. You can then import the video clip that contains the song into the Video Star app.
Here are 10 Popular TikTok Songs for you.

Using the Video Star App to Clone Yourself
1. Download Video Star App
Choosing a location, mounting your iPhone on a tripod, or picking the positions for each of your clones are all important steps you’ll need to take before you actually start recording. There are several apps that enable you to create clone videos easily, but in this article, we are going to show you how you can clone yourself with Video Star. The app can be downloaded from the App Store for free, but additional in-app purchases are necessary if you want to have access to all the power packs Video Star offers. You don’t have to record the video clips with this app since the iPhone’s native camera app is powerful enough to enable you to record high-quality footage.
2. Edit Multiple Video Clips
After you record all the positions for your next clone video with the iPhone’s native camera app, you should cut the video clips and keep only the parts where you are perfectly positioned, so your position in one clip doesn’t overlap with other positions. During the video recording process try to create as much separation between two positions in order to avoid any chance of overlapping. One of the best ways to achieve this is to shoot at a location that is spacious enough so you can make enough separation between two positions. Keep in mind that the maximum number of clips you can combine in the Video Star app is limited to just three, so if you want to have more than three clones in the shot you first have to piece together three clips, save them as a single file and then add more clips to the cloned video you created.
3. Level up Your Videos with Video Star
Video Star also enables you to shoot your videos from the app, and you can adjust the Countdown before the app starts recording or the Recording Speed. Make sure to enter the lowest Recording Speed value possible, because that way you’ll be recording like TikTok does on fast.
Tap the Record button, then select the Multiple options, and play the video that contains the song you previously selected. Once you reach the spot in the song where you want to introduce the clone simply tap Set, so the recording will stop at the designated point and you can move to another position. If at any point during recording you realize that your movements extend to your clone’s location, you can simply tap on the hamburger icon and select the Delete Last option.
To preview the video, you just have to tap on the Scissors icon, and the recorded video will automatically start playing. The Record New Clip in the Scissors menu lets you start from the beginning in case you’re not happy with the results or you can use this option to start recording the video with the second position of your clone.
When done, head back to the Scissors menu, and tap on the Multi-Layer Clip. This feature doesn’t come with the free version of the app, and you must purchase it in order to create a clone video. This action will enable you to select the back and front clips. After selecting the clips, the Mask Front menu will appear on the screen, choose the Shape option and use the hamburger icon on the right side of the screen to change the video’s shape to Rectangle. Drag the rectangle in the preview window so you can crop the first clip to match the demands of your video and press the Next icon to continue the video editing process.
Alternatively, you can use the Erase option to remove the unwanted parts of each video. You can find this option in the Mask Front or Mask Back menu, so just select it and use your finger to remove sections of the shot you don’t want to use.
The Add Effect menu will pop up on the screen so you can add different effects to your first video clip, and then repeat the entire process for the back clip. Once you’ve edited the second clip tap on the Create button to complete the process of making a multilayer clip. Tap Done to save the clip to your camera roll, and upload it to TikTok.
Conclusion
Cloning yourself in a video using the Video Star app is a simple process that can be mastered in a short period of time. The Video Star app lets you create as many clones of yourself as you want, so you just have to make sure that your video clips can be easily combined to feature two or more of your clones and have fun exploring the effects that can make your videos look even cooler. If you want to be a success on the TikTok platform, learning how to make clone videos is one of the best ways to do it, so choose your favorite songs and start producing clone yourself videos.
You can also use Wondershare Filmora to make a split-screen with ease. Check the tutorial below to figure out how to make a split-screen video to clone.


Shanoon Cox
Shanoon Cox is a writer and a lover of all things video.
Follow @Shanoon Cox
Shanoon Cox
Mar 27, 2024• Proven solutions
Every rising pop star needs music videos, but using professional video editing software may be too time-consuming if you want to quickly create a clone video you can share with your fans on TikTok.
Multiplying yourself in a video is a cool way of making sure that your video is going to get the kind of attention it deserves. The process of cloning yourself in a video is a simple one, but there are certain rules you have to follow while recording the footage that will help you avoid overlapping the figures you’re cloning. Here’s how you can make your first clone yourself video on TikTok.
Selecting the Song for your Clone Video
Before you start shooting the video you first need to select the song on TikTok you’re going to use in the video. Once you’ve found the perfect track simply record it and save it as a video to your camera roll. You can then import the video clip that contains the song into the Video Star app.
Here are 10 Popular TikTok Songs for you.
Using the Video Star App to Clone Yourself
1. Download Video Star App
Choosing a location, mounting your iPhone on a tripod, or picking the positions for each of your clones are all important steps you’ll need to take before you actually start recording. There are several apps that enable you to create clone videos easily, but in this article, we are going to show you how you can clone yourself with Video Star. The app can be downloaded from the App Store for free, but additional in-app purchases are necessary if you want to have access to all the power packs Video Star offers. You don’t have to record the video clips with this app since the iPhone’s native camera app is powerful enough to enable you to record high-quality footage.
2. Edit Multiple Video Clips
After you record all the positions for your next clone video with the iPhone’s native camera app, you should cut the video clips and keep only the parts where you are perfectly positioned, so your position in one clip doesn’t overlap with other positions. During the video recording process try to create as much separation between two positions in order to avoid any chance of overlapping. One of the best ways to achieve this is to shoot at a location that is spacious enough so you can make enough separation between two positions. Keep in mind that the maximum number of clips you can combine in the Video Star app is limited to just three, so if you want to have more than three clones in the shot you first have to piece together three clips, save them as a single file and then add more clips to the cloned video you created.
3. Level up Your Videos with Video Star
Video Star also enables you to shoot your videos from the app, and you can adjust the Countdown before the app starts recording or the Recording Speed. Make sure to enter the lowest Recording Speed value possible, because that way you’ll be recording like TikTok does on fast.
Tap the Record button, then select the Multiple options, and play the video that contains the song you previously selected. Once you reach the spot in the song where you want to introduce the clone simply tap Set, so the recording will stop at the designated point and you can move to another position. If at any point during recording you realize that your movements extend to your clone’s location, you can simply tap on the hamburger icon and select the Delete Last option.
To preview the video, you just have to tap on the Scissors icon, and the recorded video will automatically start playing. The Record New Clip in the Scissors menu lets you start from the beginning in case you’re not happy with the results or you can use this option to start recording the video with the second position of your clone.
When done, head back to the Scissors menu, and tap on the Multi-Layer Clip. This feature doesn’t come with the free version of the app, and you must purchase it in order to create a clone video. This action will enable you to select the back and front clips. After selecting the clips, the Mask Front menu will appear on the screen, choose the Shape option and use the hamburger icon on the right side of the screen to change the video’s shape to Rectangle. Drag the rectangle in the preview window so you can crop the first clip to match the demands of your video and press the Next icon to continue the video editing process.
Alternatively, you can use the Erase option to remove the unwanted parts of each video. You can find this option in the Mask Front or Mask Back menu, so just select it and use your finger to remove sections of the shot you don’t want to use.
The Add Effect menu will pop up on the screen so you can add different effects to your first video clip, and then repeat the entire process for the back clip. Once you’ve edited the second clip tap on the Create button to complete the process of making a multilayer clip. Tap Done to save the clip to your camera roll, and upload it to TikTok.
Conclusion
Cloning yourself in a video using the Video Star app is a simple process that can be mastered in a short period of time. The Video Star app lets you create as many clones of yourself as you want, so you just have to make sure that your video clips can be easily combined to feature two or more of your clones and have fun exploring the effects that can make your videos look even cooler. If you want to be a success on the TikTok platform, learning how to make clone videos is one of the best ways to do it, so choose your favorite songs and start producing clone yourself videos.
You can also use Wondershare Filmora to make a split-screen with ease. Check the tutorial below to figure out how to make a split-screen video to clone.
Shanoon Cox
Shanoon Cox is a writer and a lover of all things video.
Follow @Shanoon Cox
Also read:
- [New] 2024 Approved Android & iPhone The Ultimate Guide to Saving TikTok
- [New] Who Are the Kings of TikTok Gameplay for 2024
- [Updated] In 2024, Bold Framing Integrating Large Headscapes Into TikTok
- [Updated] In 2024, Elevate Your Instagram Aesthetic with New and Old Filters
- [Updated] Master VLC Tips Revealing Unknown Features for 2024
- [Updated] Mastering YouTube Trailer Creation with Filmora
- [Updated] Top 15 Innovative TikTok Challenges Unveiled for 2024
- 2024 Approved Crossing the Line Guesting in Friends' TikTok Shows
- 2024 Approved Discover the Top 5 Audio Editors Empowering VTuber Creators
- 2024 Approved Efface Markings IOS/Android Apps for Clear Videos
- Analyzing the Differences Twitch vs YouTube Platforms for 2024
- In 2024, Downloading SamFw FRP Tool 3.0 for Nokia C32
- In 2024, How Can We Bypass Nokia C210 FRP?
- In 2024, Plunge Into Quality Leading Camcorders for Aquatic Adventurers
- In 2024, TikTok Tricks Faster Video Loading
- Perfecting Your Snap with Snapchat's Inbuilt Editing Tools
- Top-Rated Gaming Headsets : Comprehensive Review by Tech Experts | PCMag
- Title: [Updated] Pioneering Editing Techniques for Immediate Background Transformations in TikTok
- Author: Brian
- Created at : 2024-11-18 16:17:06
- Updated at : 2024-11-24 16:11:40
- Link: https://tiktok-videos.techidaily.com/updated-pioneering-editing-techniques-for-immediate-background-transformations-in-tiktok/
- License: This work is licensed under CC BY-NC-SA 4.0.