
!["[Updated] Soundscaping Sculpting Serenity From Static for 2024"](https://www.lifewire.com/thmb/D2mK3KYzBfDvTd6hJrI_NUo6miQ=/400x300/filters:no_upscale():max_bytes(150000):strip_icc()/how-to-post-a-video-on-twitter-4589824-3f57aabcb3554c58bc8d55d90c5c336a.jpg)
"[Updated] Soundscaping Sculpting Serenity From Static for 2024"
Soundscaping: Sculpting Serenity From Static
The most frequent request you’ll get from video makers is to eliminate irritating noises like rumbling or humming from an original clip. Almost all of the time, capturing high-quality audio during filming is challenging since the conversation is often hard to hear or is made unclear due to surrounding noises, such as the dreadful air conditioners or fans.
To get rid of all these awful noises, this Audacity Noise Reduction feature will serve you a significant purpose in removing unwanted background noise for your future videos. Without further ado, let’s get started!
In this article
01 Things You Need to Prepare for Background Noise Reduction
02 How to Remove Background Noise in Audacity?
03 Why is Audacity Noise Reduction Not Working?
04 How to Prevent Background Noise in Audio Recording?
05 How to Remove Background Noise in Filmora?
Part 1: Things You Need to Prepare for Background Noise Reduction
Here are few things that you need to consider before you apply the noise reduction to your clips:
1. Noise Sample
A decent sample of the noise you wish to eliminate is perhaps the most crucial aspect of the Audacity remove noise procedure.
This will be used by Audacity to understand the noise and build a noise profile. The noise recording should last for a fair amount of time and be devoid of any other noises.
2. Avoid Copy Pasting Tiny Noise Section in Your Spoken Phrases
When you have a tiny part of noise between your stated words on your audio, please don’t copy/paste it to make a more significant piece of sound for Audacity to examine.
You would not be supplying Audacity with any more information that will help it generate a decent noise profile. The noise profile is what enables Audacity to tell the difference between speech and noise.
3. Minimum 2048 Data Samples Required
To build a noise profile, the Noise Reduction function requires a minimum of 2048 sample data. An audio file with a sampling frequency of 44.1kHz is roughly five hundredths of a second.
Note that this is the minor sound level that Audacity needs to generate a noise profile; however, should you supply a larger sample of the noise, Audacity can typically perform a great job of producing a suitable noise profile. As a result, attempt to capture a few seconds of background noises wherever possible.
4. Establish Recording Level and Record “Silence”
Setting your audio volume and capturing some “quiet” prior to speaking is the best way to achieve this. Instead, when you’ve finished talking, keep your camera/recorder going for a few moments.
Don’t move or create any sounds while capturing the background noises, and keep an ear open for any other noises. You only need to capture the ambient noise for a few moments; two to five seconds will suffice.
Part 2: How to Remove Background Noise in Audacity on Windows and Mac?
Whether you are using Windows or macOS, we will show you a step-by-step process to achieve your results using both software in this part of Audacity remove background music guide.
Remove background noise in Audacity on Windows
Step 1: On your recording, select a few moments of sound. Any segment of noise that incorporates other noises should be avoided.

Step 2: From the Effect menu, select Noise Reduction.

Step 3: Select the Get Noise Profile option whenever the Noise Reduction effect screen appears.

Note: Choose whether to implement the noise removal to the entire waveforms or only a portion of it.
Step 4: To access the Noise Reduction effects window, go to Effects > Noise Reduction. Raise the level of noise reduction progressively while previewing the result.

Step 5: Head over to the File section to Export and Save the result. Audacity does not save sound clips when you select Save Project; instead, you must choose Export. Select the file type you want to store and the place wherever you can save it. Select Save after giving the File Name.

Remove background noise in Audacity on Mac
Step 1: Create a room tone-containing audio file. When you don’t have a separate track for room tone, use a recording with a few moments of quiet in it. Click-and-drag to select a segment with a few minutes of silence using the Selection Tool.

Step 2: Select Noise Reduction from the Effects tab. Select the Get Noise Profile tab in the new tab under Step 1. The screen will shut, and Audacity will take noise profile samples of the indicated area.

Step 3: Click-and-drag to select the whole file, which requires noise reduction with the Selection Tool. To re-open the function, go to the Effect tab and pick Noise Reduction. Make modifications to the following parameters under Step 2:
- Reduce and Residue
- Frequency Smoothing (bands)
- Sensitivity
- Noise Reduction

Step 4: To listen to how the chosen file will look with the selected parameters, select Preview. Re-adjust until you have a sound noise reduction with no interference. When you’re finished, select Reduce and click OK.
Part 3: Why is Audacity Noise Reduction Not Working?
It’s possible that the Noise Reduction function isn’t letting you mop up your recording since your audio isn’t appropriate for it. The disturbance must be continuous, not random or fluctuating, to work for Audacity’s Noise Reduction function.
For example, the Noise Reduction function will not assist if your audio was made in a busy environment with unique noises such as background chatter, random traffic noises, or in an exhibition space or museum. The Noise Reduction feature in Audacity isn’t meant to cope with that kind of distortion. You’ll need to alter your recording approach if you’re capturing voice in either of those situations.
Under the following situations, the Audacity Noise Reduction function might underperform.
- Particular noise in the background, including traffic or people.
- When the harmonics of the sound and voice are comparable.
- There is sound variance where there is fluctuation in the noise.
- The volume of the voice is comparable to or lower than that of the background noise.
- When the noise is irregular or changeable rather than continuous.
- The loudness is deafening.
- The sound is a single click or pop.
Part 4: How to Prevent Background Noise in Audio Recording?
Although Audacity allows eliminating noise very simply, it is still an additional level that takes time to refine your podcast production. These pointers can help you avoid the necessity for noise reduction and cut down on the amount of time you spend processing.
1. Reduce the Computer Fan Noise
Whenever computers become too heated, they can produce a lot of noise. You may limit the amount of software that runs and position your mic away from the keyboard to help lessen this impact and avoid the fan from coming on.
However, even if you observe all of these guidelines, undesired recording sounds may still appear in your program. Fortunately, contemporary software makes this problem quite simple to resolve.
2. Reduce the Gain and Get Close to the Mic
Reduce the gain (sensitivity of the microphone) and go nearer to it. Talking straight into the microphone won’t distort your audio if you reduce the gain, and that would assist your microphone in concentrating on scooping up your voice’s tone.
Bonus Tip: Set your recorder’s (or DAW’s) sensitivity such that your speech peaks between -12 and -10db.
3. Utilize a Versatile Microphone
Condenser and dynamic microphones are the two most common types of podcast microphones. Condenser microphones are significantly more sensitive instruments meant to take up average atmospheric noise, whereas dynamic microphones have a narrower frequency range, picking up fewer ambient noises.
4. Optimize Your Recording Environment
The most significant and most crucial aspect of your podcasts’ sound quality is where you capture it. To optimize your personal podcasting space, we recommend choosing a peaceful, compact area away from HVAC systems, vehicles, external hard drives, background sound, motors, and other distractions. You may also increase the tone of your room by using natural sound absorbents such as curtains, rugs, carpets, and sofas.
Part 5: How to Remove Background Noise in Filmora?
Although there is a lot of software available to eliminate ambient noise, we highly suggest Wondershare Filmora Video Editor to edit audio and video in one place.
In addition to the standard audio editing capabilities, the recently redesigned Filmora currently includes enhanced waveforms, volume Keyframing , peak metering, and audio transitions, giving you a better audio editing interface.
For Win 7 or later (64-bit)
For macOS 10.12 or later
Filmora Video Editor will quickly remove ambient sound from both sound/video. You may also remove the sound from the video with this simple video editor, use the Audio Equalizer or Audio Mixer functions to modify the audio further, and then Export and save the audio in an Mp3 file. Here are the detailed steps:
Step 1: In the Wondershare Filmora Timeline menu, Import your footage. Trim the footage after previewing it and deleting the sections you don’t want to retain.

Step 2: To eliminate the ambient noise immediately, double-click on the video file, and go to the Audio panel to select the Remove Background Noise option. You will find that the background noise is removed automatically.

Step 3: After checking the results, select Export to download the noise-reduced clip to your desktop or upload it immediately to YouTube or Vimeo.

Conclusion
Well, there you have it. In this Audacity Remove Background Noise guide, we have reviewed every possible method you can adopt to get rid of the unnecessary background noise in the Audacity. And if the desired results are still not achieved, we highly recommend using the Wondershare Filmora editing software. Not only will it help you remove the unwanted ambient noise, but it will also allow you to customize your audio or video file further.
02 How to Remove Background Noise in Audacity?
03 Why is Audacity Noise Reduction Not Working?
04 How to Prevent Background Noise in Audio Recording?
05 How to Remove Background Noise in Filmora?
Part 1: Things You Need to Prepare for Background Noise Reduction
Here are few things that you need to consider before you apply the noise reduction to your clips:
1. Noise Sample
A decent sample of the noise you wish to eliminate is perhaps the most crucial aspect of the Audacity remove noise procedure.
This will be used by Audacity to understand the noise and build a noise profile. The noise recording should last for a fair amount of time and be devoid of any other noises.
2. Avoid Copy Pasting Tiny Noise Section in Your Spoken Phrases
When you have a tiny part of noise between your stated words on your audio, please don’t copy/paste it to make a more significant piece of sound for Audacity to examine.
You would not be supplying Audacity with any more information that will help it generate a decent noise profile. The noise profile is what enables Audacity to tell the difference between speech and noise.
3. Minimum 2048 Data Samples Required
To build a noise profile, the Noise Reduction function requires a minimum of 2048 sample data. An audio file with a sampling frequency of 44.1kHz is roughly five hundredths of a second.
Note that this is the minor sound level that Audacity needs to generate a noise profile; however, should you supply a larger sample of the noise, Audacity can typically perform a great job of producing a suitable noise profile. As a result, attempt to capture a few seconds of background noises wherever possible.
4. Establish Recording Level and Record “Silence”
Setting your audio volume and capturing some “quiet” prior to speaking is the best way to achieve this. Instead, when you’ve finished talking, keep your camera/recorder going for a few moments.
Don’t move or create any sounds while capturing the background noises, and keep an ear open for any other noises. You only need to capture the ambient noise for a few moments; two to five seconds will suffice.
Part 2: How to Remove Background Noise in Audacity on Windows and Mac?
Whether you are using Windows or macOS, we will show you a step-by-step process to achieve your results using both software in this part of Audacity remove background music guide.
Remove background noise in Audacity on Windows
Step 1: On your recording, select a few moments of sound. Any segment of noise that incorporates other noises should be avoided.
Step 2: From the Effect menu, select Noise Reduction.
Step 3: Select the Get Noise Profile option whenever the Noise Reduction effect screen appears.
Note: Choose whether to implement the noise removal to the entire waveforms or only a portion of it.
Step 4: To access the Noise Reduction effects window, go to Effects > Noise Reduction. Raise the level of noise reduction progressively while previewing the result.
Step 5: Head over to the File section to Export and Save the result. Audacity does not save sound clips when you select Save Project; instead, you must choose Export. Select the file type you want to store and the place wherever you can save it. Select Save after giving the File Name.
Remove background noise in Audacity on Mac
Step 1: Create a room tone-containing audio file. When you don’t have a separate track for room tone, use a recording with a few moments of quiet in it. Click-and-drag to select a segment with a few minutes of silence using the Selection Tool.
Step 2: Select Noise Reduction from the Effects tab. Select the Get Noise Profile tab in the new tab under Step 1. The screen will shut, and Audacity will take noise profile samples of the indicated area.
Step 3: Click-and-drag to select the whole file, which requires noise reduction with the Selection Tool. To re-open the function, go to the Effect tab and pick Noise Reduction. Make modifications to the following parameters under Step 2:
- Reduce and Residue
- Frequency Smoothing (bands)
- Sensitivity
- Noise Reduction
Step 4: To listen to how the chosen file will look with the selected parameters, select Preview. Re-adjust until you have a sound noise reduction with no interference. When you’re finished, select Reduce and click OK.
Part 3: Why is Audacity Noise Reduction Not Working?
It’s possible that the Noise Reduction function isn’t letting you mop up your recording since your audio isn’t appropriate for it. The disturbance must be continuous, not random or fluctuating, to work for Audacity’s Noise Reduction function.
For example, the Noise Reduction function will not assist if your audio was made in a busy environment with unique noises such as background chatter, random traffic noises, or in an exhibition space or museum. The Noise Reduction feature in Audacity isn’t meant to cope with that kind of distortion. You’ll need to alter your recording approach if you’re capturing voice in either of those situations.
Under the following situations, the Audacity Noise Reduction function might underperform.
- Particular noise in the background, including traffic or people.
- When the harmonics of the sound and voice are comparable.
- There is sound variance where there is fluctuation in the noise.
- The volume of the voice is comparable to or lower than that of the background noise.
- When the noise is irregular or changeable rather than continuous.
- The loudness is deafening.
- The sound is a single click or pop.
Part 4: How to Prevent Background Noise in Audio Recording?
Although Audacity allows eliminating noise very simply, it is still an additional level that takes time to refine your podcast production. These pointers can help you avoid the necessity for noise reduction and cut down on the amount of time you spend processing.
1. Reduce the Computer Fan Noise
Whenever computers become too heated, they can produce a lot of noise. You may limit the amount of software that runs and position your mic away from the keyboard to help lessen this impact and avoid the fan from coming on.
However, even if you observe all of these guidelines, undesired recording sounds may still appear in your program. Fortunately, contemporary software makes this problem quite simple to resolve.
2. Reduce the Gain and Get Close to the Mic
Reduce the gain (sensitivity of the microphone) and go nearer to it. Talking straight into the microphone won’t distort your audio if you reduce the gain, and that would assist your microphone in concentrating on scooping up your voice’s tone.
Bonus Tip: Set your recorder’s (or DAW’s) sensitivity such that your speech peaks between -12 and -10db.
3. Utilize a Versatile Microphone
Condenser and dynamic microphones are the two most common types of podcast microphones. Condenser microphones are significantly more sensitive instruments meant to take up average atmospheric noise, whereas dynamic microphones have a narrower frequency range, picking up fewer ambient noises.
4. Optimize Your Recording Environment
The most significant and most crucial aspect of your podcasts’ sound quality is where you capture it. To optimize your personal podcasting space, we recommend choosing a peaceful, compact area away from HVAC systems, vehicles, external hard drives, background sound, motors, and other distractions. You may also increase the tone of your room by using natural sound absorbents such as curtains, rugs, carpets, and sofas.
Part 5: How to Remove Background Noise in Filmora?
Although there is a lot of software available to eliminate ambient noise, we highly suggest Wondershare Filmora Video Editor to edit audio and video in one place.
In addition to the standard audio editing capabilities, the recently redesigned Filmora currently includes enhanced waveforms, volume Keyframing , peak metering, and audio transitions, giving you a better audio editing interface.
For Win 7 or later (64-bit)
For macOS 10.12 or later
Filmora Video Editor will quickly remove ambient sound from both sound/video. You may also remove the sound from the video with this simple video editor, use the Audio Equalizer or Audio Mixer functions to modify the audio further, and then Export and save the audio in an Mp3 file. Here are the detailed steps:
Step 1: In the Wondershare Filmora Timeline menu, Import your footage. Trim the footage after previewing it and deleting the sections you don’t want to retain.
Step 2: To eliminate the ambient noise immediately, double-click on the video file, and go to the Audio panel to select the Remove Background Noise option. You will find that the background noise is removed automatically.
Step 3: After checking the results, select Export to download the noise-reduced clip to your desktop or upload it immediately to YouTube or Vimeo.
Conclusion
Well, there you have it. In this Audacity Remove Background Noise guide, we have reviewed every possible method you can adopt to get rid of the unnecessary background noise in the Audacity. And if the desired results are still not achieved, we highly recommend using the Wondershare Filmora editing software. Not only will it help you remove the unwanted ambient noise, but it will also allow you to customize your audio or video file further.
TikTok Audio Enhancement Made Easy
How to Use Text to Speech on TikTok - A Complete Guide

Shanoon Cox
Mar 27, 2024• Proven solutions
Ever since its arrival, TikTok has been a dominant force in the world of social media. A mix of lip sync videos, music, and micro-video content, TikTok is extremely popular with Gen Z. Over the years, TikTok has continued to enhance the user experience by adding new features, effects, and guidelines.
Text-to-speech is one of the newest features to be added to the popular platform and it provides an additional way to add something innovative to the video uploads. Announced in December 2020, text to speech on TikTok lets creators put their text over their videos and have a Siri-like voice read it out loud.
TikTok’s text-to-speech feature was added to make the platform accessible to more people by providing an easy way for text to be heard as well as read. Consequently, using this option in video creation is one way that content creators can ensure their videos appeal to a larger number of viewers, while also offering a more comprehensive experience in general.
Since its launch, the feature has been going viral. Many find the automated voice to be a selling point in itself and something that adds a different element to the content. Also, it is a great way to get a message across without actually speaking during the video. No matter the reason it is used, the fact that many are turning to text-to-speech makes it a great addition to TikTok.
Wondering how to get the text to speech on TikTok for your next video? Here’s a detailed insight into this new feature.
- Part 1: What is the Text-To-Speech Feature On TikTok?
- Part 2: What Happened to TikTok Text-To-Speech?
- Part 3: How to Use Text-To-Speech On TikTok?
- Part 4: How to Customize the Text-To-Speech Voice On TikTok?
Part 1: What is the Text-To-Speech Feature On TikTok?
In December 2020, TikTok began rolling out a new text-to-speech feature that automatically turns text into a voiceover as users watch videos that have the feature enabled. The popular social media platform included the new option as an accessibility feature for users with impaired vision, a growing trend for apps integrating voice technology.
Simply put, text to speech on TikTok allows video content creators to convert any piece of text they put on top of their video into a Siri-sounding voice. This means that whatever you type will be read out loud in a robotic tone, eliminating the need for you to narrate. It is a useful way to explain your videos to add context, describe what’s happening, or serve the purpose you see fit.
Source: dexerto.com
There are numerous reasons why you might decide to use this option. Firstly, it’s a great alternative for users who can’t or don’t want to use their own voice in videos. Perhaps you’re shy or just wish to keep an air of anonymity. Or, you might have a speech impediment, or communicate non-vocally or non-verbally. Either way, this feature offers a great alternative way to narrate to viewers.
Also, there are several benefits this feature provides to the audience. Some of your viewers may have poor eye-sight, might struggle to read, or are blind. Using text to speech on TikTok will help you make sure that they can still interact with your video.
Making your video more accessible means that you will get better engagement, which is a win-win situation for you. Lastly, many TikTokers use the text-to-speech option for comedic or dramatic effects.
Part 2: What Happened to TikTok Text-To-Speech?
Recently, TikTok changed the voice on its text-to-speech feature to a new, more energetic, and upbeat voice. This is because of a lawsuit filed by professional voice actor Beverley Standing against ByteDance – the parent company of TikTok. Standing had sued ByteDance in mid-May for using her voice in the text-to-speech setting without her permission.
The lawsuit of the voice actor states that she was hired to work in 2018 for the state-backed Chinese Institute Of Acoustics research body to use in translations and that TikTok has used them without paying her and it has caused damage. She said she hadn’t authorized the use of her voice beyond the use for translations.
The lawsuit concerns the English-language voice used in North America. TikTok videos made prior to the change still feature the old tone. Although TikTok is yet to comment on the new voice or Standing’s lawsuit, the timing of the changes is very suggestive.
Part 3: How to Use Text-To-Speech On TikTok?
Are you puzzled about how to get text to speech on TikTok? Check out the step-by-step guide below without any further ado!
Step 1: Update Your TikTok to The Latest Version
First things first, ensure your TikTok is updated to the latest version so that you have the TikTok text-to-speech function. Many people have the natural human tendency to push updates as far as technologically possible. But, if you are perplexed about how to do text to speech on TikTok, ensure you have the latest version of this social media app before anything else.

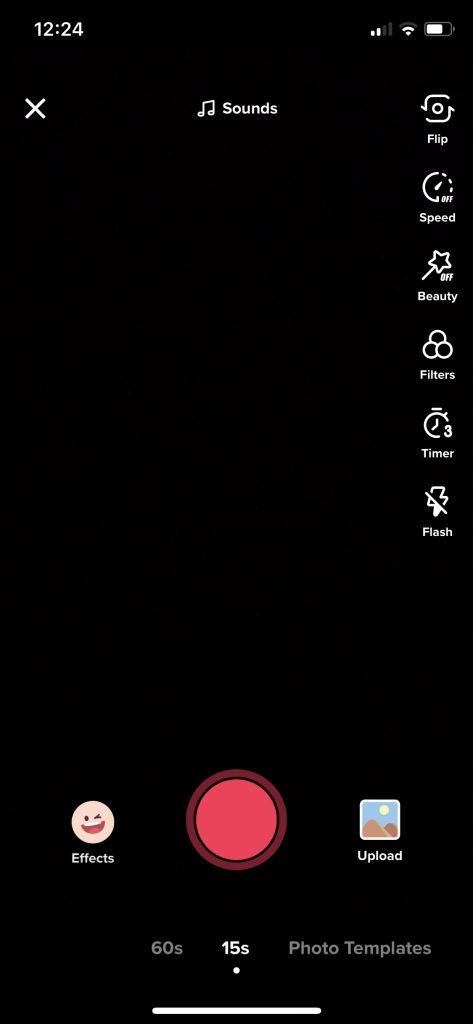
Step 2: Start Recording a Video
Take into account what you wish to say beforehand and have a rough idea of how quickly you want it to be read as the text to speech entry can be as long as your video. After you have the video recording you want to add the text over, press the checkmark on the lower right-hand corner of your app’s screen.
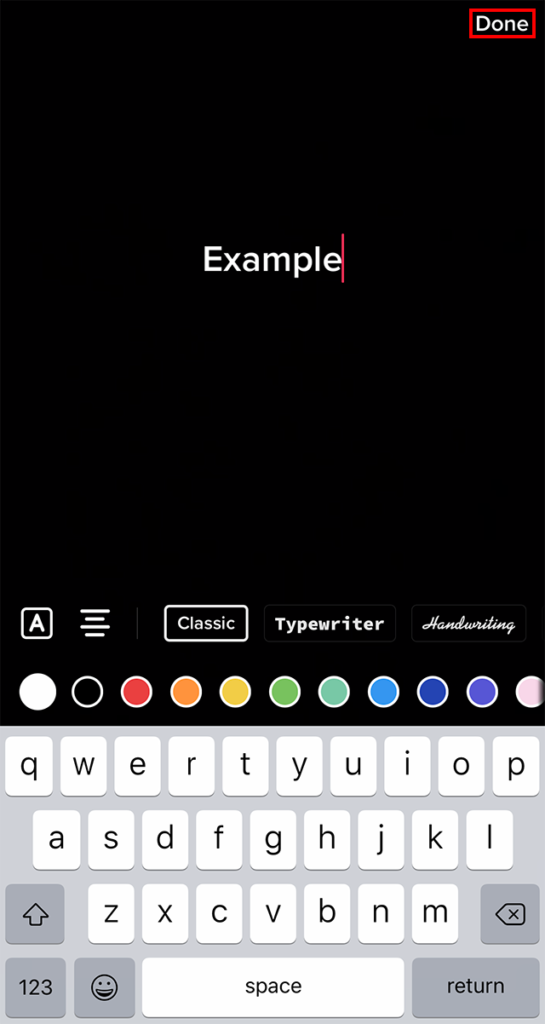
Step 3: Enter Your Text
Next, tap the text icon at the bottom of your screen and type the text you’d like to be read aloud. Ensure you keep in mind the length. Once you have entered the text, tap ‘Done’ in the upper right-hand corner of the screen. This will insert a customizable text box over your video.
Step 4: Tap On the Text, Choose Text-To-Speech
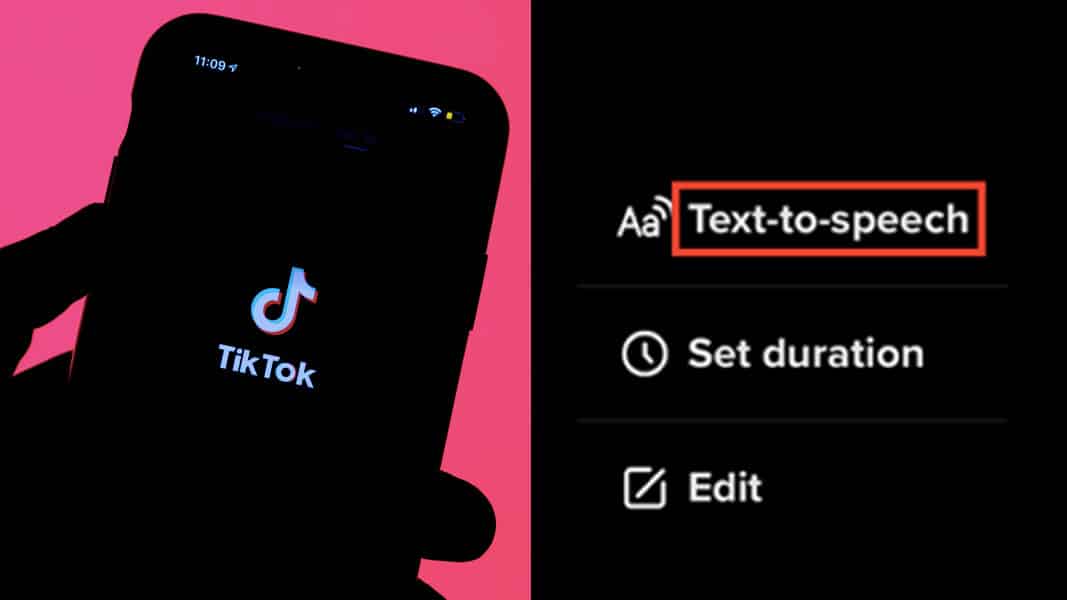
When it comes to using text to speech on TikTok, this is another crucial step.Once you enter the text into the TikTok video, tap the Textbox and you will have three options: Text-to-Speech, Set Duration, and Edit. Select Text-to-Speech and the inbuilt text-to-speech AI of TikTok will read your text over the video.

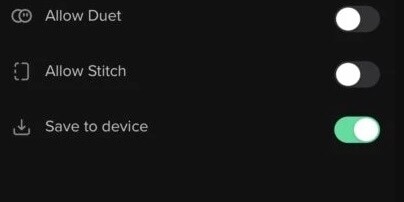
Step 5: Save the Video Locally
It is here that you will venture outside TikTok to change the text-to-speech voice. Once your video is ready in every other way, consider saving it locally on your device and not post it for everyone to see. Ensure the “Save to Device” option is active and you can post it privately.
Step 6: Download A Video Editor with Voice Modifiers
Next, you have to download a video editor – ideally for your smartphone – with voice modifiers. Adding ‘video’ into the search keywords alongside ‘Voice Modifier’ or ‘Voice Changer’ will bring up a list of options. Remember; many voice changers or free editors will either block the option to save edited videos onto the device behind a paywall or leave a watermark.
Step 7: Edit the Video and Resave
Once you have chosen your video editor, launch it and import your saved TikTok video. Here, you can edit the audio just like any other video, and voice modifiers can be applied if the video editing tool you choose has them. Apply different effects you’d like and resave your new and modified TikTok video to your device.
Step 8: Upload as A New Video to TikTok
Open the TikTok app and upload the new, edited TikTok as a singular video directly, without any further edits. You will get a TikTok video with a customized text-to-speech voice for all intents and purposes.
Part 4: How to Customize the Text-To-Speech Voice On TikTok?
Filmora is the powerful and easy-to-use video editing software that lets content creators empower the story and be amazed at results, no matter the skill level. It enables users to create stunning videos effortlessly using a range of editing tools. Filmora offers users a range of video effects like filters, animated elements, graphic overlays, etc.


Some of the key audio editing features of Wondershare Filmora are:
- Add background music
- Audio ducking
- Music beat detection
- Trim audio clips
- Adjust audio
- Split audio
- Fade audio in or out
- Adjust audio volume
- Adjust audio speed
Do you not like the in-built text-to-speech voice? Here’re a few useful tips on how to change the text to speech voice on TikTok:
- Head to the website Uberduck.ai
- Type your desired text into the “speech to synthesize” box
- Select a voice
- Download it as an MP3 file
- Upload the MP3 file to any video editing tool you have and let the video align
- Save and upload this video to TikTok.
Also, other text-to-speech websites like voicegenerator.io and tts.mp3.com are available too.
Conclusion
The text-to-speech on TikTok is one of the longest-running trends on this platform. The possibilities to get innovative with this effect are endless.
When it comes to using this feature on your content, the ultimate thing you will require is a video editor since the inbuilt text to speech isn’t adjustable as per your voice or text. And, if you are on the lookout for the best video editor, Filmora can be the best companion.
Shanoon Cox
Shanoon Cox is a writer and a lover of all things video.
Follow @Shanoon Cox
Shanoon Cox
Mar 27, 2024• Proven solutions
Ever since its arrival, TikTok has been a dominant force in the world of social media. A mix of lip sync videos, music, and micro-video content, TikTok is extremely popular with Gen Z. Over the years, TikTok has continued to enhance the user experience by adding new features, effects, and guidelines.
Text-to-speech is one of the newest features to be added to the popular platform and it provides an additional way to add something innovative to the video uploads. Announced in December 2020, text to speech on TikTok lets creators put their text over their videos and have a Siri-like voice read it out loud.
TikTok’s text-to-speech feature was added to make the platform accessible to more people by providing an easy way for text to be heard as well as read. Consequently, using this option in video creation is one way that content creators can ensure their videos appeal to a larger number of viewers, while also offering a more comprehensive experience in general.
Since its launch, the feature has been going viral. Many find the automated voice to be a selling point in itself and something that adds a different element to the content. Also, it is a great way to get a message across without actually speaking during the video. No matter the reason it is used, the fact that many are turning to text-to-speech makes it a great addition to TikTok.
Wondering how to get the text to speech on TikTok for your next video? Here’s a detailed insight into this new feature.
- Part 1: What is the Text-To-Speech Feature On TikTok?
- Part 2: What Happened to TikTok Text-To-Speech?
- Part 3: How to Use Text-To-Speech On TikTok?
- Part 4: How to Customize the Text-To-Speech Voice On TikTok?
Part 1: What is the Text-To-Speech Feature On TikTok?
In December 2020, TikTok began rolling out a new text-to-speech feature that automatically turns text into a voiceover as users watch videos that have the feature enabled. The popular social media platform included the new option as an accessibility feature for users with impaired vision, a growing trend for apps integrating voice technology.
Simply put, text to speech on TikTok allows video content creators to convert any piece of text they put on top of their video into a Siri-sounding voice. This means that whatever you type will be read out loud in a robotic tone, eliminating the need for you to narrate. It is a useful way to explain your videos to add context, describe what’s happening, or serve the purpose you see fit.
Source: dexerto.com
There are numerous reasons why you might decide to use this option. Firstly, it’s a great alternative for users who can’t or don’t want to use their own voice in videos. Perhaps you’re shy or just wish to keep an air of anonymity. Or, you might have a speech impediment, or communicate non-vocally or non-verbally. Either way, this feature offers a great alternative way to narrate to viewers.
Also, there are several benefits this feature provides to the audience. Some of your viewers may have poor eye-sight, might struggle to read, or are blind. Using text to speech on TikTok will help you make sure that they can still interact with your video.
Making your video more accessible means that you will get better engagement, which is a win-win situation for you. Lastly, many TikTokers use the text-to-speech option for comedic or dramatic effects.
Part 2: What Happened to TikTok Text-To-Speech?
Recently, TikTok changed the voice on its text-to-speech feature to a new, more energetic, and upbeat voice. This is because of a lawsuit filed by professional voice actor Beverley Standing against ByteDance – the parent company of TikTok. Standing had sued ByteDance in mid-May for using her voice in the text-to-speech setting without her permission.
The lawsuit of the voice actor states that she was hired to work in 2018 for the state-backed Chinese Institute Of Acoustics research body to use in translations and that TikTok has used them without paying her and it has caused damage. She said she hadn’t authorized the use of her voice beyond the use for translations.
The lawsuit concerns the English-language voice used in North America. TikTok videos made prior to the change still feature the old tone. Although TikTok is yet to comment on the new voice or Standing’s lawsuit, the timing of the changes is very suggestive.
Part 3: How to Use Text-To-Speech On TikTok?
Are you puzzled about how to get text to speech on TikTok? Check out the step-by-step guide below without any further ado!
Step 1: Update Your TikTok to The Latest Version
First things first, ensure your TikTok is updated to the latest version so that you have the TikTok text-to-speech function. Many people have the natural human tendency to push updates as far as technologically possible. But, if you are perplexed about how to do text to speech on TikTok, ensure you have the latest version of this social media app before anything else.
Step 2: Start Recording a Video
Take into account what you wish to say beforehand and have a rough idea of how quickly you want it to be read as the text to speech entry can be as long as your video. After you have the video recording you want to add the text over, press the checkmark on the lower right-hand corner of your app’s screen.
Step 3: Enter Your Text
Next, tap the text icon at the bottom of your screen and type the text you’d like to be read aloud. Ensure you keep in mind the length. Once you have entered the text, tap ‘Done’ in the upper right-hand corner of the screen. This will insert a customizable text box over your video.
Step 4: Tap On the Text, Choose Text-To-Speech
When it comes to using text to speech on TikTok, this is another crucial step.Once you enter the text into the TikTok video, tap the Textbox and you will have three options: Text-to-Speech, Set Duration, and Edit. Select Text-to-Speech and the inbuilt text-to-speech AI of TikTok will read your text over the video.
Step 5: Save the Video Locally
It is here that you will venture outside TikTok to change the text-to-speech voice. Once your video is ready in every other way, consider saving it locally on your device and not post it for everyone to see. Ensure the “Save to Device” option is active and you can post it privately.
Step 6: Download A Video Editor with Voice Modifiers
Next, you have to download a video editor – ideally for your smartphone – with voice modifiers. Adding ‘video’ into the search keywords alongside ‘Voice Modifier’ or ‘Voice Changer’ will bring up a list of options. Remember; many voice changers or free editors will either block the option to save edited videos onto the device behind a paywall or leave a watermark.
Step 7: Edit the Video and Resave
Once you have chosen your video editor, launch it and import your saved TikTok video. Here, you can edit the audio just like any other video, and voice modifiers can be applied if the video editing tool you choose has them. Apply different effects you’d like and resave your new and modified TikTok video to your device.
Step 8: Upload as A New Video to TikTok
Open the TikTok app and upload the new, edited TikTok as a singular video directly, without any further edits. You will get a TikTok video with a customized text-to-speech voice for all intents and purposes.
Part 4: How to Customize the Text-To-Speech Voice On TikTok?
Filmora is the powerful and easy-to-use video editing software that lets content creators empower the story and be amazed at results, no matter the skill level. It enables users to create stunning videos effortlessly using a range of editing tools. Filmora offers users a range of video effects like filters, animated elements, graphic overlays, etc.
Some of the key audio editing features of Wondershare Filmora are:
- Add background music
- Audio ducking
- Music beat detection
- Trim audio clips
- Adjust audio
- Split audio
- Fade audio in or out
- Adjust audio volume
- Adjust audio speed
Do you not like the in-built text-to-speech voice? Here’re a few useful tips on how to change the text to speech voice on TikTok:
- Head to the website Uberduck.ai
- Type your desired text into the “speech to synthesize” box
- Select a voice
- Download it as an MP3 file
- Upload the MP3 file to any video editing tool you have and let the video align
- Save and upload this video to TikTok.
Also, other text-to-speech websites like voicegenerator.io and tts.mp3.com are available too.
Conclusion
The text-to-speech on TikTok is one of the longest-running trends on this platform. The possibilities to get innovative with this effect are endless.
When it comes to using this feature on your content, the ultimate thing you will require is a video editor since the inbuilt text to speech isn’t adjustable as per your voice or text. And, if you are on the lookout for the best video editor, Filmora can be the best companion.
Shanoon Cox
Shanoon Cox is a writer and a lover of all things video.
Follow @Shanoon Cox
Also read:
- [Updated] Unleashing Potential Making a Mark with Desktop TikToks
- [Updated] 2024 Approved The Insider's Guide to Launching a Successful Device-Based TikTok
- [Updated] 2024 Approved How to Simplify TikTok Video Creation Using Siri Commands and Features
- [Updated] Sculpting an Impactful TikTok Conclusion
- [Updated] In 2024, Conquer TikTok with Proficient Voiceovers
- A Decade of Digital Disguise Expert Tips on Snapchat Filters
- [Updated] The Most Exciting TikTok Content to Date for 2024
- [New] Top 30 Trending TikTok Anime Inspirations for 2024
- 2024 Approved Must-Know Basics for Mac Users on TikTok
- [Updated] Top 10 Tips for Making Memorable TikTok Emotes
- [New] Cooking Craze Alert These 15 Viral TikTok Creations You Can't Ignore for 2024
- [Updated] 2024 Approved Discover the Power of Voice in TikTok Videos
- [Updated] Mistakenly Refreshed TikTok - How to Go Back?
- In 2024, Innovate and Create on TikTok The Complete List
- [Updated] Masterful Media Moments Innovative Bio Ideas for TikTok Audience Expansion via Filmora for 2024
- [Updated] The Art of Influencing Consumers A Guide to Profitable TikTok Marketing for 2024
- [New] In 2024, Unmatched Top 10 Tools for Making Stellar TikTok Videos (Windows)
- [New] Explore TikTok's Curated Collection Books & Beyond for 2024
- 2024 Approved Elevate Your Feed Beyond TikTok with These Platforms
- [New] Free TikTok Video Downloads No Watermarks Required
- [New] In 2024, Trending Triumphs Your Guide to the Top TikTok Game Frenzy
- [Updated] In 2024, Chrome/Android/iOS The Ultimate Guide to TikTok Video Uploads
- 60 Quick Witty TikTok One-Liners for 2024
- [Updated] In 2024, Gripping Gurus on TikTok Top 15 for Aspiring Influencers
- [Updated] 2024 Approved Crafting the Ultimate Giant Heads on TikTok
- [Updated] Harnessing TikTok Voice Control with Apple's Siri for 2024
- [New] 2024 Approved Delicious Dramas Unfolded These 15 Viral Cooking Sensations Worth Your Curiosity
- [Updated] 2024 Approved Dynamic Designs Drive Dazzling TikTok Videos Quickly
- [New] In 2024, Absurd Adventures A Compilation of Extraordinary TikTok Games
- Ranked Top 6 TikTok Profit Analyzers for Creators
- In 2024, Gastronomy Galore TikTok's Foreign Delicacies
- In 2024, Unlocking Growth Potential with Top 7 TikTok Tools
- How to Perfectly Alter Your Vocal Audio on TikTok
- 2024 Approved Watermark-Free TikTok Content for Your iPhone
- [Updated] Top 10 Viral TikTok Kitchen Secrets
- Tips for Speeding Up Your TikTok Videos for 2024
- [Updated] In 2024, Upset Timeline on TikTok – Retrieve Lost Content
- [New] Essential Tips for Using TikTok on Mac/Windows Systems for 2024
- [Updated] Swiftly Switch From Video to Vivid GIFs with TikTok Tools
- [New] 2024 Approved A Comprehensive Tutorial for TikTok Stitched Content
- 2024 Approved Top 15 Reading Recommendations From BookTok Stars
- [Updated] 2024 Approved Top Relaxing Country Bops & Beats for Dance Parties on TikTok
- [New] In 2024, From Silence to Soundtrack Making Music-Centric TikToks
- [Updated] Chrome-Based TikTok Video Submission for Devices for 2024
- Expertly Calculated Earnings TikTok's Finest Tools
- The way to recover deleted pictures on P55+ without backup.
- Updated Elevate Your MP3 Experience Practical Tips for Everyday Listening for 2024
- Looking For A Location Changer On Realme 11 Pro+? Look No Further | Dr.fone
- New Clear the Clutter A Comprehensive Guide to Freeing Up Space on Your FCPX Mac for 2024
- 2024 Approved The Ultimate Companion for a Seamless Instagram Video Journey
- In 2024, Revitalize Audio Diminishments in Video Presentation
- In 2024, Easy Steps on How To Create a New Apple ID Account On Apple iPhone 15 Plus | Dr.fone
- First Edition of LexiEdit Training Building Your Base in Audio Editing for 2024
- Life360 Circle Everything You Need to Know On Xiaomi Redmi K70 | Dr.fone
- Unlock Motorola Moto G24 Phone Password Without Factory Reset Full Guide Here
- 2024 Approved Instagram Connections Unlocked Topest 15 Secure Friending Apps
- Inside the Pro's Playbook Top 5 Gaming Techniques for 2024
- Essential 12 PC Clicker Games to Elevate Gameplay for 2024
- In 2024, 5 Ways to Move Contacts From Realme 12 Pro+ 5G to iPhone (13/14/15) | Dr.fone
- Does Life360 Notify When You Log Out On Realme C51? | Dr.fone
- Tuning In Smoothly Learning to Adjust Audio Volumes on Audacity for 2024
- [New] 2024 Approved Screener Info Deconverter
- Title: "[Updated] Soundscaping Sculpting Serenity From Static for 2024"
- Author: Brian
- Created at : 2024-05-23 15:20:47
- Updated at : 2024-05-24 15:20:47
- Link: https://tiktok-videos.techidaily.com/updated-soundscaping-sculpting-serenity-from-static-for-2024/
- License: This work is licensed under CC BY-NC-SA 4.0.
