
![[Updated] The Secrets Behind Compelling Captions for Captivating TikTok Content](https://www.lifewire.com/thmb/7wWwLeV8KAaB-XqPIbKe8lIgaY4=/400x300/filters:no_upscale():max_bytes(150000):strip_icc():format(webp)/reddit-app-for-andoird-652f6fcd646245e9807afbac25a072ee.jpg)
[Updated] The Secrets Behind Compelling Captions for Captivating TikTok Content
The Secrets Behind Compelling Captions for Captivating TikTok Content
TikTok is one of the most famous social media apps as it creates various trends frequently that engage users continuously. Every week, you can explore various TikTok trends, such as dance videos, pranks, challenges, or quick hacks. These trends are a great entertainment source for people and motivate them to create engaging content.
However, adding captions is mandatory if you want to make TikTok trend videos for a diverse audience. This article will guide you if you are unaware of how to add captions on TikTok. We will provide 5 different ways to create TikTok captions effectively.
- Way 1: Auto-Generate Captions with TikTok’s Built-in Feature
- Way 2: Use Auto Captions in CapCut
- Way 3: Add Captions to TikTok Videos Manually
- Way 4: Automatically Add Subtitles to TikTok Videos with Online Editor
Part 1: Why Should You Add Captions to TikTok Videos?
Adding captions on TikTok videos can bring you multiple advantages. To learn more about the benefits of adding captions on TikTok, read this section:
1. Increases Comprehension
It may be possible that viewers won’t be able to understand a particular dialogue in your TikTok video. To make your TikTok content more understandable, adding captions can prove to be a great option. Moreover, if some viewers can’t turn on the sound of TikTok videos, they can easily read the captions to understand the content.
2. Enhances Focus
Captions have the ability to grasp the attention of a viewer automatically. Adding captions to your TikTok video lets your viewers focus more properly. Thus, you can engage your audience throughout the TikTok video effortlessly.
3. Helps During Audio Problems
Audio problems may arise unexpectedly. In such situations, added captions on TikTok videos can offer great convenience. Moreover, people who have auditory disabilities can also enjoy your TikTok videos.
4. Attracts Diverse Audience
If some foreigners can’t understand or speak your native language, TikTok captions are necessary for them. By doing so, a broad and diverse audience can watch your TikTok videos easily.
Part 2: How to Add Captions on TikTok?
There are various ways through which you can generate TikTok captions effortlessly. Read this section to discover multiple and convenient ways to create TikTok captions easily.
Way 1: Auto-Generate Captions with TikTok’s Built-in Feature
If you don’t want to download video editing software, you can utilize the built-in feature of TikTok to create auto-captions. This will save you from the hassle of launching or accessing a professional subtitle editor. Moreover, it will also save you time and effort from creating subtitles manually. To use the built-in feature of TikTok automatic captions, check the following instructions:
Step1 Once you have captured a video on TikTok, tap the “Tick” icon from the bottom right side. This will redirect you to the editing mode.
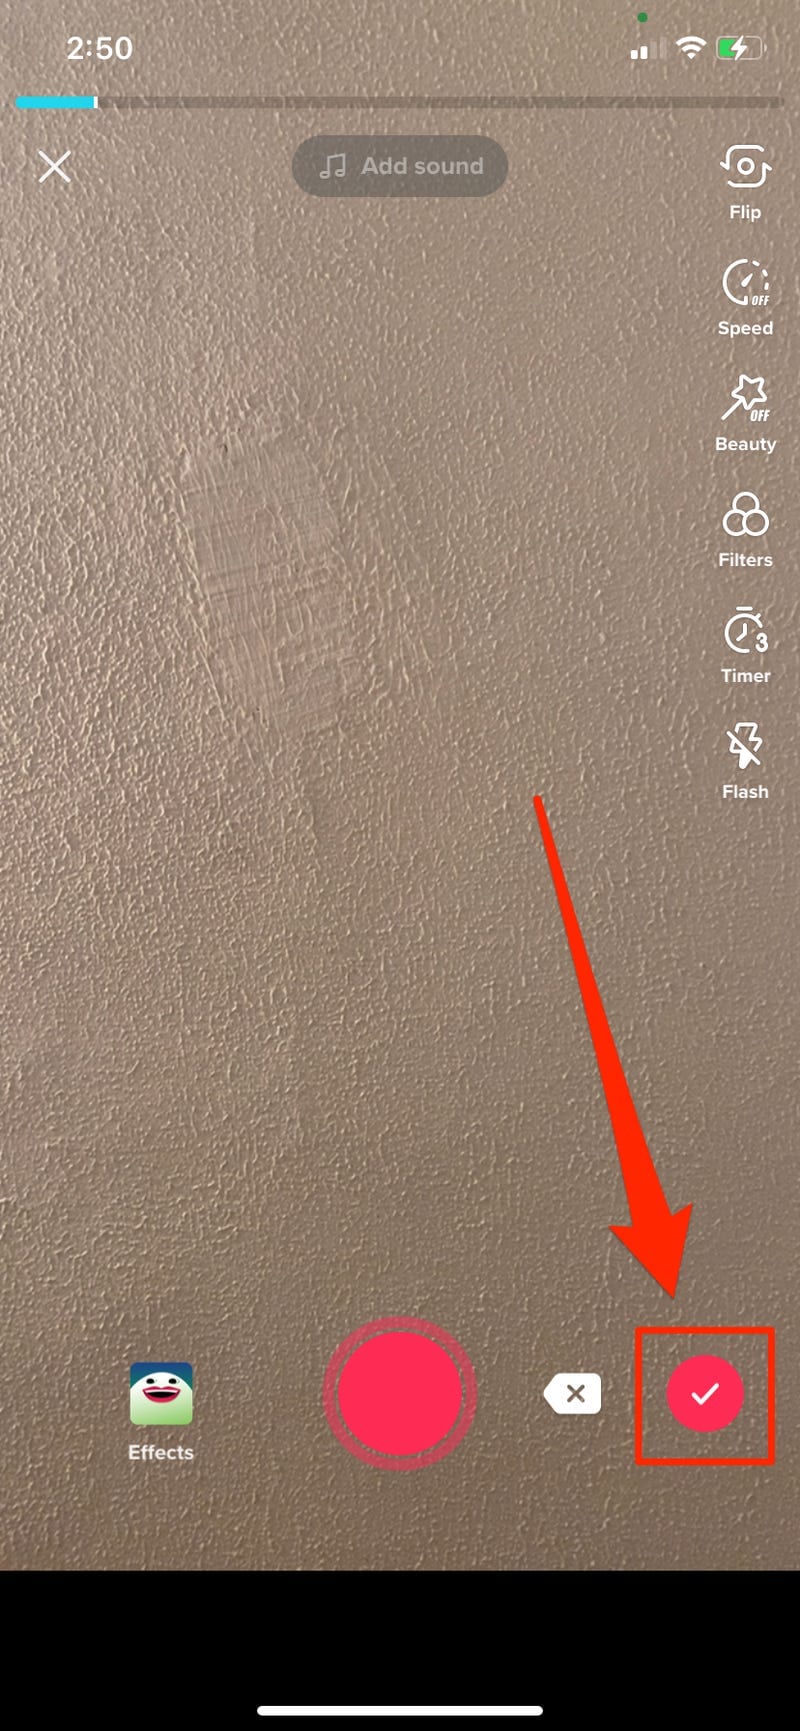
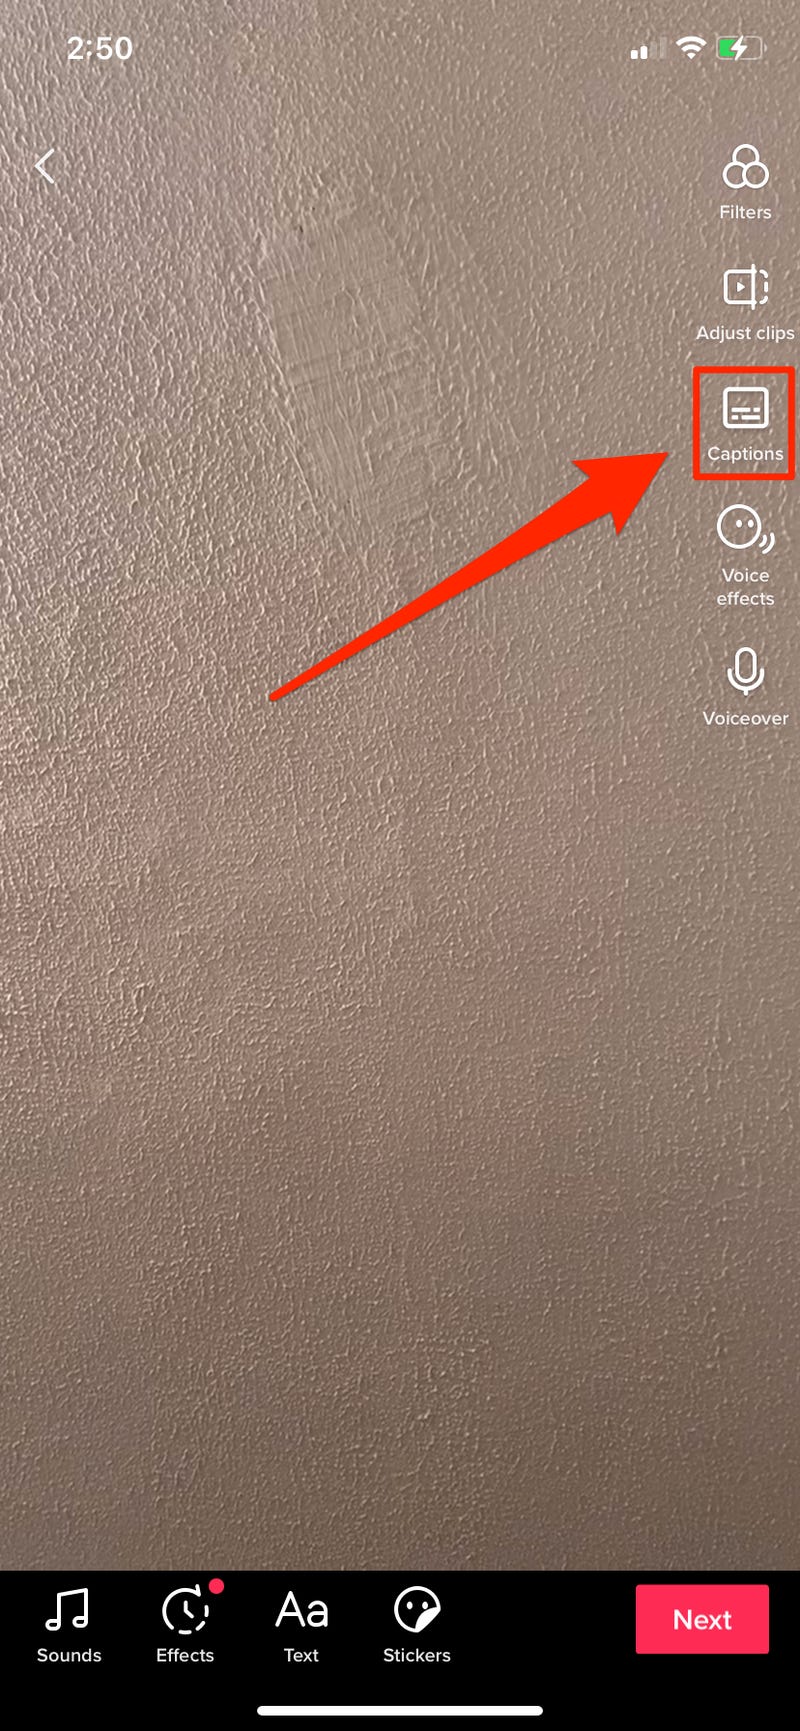
Step2 On the editing mode, locate the “Captions” option from the right side. After tapping on it, TikTok will instantly generate the subtitles automatically. Make sure that all the captions are correctly created. Once you are done, hit the “Save” button displayed at the top right side. Afterward, you can quickly post your TikTok video with captions.
Way 2: Use Auto Captions in CapCut
CapCut and TikTok are closely related to each other as they both have the same parent company called ByteDance. Thus, using CapCut to create captions for your TikTok videos can bring high-quality results. You can easily download CapCut on Android and iOS devices without any complications. The interface of this tool is clean that allows you to generate subtitles efficiently.
The auto caption feature in CapCut enables you to produce subtitles instantly. It uses advanced algorithms that ensure high accuracy while creating subtitles. To use this advanced feature of CapCut, read the below steps:
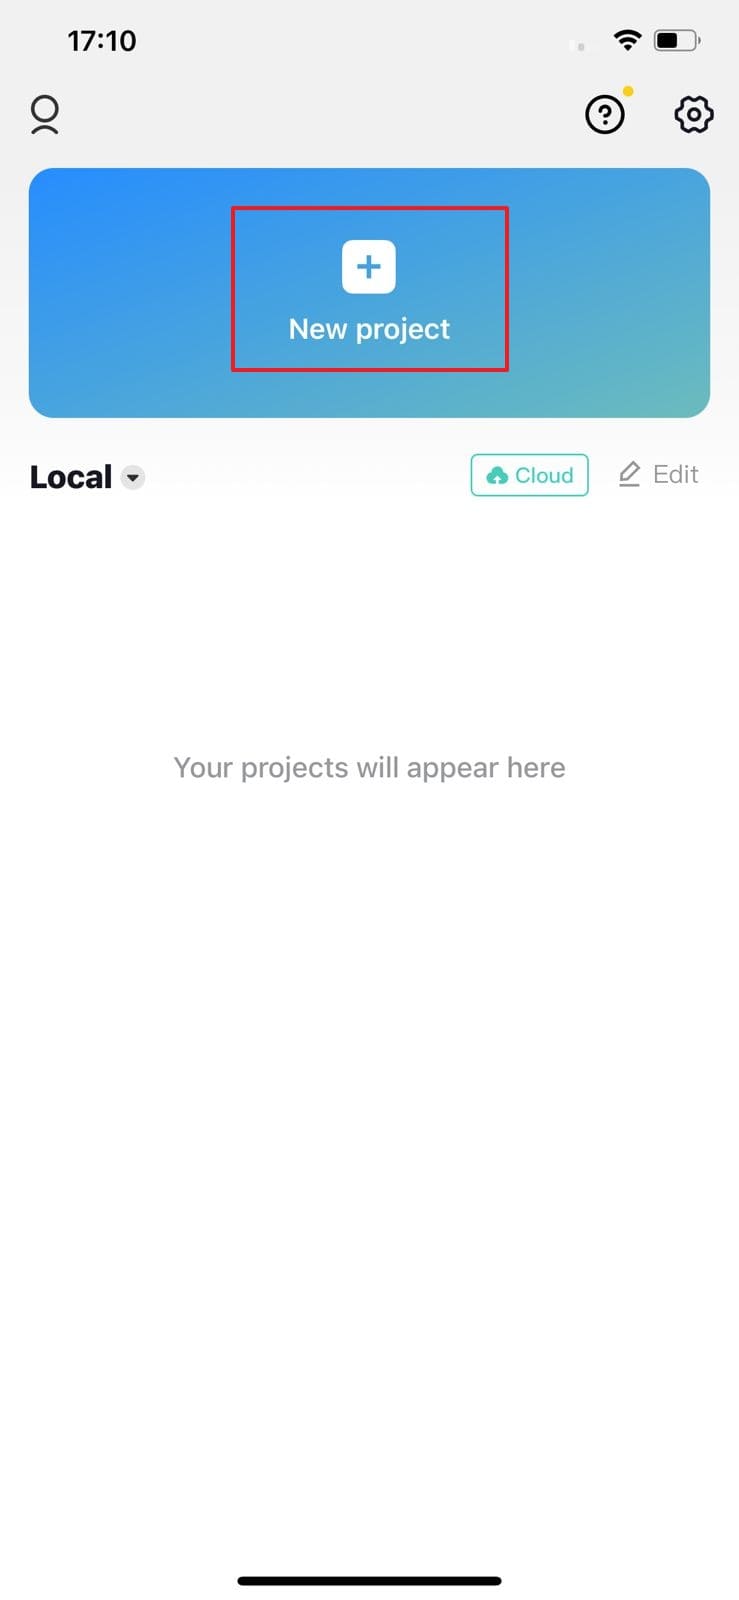
Step1 Download and launch CapCut on your phone. To import, tap on “New Project” and select the video from your phone’s gallery. Tap on “Add” to head to the editing mode of CapCut.
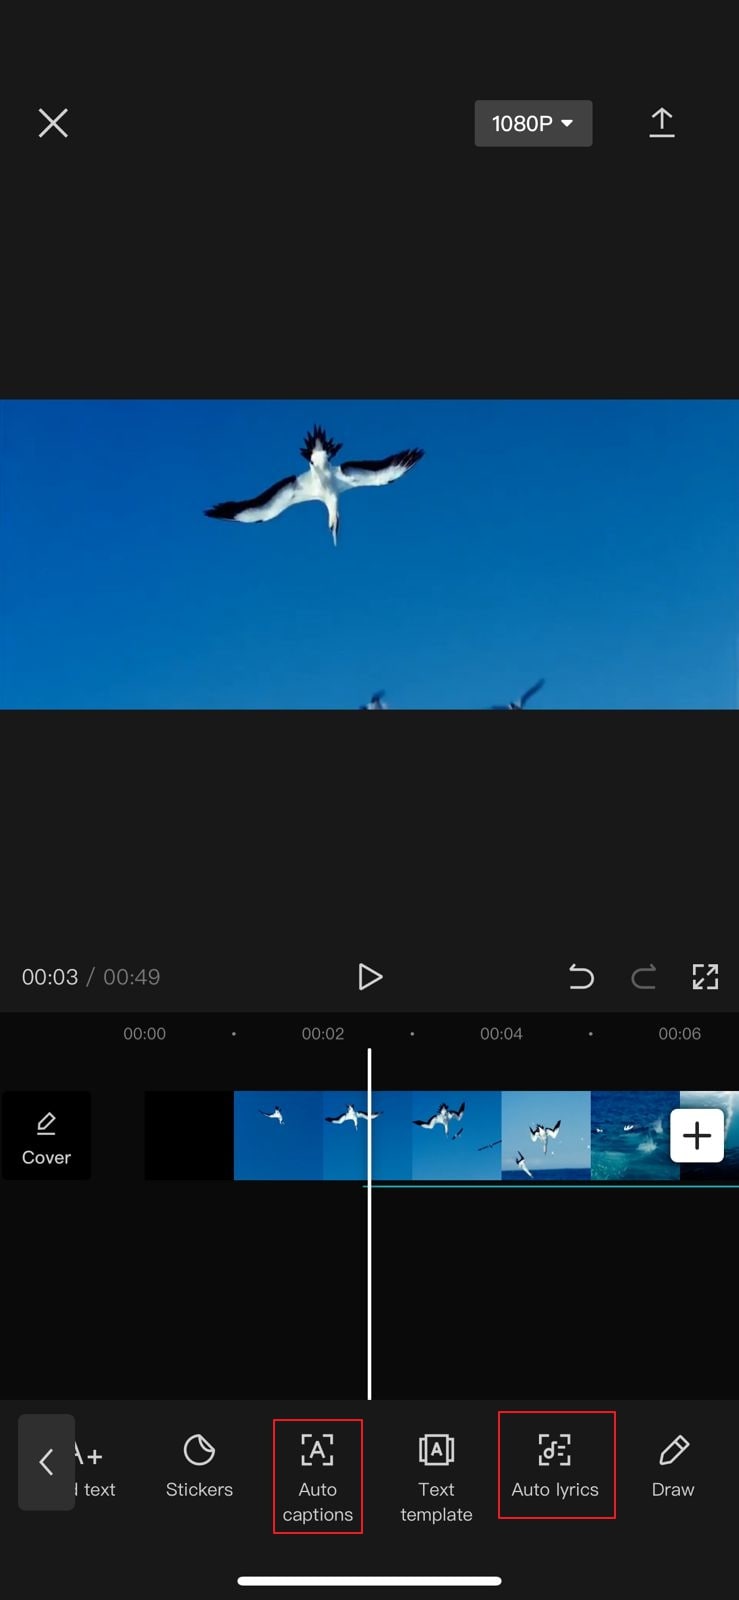
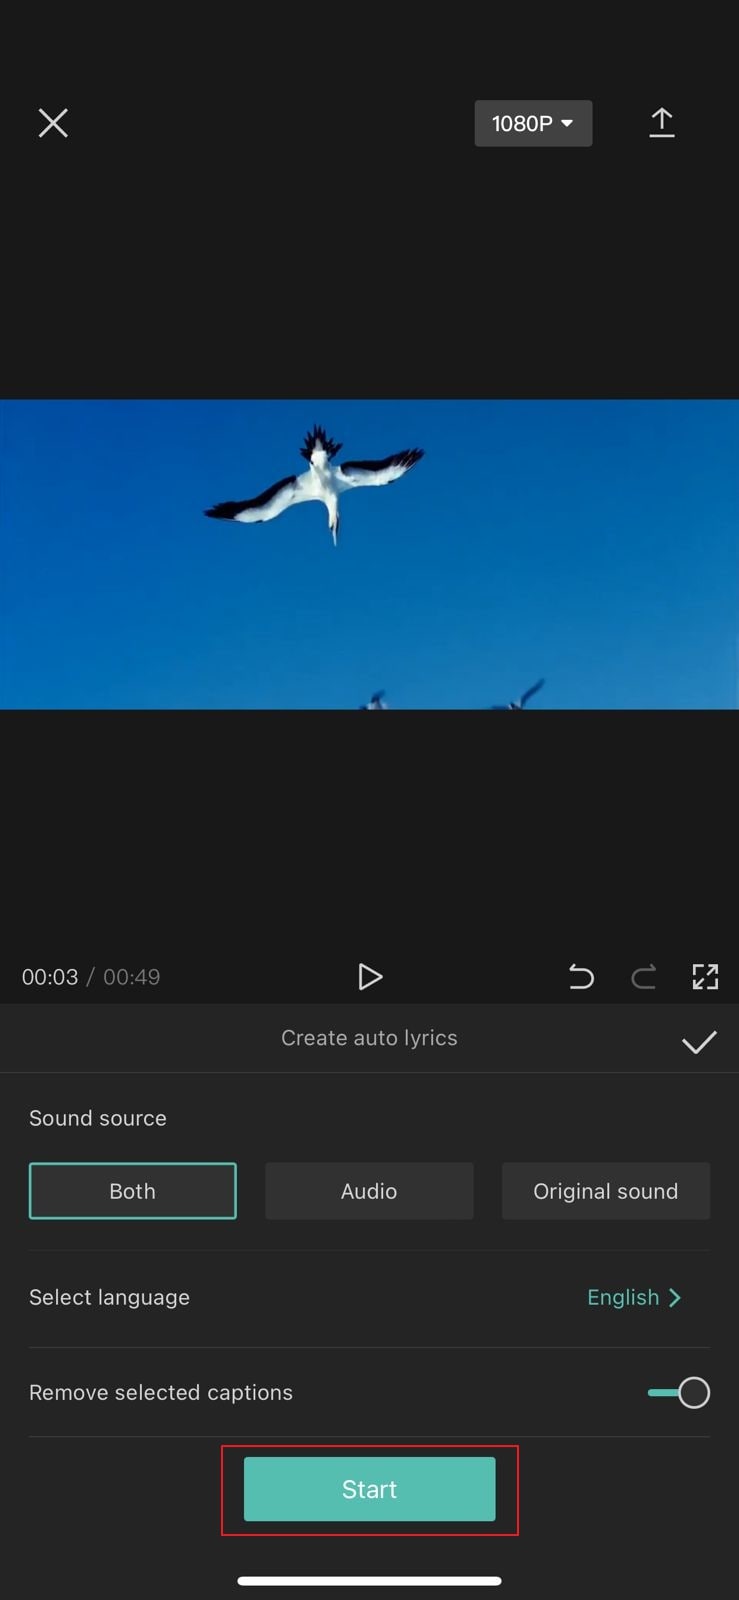
Step2 Afterward, select “Text” options from which you can either choose “Auto Lyrics” or “Auto Captions.” Using the Auto Lyrics option, you can generate captions for a song automatically. On the other hand, by using the Auto Captions option, you can transcribe the voice in your video to create subtitles. From the pop-up menus, choose the sound source and language to proceed.
Step3 Once you are done adjusting the settings, hit the “Start” button. After some seconds, CapCut will create captions for your TikTok video efficiently. Afterward, you can choose video resolution and hit the “Arrow” icon to export the video.
Way 3: Add Captions to TikTok Videos Manually
If you want to create captions for TikTok briefly, you can manually add them using the instructions given below. This method is extremely simple and helpful if you want to create small captions for your TikTok videos. Moreover, you can efficiently choose the font, color, and style of your captions in this manual method:
Step1 Open your TikTok app and create a video to begin. Tap on the “Tick” icon to enter the editing mode. Select “Text” given on the bottom toolbar of your screen.
Step2 Now, choose the style for your captions from the available options. Select the color and start writing your captions carefully. Once you are done, you can save and publish your created TikTok video.
Way 4: Automatically Add Subtitles to TikTok Videos with Online Editor
There are various online editors that can create captions for TikTok videos automatically. They use the Auto Transcription feature, through which the tool can create subtitles by recognizing the voice used in a TikTok video. One of the reliable online tools that can produce auto-subtitles is Veed.io.
Veed.io is an online tool that is capable of creating TikTok automatic captions efficiently. You can easily access this online tool from your web browsers. Moreover, it supports more than 100 languages and accents that you can choose to create auto-captions. Also, you can translate your captions into different languages using this tool. To use this tool flawlessly, check the below steps:
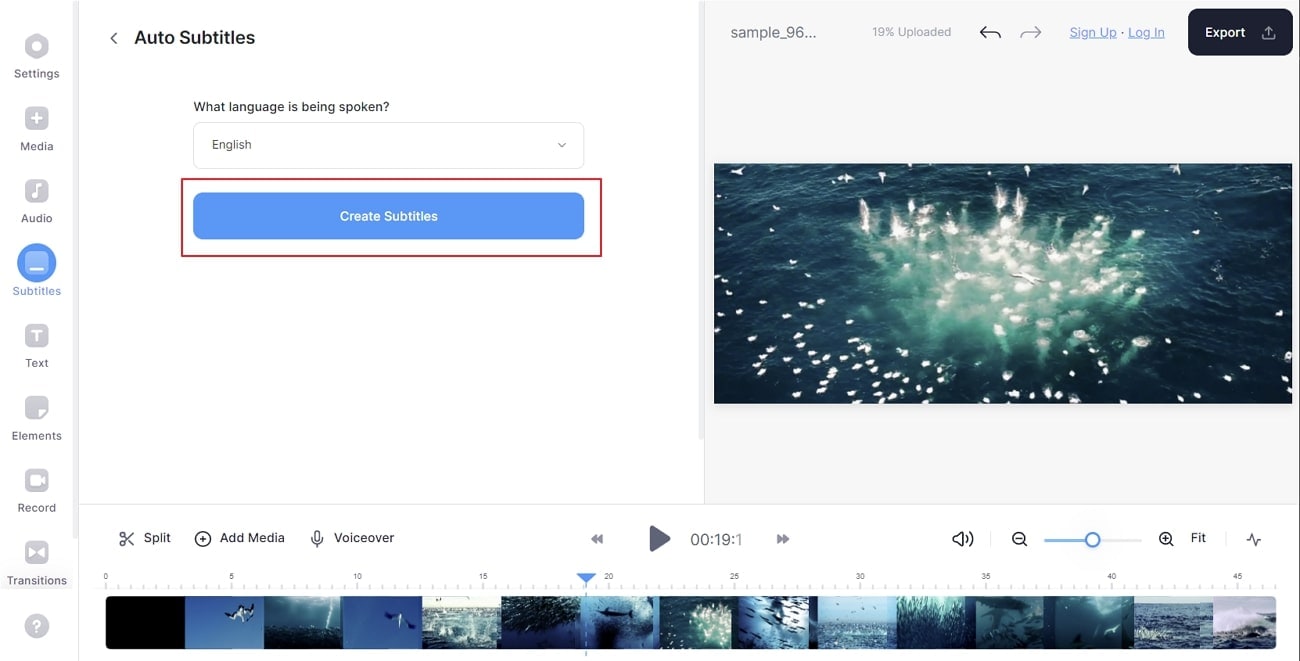
Step1 Begin by reaching the official website of Veed.io. Go to its Tools and locate the “Auto Subtitle Generator” option. It will redirect you to another page that consists of the tool information.

Step2 Click “Get Started” and upload a video from your system. Once you are done, tap on “Subtitles” and select “Auto Subtitle” from the given options. Choose your preferred language and tap on “Create Subtitles.”
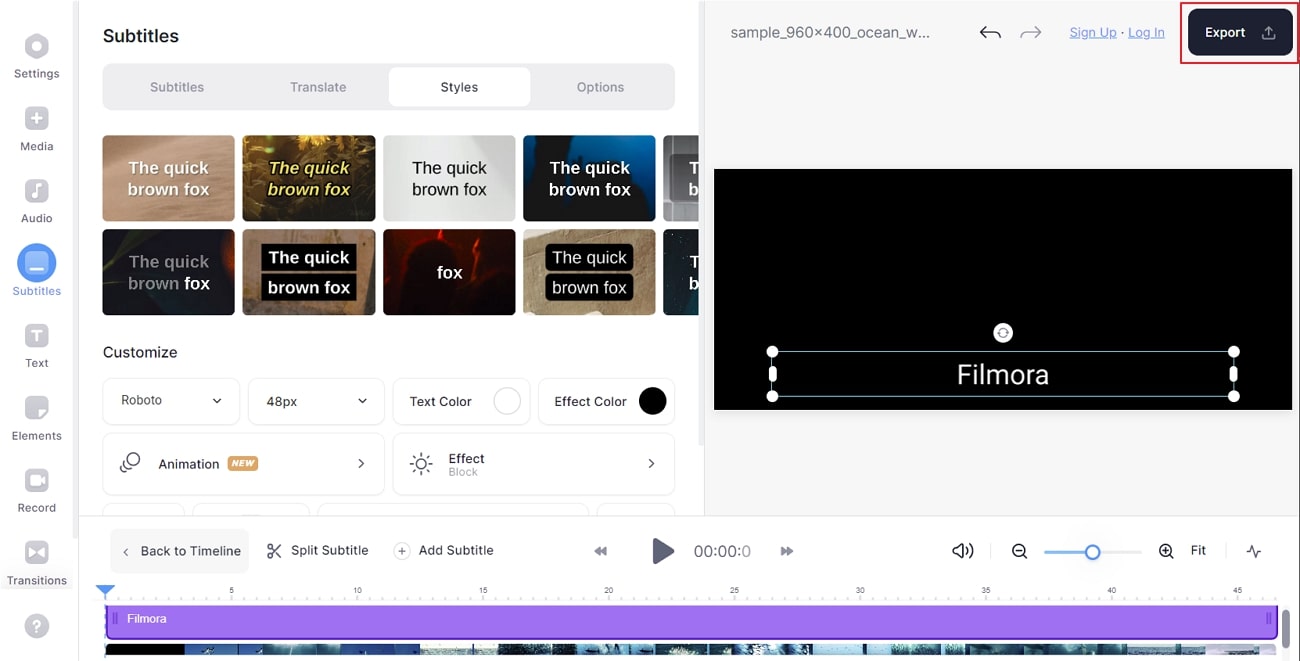
Step3 After waiting some time, you can see your auto-captions. You can choose the text color, effect, size, and alignment from the given options. Once you are satisfied with the TikTok captions, hit the “Export” button.
Part 3: How to Add Captions to Your TikTok Videos with Filmora
If you want to add further enhancements to your TikTok captions, you can use an offline tool like Wondershare Filmora . Using this platform, you can manually add captions by choosing the suitable style from the presets. Moreover, you can also add customizations to the captions through Filomora easily. You can also upload SRT files on this tool to produce TikTok captions.
Free Download For Win 7 or later(64-bit)
Free Download For macOS 10.14 or later
TikTok automatic captions can be easily generated from Filmora as it offers excellent results through its Speech-to-Text feature. Using this unique feature, you can transcribe the voice in your TikTok videos in up to 16 different languages. To use this feature conveniently, follow the below steps:
Step 1 Import the TikTok Video
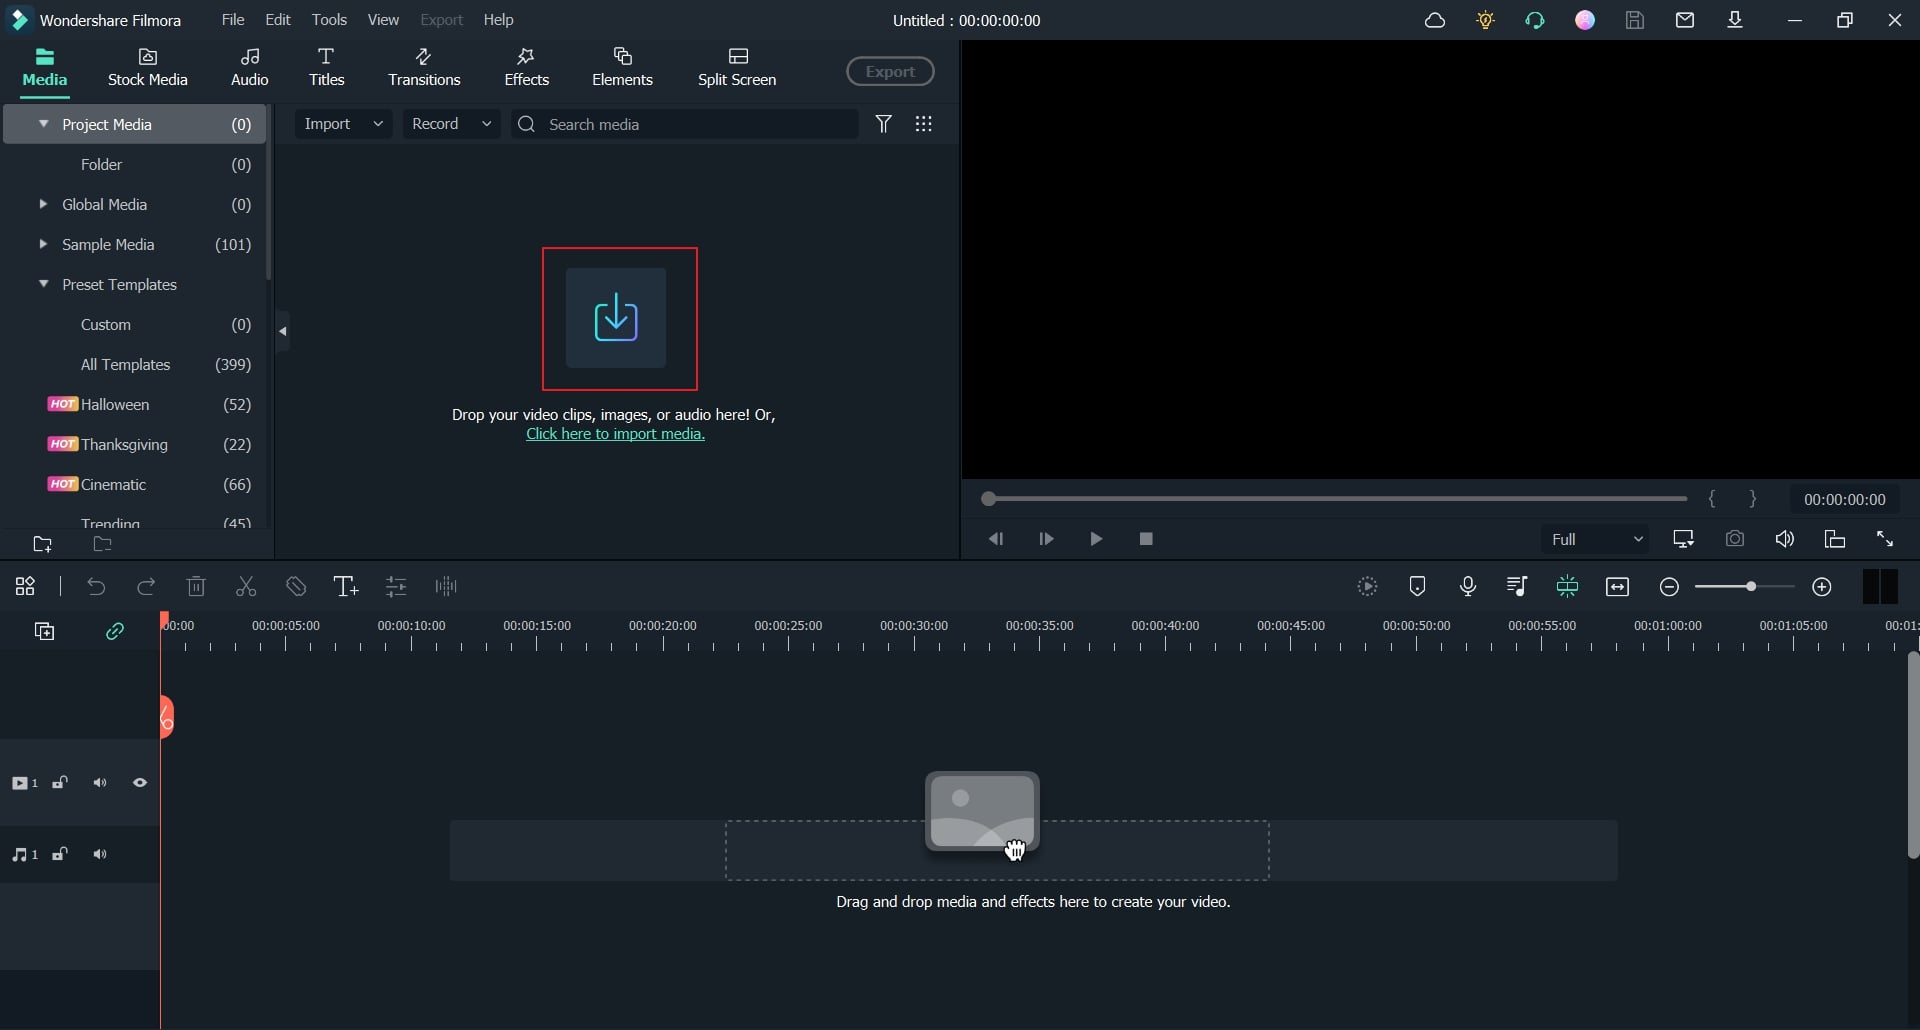
Once done with launching and creating the Filmora project on your PC, hit the “Arrow” icon to import your video file on this tool. Now drag and drop the video file to the timeline in order to proceed.
Step 2 Initiate the Automatic Subtitle Feature
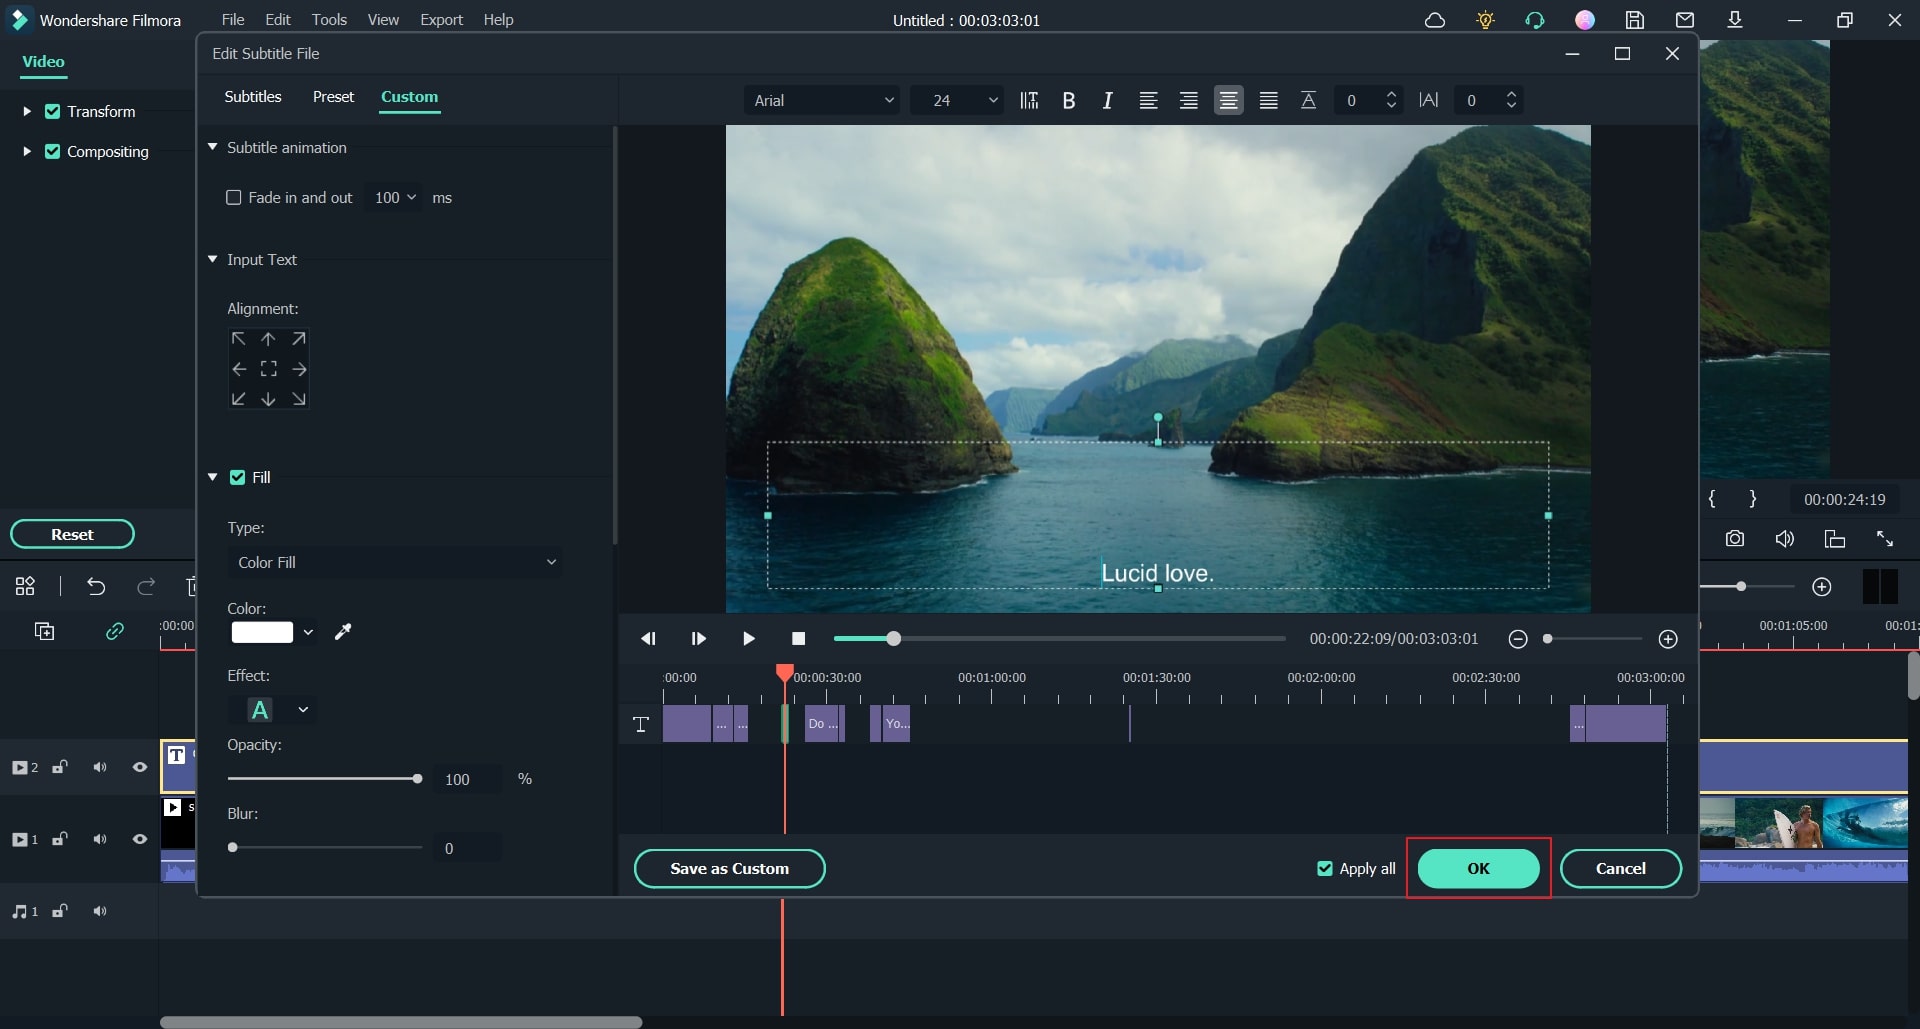
On your timeline, tap on the “Speech-to-Text” feature. Choose your language and video clip from the pop-up menu. Wait for some seconds, and the subtitles will be generated automatically. Double-click on the created TikTok automatic captions to open the editing settings. Here, you can select subtitles style and respective time duration. You can also add customizations efficiently.
Step 3 Export the TikTok Video
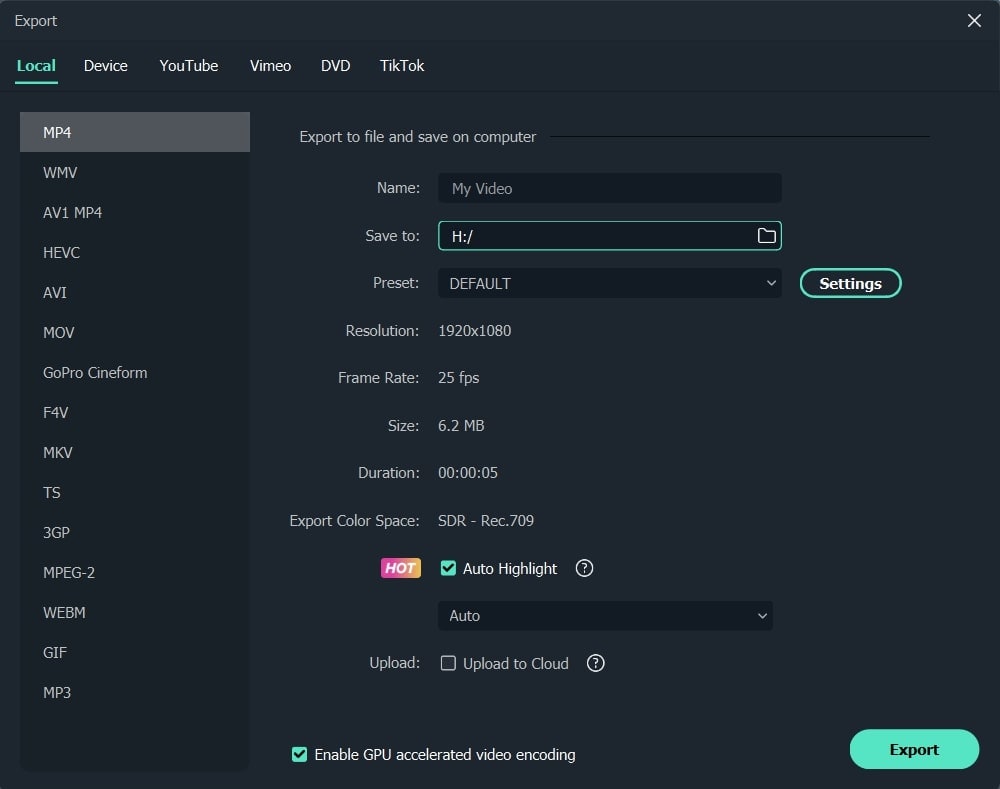
After completing all the settings, you can click on the “Export” button. Before exporting, you can choose the video resolution and file formats easily. Also, this tool gives you the facility to export the video file directly to your TikTok account.
Part 4: People Also Want to Know
1. How to add captions to TikTok?
To add TikTok captions, you can choose the manual or automatic way. TikTok has a built-in auto-generator through which you can add captions automatically. Moreover, there are different offline and online tools, such as Filmora, CapCut, and Veed.io, through which you can add captions on TikTok flawlessly.
2. How to add captions to TikTok after posting?
If you want to add TikTok captions after posting, you have to download the video on your phone first. Afterward, hit the Plus icon to re-upload the video from your gallery. Choose that particular video again and tap on the Post button. Now you can write the captions on the given space easily. Afterward, tap on the “Post” button.
Last Words
This article has shed light on various ways how to add captions on TikTok efficiently. You can add TikTok captions manually or use the auto-generator for ease. Moreover, we have also highlighted an online tool to create subtitles that can be accessed from any web browser. However, if you want a professional caption editor for a longer run, Wondershare Filmora is the best choice among other tools. It has an easy-to-use interface and achieves accurate results comfortably.
Part 1: Why Should You Add Captions to TikTok Videos?
Adding captions on TikTok videos can bring you multiple advantages. To learn more about the benefits of adding captions on TikTok, read this section:
1. Increases Comprehension
It may be possible that viewers won’t be able to understand a particular dialogue in your TikTok video. To make your TikTok content more understandable, adding captions can prove to be a great option. Moreover, if some viewers can’t turn on the sound of TikTok videos, they can easily read the captions to understand the content.
2. Enhances Focus
Captions have the ability to grasp the attention of a viewer automatically. Adding captions to your TikTok video lets your viewers focus more properly. Thus, you can engage your audience throughout the TikTok video effortlessly.
3. Helps During Audio Problems
Audio problems may arise unexpectedly. In such situations, added captions on TikTok videos can offer great convenience. Moreover, people who have auditory disabilities can also enjoy your TikTok videos.
4. Attracts Diverse Audience
If some foreigners can’t understand or speak your native language, TikTok captions are necessary for them. By doing so, a broad and diverse audience can watch your TikTok videos easily.
Part 2: How to Add Captions on TikTok?
There are various ways through which you can generate TikTok captions effortlessly. Read this section to discover multiple and convenient ways to create TikTok captions easily.
Way 1: Auto-Generate Captions with TikTok’s Built-in Feature
If you don’t want to download video editing software, you can utilize the built-in feature of TikTok to create auto-captions. This will save you from the hassle of launching or accessing a professional subtitle editor. Moreover, it will also save you time and effort from creating subtitles manually. To use the built-in feature of TikTok automatic captions, check the following instructions:
Step1 Once you have captured a video on TikTok, tap the “Tick” icon from the bottom right side. This will redirect you to the editing mode.
Step2 On the editing mode, locate the “Captions” option from the right side. After tapping on it, TikTok will instantly generate the subtitles automatically. Make sure that all the captions are correctly created. Once you are done, hit the “Save” button displayed at the top right side. Afterward, you can quickly post your TikTok video with captions.
Way 2: Use Auto Captions in CapCut
CapCut and TikTok are closely related to each other as they both have the same parent company called ByteDance. Thus, using CapCut to create captions for your TikTok videos can bring high-quality results. You can easily download CapCut on Android and iOS devices without any complications. The interface of this tool is clean that allows you to generate subtitles efficiently.
The auto caption feature in CapCut enables you to produce subtitles instantly. It uses advanced algorithms that ensure high accuracy while creating subtitles. To use this advanced feature of CapCut, read the below steps:
Step1 Download and launch CapCut on your phone. To import, tap on “New Project” and select the video from your phone’s gallery. Tap on “Add” to head to the editing mode of CapCut.
Step2 Afterward, select “Text” options from which you can either choose “Auto Lyrics” or “Auto Captions.” Using the Auto Lyrics option, you can generate captions for a song automatically. On the other hand, by using the Auto Captions option, you can transcribe the voice in your video to create subtitles. From the pop-up menus, choose the sound source and language to proceed.
Step3 Once you are done adjusting the settings, hit the “Start” button. After some seconds, CapCut will create captions for your TikTok video efficiently. Afterward, you can choose video resolution and hit the “Arrow” icon to export the video.
Way 3: Add Captions to TikTok Videos Manually
If you want to create captions for TikTok briefly, you can manually add them using the instructions given below. This method is extremely simple and helpful if you want to create small captions for your TikTok videos. Moreover, you can efficiently choose the font, color, and style of your captions in this manual method:
Step1 Open your TikTok app and create a video to begin. Tap on the “Tick” icon to enter the editing mode. Select “Text” given on the bottom toolbar of your screen.
Step2 Now, choose the style for your captions from the available options. Select the color and start writing your captions carefully. Once you are done, you can save and publish your created TikTok video.
Way 4: Automatically Add Subtitles to TikTok Videos with Online Editor
There are various online editors that can create captions for TikTok videos automatically. They use the Auto Transcription feature, through which the tool can create subtitles by recognizing the voice used in a TikTok video. One of the reliable online tools that can produce auto-subtitles is Veed.io.
Veed.io is an online tool that is capable of creating TikTok automatic captions efficiently. You can easily access this online tool from your web browsers. Moreover, it supports more than 100 languages and accents that you can choose to create auto-captions. Also, you can translate your captions into different languages using this tool. To use this tool flawlessly, check the below steps:
Step1 Begin by reaching the official website of Veed.io. Go to its Tools and locate the “Auto Subtitle Generator” option. It will redirect you to another page that consists of the tool information.
Step2 Click “Get Started” and upload a video from your system. Once you are done, tap on “Subtitles” and select “Auto Subtitle” from the given options. Choose your preferred language and tap on “Create Subtitles.”
Step3 After waiting some time, you can see your auto-captions. You can choose the text color, effect, size, and alignment from the given options. Once you are satisfied with the TikTok captions, hit the “Export” button.
Part 3: How to Add Captions to Your TikTok Videos with Filmora
If you want to add further enhancements to your TikTok captions, you can use an offline tool like Wondershare Filmora . Using this platform, you can manually add captions by choosing the suitable style from the presets. Moreover, you can also add customizations to the captions through Filomora easily. You can also upload SRT files on this tool to produce TikTok captions.
Free Download For Win 7 or later(64-bit)
Free Download For macOS 10.14 or later
TikTok automatic captions can be easily generated from Filmora as it offers excellent results through its Speech-to-Text feature. Using this unique feature, you can transcribe the voice in your TikTok videos in up to 16 different languages. To use this feature conveniently, follow the below steps:
Step 1 Import the TikTok Video
Once done with launching and creating the Filmora project on your PC, hit the “Arrow” icon to import your video file on this tool. Now drag and drop the video file to the timeline in order to proceed.
Step 2 Initiate the Automatic Subtitle Feature
On your timeline, tap on the “Speech-to-Text” feature. Choose your language and video clip from the pop-up menu. Wait for some seconds, and the subtitles will be generated automatically. Double-click on the created TikTok automatic captions to open the editing settings. Here, you can select subtitles style and respective time duration. You can also add customizations efficiently.
Step 3 Export the TikTok Video
After completing all the settings, you can click on the “Export” button. Before exporting, you can choose the video resolution and file formats easily. Also, this tool gives you the facility to export the video file directly to your TikTok account.
Part 4: People Also Want to Know
1. How to add captions to TikTok?
To add TikTok captions, you can choose the manual or automatic way. TikTok has a built-in auto-generator through which you can add captions automatically. Moreover, there are different offline and online tools, such as Filmora, CapCut, and Veed.io, through which you can add captions on TikTok flawlessly.
2. How to add captions to TikTok after posting?
If you want to add TikTok captions after posting, you have to download the video on your phone first. Afterward, hit the Plus icon to re-upload the video from your gallery. Choose that particular video again and tap on the Post button. Now you can write the captions on the given space easily. Afterward, tap on the “Post” button.
Last Words
This article has shed light on various ways how to add captions on TikTok efficiently. You can add TikTok captions manually or use the auto-generator for ease. Moreover, we have also highlighted an online tool to create subtitles that can be accessed from any web browser. However, if you want a professional caption editor for a longer run, Wondershare Filmora is the best choice among other tools. It has an easy-to-use interface and achieves accurate results comfortably.
Elevate Your Edits: Creating Stellar TikTok React Videos in Filmora’s Pro Features
How to Make TikTok Reaction Videos Easily in 2 Ways

Shanoon Cox
Mar 27, 2024• Proven solutions
With all the videos of different moods and categories available on the platform, TikTok’s reaction is something that makes the footage more engaging. Available for both iOS and Android platforms, TikTok allows you to record, edit , and compile a video of up to 60 seconds, and apply a plethora of filters and animation effects to them along with adding relevant music to awe your audience.
Considering this, here you will learn how to make TikTok reaction videos with ease from within the app itself, and if that’s not enough, using one of the best and most efficient programs available in the market that can even allow you to add unique effects to the reactions you create.
- Part 1: How to Make React Videos on TikTok
- Part 2: How to Use Snap Filmora to Make TikTok Reaction Videos
Bonus: Create A More Attractive Video with Human Segmentation Effect
The human segmentation effect under AI Portrait allows you to isolate people from video background even without a green screen, and then you can composite it to make a reaction video easily. Watch the video tutorial below to find out more details.


Want to read the texts instead of watching videos? Check the complete guide to making a reaction video in 3 ways .
Part 1: How to React to a TikTok Video
After being equipped with all the worldly knowledge about TikTok reaction videos, you can follow the steps given below to learn how to react to the footage created by other people:
1. Tap Share and Record Your Reaction
Start TikTok, play the video you want to react on, tap the Share icon from the lower-right area, and tap the React option from the Share to menu. Tap Flip from the top-right corner of the Camera screen to switch between the front and rear camera as needed, optionally tap the Mic icon to disable or enable voice and system audio capture, drag and reposition React window according to the source footage, and tap the Record button from the bottom to start shooting your TikTok reaction. Wait while the source clip and your recording process are complete successfully before moving forward to the next step.

2. Apply Filters
Tap the Filters icon from the top-right corner, tap to pick a filter from those available at the bottom, and tap anywhere on the screen to accept the one you selected and to get back to the previous window.

3. Manage Audio
Tap the Mixer icon from the upper-right corner of the screen, drag the My Voice and Soundtrack Volume sliders to manage your voice recording and the internal audio respectively, and tap Done to save the changes once you’re through with the modifications. Back on the previous window, tap Next from the bottom-right corner.

4. Publish the Video
Tap the Who can view this video option to manage your reaction’s visibility settings (optional). Tap the Save to device toggle switch to prevent TikTok reaction from being stored on your mobile’s storage (optional). Next, tap the Post button from the bottom-right corner to publish the video to TikTok.

More creative tricks about TikTok video: Clone Yourself in TikTok
Part 2: How to Make Reaction Videos with Filmora
Even though you can make TikTok reaction videos using its own filters and audio mixing tools that work pretty well under ideal conditions, if you are a perfectionist and like precision in anything you do or create, you need a dedicated program that has been designed specifically for the purpose.
Although several such tools are available in the market and can be easily downloaded and used, the best among them is Filmora by Wondershare. Wondershare Filmora is an industry-standard production and post-production tool for both Mac and Windows PCs that the majority of users prefer over its competitors such as Adobe Premiere Pro, Final Cut Pro X, etc. This is because Filmora offers simple UI, is less resource-intensive, and is able to render the outputs significantly faster.
You can learn how to make TikTok reaction videos using Wondershare Filmora by following the steps given below:
Note: Before proceeding, make sure that you have already copied the source (and the reaction) video(s) from your smartphone to your computer.
1. Create New Project and Set Preferences
Start Wondershare Filmora on your Windows or Mac PC, go to File > New Project and click 9:16 (Portrait) from the submenu that appears.
Click Split Screen from the standard toolbar at the top, hover mouse to the screen type preset you want to use, click the + ( Add to Project ) icon that appears at the bottom-right corner of the thumbnail, and click OK from the bottom-right corner once the preset is added to the Timeline.

2. Import and Add Video(s) Preview/Timeline
Click the Media button from the standard toolbar, click anywhere inside the Media window at the upper-left corner, and when the Open box comes up, select and import the video file(s) you want to participate in the TikTok reaction. Alternatively, you can also click Record from below the standard toolbar, and choose any of the options to record your own video or voice right from within Wondershare Filmora itself.
Next, click and drag each of the imported videos to their corresponding screen sections in the Preview window in the upper-right area. Notice how the files are automatically added to the Timeline at the bottom.
3. Add Elements and Titles
Click Elements from the standard toolbar, hover mouse to the element you want to add to the reaction, click the + icon that appears at the center of the thumbnail, and reposition the element in the Timeline to match the duration with that of the reaction you are creating.

4. Export the Reaction

Click EXPORT from the top-middle section of the interface, go to the Local tab from the top of the Export box that appears next, select your preferred format from the left bar, optionally choose a destination folder from the right window, optionally click SETTINGS to fine-tune the output preferences as needed, and click EXPORT from the bottom-right corner to export the TikTok reaction. Or, you can save it in the settings perfect for iPhone or another device.
Below is a sample reaction video made with Filmora, you can do much better than that for your TikTok account:
Besides using Filmora to edit reaction videos with the split-screen presets, you can also use some other video editing software to create a reaction video . Filmora can empower your video creation with more creativity, watch the video below and download Filmora to try.
Conclusion
A TikTok reaction enables you to make the source videos more fun and entertaining. Luckily the app itself has a “React” button that helps you create TikTok reaction videos with merely a few simple taps. However, if you feel that the built-in options are not as robust as they should be, a third-party program like Wondershare Filmora is something you would definitely love to try your hands on as the software is not only easy to use, it is also lightweight, and doesn’t put any overhead on your computer hardware.
Shanoon Cox
Shanoon Cox is a writer and a lover of all things video.
Follow @Shanoon Cox
Shanoon Cox
Mar 27, 2024• Proven solutions
With all the videos of different moods and categories available on the platform, TikTok’s reaction is something that makes the footage more engaging. Available for both iOS and Android platforms, TikTok allows you to record, edit , and compile a video of up to 60 seconds, and apply a plethora of filters and animation effects to them along with adding relevant music to awe your audience.
Considering this, here you will learn how to make TikTok reaction videos with ease from within the app itself, and if that’s not enough, using one of the best and most efficient programs available in the market that can even allow you to add unique effects to the reactions you create.
- Part 1: How to Make React Videos on TikTok
- Part 2: How to Use Snap Filmora to Make TikTok Reaction Videos
Bonus: Create A More Attractive Video with Human Segmentation Effect
The human segmentation effect under AI Portrait allows you to isolate people from video background even without a green screen, and then you can composite it to make a reaction video easily. Watch the video tutorial below to find out more details.
Want to read the texts instead of watching videos? Check the complete guide to making a reaction video in 3 ways .
Part 1: How to React to a TikTok Video
After being equipped with all the worldly knowledge about TikTok reaction videos, you can follow the steps given below to learn how to react to the footage created by other people:
1. Tap Share and Record Your Reaction
Start TikTok, play the video you want to react on, tap the Share icon from the lower-right area, and tap the React option from the Share to menu. Tap Flip from the top-right corner of the Camera screen to switch between the front and rear camera as needed, optionally tap the Mic icon to disable or enable voice and system audio capture, drag and reposition React window according to the source footage, and tap the Record button from the bottom to start shooting your TikTok reaction. Wait while the source clip and your recording process are complete successfully before moving forward to the next step.
2. Apply Filters
Tap the Filters icon from the top-right corner, tap to pick a filter from those available at the bottom, and tap anywhere on the screen to accept the one you selected and to get back to the previous window.
3. Manage Audio
Tap the Mixer icon from the upper-right corner of the screen, drag the My Voice and Soundtrack Volume sliders to manage your voice recording and the internal audio respectively, and tap Done to save the changes once you’re through with the modifications. Back on the previous window, tap Next from the bottom-right corner.
4. Publish the Video
Tap the Who can view this video option to manage your reaction’s visibility settings (optional). Tap the Save to device toggle switch to prevent TikTok reaction from being stored on your mobile’s storage (optional). Next, tap the Post button from the bottom-right corner to publish the video to TikTok.
More creative tricks about TikTok video: Clone Yourself in TikTok
Part 2: How to Make Reaction Videos with Filmora
Even though you can make TikTok reaction videos using its own filters and audio mixing tools that work pretty well under ideal conditions, if you are a perfectionist and like precision in anything you do or create, you need a dedicated program that has been designed specifically for the purpose.
Although several such tools are available in the market and can be easily downloaded and used, the best among them is Filmora by Wondershare. Wondershare Filmora is an industry-standard production and post-production tool for both Mac and Windows PCs that the majority of users prefer over its competitors such as Adobe Premiere Pro, Final Cut Pro X, etc. This is because Filmora offers simple UI, is less resource-intensive, and is able to render the outputs significantly faster.
You can learn how to make TikTok reaction videos using Wondershare Filmora by following the steps given below:
Note: Before proceeding, make sure that you have already copied the source (and the reaction) video(s) from your smartphone to your computer.
1. Create New Project and Set Preferences
Start Wondershare Filmora on your Windows or Mac PC, go to File > New Project and click 9:16 (Portrait) from the submenu that appears.
Click Split Screen from the standard toolbar at the top, hover mouse to the screen type preset you want to use, click the + ( Add to Project ) icon that appears at the bottom-right corner of the thumbnail, and click OK from the bottom-right corner once the preset is added to the Timeline.
2. Import and Add Video(s) Preview/Timeline
Click the Media button from the standard toolbar, click anywhere inside the Media window at the upper-left corner, and when the Open box comes up, select and import the video file(s) you want to participate in the TikTok reaction. Alternatively, you can also click Record from below the standard toolbar, and choose any of the options to record your own video or voice right from within Wondershare Filmora itself.
Next, click and drag each of the imported videos to their corresponding screen sections in the Preview window in the upper-right area. Notice how the files are automatically added to the Timeline at the bottom.
3. Add Elements and Titles
Click Elements from the standard toolbar, hover mouse to the element you want to add to the reaction, click the + icon that appears at the center of the thumbnail, and reposition the element in the Timeline to match the duration with that of the reaction you are creating.
4. Export the Reaction
Click EXPORT from the top-middle section of the interface, go to the Local tab from the top of the Export box that appears next, select your preferred format from the left bar, optionally choose a destination folder from the right window, optionally click SETTINGS to fine-tune the output preferences as needed, and click EXPORT from the bottom-right corner to export the TikTok reaction. Or, you can save it in the settings perfect for iPhone or another device.
Below is a sample reaction video made with Filmora, you can do much better than that for your TikTok account:
Besides using Filmora to edit reaction videos with the split-screen presets, you can also use some other video editing software to create a reaction video . Filmora can empower your video creation with more creativity, watch the video below and download Filmora to try.
Conclusion
A TikTok reaction enables you to make the source videos more fun and entertaining. Luckily the app itself has a “React” button that helps you create TikTok reaction videos with merely a few simple taps. However, if you feel that the built-in options are not as robust as they should be, a third-party program like Wondershare Filmora is something you would definitely love to try your hands on as the software is not only easy to use, it is also lightweight, and doesn’t put any overhead on your computer hardware.
Shanoon Cox
Shanoon Cox is a writer and a lover of all things video.
Follow @Shanoon Cox
Also read:
- Deciding Between Discord and Skype for Teams
- 2024 Approved Exploring #BestEatsOnTikTok
- [New] 2024 Approved Needlework Nuggets Cultivating Craftsmanship in the Creative Sphere
- [Updated] In 2024, Quick and Effective Ways to Expand Your TikTok Clan
- 2024 Approved 2023 | How to Check Tiktok Video Copyright Before Uploading?
- [New] Android/iOS TikTok Editing Winners
- [Updated] In 2024, Boost Creativity and Performance with These Top 10 FREE TikTok Editors for Mac
- [New] Creating a Memorable TikTok End Credits
- [New] Seamless TikTok Conversion Pure MP4 Extractors Guide for 2024
- [Updated] From Forgotten to Found A Guide to Using TikTok Hashtags Right
- [Updated] Fostering Duets TikTok Vocal Pairings for 2024
- [New] 2024 Approved Expedite Clear Marks Prime TikTok Watermarks Solutions
- [New] 2024 Approved The Ultimate Guide to Going Viral with TikTok Edits
- [Updated] Vivid PFP Designs, Unleash the Potential of Your TikTok Profile
- Stop the Frenzy – Fixing a Mistaken TikTok Reload for 2024
- [Updated] Ace TikTok's Fast Forward Feature for 2024
- [New] Crafting An Engaging TikTok Closing Credits for 2024
- [New] 2024 Approved From Bubbles to Billions The Most Shared TikTok Quotes
- Instagram Pro Tip Speedy Like-Video Strategies for 2024
- In 2024, How to Transfer Data from Xiaomi 13 Ultra to BlackBerry | Dr.fone
- New In 2024, New to Cartoon Making? Start with These 10 Top Tools
- Hassle-Free Ways to Remove FRP Lock from Nubia Red Magic 9 Pro Phones with/without a PC
- [Updated] 2024 Approved Streamtech Analysis Rethinking the Standard Choice
- In 2024, How to Unlock Xiaomi Redmi Note 12 4G Phone Password Without Factory Reset?
- In 2024, How To Delete iCloud Account Remove Your Apple ID Permanently On iPhone 12
- 2024 Approved Socialite's Secret Accelerate Your Fame on Insta with Our Top 15 Hacks
- 2024 Approved The Best of Breed Top Screen Capture Software Reviews
- In 2024, How to fix iCloud lock from your Apple iPhone 12 mini and iPad
- How to Unlock Apple iPhone 13 Pro Max Without Passcode? | Dr.fone
- How to Fake Snapchat Location on HTC U23 Pro | Dr.fone
- [Updated] 2024 Approved Crafting the Ideal Voice Over Soundtrack
- Title: [Updated] The Secrets Behind Compelling Captions for Captivating TikTok Content
- Author: Brian
- Created at : 2024-05-23 14:14:21
- Updated at : 2024-05-24 14:14:21
- Link: https://tiktok-videos.techidaily.com/updated-the-secrets-behind-compelling-captions-for-captivating-tiktok-content/
- License: This work is licensed under CC BY-NC-SA 4.0.
